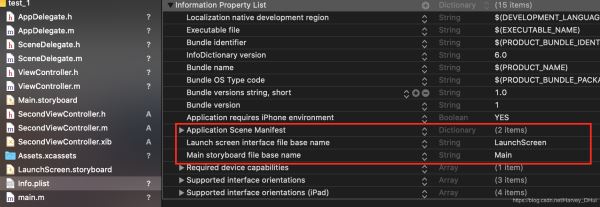
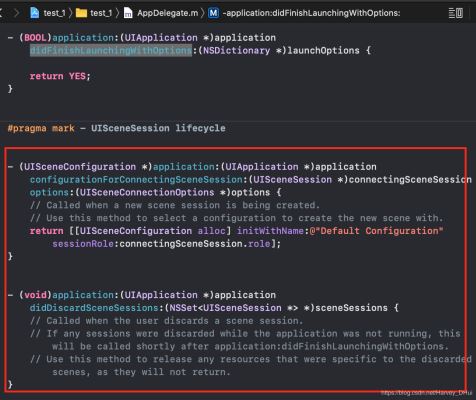
xcode11新建项目工程,新增了scenedelegate这个类,转而将原Appdelegate负责的对UI生命周期的处理担子接了过来。故此可以理解为:ios 13以后,Appdelegate负责处理App生命周期,scenedelegate负责处理UI生命周期的处理。
1.使用scenedelegate(iOS 13以下黑屏)
如果创建app支持的最低版本是ios13,可以考虑直接使用。
举例使用系统底部栏:
- (void)scene:(UIScene *)scene willConnectToSession:(UISceneSession *)session options:(UISceneConnectionOptions *)connectionOptions API_AVAILABLE(ios(13.0)){

 self.window = [[UIWindow alloc] initWithFrame:[[UIScreen mainScreen] bounds]];

 //1.创建Tab导航条控制器
 UITabBarController *tabControl = [[UITabBarController alloc] init];
 tabControl.tabBar.barStyle = UIBarStyleBlack;

 //2.创建相应的子控制器(viewcontroller)
 ViewController *control = [[ViewController alloc] init];
 control.tabBarItem = [[UITabBarItem alloc] initWithTitle:@"first" image:[UIImage imageNamed:@"icon_contact_normal"] selectedImage:[UIImage imageNamed:@"icon_contact_normal"]];
 UINavigationController * nav = [[UINavigationController alloc]initWithRootViewController: control];

 ViewController2 *control2 = [[ViewController2 alloc] init];
 control2.tabBarItem = [[UITabBarItem alloc] initWithTitle:@"first" image:[UIImage imageNamed:@"icon_contact_normal"] selectedImage:[UIImage imageNamed:@"icon_contact_normal"]];
 UINavigationController * nav2 = [[UINavigationController alloc]initWithRootViewController: control2];

 //将Tab导航条控制器设为window根控制器
 self.window.rootViewController = @[nav, nav2];

 //显示window
 [self.window makeKeyAndVisible];

}
2.如果要适配iOS 13以下的设备,需要把相关的scenedelegate删掉才能正常使用。分四个步骤:
第一步: 删除 Info.plist 里面的 SceneDelegate 配置信息

第二步:删除 SceneDelegate 类文件

第三步:还原 AppDelegate 的 UIWindow 属性。

第四步:删除 AppDelegate.m 中的方法

至此,可以像往常一样在 AppDelegate类中的 didFinishLaunchingWithOptions 方法中写UI 执行代码。
总结