vue图片上传组件,供大家参考,具体内容如下
最近在做项目的时候顺便补充了一下公司项目的公共组件库,刚刚手头事情告一段落,就来做个笔记。
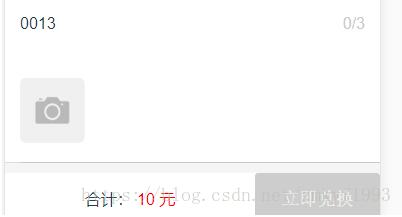
首先来看看最终效果
1.不允许删除

2.允许用户删除(显示删除按钮)
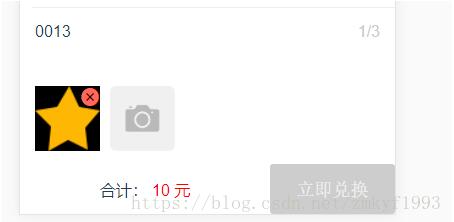
实现的效果就是上图显示内容
接下来说说组件布局那部分直接上代码了
<template>
 <div class="uploadImg">
 <div class="upload-content">
  <div class="upload-title">
  <p>{{upTitle}}</p>
  <p class="show-num">{{upNum}}/{{uploadNum}}</p>
  </div>
  <ul class="img-list">
  <li class="show-img" v-for="(item, index) in imgList" :key="index">
   <img :src="item" alt="">
   <kk-icon :class="isDel == true ? '' : 'hide-del'" name="error" color="#FF685D" size="0.4rem" @click.native="delImg(index)"></kk-icon>
  </li>
  <div class="uploadSec">
   <img :src="globalPath+'img/insurance/upload.png'" alt="上传图标">
   <input type="file" value="" id="choose" @change='onUpload' multiple>
  </div>
  </ul>
 </div>
 </div>
</template>
上面代码中的kk-icon是自定义的图标组件,只是多了个接受颜色和大小的功能,你们自己写一个替换就行了。然后动态定义它的class,实现显隐就结束了。
随手贴个样式
<style lang="less" type="text/less" rel="stylesheet/less">
 .uploadImg{
 text-align: left;
 .upload-content{
  margin-left: 0.3rem;
  .upload-title{
  display: flex;
  justify-content: space-between;
  padding: 0.3rem 0.3rem 0.3rem 0;
  .show-num{
   color: #c9c9c9;
  }
  }
  .img-list{
  display: inline-block;
  margin: 0.6rem 0.3rem 0.3rem 0;
  .show-img{
   position: relative;
   display: inline-block;
   margin-right: 0.12rem;
   height: 1.3rem;
   width: 1.3rem;
   img{
   width: 100%;
   height: 100%;
   }
   .hide-del{
   display: none;
   }
   .yd-icon-error{
   position: absolute;
   top: 0;
   right: 0;
   }
  }
  .uploadSec{
   position: relative;
   display: inline-block;
   width: 1.3rem;
   height: 1.3rem;
   overflow: hidden;
   img{
   width: 100%;
   height: 100%;
   }
   #choose{
   position: absolute;
   height: 100%;
   left: 0;
   top: 0;
   opacity: 0;
   }
  }
  }
 }
 }
</style>
接下来看看实现逻辑
借助input type="file"实现图片选择,是否允许多选图片的话是通过给input的multiple属性。(其他直接备注在里面了)
在组件中接收父组件传来的图片数量限制,是否开启删除操作,上传图片地址,预览地址等
props: ['imgNum','title','upUrl','showUrl','showDel'],
title 上传组件的标题
imgNum 上传图片数量限制
upUrl 设置上传图片地址
showUrl设置图片回显地址
showDel是否允许删除图片
changeNum 图片改变时,触发父组件中的方法
当选择图片确定后就会触发change,因此我在@change="onUpload" 进行上传,上传使用了formData
// 上传操作
onUpload (e) {
 let photoFile = e.target
 let val = e.target.value
 // 判断是否符合上传条件
 if (photoFile.files.length === 0) return false
 for (let i = 0; i < photoFile.files.length; i++) {
 this.fileAdd(photoFile.files[i],i)
 }
}
上传操作中触发图片后续处理方法fileAdd
因为后台要求拿到的图片地址是一串字符串,所以我在下面中使用join() 进行数组转化处理(因为后台不支持接受图片数组,因此我这个上传多选图片之后上传也是单张上传)
// 添加图片
fileAdd (file,index) {
 let csrf_token = this.getCookie('XSRF-TOKEN');
 let formFile = new FormData();
 let imgName = 'img0';
 formFile.append(imgName, file);
 formFile.append("_token", csrf_token);
 let name = file.name
 let size = file.size
 let types = '.jpg,.jpeg,.png,.gif' //文件格式
 let fileExt = name.substring(name.lastIndexOf('.')).toLowerCase()
 let result = types.indexOf(fileExt)
 if (result < 0) {  //验证图片格式
 this.$dialog.toast({
  mes: '图片格式不正确',
  timeout: 1000
 })
 return false
 }
 if (size > 1 * 1024 * 1024) {
 this.$dialog.toast({
  mes: '图片大小不能大于1M',
  timeout: 1000
 })
 return false
 }
 if (this.fileList.length >= this.uploadNum) {
 this.$dialog.toast({
  mes: '图片最多只能上传' + this.uploadNum + '张',
  timeout: 1000
 })
 return false
 }

 axios.post(this.upUrl,formFile)
 .then((res) => {
  this.upNum = this.fileList.length + 1; //计算图片数量
  this.fileList.push(file);    //添加进图片数组
  let imgUrl = this.showUrl + res.data.data; //图片回显地址
  let upImg = res.data.data;    //传给后台的图片地址
  this.imgList.push(imgUrl);
  this.upImgList.push(upImg);
  let upImgAll = this.upImgList.join(',');
  this.$emit('input', upImgAll);
 }).catch((err) => {
  console.log(err);
 })
},
删除图片操作
我这删除仅仅是对最后提交的图片数组进行处理,并未对上传到图片服务器上的图片进行移除处理
// 删除图片
delImg (index) {
 this.imgList.splice(index, 1);
 this.fileList.splice(index, 1);
 this.upNum = this.imgList.length;
 let imgAll = this.imgList.join(',');
 this.$emit('input', imgAll);
},
最后我在组件中监听了图片改变
watch: {
 imgList () {
  this.$emit('changeNum'); //触发父组件中验证资料是否完整的方法
 }
 },
就是这样了,一个简易的上传组件(写的不是很好,轻喷),还有可以优化的地方,后面改完再看看吧

