在上一讲中,我们已经完成了一个完整的案例,在这个案例中,我们可以通过Angular单页面应用(SPA)进行登录,然后通过后端的Ocelot API网关整合IdentityServer4完成身份认证。在本讲中,我们会讨论在当前这种架构的应用程序中,如何完成用户授权。
在继续分析我们的应用程序之前,我们简单回顾一下用户授权。在用户登录的过程中,系统首先确定当前试图登录的用户是否为合法用户,也就是该用户是否被允许访问应用程序,在这个过程中,登录流程并不负责检查用户对哪些资源具有访问权限,反正系统中存在用户的合法记录,就认证通过。接下来,该用户账户就需要访问系统中的各个功能模块,并查看或者修改系统中的业务数据,此时,授权机制就会发挥作用,以便检查当前登录用户是否被允许访问某些功能模块或者某些数据,以及该用户对这些数据是否具有读写权限。这种决定用户是否被允许以某种方式访问系统中的某些资源的机制,称为授权。
最常见的授权可以基于用户组,也可以基于用户角色,还可以组合用户组与角色,实现基于角色的授权(Role Based Access Control,RBAC)。比如:某个“用户”属于“管理员组”,而“管理员组”的所有“用户”都具有“管理员角色”,对于“管理员角色”,系统允许它可以管理和组织系统中的业务数据,但不能对用户账户进行管理,系统希望只有超级管理员才可以管理用户账户。于是,当某个用户账户被添加到“管理员组”之后,该用户账户就自动被赋予了“管理员角色”,它可以管理系统中的业务数据,但仍然无法对系统中的用户账户进行管理,因为那是“超级管理员”的事情。
从应用程序的架构角度来看,不难得出这样的结论:用户认证可以通过第三方的框架或者解决方案来完成,但用户授权一般都是在应用程序内部完成的,因为它的业务性很强。不同系统可以有不同的授权方式,但认证方式还是相对统一的,比如让用户提供用户名密码,或者通过第三方身份供应商(Identity Provider,IdP)完成单点登录等等。纵观当下流行的认证服务供应商(例如Auth0),它们在认证这部分的功能非常强大,但仅提供一些相对简单基础的授权服务,帮助应用程序完成一些简单的授权需求,虽然应用程序也可以依赖第三方服务供应商来统一完成认证与授权,但这并不是一个很好的架构实践,因为对第三方服务的依赖性太强。
回顾我们的案例,至今为止,我们仅仅完成了用户认证的部分,接下来,一起看看在Ocelot API网关中如何做用户授权。
在系统架构中引入API网关之后,实现用户授权可以有以下两种方式:
先来看看第二种方式,也就是API网关将用户账户信息传递给后端服务,由后端服务完成授权。在前文中,我们可以看到,Access Token中已经包含了如下四个User Claims:
Ocelot允许将Token中所包含的Claims通过HTTP Header的形式传递到后端服务上去,做法非常简单,只需要修改Ocelot的配置文件即可,例如:
{
  "ReRoutes": [
    {
      "DownstreamPathTemplate": "/weatherforecast",
      "DownstreamScheme": "http",
      "DownstreamHostAndPorts": [
        {
          "Host": "localhost",
          "Port": 5000
        }
      ],
      "UpstreamPathTemplate": "/api/weather",
      "UpstreamHttpMethod": [ "Get" ],
      "AuthenticationOptions": {
        "AuthenticationProviderKey": "AuthKey",
        "AllowedScopes": []
      },
      "AddHeadersToRequest": {
        "X-CLAIMS-NAME-IDENTIFIER": "Claims[http://schemas.xmlsoap.org/ws/2005/05/identity/claims/nameidentifier] > value > |",
        "X-CLAIMS-NAME": "Claims[http://schemas.xmlsoap.org/ws/2005/05/identity/claims/name] > value > |",
        "X-CLAIMS-EMAIL": "Claims[http://schemas.xmlsoap.org/ws/2005/05/identity/claims/emailaddress] > value > |",
        "X-CLAIMS-ROLE": "Claims[http://schemas.microsoft.com/ws/2008/06/identity/claims/role] > value > |"
      }
    }
  ]
}
然后重新运行服务,并在后端服务的API Controller中设置断点,可以看到,这四个Claims的数据都可以通过Request.Headers得到:
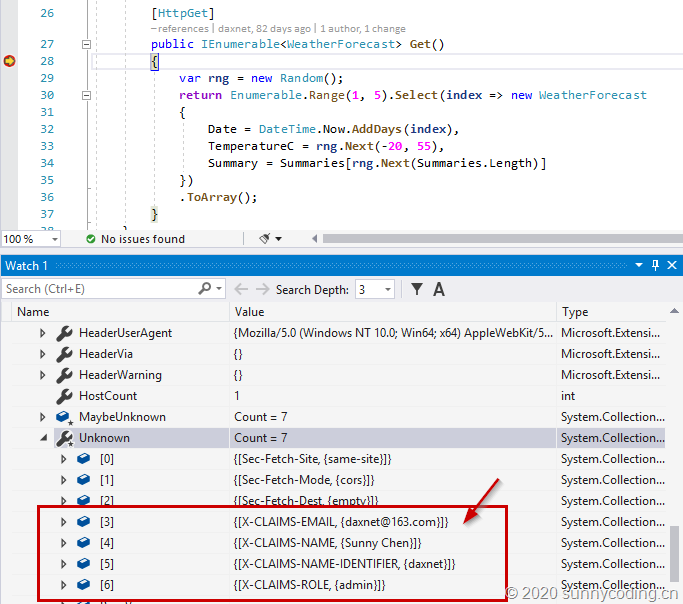
有了这个信息,服务端就可以得知目前是哪个用户账户在请求API调用,并且它是属于哪个角色,剩下的工作就是基于这个角色信息来决定是否允许当前用户访问当前的API。很显然,这里需要一种合理的设计,而且至少需要满足以下两个需求:
在这里我们就不深入讨论如何去设计这样一套权限认证系统了,今后有机会再介绍吧。
注:Ocelot可以支持多种Claims的转换形式,这里介绍的AddHeadersToRequest只是其中的一种,更多方式可以参考:https://ocelot.readthedocs.io/en/latest/features/claimstransformation.html
通过Ocelot网关授权,有两种比较常用的方式,一种是在配置文件中,针对不同的downstream配置,设置其RouteClaimsRequirement配置,以便指定哪些用户角色能够被允许访问所请求的API资源。比如:
{
  "ReRoutes": [
    {
      "DownstreamPathTemplate": "/weatherforecast",
      "DownstreamScheme": "http",
      "DownstreamHostAndPorts": [
        {
          "Host": "localhost",
          "Port": 5000
        }
      ],
      "UpstreamPathTemplate": "/api/weather",
      "UpstreamHttpMethod": [ "Get" ],
      "AuthenticationOptions": {
        "AuthenticationProviderKey": "AuthKey",
        "AllowedScopes": []
      },
      "RouteClaimsRequirement": {
        "Role": "admin"
      }
    }
  ]
}
上面高亮部分的代码指定了只有admin角色的用户才能访问/weatherforecast API,这里的“Role”就是Claim的名称,而“admin”就是Claim的值。如果我们在此处将Role设置为superadmin,那么前端页面就无法正常访问API,而是获得403 Forbidden的状态码:

注意:理论上讲,此处的“Role”原本应该是使用标准的Role Claim的名称,即原本应该是:

但由于ASP.NET Core框架在处理JSON配置文件时存在特殊性,使得上述标准的Role Claim的名称无法被正确解析,因此,也就无法在RouteClaimsRequirement中正常使用。目前的解决方案就是用户认证后,在Access Token中带入一个自定义的Role Claim(在这里我使用最简单的名字“Role”作为这个自定义的Claim的名称,这也是为什么上面的JSON配置例子中,使用的是“Role”,而不是“http://schemas.microsoft.com/ws/2008/06/identity/claims/role”),而要做到这一点,就要修改两个地方。
首先,在IdentityService的Config.cs文件中,增加一个自定义的User Claim:
public static IEnumerable<ApiResource> GetApiResources() =>
    new[]
    {
        new ApiResource("api.weather", "Weather API")
        {
            Scopes =
            {
                new Scope("api.weather.full_access", "Full access to Weather API")
            },
            UserClaims =
            {
                ClaimTypes.NameIdentifier,
                ClaimTypes.Name,
                ClaimTypes.Email,
                ClaimTypes.Role,
                "Role"
            }
        }
    };
然后,在注册新用户的API中,当用户注册信息包含Role时,将“Role” Claim也添加到数据库中:
[HttpPost]
[Route("api/[controller]/register-account")]
public async Task<IActionResult> RegisterAccount([FromBody] RegisterUserRequestViewModel model)
{
    if (!ModelState.IsValid)
    {
        return BadRequest(ModelState);
    }

    var user = new AppUser { UserName = model.UserName, DisplayName = model.DisplayName, Email = model.Email };


    var result = await _userManager.CreateAsync(user, model.Password);

    if (!result.Succeeded) return BadRequest(result.Errors);

    await _userManager.AddClaimAsync(user, new Claim(ClaimTypes.NameIdentifier, user.UserName));
    await _userManager.AddClaimAsync(user, new Claim(ClaimTypes.Name, user.DisplayName));
    await _userManager.AddClaimAsync(user, new Claim(ClaimTypes.Email, user.Email));

    if (model.RoleNames?.Count > 0)
    {
        var validRoleNames = new List<string>();
        foreach (var roleName in model.RoleNames)
        {
            var trimmedRoleName = roleName.Trim();
            if (await _roleManager.RoleExistsAsync(trimmedRoleName))
            {
                validRoleNames.Add(trimmedRoleName);
                await _userManager.AddToRoleAsync(user, trimmedRoleName);
            }
        }

        await _userManager.AddClaimAsync(user, new Claim(ClaimTypes.Role, string.Join(',', validRoleNames)));
        await _userManager.AddClaimAsync(user, new Claim("Role", string.Join(',', validRoleNames)));
    }

    return Ok(new RegisterUserResponseViewModel(user));
}
修改完后,重新通过调用这个register-account API来新建一个用户来进行测试,一切正常的话,就可以通过Ocelot API网关中的RouteClaimsRequirement来完成授权了。
通过Ocelot网关授权的另一种做法是使用代码实现。通过代码方式,可以实现更为复杂的授权策略,我们仍然以“角色”作为授权参照,我们可以首先定义所需的授权策略:
public void ConfigureServices(IServiceCollection services)
{
    services.AddOcelot();
    services.AddAuthentication()
        .AddIdentityServerAuthentication("AuthKey", options =>
        {
            options.Authority = "http://localhost:7889";
            options.RequireHttpsMetadata = false;
        });

    services.AddAuthorization(options =>
    {
        options.AddPolicy("admin", builder => builder.RequireRole("admin"));
        options.AddPolicy("superadmin", builder => builder.RequireRole("superadmin"));
    });

    services.AddCors(options => options.AddPolicy("AllowAll", p => p.AllowAnyOrigin()
       .AllowAnyMethod()
       .AllowAnyHeader()));
}
然后使用Ocelot的AuthorisationMiddleware中间件,来定义我们的授权处理逻辑:
app.UseOcelot((b, c) =>
{
    c.AuthorisationMiddleware = async (ctx, next) =>
    {
        if (ctx.DownstreamReRoute.DownstreamPathTemplate.Value == "/weatherforecast")
        {
            var authorizationService = ctx.HttpContext.RequestServices.GetService<IAuthorizationService>();
            var result = await authorizationService.AuthorizeAsync(ctx.HttpContext.User, "superadmin");
            if (result.Succeeded)
            {
                await next.Invoke();
            }
            else
            {
                ctx.Errors.Add(new UnauthorisedError($"Fail to authorize policy: admin"));
            }
        }
        else
        {
            await next.Invoke();
        }
    };

    b.BuildCustomOcelotPipeline(c).Build();

}).Wait();
当然,上面的BuildCustomOcelotPipeline方法的目的就是将一些默认的Ocelot中间件加入到管道中,否则整个Ocelot框架是不起作用的。我将这个方法定义为一个扩展方法,代码如下:
public static class Extensions
{
    private static void UseIfNotNull(this IOcelotPipelineBuilder builder,
        Func<DownstreamContext, Func<Task>, Task> middleware)
    {
        if (middleware != null)
        {
            builder.Use(middleware);
        }
    }

    public static IOcelotPipelineBuilder BuildCustomOcelotPipeline(this IOcelotPipelineBuilder builder,
        OcelotPipelineConfiguration pipelineConfiguration)
    {
        builder.UseExceptionHandlerMiddleware();
        builder.MapWhen(context => context.HttpContext.WebSockets.IsWebSocketRequest,
            app =>
            {
                app.UseDownstreamRouteFinderMiddleware();
                app.UseDownstreamRequestInitialiser();
                app.UseLoadBalancingMiddleware();
                app.UseDownstreamUrlCreatorMiddleware();
                app.UseWebSocketsProxyMiddleware();
            });
        builder.UseIfNotNull(pipelineConfiguration.PreErrorResponderMiddleware);
        builder.UseResponderMiddleware();
        builder.UseDownstreamRouteFinderMiddleware();
        builder.UseSecurityMiddleware();
        if (pipelineConfiguration.MapWhenOcelotPipeline != null)
        {
            foreach (var pipeline in pipelineConfiguration.MapWhenOcelotPipeline)
            {
                builder.MapWhen(pipeline);
            }
        }
        builder.UseHttpHeadersTransformationMiddleware();
        builder.UseDownstreamRequestInitialiser();
        builder.UseRateLimiting();

        builder.UseRequestIdMiddleware();
        builder.UseIfNotNull(pipelineConfiguration.PreAuthenticationMiddleware);
        if (pipelineConfiguration.AuthenticationMiddleware == null)
        {
            builder.UseAuthenticationMiddleware();
        }
        else
        {
            builder.Use(pipelineConfiguration.AuthenticationMiddleware);
        }
        builder.UseClaimsToClaimsMiddleware();
        builder.UseIfNotNull(pipelineConfiguration.PreAuthorisationMiddleware);
        if (pipelineConfiguration.AuthorisationMiddleware == null)
        {
            builder.UseAuthorisationMiddleware();
        }
        else
        {
            builder.Use(pipelineConfiguration.AuthorisationMiddleware);
        }
        builder.UseClaimsToHeadersMiddleware();
        builder.UseIfNotNull(pipelineConfiguration.PreQueryStringBuilderMiddleware);
        builder.UseClaimsToQueryStringMiddleware();
        builder.UseLoadBalancingMiddleware();
        builder.UseDownstreamUrlCreatorMiddleware();
        builder.UseOutputCacheMiddleware();
        builder.UseHttpRequesterMiddleware();

        return builder;
    }
}
与上文所提交的“后端服务授权”类似,我们需要在Ocelot API网关上定义并实现授权策略,有可能是需要设计一些框架来简化用户数据的访问并提供灵活的、可复用的授权逻辑,由于这部分内容跟每个应用程序的业务关系较为密切,所以本文也就不深入讨论了。
至此,有关Angular SPA基于Ocelot API网关与IdentityServer4的身份认证与授权的介绍,就告一段落了。通过四篇文章,我们从零开始,一步步搭建微服务、基于IdentityServer4的IdentityService、Ocelot API网关以及Angular单页面应用,并逐步介绍了认证与授权的实现过程。虽然没有最终实现一个可被重用的授权框架,但基本架构也算是完整了,今后有机会我可以再补充认证、授权的相关内容,欢迎阅读并提宝贵意见。
访问以下Github地址以获取源代码:
https://github.comhttps://img.qb5200.com/download-x/daxnet/identity-demo

