流程控制
if
单分支结构
if 条件测试
then 命令序列
fi
双分支结构
if 条件测试
then 命令序列
else 命令序列
fi
多分支结构
if 条件测试 1
then 命令序列
[elif 条件测试 2
then 命令序列
elif 条件测试 3
then 命令序列]...
else 命令序列
fi
示例说明
例1
安装httpd脚本(初始版本):判断网络是否正常,正常就安装,异常就直接退出
[root@hadoop04 shell_if]# vim install_apache01.sh
#!/usr/bin/bash
##########################################
# install apache                         #
# v1.0 by ElegantSmile 8/12/2019         #
##########################################

ping -c1 www.baidu.com &> https://img.qb5200.com/download-x/dev/nul

if [ $? -ne 0 ];then
  echo "connect: unreachable"
  exit
fi


yum -y install httpd

systemctl start httpd

systemctl enable httpd

firewall-cmd --permanent --add-service=http
firewall-cmd --permanent --add-service=https
firewall-cmd --reload

sed -ri '/^SELINUX=/cSELINUX=disabled' /etc/selinux/config

setenforce 0
例2
安装httpd脚本(改进版):判断网络是否正常,正常就安装,异常就先判断是否可以测通网关,否则提示检查IP地址
[root@hadoop04 shell_if]# vim install_apache02.sh
#!/usr/bin/bash
##########################################
# install apache                         #
# v1.1 by ElegantSmile 8/12/2019         #
##########################################

gateway=172.22.34.1

ping -c1 www.baidu.com &> https://img.qb5200.com/download-x/dev/nul

if [ $? -eq 0 ];then
        yum -y install httpd
        systemctl start httpd
        systemctl enable httpd
        firewall-cmd --permanent --add-service=http
        firewall-cmd --permanent --add-service=https
        firewall-cmd --reload
        sed -ri '/^SELINUX=/cSELINUX=disabled' /etc/selinux/config
        setenforce 0

        curl http://127.0.0.1 &> https://img.qb5200.com/download-x/dev/null
        if [ $? -eq 0 ];then
                echo "Apache ok..."
        fi
elif ping -c1 ${gateway} &> https://img.qb5200.com/download-x/dev/null
        echo "check dns..."
else
        echo "check ip address!"
fi
例3
read -p "确认开始安装 KVM [y]: " kvm_install
if [ ! "${kvm_install}" = "y" ];then
echo -e "$red_col 输入不正确! $reset_col"
exit
fi
例4
配置yum源脚本
阿里云yum配置帮助:https:/https://img.qb5200.com/download-x/developer.aliyun.com/mirror/centos?spm=a2c6h.13651102.0.0.53322f70C917rC
阿里云镜像仓库:https:/https://img.qb5200.com/download-x/developer.aliyun.com/mirror
#!/usr/bin/bash
##########################################
# yum  config                            #
# v1.0 by ElegantSmile 8/12/2019         #
##########################################

yum_server=10.18.40.100
os_version=`cat /etc/redhat-release | awk '{print $(NF-1)}' | awk -F "." '{print $1}'`

# 备份yum源文件方式1
# [ -d /etc/yum.repos.d/bak ] || mkdir /etc/yum.repos.d/bak
#mv /etc/yum.repos.d/*.repo /etc/yum.repos.d/bak/

# 备份yum源文件方式2
mv /etc/yum.repos.d/CentOS-Base.repo /etc/yum.repos.d/CentOS-Base.repo.backup

# 7纯属测试本地yum源,建议使用6和8的方式下载阿里云的yum源文件
if [ "${os_version}" = "7" ];then
        cat > /etc/yum.repos.d/centos7u6.repo
        [centos7u6]
        name=centos7u6
        baseurl=ftp://$yum_server/centos7u6
        gpkcheck=0
        EOF
# 建议做法: curl -o /etc/yum.repos.d/CentOS-Base.repo http://mirrors.aliyun.com/repo/Centos-7.repo

# 6和8下载阿里云的yum源文件
elif [ "${os_version}" = "6" ];then
        curl -o /etc/yum.repos.d/CentOS-Base.repo http://mirrors.aliyun.com/repo/Centos-6.repo
elif [ "${os_version}" = "8" ];then
        curl -o /etc/yum.repos.d/CentOS-Base.repo http://mirrors.aliyun.com/repo/Centos-8.repo
fi
例5
检查某软件包是否已经安装
#!/usr/bin/bash
##########################################
# check vsftpd install                   #
# v1.0 by ElegantSmile 9/12/2019         #
##########################################

# 可以通过$1传参
# rpm_name=$1
rpm_name=vsftpd

# 检查安装包是否已经安装
rpm -qa | grep ${rpm_name}

# 已经安装的话,提示已经安装
if [ $? -eq 0 ];then
        echo "${rpm_name} is installed."
# 未安装的话,可以提示未安装,也可以执行安装操作
else
        echo "${rpm_name} is not installed."
fi
case
语法结构
case 变量 in
模式 1)
命令序列 1
;;
模式 2)
命令序列 2
;;
模式 3)
命令序列 3
;;
*)
无匹配后命令序列
esac
示例说明
例1
配置yum源脚本
[root@hadoop04 shell_case]# vim yum_config.sh
#!/usr/bin/bash
##########################################
# yum  config                            #
# v1.0 by ElegantSmile 9/12/2019         #
##########################################

os_version=`cat /etc/redhat-release | awk '{print $(NF-1)}' | awk -F "." '{print $1}'`

# 备份yum源文件
mv /etc/yum.repos.d/CentOS-Base.repo /etc/yum.repos.d/CentOS-Base.repo.backup &> https://img.qb5200.com/download-x/dev/null && echo "CentOS-Base.repo backup done"

# 下载阿里云的yum源文件
case "${os_version}" in
"8")
        curl -o /etc/yum.repos.d/CentOS-Base.repo http://mirrors.aliyun.com/repo/Centos-8.repo
        echo "yum configure done"
        ;;
"7")
        curl -o /etc/yum.repos.d/CentOS-Base.repo http://mirrors.aliyun.com/repo/Centos-7.repo
        echo "yum configure done"
        ;;
"6")
        curl -o /etc/yum.repos.d/CentOS-Base.repo http://mirrors.aliyun.com/repo/Centos-6.repo
        echo "yum configure done"
        ;;
"*")
        echo "error"
esac

# if 结构的yum配置
#if [ "${os_version}" = "7" ];then
#       curl -o /etc/yum.repos.d/CentOS-Base.repo http://mirrors.aliyun.com/repo/Centos-7.repo
#elif [ "${os_version}" = "6" ];then
#       curl -o /etc/yum.repos.d/CentOS-Base.repo http://mirrors.aliyun.com/repo/Centos-6.repo
#elif [ "${os_version}" = "8" ];then
#       curl -o /etc/yum.repos.d/CentOS-Base.repo http://mirrors.aliyun.com/repo/Centos-8.repo
#fi
例2
删除用户脚本:判断用户是否存在,如果存在,询问是否确认删除
[root@hadoop04 shell_case]# cat del_user.sh
#!/usr/bin/bash
##########################################
# yum  config                            #
# v1.0 by ElegantSmile 9/12/2019         #
##########################################

red_col="\e[31m"
green_col="\e[32m"
reset_col="\e[0m"


read -p "Please input a username: " username

id ${username} &> https://img.qb5200.com/download-x/dev/null

if [ $? -ne 0 ];then
    echo -e "user ${red_col}${username}${reset_col} not exists."
    exit 1
fi


read -p "Are you sure?[y/n]: " action
case "${action}" in
y|Y|yes|YES)
    userdel -r ${username}
    echo -e "user ${green_col}${username}${reset_col} is deleted."
    ;;
*)
    echo "error"
esac
例3
系统管理工具箱(初始版本)
[root@hadoop04 shell_case]# vim system_manage01.sh
#!/usr/bin/bash
##########################################
# system  manage                         #
# v1.0 by ElegantSmile 9/12/2019         #
##########################################

red_col="\e[31m"
green_col="\e[32m"
reset_col="\e[0m"
blue_col="\e[34m"

menu() {
        cat <<-EOF
        ##########系统管理工具箱#############
        #       Command action              #
        #       h 显示命令帮助              #
        #       f 显示磁盘分区              #
        #       d 显示磁盘挂载              #
        #       m 查看内存使用              #
        #       u 查看系统负载              #
        #       q 退出程序                  #
        #####################################
        EOF
}

menu

echo -e "${blue_col}command (h for help):${reset_col} \c"

read action

#echo "Your choice is ${choice}"

case "${action}" in
"h")
        clear
        menu
        ;;
"f")
        fdisk -l
        ;;
"d")
        df -Th
        ;;
"m")
        free -m
        ;;
"u")
        uptime | awk -F ",  " '{print $NF}'
        ;;
"q")
        #exit
        break
        ;;
*)
        echo "error input"
        ;;
esac
例4
系统管理工具(优化版):增加循环,不会输入一次选项就直接退出,输入q才会退出;输入空白跟输入错误的提示不同
[root@hadoop04 shell_case]# vim system_manage02.sh
#!/usr/bin/bash
##########################################
# system  manage                         #
# v1.1 by ElegantSmile 9/12/2019         #
##########################################

red_col="\e[31m"
green_col="\e[32m"
reset_col="\e[0m"
blue_col="\e[34m"

menu() {
    cat <<-EOF
    ##########系统管理工具箱#############
    #   Command action          #
    #   h 显示命令帮助            #
    #   f 显示磁盘分区            #
    #   d 显示磁盘挂载            #
    #   m 查看内存使用            #
    #   u 查看系统负载              #
    #   q 退出程序                  #
    #####################################
    EOF
}


menu

# while :循环,相当于 while true:
while :
do

        echo -e "${blue_col}command (h for help):${reset_col} \c"

        read action

        #echo "Your choice is ${choice}"

        case "${action}" in
        "h")
                clear
                menu
                ;;
        "f")
                fdisk -l
                ;;
        "d")
                df -Th
                ;;
        "m")
                free -m
                ;;
        "u")
                uptime | awk -F ",  " '{print $NF}'
                ;;
        "q")
                #exit
                break
                ;;
        "")
                ;;
         *)
                echo "error input"
                ;;
        esac

done
简单的 JumpServer
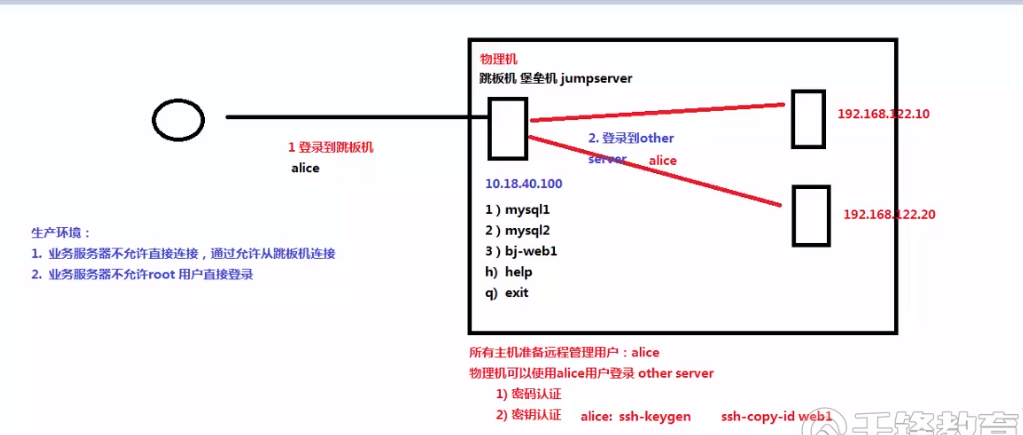
虚拟机准备
jumpserver 172.22.34.20
client server1 172.22.34.16
client server2 172.22.34.15
client server配置
创建alice用户,并设置密码
[root@hadoop00 ~]# useradd alice
[root@hadoop00 ~]# passwd alice
jump server配置
编写jumpserver.sh脚本
[root@hadoop04 shell_case]# cat jump_server.sh
#!/usr/bin/bash
##########################################
# jump server                            #
# v1.0 by ElegantSmile 9/12/2019         #
##########################################

reset_col="\e[0m"
blue_col="\e[34m"
red_col="\e[31m"

# 捕捉到相应的键盘信号,不做任何操作
trap "" HUP INT OUIT TSTP

web1=172.22.34.16
web2=172.22.34.17
mysql1=172.22.34.18

clear

while :
do
        cat <<-EOF
        +------------------------------------------------+
        |       Jump server                              |
        |       1.web1                                   |
        |       2.web2                                   |
        |       3.mysql1                                 |
        +------------------------------------------------+
        EOF
        # 文字显示颜色,并且不换行,有两种实现方式
        # -e \c
        # -en
        # echo -e "${blue_col}请选择要连接的主机[1-3]:${reset_col} \c"
        echo -en "${blue_col}请选择要连接的主机[1-3]:${reset_col}"

        read action

        case "${action}" in
        "1")
                ssh alice@${web1}
                ;;
        "2")
                ssh alice@${web2}
                ;;
        "3")
                ssh alice@${mysql1}
                ;;
        "")
                ;;
        *)
                echo -e "${red_col}error input${reset_col}"
                ;;
        esac
done
创建用户alice
[root@hadoop04 ~]# useradd alice
[root@hadoop04 ~]# passwd alice
# 将jumpserver.sh拷贝到alice的家目录
生成密钥
# 切换到alice用户
[root@hadoop04 ~]# su - alice

[alice@hadoop04 ~]$ ssh-keygen
Generating public/private rsa key pair.

Enter file in which to save the key (/home/alice/.ssh/id_rsa): Created directory '/home/alice/.ssh'.
Enter passphrase (empty for no passphrase):
Enter same passphrase again:
Your identification has been saved in /home/alice/.ssh/id_rsa.
Your public key has been saved in /home/alice/.ssh/id_rsa.pub.
The key fingerprint is:
SHA256:TiwMdEGhaYU3zv3N9b8aNHBglFr9Wh9i4Rj6tyT7e/U alice@hadoop04
The key's randomart image is:
+---[RSA 2048]----+
|    .o*o  .+o    |
|   ..=o   .+.o   |
|    =+ o  +.+.o  |
|   . oo..o .o+.+ |
|      o S..o.++.o|
|       +  .o++. +|
|        .   =.. +|
|           . ...E|
|            .++..|
+----[SHA256]-----+
拷贝密钥
[alice@hadoop04 ~]$ ssh-copy-id 172.22.34.16


[alice@hadoop04 ~]$ ssh-copy-id 172.22.34.17


[alice@hadoop04 ~]$ ssh-copy-id 172.22.34.18
配置执行脚本
切换到alice用户,配置.bashrc文件
[alice@hadoop04 ~]$ vim ~/.bashrc

/bin/bash /home/alice/jump_server.sh
实际效果
登录到alice用户
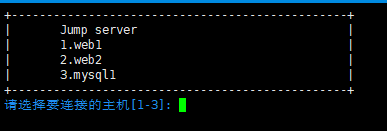
只能输入数字1-3,Ctrl+C之类的命令无效,无法退出,也就说只能通过这台机器跳转到其他机器,无法在该机器上进行其他操作
