写在前面的话
相关背景及资源:
曹工说Spring Boot源码(1)-- Bean Definition到底是什么,附spring思维导图分享
曹工说Spring Boot源码(2)-- Bean Definition到底是什么,咱们对着接口,逐个方法讲解
曹工说Spring Boot源码(3)-- 手动注册Bean Definition不比游戏好玩吗,我们来试一下
曹工说Spring Boot源码(4)-- 我是怎么自定义ApplicationContext,从json文件读取bean definition的?
曹工说Spring Boot源码(5)-- 怎么从properties文件读取bean
曹工说Spring Boot源码(6)-- Spring怎么从xml文件里解析bean的
曹工说Spring Boot源码(7)-- Spring解析xml文件,到底从中得到了什么(上)
曹工说Spring Boot源码(8)-- Spring解析xml文件,到底从中得到了什么(util命名空间)
曹工说Spring Boot源码(9)-- Spring解析xml文件,到底从中得到了什么(context命名空间上)
曹工说Spring Boot源码(10)-- Spring解析xml文件,到底从中得到了什么(context:annotation-config 解析)
曹工说Spring Boot源码(11)-- context:component-scan,你真的会用吗(这次来说说它的奇技淫巧)
曹工说Spring Boot源码(12)-- Spring解析xml文件,到底从中得到了什么(context:component-scan完整解析)
曹工说Spring Boot源码(13)-- AspectJ的运行时织入(Load-Time-Weaving),基本内容是讲清楚了(附源码)
曹工说Spring Boot源码(14)-- AspectJ的Load-Time-Weaving的两种实现方式细细讲解,以及怎么和Spring Instrumentation集成
曹工说Spring Boot源码(15)-- Spring从xml文件里到底得到了什么(context:load-time-weaver 完整解析)
曹工说Spring Boot源码(16)-- Spring从xml文件里到底得到了什么(aop:config完整解析【上】)
曹工说Spring Boot源码(17)-- Spring从xml文件里到底得到了什么(aop:config完整解析【中】)
曹工说Spring Boot源码(18)-- Spring AOP源码分析三部曲,终于快讲完了 (aop:config完整解析【下】)
曹工说Spring Boot源码(19)-- Spring 带给我们的工具利器,创建代理不用愁(ProxyFactory)
曹工说Spring Boot源码(20)-- 码网恢恢,疏而不漏,如何记录Spring RedisTemplate每次操作日志
工程代码地址 思维导图地址
工程结构图:

概要
前面两三篇,介绍了spring aop得以实现的利器:ProxyFactory。
ProxyFactory,全称:org.springframework.aop.framework.ProxyFactory,spring帝国spring aop军工厂boss,职责就是生产proxy,即,代理工厂。
通过下面几行代码,就能生成一个代理对象,而且我们还加了了一个环绕通知:
 @Test
    public void createJdkDynamicProxyWithAdvisor() {
        ProxyFactory proxyFactory = new ProxyFactory();
        Performer performer = new Performer();
        proxyFactory.setTarget(performer);

        proxyFactory.addInterface(Perform.class);
        DefaultPointcutAdvisor advisor = new DefaultPointcutAdvisor();
        advisor.setAdvice(new MethodInterceptor() {
            @Override
            public Object invoke(MethodInvocation invocation) throws Throwable {
                Object result = invocation.proceed();
                System.out.println("男孩唱完要行礼");
                return result;
            }
        });


        proxyFactory.addAdvisor(advisor);

        Perform proxy = (Perform) proxyFactory.getProxy();

        ProxyFactoryTest.log.info("proxy class:{}",proxy.getClass().getName());
        proxy.sing();
    }
输出如下:

本讲,我们来讲讲,背后的故事。
ProxyFactory如何构造
其一共有如下几个重载的构造函数:
- 无参构造函数
- ProxyFactory(Object target) 指定target
- ProxyFactory(Class[] proxyInterfaces) 指定代理类要实现的接口
- ProxyFactory(Class proxyInterface, Interceptor interceptor) 指定代理类要实现的接口,以及一个切面
- ProxyFactory(Class proxyInterface, TargetSource targetSource) 指定代理类要实现的接口,以及一个targetSource,targetSource类似于一个targetFactory,通过其,间接获取target
因为spring aop源码里,默认就使用了的是无参构造函数,这里我们也以无参构造函数来讲解。
我们知道,构造函数调用时,如果这个类有父类,还得先调用父类的构造函数。恰巧,这个类就有父类:
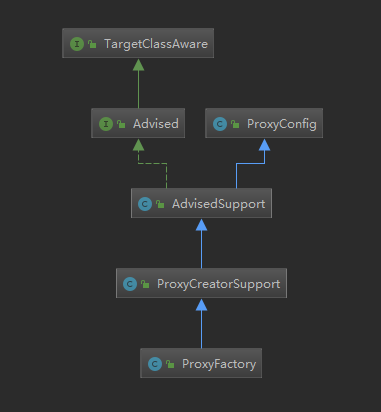
其中,ProxyConfig没有显示定义的构造函数,所以只有默认的无参构造函数。所以,
会先调用ProxyConfig的无参构造函数;
调用AdvisedSupport的无参构造函数,如下:
/**
 * No-arg constructor for use as a JavaBean.
 */
public AdvisedSupport() {
    initMethodCache();
}
/**
 * Initialize the method cache.
 */
private void initMethodCache() {
    this.methodCache = new ConcurrentHashMap<MethodCacheKey, List<Object>>(32);
}
接下来,调用ProxyCreatorSupport的无参构造函数:
/**
 * Create a new ProxyCreatorSupport instance.
 */
public ProxyCreatorSupport() {
   this.aopProxyFactory = new DefaultAopProxyFactory();
}
调用ProxyFactory的无参构造函数
/**
 * Create a new ProxyFactory.
 */
public ProxyFactory() {
}
其中,比较有的讲的,主要是第三个步骤,即ProxyCreatorSupport的无参构造函数。
这一步呢,new了一个DefaultAopProxyFactory,不过,暂时还没用到它。
构造完了,接下来,就是各种配置上场的时候了。
配置ProxyFactory
好歹这也是一响当当的工厂,但是吧,要生产啥呢?总得有个方向吧。你是一个ProxyFactory,代理工厂,你要代理谁?代理卖火车票,还是代理卖房呢?注意,这里我说的是卖火车票,和卖房。
这说明啥,说明我屁股是坐在卖方的,是12306一方,是要卖房的一方。因为啥呢,因为我现在的target,是卖方,我是作为卖方的代表(即,代理)来出现的。
target很重要,这个直接决定了我们工厂的方向。比如,假设翻转一下,代理买方。比如,现在中国人,有钱人很多,很多人就去国外买房,比如澳洲、日本、东南亚啥的,但是呢,你对当地不了解,所以,就催生了当地的一批华人,来帮助大陆中国人在那边买房,此时,他们就是我们的代理。我们呢,就是他们的target。
ok,大家想必理解了,ProxyFactory要生产啥,主要还是要有个定位,看看屁股坐哪边。所以,我们作为代码世界的王者,就要负责来定方向。
配置target
Performer performer = new Performer();
proxyFactory.setTarget(performer);
定了target,基本定了一半了。
当然,你也不可以不直接定target,定接口也行。
配置接口,即代理要具备的功能
proxyFactory.addInterface(Perform.class);配置额外的切面(可选)
DefaultPointcutAdvisor advisor = new DefaultPointcutAdvisor();
advisor.setAdvice(new MethodInterceptor() {
    @Override
    public Object invoke(MethodInvocation invocation) throws Throwable {
        Object result = invocation.proceed();
        Method method = invocation.getMethod();
        if (method.getName().equals("sing")) {
            System.out.println("男孩唱完要行礼");
        }
        return result;
    }
});
proxyFactory.addAdvisor(advisor);
这个步骤是可选的,你也可以没有切面,没有的话,默认就是代理啥事都不帮你做,你让他帮你分析房产,结果人只收钱不干活。
我们这里的切面,是在target唱歌完了之后,输出一句话:要行礼。
额外的一些配置
当然了,作为一个齐备的工厂,还是要支持一些客户的定制功能的。比如:
从ProxyConfig继承来的一些方法
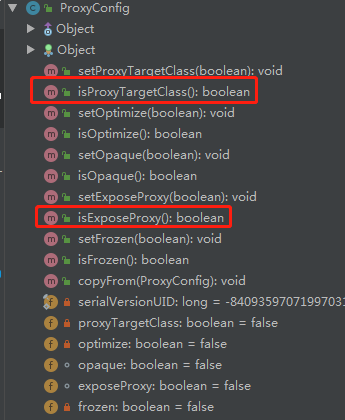
比如,有的客户说,我要cglib创建代理,有的说,我要jdk。ok,这个就满足你了。
再比如,isExposeProxy,这个可以把生成的代理通过一个api提供给你,你可以在target方法内,拿到代理对象。
从AdvisedSupport继承来的功能

这个也简单,基本就是我们前面那几个配置的重载方法,增删改查嘛。
从ProxyCreatorSupport继承来的功能

这个嘛,基本就是扩展了一下,搞了点事件/监听的机制,方便我们扩展。
ok,配也配好了,是不是该把代理对象给人家了。
根据配置,生成代理
我写着写着,发现这个东西,很像开一个煎饼店,比如根据客户要求:要鸡蛋、培根、鸡排啥的(这个就是对应上面的配置部分);然后,这一步,我们作为店老板,就开始去根据客户的要求,煎煎饼!
Perform proxy = (Perform) proxyFactory.getProxy();煎饼的过程如何,我们来看看:
public Object getProxy() {
   return createAopProxy().getProxy();
}
是不是很简单,其实,我们应该分为两步来看:
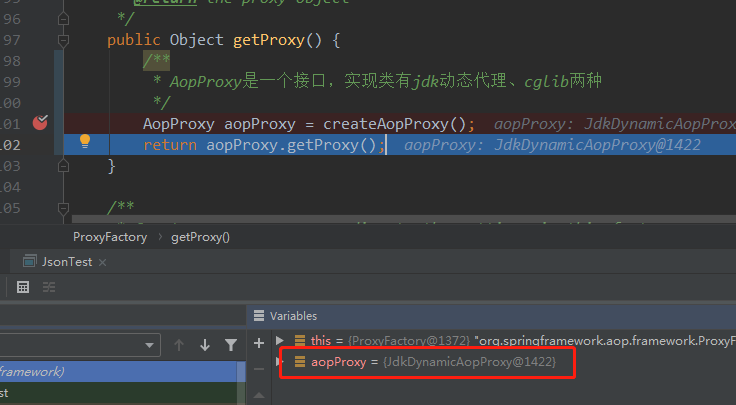
    public Object getProxy() {
        /**
         * AopProxy是一个接口,实现类有jdk动态代理、cglib两种
         */
        AopProxy aopProxy = createAopProxy();
        return aopProxy.getProxy();
    }
选择客户要求,选择合适的煎锅
这一步,就是对应:
/**
 * AopProxy是一个接口,实现类有jdk动态代理、cglib两种
 */
AopProxy aopProxy = createAopProxy();
因为我们这里,AopProxy有两种实现,要用哪一种,要根据之前的配置来,比如,指定了proxyTargetClass,那就是要用cglib;否则就用jdk 动态代理。
我们具体看看:
    protected final synchronized AopProxy createAopProxy() {
        if (!this.active) {
            activate();
        }
        /**
         * 其实这里获取的,就是之前构造函数时那个DefaultAopProxyFactory
         */
        AopProxyFactory aopProxyFactory = getAopProxyFactory();
        return aopProxyFactory.createAopProxy(this);
    }
这里,先获取了AopProxyFactory,这里呢,拿到的,就是之前我们构造函数时候那个。
/**
 * Return the AopProxyFactory that this ProxyConfig uses.
 */
public AopProxyFactory getAopProxyFactory() {
    return this.aopProxyFactory;
}
这里拿到DefaultAopProxyFactory后,程序会调用其createAopProxy(this),且把当前对象都传进去了,当前对象是谁?就是ProxyFactory代理工厂本厂。
具体的创建代码如下:
public AopProxy createAopProxy(AdvisedSupport config) throws AopConfigException {
   if (config.isOptimize() || config.isProxyTargetClass() || hasNoUserSuppliedProxyInterfaces(config)) {
      Class targetClass = config.getTargetClass();
      if (targetClass == null) {
         throw new AopConfigException("TargetSource cannot determine target class: " +
               "Either an interface or a target is required for proxy creation.");
      }
      if (targetClass.isInterface()) {
         return new JdkDynamicAopProxy(config);
      }
      return CglibProxyFactory.createCglibProxy(config);
   }
   else {
      return new JdkDynamicAopProxy(config);
   }
}
注意看最上面的if判断:
if (config.isOptimize() || config.isProxyTargetClass() || hasNoUserSuppliedProxyInterfaces(config))
是不是,如果isProxyTargetClass为true,或者hasNoUserSuppliedProxyInterfaces,按里面理解,没有提供接口,则会走下面的逻辑,去用cglib创建代理。
因为我们这里是提供了接口的,所以,会new一个:jdk的动态代理。
public JdkDynamicAopProxy(AdvisedSupport config) throws AopConfigException {
   Assert.notNull(config, "AdvisedSupport must not be null");
   if (config.getAdvisors().length == 0 && config.getTargetSource() == AdvisedSupport.EMPTY_TARGET_SOURCE) {
      throw new AopConfigException("No advisors and no TargetSource specified");
   }
   this.advised = config;
}
这里可以看到,构造函数很简单,就是把代理工厂本厂的引用传给他了。我们前面配了那么多东西在ProxyFactory上,怎么能说给人就给人?
废话,不给JdkDynamicAopProxy,它怎么创建代理呢?

JdkDynamicAopProxy揭秘
这个类,我直接给大家说,其实现了两个接口:
代理接口:AopProxy
public interface AopProxy {

   /**
    * Create a new proxy object.
    * <p>Uses the AopProxy's default class loader (if necessary for proxy creation):
    * usually, the thread context class loader.
    * @return the new proxy object (never {@code null})
    * @see Thread#getContextClassLoader()
    */
   Object getProxy();
}
这个接口就是获取代理对象。
java.lang.reflect.InvocationHandler接口
这个接口,熟悉jdk动态代理的就知道,拦截的逻辑就写在这里面。我们大概可以猜测,代理对象调用方法时,就会被拦截到这个方法里面来处理。
生成代理对象
前面,我们已经讲解了这一步了:
马上就要调用getProxy来生成代理对象。
org.springframework.aop.framework.JdkDynamicAopProxy#getProxy(java.lang.ClassLoader)
public Object getProxy(ClassLoader classLoader) {
   if (logger.isDebugEnabled()) {
      logger.debug("Creating JDK dynamic proxy: target source is " + this.advised.getTargetSource());
   }
   Class[] proxiedInterfaces = AopProxyUtils.completeProxiedInterfaces(this.advised);
   findDefinedEqualsAndHashCodeMethods(proxiedInterfaces);
   return Proxy.newProxyInstance(classLoader, proxiedInterfaces, this);
}
这里就简单的几步:
获取要代理的全部接口
Class[] proxiedInterfaces = AopProxyUtils.completeProxiedInterfaces(this.advised);实际上,大家记得,我们前面只配了一个要代理的接口,但这个方法内部,还会给我们加上两个接口。
org.springframework.aop.SpringProxy
这个是marker接口,空的,不用管,只是做个标记,框架会用到
org.springframework.aop.framework.Advised
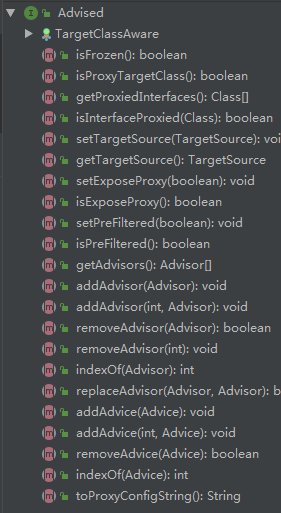
这个接口,功能比较全,还是一些增删改查的操作,对象吧,是那些切面、target啥的,这可以让我们动态地修改生成的代理对象。
调用jdk方法,生成代理
return Proxy.newProxyInstance(classLoader, proxiedInterfaces, this);这里没啥说的,唯一就是,第三个参数,传了个this,这里的this,就是JdkDynamicAopProxy它自己。前面我们也说了,它自己实现了java.lang.reflect.InvocationHandler。
调用代理对象的方法时,如何作用
我们再想想代理的作用,不就是帮我们干点事吗?那要怎么帮我们target干事呢?
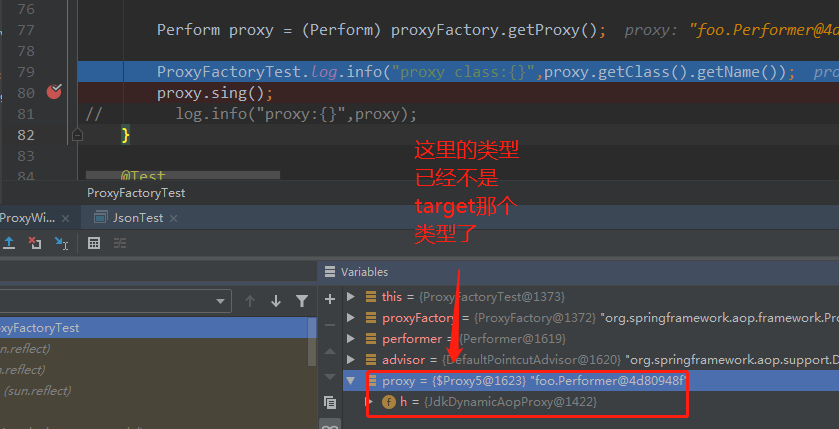
注意,当我们拿到ProxyFactory的getProxy返回的对象时,其类型已经有点奇怪,你看上图,它的类型是$Proxy5.
这是jdk动态生成的class。
所以,我们调用,实际上是在代理对象上进行调用,对他们进行调用,实际的逻辑会被跳转到之前生成代理时,传进去的那个invocationHandler对象的invoke里面去。
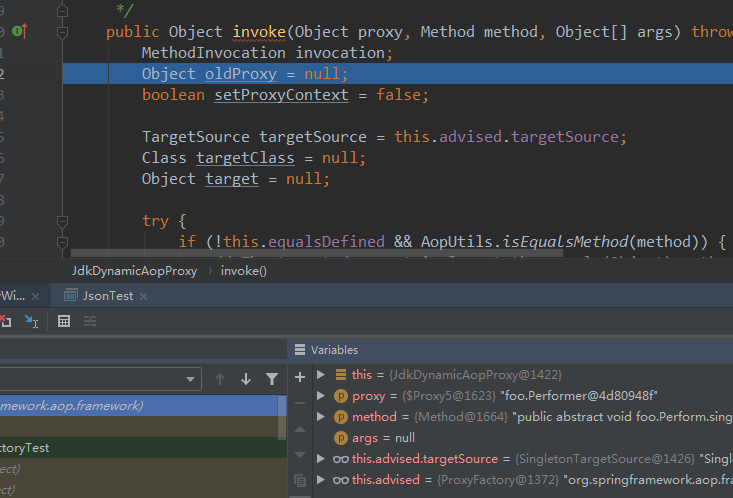
这个页面,熟悉吧,不用我多说了,但凡大家在service层加了事务,debug时,进去的就是这个地方。
方法的核心逻辑,大概如下:
Object retVal;

// 1. May be null. Get as late as possible to minimize the time we "own" the target,
// in case it comes from a pool.
target = targetSource.getTarget();
if (target != null) {
   targetClass = target.getClass();
}

// 2. Get the interception chain for this method.
List<Object> chain = this.advised.getInterceptorsAndDynamicInterceptionAdvice(method, targetClass);

// Check whether we have any advice. If we don't, we can fallback on direct
// reflective invocation of the target, and avoid creating a MethodInvocation.
if (chain.isEmpty()) {
   // 3. We can skip creating a MethodInvocation: just invoke the target directly
   // Note that the final invoker must be an InvokerInterceptor so we know it does
   // nothing but a reflective operation on the target, and no hot swapping or fancy proxying.
   retVal = AopUtils.invokeJoinpointUsingReflection(target, method, args);
}
else {
   // 4. We need to create a method invocation...
   invocation = new ReflectiveMethodInvocation(proxy, target, method, args, targetClass, chain);
   // Proceed to the joinpoint through the interceptor chain.
   retVal = invocation.proceed();
}
上面的代码,我标了号。
第一处,是获取target,根据之前配置的targetSource来获取,忘了的可以再翻一下;
第二处,根据当前要执行的method和class,判断哪些切面(其实就是代理要帮我们做的事)是匹配的
第三处,如果切面集合为null,说明代理啥事不干,所以只能直接调用target了
retVal = AopUtils.invokeJoinpointUsingReflection(target, method, args);第四处,如果切面不为null,说明代理有事要做,这里就封装了一个invocation,来调用切面集合。
这里面有两点要讲,第二处和第四处。
第二处,获取匹配的切面时,核心逻辑是,把切面里的切点,和目标类、目标方法一一匹配,都匹配,就算;否则不算。
public List<Object> getInterceptorsAndDynamicInterceptionAdvice(
         Advised config, Method method, Class targetClass) {

     // This is somewhat tricky... we have to process introductions first,
     // but we need to preserve order in the ultimate list.
     List<Object> interceptorList = new ArrayList<Object>(config.getAdvisors().length);
     boolean hasIntroductions = hasMatchingIntroductions(config, targetClass);
     AdvisorAdapterRegistry registry = GlobalAdvisorAdapterRegistry.getInstance();
     // 讲解点1
     for (Advisor advisor : config.getAdvisors()) {
         if (advisor instanceof PointcutAdvisor) {
             // Add it conditionally.
             PointcutAdvisor pointcutAdvisor = (PointcutAdvisor) advisor;
                  // 讲解点2
             if (config.isPreFiltered() || pointcutAdvisor.getPointcut().getClassFilter().matches(targetClass)) {
                 MethodInterceptor[] interceptors = registry.getInterceptors(advisor);
                 MethodMatcher mm = pointcutAdvisor.getPointcut().getMethodMatcher();
                      // 讲解点3
                 if (MethodMatchers.matches(mm, method, targetClass, hasIntroductions))
                    {
                     interceptorList.addAll(Arrays.asList(interceptors));
                 }
             }
         }
         else {
             Interceptor[] interceptors = registry.getInterceptors(advisor);
             interceptorList.addAll(Arrays.asList(interceptors));
         }
     }
     return interceptorList;
 }
这里就三个讲解点,
- 1是遍历全部的切面
- 2是拿出切面中的切点的classMatcher,看看目标class是否匹配
- 3是拿出切面中的切点的methodMatcher,看看目标方法是否匹配
实际调用切面和目标方法
这里用到了责任链模式,递归执行;其实也可以直接for循环的。
这里new了一个ReflectiveMethodInvocation,这个其实就是一个wrapper,包裹了所有必要的参数,可以理解为大杂烩,主要是封装一下,代码不那么乱。
protected ReflectiveMethodInvocation(
      Object proxy, Object target, Method method, Object[] arguments,
      Class targetClass, List<Object> interceptorsAndDynamicMethodMatchers) {

   this.proxy = proxy;
   this.target = target;
   this.targetClass = targetClass;
   this.method = BridgeMethodResolver.findBridgedMethod(method);
   this.arguments = arguments;
   this.interceptorsAndDynamicMethodMatchers = interceptorsAndDynamicMethodMatchers;
}
看,是不是,这里面啥都有了,代理对象、目标对象、目标class,目标方法,方法参数,切面集合。
同时,这里面还有个隐含的数组下标:
/**
 * Index from 0 of the current interceptor we're invoking.
 * -1 until we invoke: then the current interceptor.
 */
private int currentInterceptorIndex = -1;
这玩意主要是用来遍历切面集合的。
好了,接下来说下面这处:
else {
   // 这一步已经讲解完了,拿到了ReflectiveMethodInvocation 对象
   invocation = new ReflectiveMethodInvocation(proxy, target, method, args, targetClass, chain);
   // Proceed to the joinpoint through the interceptor chain.
   retVal = invocation.proceed();
}
接下来,我们看看invocation.proceed();
public Object proceed() throws Throwable { //讲解点1: if (this.currentInterceptorIndex == this.interceptorsAndDynamicMethodMatchers.size() - 1) { return invokeJoinpoint(); } Object interceptorOrInterceptionAdvice = this.interceptorsAndDynamicMethodMatchers.get(++this.currentInterceptorIndex); // 讲解点2: if (interceptorOrInterceptionAdvice instanceof InterceptorAndDynamicMethodMatcher) { // Evaluate dynamic method matcher here: static part will already have // been evaluated and found to match. InterceptorAndDynamicMethodMatcher dm = (InterceptorAndDynamicMethodMatcher) interceptorOrInterceptionAdvice; if (dm.methodMatcher.matches(this.method, this.targetClass, this.arguments)) { return dm.interceptor.invoke(this); } else { // Dynamic matching failed. // Skip this interceptor and invoke the next in the chain. return proceed(); } } else { // 讲解点3: // It's an interceptor, so we just invoke it: The pointcut will have // been evaluated statically before this object was constructed. return ((MethodInterceptor) interceptorOrInterceptionAdvice).invoke(this); } }- 讲解点1:一开始进来的时候,之前说的那个下标为-1;判断是否已经是切面集合的最后一个,我们这里刚开始,所以会走到下面
- 讲解点2:一般都不会走到这个分支里,会直接跳到讲解点3. 因为我们spring aop,一般都是基于方法的切面嘛。
- 讲解点3:这里,调用切面的invoke方法,传进去了this。this是啥?就是ReflectiveMethodInvocation自己。
所以,大家看上图就知道了,这里形成了递归调用。
我思考了一下,之所以递归调用,而不是for循环,主要是要保证target的method先执行,执行完了,才能到我们这里的切面来执行。
这样逻辑才对。
当这里递归调用进去时,因为我们只有一个切面,所以就开始执行连接点:
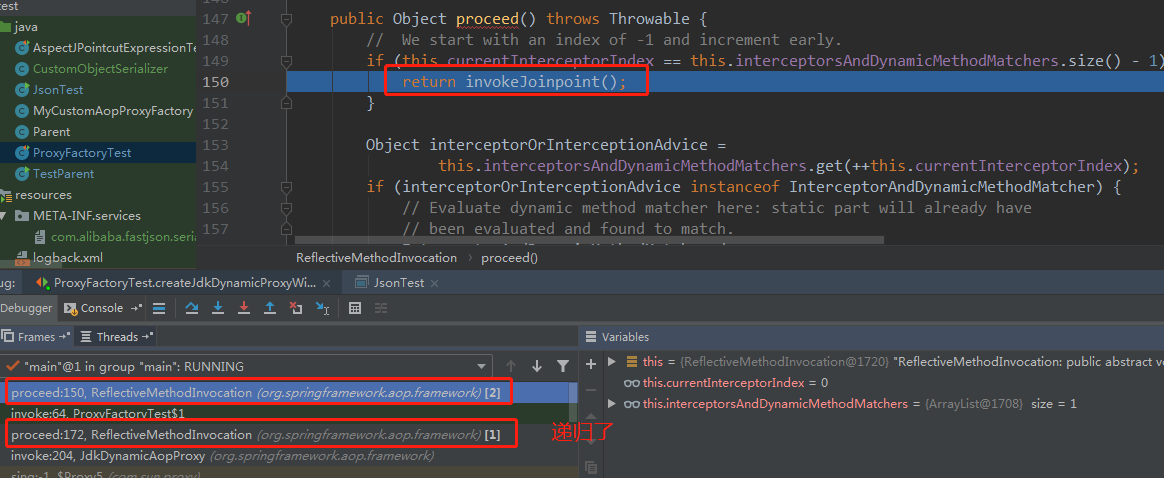
待到连接点执行完了后,会继续执行我们切面的后续逻辑。
这就是和tomcat filter链类似的责任链模式。
总结
aop这块,基本的东西是差不多了,大家有问题及时联系我。

