项目环境:python3.6


数据集准备分为两步:
首先可以利用爬虫,从百度图片上批量下载图片,但注意下载数据集所用的关键词不要和之后识别任务的关键词太接近,否则若有图片重合,就会产生“识别得很准”的错觉。下面的程序为爬虫部分,在name.txt文件中写好要搜索的关键词,即可使用。
# 爬虫部分,存放到 name + ‘文件'
    #############################################################################################
    if GET_PIC == 1:
        headers = {
            'Accept-Language': 'zh-CN,zh;q=0.8,zh-TW;q=0.7,zh-HK;q=0.5,en-US;q=0.3,en;q=0.2',
            'Connection': 'keep-alive',
            'User-Agent': 'Mozilla/5.0 (X11; Linux x86_64; rv:60.0) Gecko/20100101 Firefox/60.0',
            'Upgrade-Insecure-Requests': '1'
        }
        A = requests.Session()
        A.headers = headers
        tm = int(input('请输入每类图片的下载数量 '))
        numPicture = tm
        line_list = []
        with open('./name.txt', encoding='utf-8') as file:
            line_list = [k.strip() for k in file.readlines()]  # 用 strip()移除末尾的空格
        for word in line_list:
            url = 'https://image.baidu.com/search/flip?tn=baiduimage&ie=utf-8&word=' + word + '&pn='
            tot = Find(url, A)
            Recommend = recommend(url)  # 记录相关推荐
            print('经过检测%s类图片共有%d张' % (word, tot))
            file = word + '文件'
            y = os.path.exists(file)
            if y == 1:
                print('该文件已存在,无需创建')
            else:
                os.mkdir(file)
            t = 0
            tmp = url
            while t < numPicture:
                try:
                    url = tmp + str(t)
                    # result = requests.get(url, timeout=10)
                    # 这里搞了下
                    result = A.get(url, timeout=10, allow_redirects=False)
                    print(url)
                except error.HTTPError as e:
                    print('网络错误,请调整网络后重试')
                    t = t + 60
                else:
                    dowmloadPicture(result.text, word)
                    t = t + 60
            numPicture = numPicture + tm
        print('当前搜索结束,开始提取人脸')
    #############################################################################################
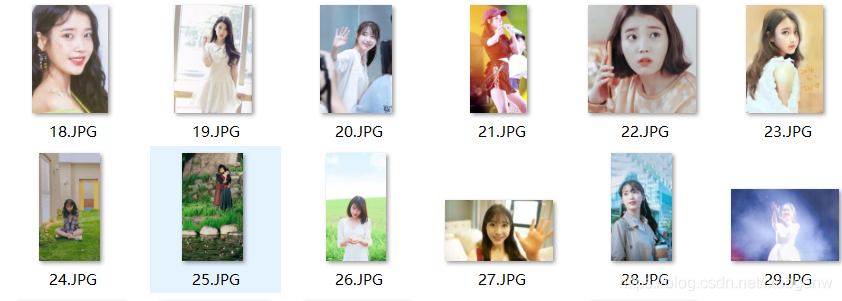
下载图片时要注意区分,将IU的图片放在一个文件夹下,Other的放在另一文件夹下。训练集和测试集都要如此。如下图所示:

每个文件夹内都是下图形式:

在IU文件夹内图片如下所示:
对于文件夹内文件的命名,可以利用以下这段程序,按顺序重命名。
import os
raw_train_root_1 = 'E:/Table/学习数据集/find_iu/data/raw/train/IU/'
raw_train_root_2 = 'E:/Table/学习数据集/find_iu/data/raw/train/Other/'
raw_test_root_1 = 'E:/Table/学习数据集/find_iu/data/raw/test/IU/'
raw_test_root_2 = 'E:/Table/学习数据集/find_iu/data/raw/test/Other/'
raw_roots = [raw_train_root_1, raw_train_root_2, raw_test_root_1, raw_test_root_2]
for path in raw_roots:
    # 获取该目录下所有文件,存入列表中
    fileList = os.listdir(path)
    n = 0
    for i in fileList:
        # 设置旧文件名(就是路径+文件名)
        oldname = path + os.sep + fileList[n]  # os.sep添加系统分隔符
        # 设置新文件名
        newname = path + os.sep + str(n) + '.JPG'
        os.rename(oldname, newname)  # 用os模块中的rename方法对文件改名
        print(oldname, '======>', newname)
        n += 1
提取人脸,需要用到一个人脸识别库face_recognition库。face_recognition库的下载步骤参考:
主要有三步,可以直接在anaconda的命令行界面复制使用:
笔者已尝试,确实可用。
使用下述的函数就可以获得一张图片对应的人脸,返回值就是人脸图片。
# 找到图片中的人脸
#############################################################################################
def find_face(path):
    # Load the jpg file into a numpy array
    image = face_recognition.load_image_file(path)
    # Find all the faces in the image using the default HOG-based model.
    # This method is fairly accurate, but not as accurate as the CNN model and not GPU accelerated.
    # See also: find_faces_in_picture_cnn.py
    face_locations = face_recognition.face_locations(image) # 可以选择 model="cnn"
    if len(face_locations) == 0:
        return None
    else:
        for face_location in face_locations:
            # Print the location of each face in this image
            top, right, bottom, left = face_location
            # You can access the actual face itself like this:
            face_image = image[top:bottom, left:right]
            pil_image = Image.fromarray(face_image)
            return pil_image
#############################################################################################
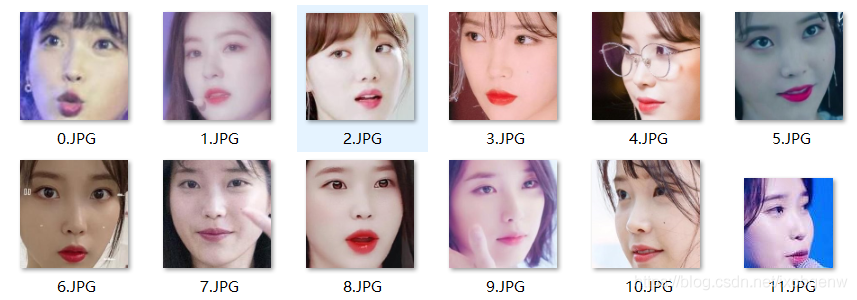
对数据集进行操作之后,就可以获得处理后的人脸图片。之所以不用人物图训练,而是提取出人脸后再进行训练,是考虑到人物图像中干扰因素太多,且经过试验后发现识别的效果非常差,于是加入这个提取人脸的环节。对数据集的操作代码如下:
# 将训练集和测试集中的raw图片处理,提取出人脸图片
#############################################################################################
if __name__ == '__main__':  # 主函数入口
    raw_train_root_1 = 'E:/Table/学习数据集/find_iu/data/raw/train/IU/'
    raw_train_root_2 = 'E:/Table/学习数据集/find_iu/data/raw/train/Other/'
    raw_test_root_1 = 'E:/Table/学习数据集/find_iu/data/raw/test/IU/'
    raw_test_root_2 = 'E:/Table/学习数据集/find_iu/data/raw/test/Other/'
    raw_roots = [raw_train_root_1, raw_train_root_2, raw_test_root_1, raw_test_root_2]
    img_raw_train_1 = os.listdir(raw_train_root_1)
    img_raw_train_2 = os.listdir(raw_train_root_2)
    img_raw_test_1 = os.listdir(raw_test_root_1)
    img_raw_test_2 = os.listdir(raw_test_root_2)
    img_raws = [img_raw_train_1, img_raw_train_2, img_raw_test_1, img_raw_test_2]
    new_path_train_1 = 'E:/Table/学习数据集/find_iu/data/processed/train/IU/'
    new_path_train_2 = 'E:/Table/学习数据集/find_iu/data/processed/train/Other/'
    new_path_test_1 = 'E:/Table/学习数据集/find_iu/data/processed/test/IU/'
    new_path_test_2 = 'E:/Table/学习数据集/find_iu/data/processed/test/Other/'
    new_paths = [new_path_train_1, new_path_train_2, new_path_test_1, new_path_test_2]
    for raw_root, img_raw, new_path in zip(raw_roots, img_raws, new_paths):
        n = 0
        for i in range(len(img_raw)):
            try:
                img = Image.open(raw_root + img_raw[i])
            except:
                print('a file error, continue')
                continue
            else:
                img_train = find_face(raw_root + img_raw[i])
                if img_train == None:
                    continue
                else:
                    # img_train.save(new_path + '%d.JPG'%n)
                    # print(raw_root + img_raw[i])
                    n += 1
        print('在%d张图片中,共找到%d张脸' % (len(img_raw), n))
#############################################################################################
处理前的图片数据均存放在raw文件夹中,处理后的存放在processed文件夹中,如下图:

两个文件夹的内部结构完全一样:


将图片裁剪为112×92大小,使用RGB图像,(这里试过用灰度图像,但好像效果不会更好,就放弃了),在对图片进行归一化处理。
data_transform = transforms.Compose([
        # transforms.Grayscale(num_output_channels=1),  # 彩色图像转灰度图像num_output_channels默认1
        transforms.Resize(112),
        transforms.CenterCrop((112, 92)),  # 中心裁剪为112*92
        transforms.ToTensor(),
        transforms.Normalize(mean=[0.5, 0.5, 0.5], std=[0.5, 0.5, 0.5])
        # transforms.Normalize(mean=0.5, std=0.5)
    ])
使用孪生神经网络(Siamese Network)
class SiameNetwork(nn.Module):
    def __init__(self):
        super(SiameNetwork, self).__init__()
        # input: h=112, w=92
        self.conv1 = torch.nn.Sequential(
            torch.nn.Conv2d(in_channels=3,  # 输入单通道
                            out_channels=16,  # 16个3*3卷积核
                            kernel_size=3,  # 卷积核尺寸
                            stride=2,  # 卷积核滑动步长, 1的话图片大小不变,2的话会大小会变为(h/2)*(w/2)
                            padding=1),  # 边缘填充大小,如果要保持原大小,kernel_size//2
            torch.nn.BatchNorm2d(16),  # 标准化,前面卷积后有16个图层
            torch.nn.ReLU()  # 激活函数
        )  # output: h=56, w=46
        self.conv2 = torch.nn.Sequential(
            torch.nn.Conv2d(16, 32, 3, 2, 1),
            torch.nn.BatchNorm2d(32),
            torch.nn.ReLU()
        )  # output: h=28, w=23
        self.conv3 = torch.nn.Sequential(
            torch.nn.Conv2d(32, 64, 3, 2, 1),
            torch.nn.BatchNorm2d(64),
            torch.nn.ReLU()
        )  # output: h=14, w=12
        self.conv4 = torch.nn.Sequential(
            torch.nn.Conv2d(64, 64, 2, 2, 0),
            torch.nn.BatchNorm2d(64),
            torch.nn.ReLU()
        )  # output: h=7, w=6
        self.mlp1 = torch.nn.Linear(7 * 6 * 64, 100)  # 需要计算conv4的输出尺寸,每次卷积的输出尺寸(size - kernal + 2*padding)/stride + 1
        self.mlp2 = torch.nn.Linear(100, 10)
    def forward(self, x):
        x = self.conv1(x)
        x = self.conv2(x)
        x = self.conv3(x)
        x = self.conv4(x)
        x = self.mlp1(x.view(x.size(0), -1))  # view展平
        x = self.mlp2(x)
        return x
from PIL import Image
import face_recognition
import os
# 找到图片中的人脸
#############################################################################################
def find_face(path):
    # Load the jpg file into a numpy array
    image = face_recognition.load_image_file(path)
    # Find all the faces in the image using the default HOG-based model.
    # This method is fairly accurate, but not as accurate as the CNN model and not GPU accelerated.
    # See also: find_faces_in_picture_cnn.py
    face_locations = face_recognition.face_locations(image) # 可以选择 model="cnn"
    if len(face_locations) == 0:
        return None
    else:
        for face_location in face_locations:
            # Print the location of each face in this image
            top, right, bottom, left = face_location
            # You can access the actual face itself like this:
            face_image = image[top:bottom, left:right]
            pil_image = Image.fromarray(face_image)
            return pil_image
#############################################################################################
# 将训练集和测试集中的raw图片处理,提取出人脸图片
#############################################################################################
if __name__ == '__main__':  # 主函数入口
    raw_train_root_1 = 'E:/Table/学习数据集/find_iu/data/raw/train/IU/'
    raw_train_root_2 = 'E:/Table/学习数据集/find_iu/data/raw/train/Other/'
    raw_test_root_1 = 'E:/Table/学习数据集/find_iu/data/raw/test/IU/'
    raw_test_root_2 = 'E:/Table/学习数据集/find_iu/data/raw/test/Other/'
    raw_roots = [raw_train_root_1, raw_train_root_2, raw_test_root_1, raw_test_root_2]
    img_raw_train_1 = os.listdir(raw_train_root_1)
    img_raw_train_2 = os.listdir(raw_train_root_2)
    img_raw_test_1 = os.listdir(raw_test_root_1)
    img_raw_test_2 = os.listdir(raw_test_root_2)
    img_raws = [img_raw_train_1, img_raw_train_2, img_raw_test_1, img_raw_test_2]
    new_path_train_1 = 'E:/Table/学习数据集/find_iu/data/processed/train/IU/'
    new_path_train_2 = 'E:/Table/学习数据集/find_iu/data/processed/train/Other/'
    new_path_test_1 = 'E:/Table/学习数据集/find_iu/data/processed/test/IU/'
    new_path_test_2 = 'E:/Table/学习数据集/find_iu/data/processed/test/Other/'
    new_paths = [new_path_train_1, new_path_train_2, new_path_test_1, new_path_test_2]
    for raw_root, img_raw, new_path in zip(raw_roots, img_raws, new_paths):
        n = 0
        for i in range(len(img_raw)):
            try:
                img = Image.open(raw_root + img_raw[i])
            except:
                print('a file error, continue')
                continue
            else:
                img_train = find_face(raw_root + img_raw[i])
                if img_train == None:
                    continue
                else:
                    # img_train.save(new_path + '%d.JPG'%n)
                    # print(raw_root + img_raw[i])
                    n += 1
        print('在%d张图片中,共找到%d张脸' % (len(img_raw), n))
#############################################################################################
import torch
import torchvision
import torch.nn as nn
from torch.autograd import Variable
from torchvision import datasets, transforms
from torch.utils.data import DataLoader
import cv2   #opencv库,用于图片可视化
import numpy as np
import os
from utils import draw_result
from network import SiameNetwork
from get_face import find_face
if __name__ == '__main__':  # 主函数入口
    # 设置参数
    #############################################################################################
    path = 'E:/Table/学习数据集/find_iu/result/'    # 存放和生成结果的路径标志
    epochs = 20       #训练周期
    BATCH_SIZE = 16    #批量样本大小
    NUM_WORKERS = 0
    #############################################################################################
    # 数据处理
    #############################################################################################
    data_transform = transforms.Compose([
        # transforms.Grayscale(num_output_channels=1),  # 彩色图像转灰度图像num_output_channels默认1
        transforms.Resize(112),
        transforms.CenterCrop((112, 92)),  # 中心裁剪为112*92
        transforms.ToTensor(),
        transforms.Normalize(mean=[0.5, 0.5, 0.5], std=[0.5, 0.5, 0.5])
        # transforms.Normalize(mean=0.5, std=0.5)
    ])
    train_dataset = datasets.ImageFolder(root = r'E:/Table/学习数据集/find_iu/data/processed/train',
                                         transform = data_transform)
    test_dataset = datasets.ImageFolder(root = r'E:/Table/学习数据集/find_iu/data/processed/test',
                                         transform = data_transform)
    train_loader = DataLoader(train_dataset, batch_size=BATCH_SIZE, shuffle=True, num_workers=NUM_WORKERS)
    test_loader = DataLoader(test_dataset, batch_size=BATCH_SIZE, shuffle=True, num_workers=NUM_WORKERS)
    image, labels = next(iter(train_loader))       #数据可视化
    img = torchvision.utils.make_grid(image, nrow = 10)
    img = img.numpy().transpose(1, 2, 0)
    cv2.imshow('img', img)    #展示图像
    cv2.waitKey(0)  #按下任一按键后开始工作
    print("data ready!")
    #############################################################################################
    #配置设备、损失函数和优化器
    #############################################################################################
    device = torch.device('cuda')
    model = SiameNetwork().to(device)
    cost = torch.nn.CrossEntropyLoss()        #定义损失函数,使用交叉熵
    optimizer = torch.optim.Adam(model.parameters(), lr=0.0008, weight_decay=0.001)            #Adam优化器
    print("device ready!")
    #############################################################################################
    #训练过程,训练周期由epochs决定
    #############################################################################################
    draw_epoch = []   #记录训练阶段
    draw_loss = []    #记录训练损失,用于绘制
    draw_train_acc = []   #记录训练准确度,用于绘制
    draw_val_loss = []   #记录测试损失,用于绘制
    draw_val_acc = []  # 记录测试准确度,用于绘制
    for epoch in range(epochs):
        #训练过程
        sum_loss = 0.0
        sum_val_loss = 0.0
        train_correct = 0
        test_correct = 0
        for data in train_loader:
            inputs,labels = data
            inputs,labels = Variable(inputs).cuda(),Variable(labels).cuda()
            optimizer.zero_grad()        #将上一batch梯度清零
            outputs = model(inputs)
            loss = cost(outputs, labels)
            loss.backward()             #反向传播
            optimizer.step()
            _, id = torch.max(outputs.data, 1)
            sum_loss += loss.data
            train_correct += torch.sum(id == labels.data)
        for data in test_loader:              # 模型测试
            inputs,labels = data
            inputs,labels = Variable(inputs).cuda(),Variable(labels).cuda()
            outputs = model(inputs)
            val_loss = cost(outputs, labels)
            _,id = torch.max(outputs.data, 1)
            sum_val_loss += val_loss.data
            test_correct += torch.sum(id == labels.data)
        print('[%d,%d] train loss:%.03f      train acc:%.03f%%'
              %(epoch + 1, epochs, sum_loss / len(train_loader), (100 * train_correct / len(train_dataset))))
        print('        val loss:%.03f        val acc:%.03f%%'
              %(sum_val_loss / len(test_loader), (100 * test_correct / len(test_dataset))))
        draw_epoch.append(epoch+1)       # 用于后续画图的数据
        draw_loss.append(sum_loss / len(train_loader))
        draw_train_acc.append(100 * train_correct / len(train_dataset))
        draw_val_loss.append(sum_val_loss / len(test_loader))
        draw_val_acc.append(100 * test_correct / len(test_dataset))
        np.savetxt('%s/train_loss.txt'%(path), draw_loss, fmt="%.3f")        # 保存损失数据
        np.savetxt('%s/train_acc.txt'%(path), draw_train_acc, fmt="%.3f")  # 保存准确率数据
        np.savetxt('%s/val_loss.txt'%(path), draw_val_loss, fmt="%.3f")     # 保存损失数据
        np.savetxt('%s/val_acc.txt'%(path), draw_val_acc, fmt="%.3f")  # 保存准确率数据
    print("train ready!")
    #############################################################################################
    #数据可视化
    #############################################################################################
    draw_result(draw_epoch, path)   # 绘图函数
    print("draw ready!")
    #############################################################################################
    #模型的存储和载入
    #############################################################################################
    torch.save(model.state_dict(), "parameter.pkl") #save
    print("save ready!")
    #############################################################################################
import re
import requests
from urllib import error
from bs4 import BeautifulSoup
import os
import torch
from torch.autograd import Variable
from torchvision import datasets, transforms
from torch.utils.data import DataLoader
from network import SiameNetwork
from utils import cv_imread
import cv2
from PIL import Image
import shutil
from get_face import find_face
# 设置参数
#############################################################################################
GET_PIC = 0    # 1 执行这步,0 不执行
GET_FACE = 0
GET_IU = 1
#############################################################################################
num = 0
numPicture = 0
file = ''
List = []
# 爬虫所用函数
#############################################################################################
def Find(url, A):
    global List
    print('正在检测图片总数,请稍等.....')
    t = 0
    i = 1
    s = 0
    while t < 1000:
        Url = url + str(t)
        try:
            # 这里搞了下
            Result = A.get(Url, timeout=7, allow_redirects=False)
        except BaseException:
            t = t + 60
            continue
        else:
            result = Result.text
            pic_url = re.findall('"objURL":"(.*?)",', result, re.S)  # 先利用正则表达式找到图片url
            s += len(pic_url)
            if len(pic_url) == 0:
                break
            else:
                List.append(pic_url)
                t = t + 60
    return s
def recommend(url):
    Re = []
    try:
        html = requests.get(url, allow_redirects=False)
    except error.HTTPError as e:
        return
    else:
        html.encoding = 'utf-8'
        bsObj = BeautifulSoup(html.text, 'html.parser')
        div = bsObj.find('div', id='topRS')
        if div is not None:
            listA = div.findAll('a')
            for i in listA:
                if i is not None:
                    Re.append(i.get_text())
        return Re
def dowmloadPicture(html, keyword):
    global num
    # t =0
    pic_url = re.findall('"objURL":"(.*?)",', html, re.S)  # 先利用正则表达式找到图片url
    print('找到关键词:' + keyword + '的图片,即将开始下载图片...')
    for each in pic_url:
        print('正在下载第' + str(num + 1) + '张图片,图片地址:' + str(each))
        try:
            if each is not None:
                pic = requests.get(each, timeout=7)
            else:
                continue
        except BaseException:
            print('错误,当前图片无法下载')
            continue
        else:
            string = file + r'\\' + keyword + '_' + str(num) + '.jpg'
            fp = open(string, 'wb')
            fp.write(pic.content)
            fp.close()
            num += 1
        if num >= numPicture:
            return
#############################################################################################
if __name__ == '__main__':  # 主函数入口
    # 爬虫部分,存放到 name + ‘文件'
    #############################################################################################
    if GET_PIC == 1:
        headers = {
            'Accept-Language': 'zh-CN,zh;q=0.8,zh-TW;q=0.7,zh-HK;q=0.5,en-US;q=0.3,en;q=0.2',
            'Connection': 'keep-alive',
            'User-Agent': 'Mozilla/5.0 (X11; Linux x86_64; rv:60.0) Gecko/20100101 Firefox/60.0',
            'Upgrade-Insecure-Requests': '1'
        }
        A = requests.Session()
        A.headers = headers
        tm = int(input('请输入每类图片的下载数量 '))
        numPicture = tm
        line_list = []
        with open('./name.txt', encoding='utf-8') as file:
            line_list = [k.strip() for k in file.readlines()]  # 用 strip()移除末尾的空格
        for word in line_list:
            url = 'https://image.baidu.com/search/flip?tn=baiduimage&ie=utf-8&word=' + word + '&pn='
            tot = Find(url, A)
            Recommend = recommend(url)  # 记录相关推荐
            print('经过检测%s类图片共有%d张' % (word, tot))
            file = word + '文件'
            y = os.path.exists(file)
            if y == 1:
                print('该文件已存在,无需创建')
            else:
                os.mkdir(file)
            t = 0
            tmp = url
            while t < numPicture:
                try:
                    url = tmp + str(t)
                    # result = requests.get(url, timeout=10)
                    # 这里搞了下
                    result = A.get(url, timeout=10, allow_redirects=False)
                    print(url)
                except error.HTTPError as e:
                    print('网络错误,请调整网络后重试')
                    t = t + 60
                else:
                    dowmloadPicture(result.text, word)
                    t = t + 60
            numPicture = numPicture + tm
        print('当前搜索结束,开始提取人脸')
    #############################################################################################
    # 将训练集和测试集中的raw图片处理,提取出人脸图片,从file+'文件'到‘待分辨人脸'
    ############################################################################################
    if GET_FACE == 1:
        if GET_PIC == 0:
            file = '韩国女艺人文件'
        raw_root = 'E:/Table/学习数据集/find_iu/'+ file + '/'
        img_raw = os.listdir(raw_root)
        new_path = 'E:/Table/学习数据集/find_iu/待分辨人脸/'
        n = 0
        for i in range(len(img_raw)):
            try:
                img = Image.open(raw_root + img_raw[i])
            except:
                print('a file error, continue')
                continue
            else:
                img_train = find_face(raw_root + img_raw[i])
                if img_train == None:
                    continue
                else:
                    img_train.save(new_path + '%d.JPG' % n)
                    print(raw_root + img_raw[i])
                    n += 1
        print('在%d张图片中,共找到%d张脸' % (len(img_raw), n))
        print('提取人脸结束,开始寻找IU')
    #############################################################################################
    # 开始判别,从'待分辨人脸‘中找出IU存放到'IU_pic‘
    #############################################################################################
    if GET_IU == 1:
        data_transform = transforms.Compose([
            # transforms.Grayscale(num_output_channels=1),  # 彩色图像转灰度图像num_output_channels默认1
            transforms.Resize(112),
            transforms.CenterCrop((112, 92)),  # 中心裁剪为112*92
            transforms.ToTensor(),
            transforms.Normalize(mean=[0.5, 0.5, 0.5],std=[0.5, 0.5, 0.5])
            # transforms.Normalize(mean=0.5, std=0.5)
        ])
        device = torch.device('cuda')
        model = SiameNetwork().to(device)
        model.load_state_dict(torch.load('parameter.pkl'))  # load
        model.eval()
        judge_root = 'E:/Table/学习数据集/find_iu/待分辨人脸/'
        img_judge = os.listdir(judge_root)
        new_path = 'E:/Table/学习数据集/find_iu/IU_pic/'
        result = []
        n = 0
        for i in range(len(img_judge)):
            try:
                img = Image.open(judge_root + img_judge[i])
            except:
                print('a file error, continue')
                continue
            else:
                img = img.convert('RGB')
                print(judge_root + img_judge[i])
                input = data_transform(img)
                input = input.unsqueeze(0)  # 这里经过转换后输出的input格式是[C,H,W],网络输入还需要增加一维批量大小B
                # 增加一维,输出的img格式为[1,C,H,W]
                input = Variable(input.cuda())
                output = model(input)  # 将图片输入网络得到输出
                _, id = torch.max(output.data, 1)   # 0是IU,1是其他
                if id.item() == 0:
                    shutil.copy(judge_root + img_judge[i], new_path)
                    n += 1
        print('/n在%d张图片中,共找到%d张IU的图片'%(len(img_judge), n))
    #############################################################################################
import os
raw_train_root_1 = 'E:/Table/学习数据集/find_iu/data/raw/train/IU/'
raw_train_root_2 = 'E:/Table/学习数据集/find_iu/data/raw/train/Other/'
raw_test_root_1 = 'E:/Table/学习数据集/find_iu/data/raw/test/IU/'
raw_test_root_2 = 'E:/Table/学习数据集/find_iu/data/raw/test/Other/'
raw_roots = [raw_train_root_1, raw_train_root_2, raw_test_root_1, raw_test_root_2]
for path in raw_roots:
    # 获取该目录下所有文件,存入列表中
    fileList = os.listdir(path)
    n = 0
    for i in fileList:
        # 设置旧文件名(就是路径+文件名)
        oldname = path + os.sep + fileList[n]  # os.sep添加系统分隔符
        # 设置新文件名
        newname = path + os.sep + str(n) + '.JPG'
        os.rename(oldname, newname)  # 用os模块中的rename方法对文件改名
        print(oldname, '======>', newname)
        n += 1
import torch
import torch.nn as nn
class SiameNetwork(nn.Module):
    def __init__(self):
        super(SiameNetwork, self).__init__()
        # input: h=112, w=92
        self.conv1 = torch.nn.Sequential(
            torch.nn.Conv2d(in_channels=3,  # 输入单通道
                            out_channels=16,  # 16个3*3卷积核
                            kernel_size=3,  # 卷积核尺寸
                            stride=2,  # 卷积核滑动步长, 1的话图片大小不变,2的话会大小会变为(h/2)*(w/2)
                            padding=1),  # 边缘填充大小,如果要保持原大小,kernel_size//2
            torch.nn.BatchNorm2d(16),  # 标准化,前面卷积后有16个图层
            torch.nn.ReLU()  # 激活函数
        )  # output: h=56, w=46
        self.conv2 = torch.nn.Sequential(
            torch.nn.Conv2d(16, 32, 3, 2, 1),
            torch.nn.BatchNorm2d(32),
            torch.nn.ReLU()
        )  # output: h=28, w=23
        self.conv3 = torch.nn.Sequential(
            torch.nn.Conv2d(32, 64, 3, 2, 1),
            torch.nn.BatchNorm2d(64),
            torch.nn.ReLU()
        )  # output: h=14, w=12
        self.conv4 = torch.nn.Sequential(
            torch.nn.Conv2d(64, 64, 2, 2, 0),
            torch.nn.BatchNorm2d(64),
            torch.nn.ReLU()
        )  # output: h=7, w=6
        self.mlp1 = torch.nn.Linear(7 * 6 * 64, 100)  # 需要计算conv4的输出尺寸,每次卷积的输出尺寸(size - kernal + 2*padding)/stride + 1
        self.mlp2 = torch.nn.Linear(100, 10)
    def forward(self, x):
        x = self.conv1(x)
        x = self.conv2(x)
        x = self.conv3(x)
        x = self.conv4(x)
        x = self.mlp1(x.view(x.size(0), -1))  # view展平
        x = self.mlp2(x)
        return x
import matplotlib as mpl
import matplotlib.pyplot as plt
import numpy as np
import cv2
# 绘制训练、测试的损失、准确度
#############################################################################################
def draw_result(draw_epoch, path):
    show_loss = np.loadtxt('%s/train_loss.txt' % (path))   # 读取txt文件,不同优化器的损失
    show_train_acc = np.loadtxt('%s/train_acc.txt' % (path))  # 读取不同模型的准确度
    show_val_loss = np.loadtxt('%s/val_loss.txt' % (path))  # 读取txt文件,不同优化器的损失
    show_val_acc = np.loadtxt('%s/val_acc.txt' % (path))  # 读取不同模型的准确度
    mpl.rc('font',family='Times New Roman', weight='semibold', size=9)  # 设置matplotlib中所有绘图风格的设置
    font1 = {'weight' : 'semibold', 'size' : 11}  #设置文字风格
    fig = plt.figure(figsize = (7,5))    #figsize是图片的大小`
    ax1 = fig.add_subplot(2, 2, 1)       # ax1是子图的名字
    ax1.plot(draw_epoch, show_loss,color = 'red', label = u'AdaPID', linewidth =1.0)
    ax1.legend()   #显示图例
    ax1.set_title('Training Loss', font1)
    ax1.set_xlabel(u'Epoch', font1)
    ax2 = fig.add_subplot(2, 2, 2)
    ax2.plot(draw_epoch, show_val_loss,color = 'red', label = u'Adam', linewidth =1.0)
    ax2.legend()   #显示图例
    ax2.set_title('Validation Loss', font1)
    ax2.set_xlabel(u'Epoch', font1)
    ax3 = fig.add_subplot(2, 2, 3)
    ax3.plot(draw_epoch, show_train_acc,color = 'red', label = u'Adam', linewidth =1.0)
    ax3.legend()   #显示图例
    ax3.set_title('Training Accuracy', font1)
    ax3.set_xlabel(u'Epoch', font1)
    ax4 = fig.add_subplot(2, 2, 4)
    ax4.plot(draw_epoch, show_val_acc,color = 'red', label = u'Adam', linewidth =1.0)
    ax4.legend()   #显示图例
    ax4.set_title('Validation Accuracy', font1)
    ax4.set_xlabel(u'Epoch', font1)
    plt.subplots_adjust(left=None, bottom=None, right=None, top=None, wspace=None, hspace=0.45) # hspace为子图上下间距
    plt.savefig('%s/show_curve.jpg' % (path), dpi=300)
#############################################################################################
# 用于解决cv.imread不能读取中文路径的问题
#############################################################################################
def cv_imread(filePath):
    # 核心就是下面这句,一般直接用这句就行,直接把图片转为mat数据
    cv_img = cv2.imdecode(np.fromfile(filePath, dtype=np.uint8), -1)
    # imdecode读取的是rgb,如果后续需要opencv处理的话,需要转换成bgr,转换后图片颜色会变化
    # cv_img=cv2.cvtColor(cv_img,cv2.COLOR_RGB2BGR)
    return cv_img
#############################################################################################
总结
总体而言,这是一个新人的兴趣之作,但是限于GPU性能无法使用太复杂的网络,最后识别的效果不佳,若读者有兴趣,也可以去替换一下网络,改善一下数据集,尝试提升识别性能。更多相关人脸识别内容请搜索以前的文章或继续浏览下面的相关文章,希望大家以后多多支持!

