《潜水艇大挑战》是抖音上的一款小游戏,以面部识别来驱动潜艇通过障碍物,最近特别火爆,相信很多人都玩过。

一时兴起自己用Android自定义View也撸了一个,发现只要有好的创意,不用高深的技术照样可以开发出好玩的应用。开发过程现拿出来与大家分享一下。
项目地址:
https://github.com/vitaviva/ugame
基本思路
整个游戏视图可以分成三层:
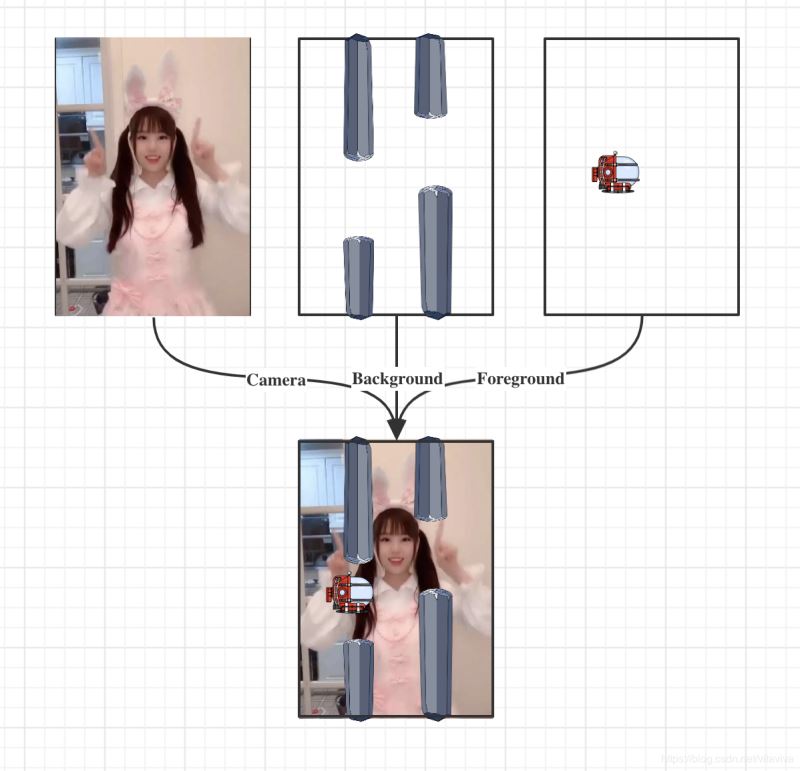
代码也是按上面三个层面组织的,游戏界面的布局可以简单理解为三层视图的叠加,然后在各层视图中完成相关工作
<FrameLayout xmlns:android="http://schemas.android.com/apk/res/android"
 xmlns:tools="http://schemas.android.com/tools"
 android:layout_width="match_parent"
 android:layout_height="match_parent">

 <!-- 相机 -->
 <TextureView
 android:layout_width="match_parent"
 android:layout_height="match_parent"/>

 <!-- 后景 -->
 <com.my.ugame.bg.BackgroundView
 android:layout_width="match_parent"
 android:layout_height="match_parent"/>

 <!-- 前景 -->
 <com.my.ugame.fg.ForegroundView
 android:layout_width="match_parent"
 android:layout_height="match_parent"/>

</Framelayout>
开发中会涉及以下技术的使用,没有高精尖、都是大路货:
少啰嗦,先看东西!下面介绍各部分代码的实现。
后景(Background)Bar
首先定义障碍物基类Bar,主要负责是将bitmap资源绘制到指定区域。由于障碍物从屏幕右侧定时刷新时的高度随机,所以其绘制区域的x、y、w、h需要动态设置
/**
 * 障碍物基类
 */
sealed class Bar(context: Context) {

 protected open val bmp = context.getDrawable(R.mipmap.bar)!!.toBitmap()

 protected abstract val srcRect: Rect

 private lateinit var dstRect: Rect

 private val paint = Paint()

 var h = 0F
 set(value) {
  field = value
  dstRect = Rect(0, 0, w.toInt(), h.toInt())
 }

 var w = 0F
 set(value) {
  field = value
  dstRect = Rect(0, 0, w.toInt(), h.toInt())
 }

 var x = 0F
 set(value) {
  view.x = value
  field = value
 }

 val y
 get() = view.y

 internal val view by lazy {
 BarView(context) {
  it?.apply {
  drawBitmap(
   bmp,
   srcRect,
   dstRect,
   paint
  )
  }
 }
 }

}

internal class BarView(context: Context?, private val block: (Canvas?) -> Unit) :
 View(context) {

 override fun onDraw(canvas: Canvas?) {
 block((canvas))
 }
}
障碍物分为上方和下方两种,由于使用了同一张资源,所以绘制时要区别对待,因此定义了两个子类:UpBar和DnBar
/**
 * 屏幕上方障碍物
 */
class UpBar(context: Context, container: ViewGroup) : Bar(context) {

 private val _srcRect by lazy(LazyThreadSafetyMode.NONE) {
 Rect(0, (bmp.height * (1 - (h / container.height))).toInt(), bmp.width, bmp.height)
 }
 override val srcRect: Rect
 get() = _srcRect
}
下方障碍物的资源旋转180度后绘制
/**
 * 屏幕下方障碍物
 */
class DnBar(context: Context, container: ViewGroup) : Bar(context) {

 override val bmp = super.bmp.let {
 Bitmap.createBitmap(
  it, 0, 0, it.width, it.height,
  Matrix().apply { postRotate(-180F) }, true
 )
 }

 private val _srcRect by lazy(LazyThreadSafetyMode.NONE) {
 Rect(0, 0, bmp.width, (bmp.height * (h / container.height)).toInt())
 }

 override val srcRect: Rect
 get() = _srcRect
}
BackgroundView
接下来创建后景的容器BackgroundView,容器用来定时地创建、并移动障碍物。
通过列表barsList管理当前所有的障碍物,onLayout中,将障碍物分别布局到屏幕上方和下方
/**
 * 后景容器类
 */
class BackgroundView(context: Context, attrs: AttributeSet?) : FrameLayout(context, attrs) {

 internal val barsList = mutableListOf<Bars>()

 override fun onLayout(changed: Boolean, left: Int, top: Int, right: Int, bottom: Int) {
 barsList.flatMap { listOf(it.up, it.down) }.forEach {
  val w = it.view.measuredWidth
  val h = it.view.measuredHeight
  when (it) {
  is UpBar -> it.view.layout(0, 0, w, h)
  else -> it.view.layout(0, height - h, w, height)
  }
 }
 }
提供两个方法start和stop,控制游戏的开始和结束:
Timer,定时刷新障碍物
/**
 * 游戏结束,停止所有障碍物的移动
 */
 @UiThread
 fun stop() {
 _timer.cancel()
 _anims.forEach { it.cancel() }
 _anims.clear()
 }

 /**
 * 定时刷新障碍物:
 * 1. 创建
 * 2. 添加到视图
 * 3. 移动
 */
 @UiThread
 fun start() {
 _clearBars()
 Timer().also { _timer = it }.schedule(object : TimerTask() {
  override fun run() {
  post {
   _createBars(context, barsList.lastOrNull()).let {
   _addBars(it)
   _moveBars(it)
   }
  }
  }

 }, FIRST_APPEAR_DELAY_MILLIS, BAR_APPEAR_INTERVAL_MILLIS
 )
 }

 /**
 * 游戏重启时,清空障碍物
 */
 private fun _clearBars() {
 barsList.clear()
 removeAllViews()
 }
刷新障碍物
障碍物的刷新经历三个步骤:
创建障碍物时会为其设置随机高度,随机不能太过,要以前一个障碍物为基础进行适当调整,保证随机的同时兼具连贯性
 /**
 * 创建障碍物(上下两个为一组)
 */
 private fun _createBars(context: Context, pre: Bars?) = run {
 val up = UpBar(context, this).apply {
  h = pre?.let {
  val step = when {
   it.up.h >= height - _gap - _step -> -_step
   it.up.h <= _step -> _step
   _random.nextBoolean() -> _step
   else -> -_step
  }
  it.up.h + step
  } ?: _barHeight
  w = _barWidth
 }

 val down = DnBar(context, this).apply {
  h = height - up.h - _gap
  w = _barWidth
 }

 Bars(up, down)

 }

 /**
 * 添加到屏幕
 */
 private fun _addBars(bars: Bars) {
 barsList.add(bars)
 bars.asArray().forEach {
  addView(
  it.view,
  ViewGroup.LayoutParams(
   it.w.toInt(),
   it.h.toInt()
  )
  )
 }
 }

 /**
 * 使用属性动画移动障碍物
 */
 private fun _moveBars(bars: Bars) {
 _anims.add(
  ValueAnimator.ofFloat(width.toFloat(), -_barWidth)
  .apply {
   addUpdateListener {
   bars.asArray().forEach { bar ->
    bar.x = it.animatedValue as Float
    if (bar.x + bar.w <= 0) {
    post { removeView(bar.view) }
    }
   }
   }

   duration = BAR_MOVE_DURATION_MILLIS
   interpolator = LinearInterpolator()
   start()
  })
 }

}
前景(Foreground)
Boat
定会潜艇类Boat,创建自定义View,并提供方法移动到指定坐标
/**
 * 潜艇类
 */
class Boat(context: Context) {

 internal val view by lazy { BoatView(context) }

 val h
 get() = view.height.toFloat()

 val w
 get() = view.width.toFloat()

 val x
 get() = view.x

 val y
 get() = view.y

 /**
 * 移动到指定坐标
 */
 fun moveTo(x: Int, y: Int) {
 view.smoothMoveTo(x, y)
 }

}
BoatView
自定义View中完成以下几个事情
internal class BoatView(context: Context?) : AppCompatImageView(context) {

 private val _scroller by lazy { OverScroller(context) }

 private val _res = arrayOf(
 R.mipmap.boat_000,
 R.mipmap.boat_002
 )

 private var _rotationAnimator: ObjectAnimator? = null

 private var _cnt = 0
 set(value) {
  field = if (value > 1) 0 else value
 }

 init {
 scaleType = ScaleType.FIT_CENTER
 _startFlashing()
 }

 private fun _startFlashing() {
 postDelayed({
  setImageResource(_res[_cnt++])
  _startFlashing()
 }, 500)
 }

 override fun computeScroll() {
 super.computeScroll()

 if (_scroller.computeScrollOffset()) {

  x = _scroller.currX.toFloat()
  y = _scroller.currY.toFloat()

  // Keep on drawing until the animation has finished.
  postInvalidateOnAnimation()
 }

 }

 /**
 * 移动更加顺换
 */
 internal fun smoothMoveTo(x: Int, y: Int) {
 if (!_scroller.isFinished) _scroller.abortAnimation()
 _rotationAnimator?.let { if (it.isRunning) it.cancel() }

 val curX = this.x.toInt()
 val curY = this.y.toInt()

 val dx = (x - curX)
 val dy = (y - curY)
 _scroller.startScroll(curX, curY, dx, dy, 250)

 _rotationAnimator = ObjectAnimator.ofFloat(
  this,
  "rotation",
  rotation,
  Math.toDegrees(atan((dy / 100.toDouble()))).toFloat()
 ).apply {
  duration = 100
  start()
 }

 postInvalidateOnAnimation()
 }
}
ForegroundView
/**
 * 前景容器类
 */
class ForegroundView(context: Context, attrs: AttributeSet?) : FrameLayout(context, attrs),
 CameraHelper.FaceDetectListener {

 private var _isStop: Boolean = false

 internal var boat: Boat? = null

 /**
 * 游戏停止,潜艇不再移动
 */
 @MainThread
 fun stop() {
 _isStop = true
 }

 /**
 * 接受人脸识别的回调,移动位置
 */
 override fun onFaceDetect(faces: Array<Face>, facesRect: ArrayList<RectF>) {
 if (_isStop) return
 if (facesRect.isNotEmpty()) {
  boat?.run {
  val face = facesRect.first()
  val x = (face.left - _widthOffset).toInt()
  val y = (face.top + _heightOffset).toInt()
  moveTo(x, y)
  }
  _face = facesRect.first()
 }
 }

}
开场动画
游戏开始时,将潜艇通过动画移动到起始位置,即y轴的二分之一处
 /**
 * 游戏开始时通过动画进入
 */
 @MainThread
 fun start() {
 _isStop = false
 if (boat == null) {
  boat = Boat(context).also {
  post {
   addView(it.view, _width, _width)
   AnimatorSet().apply {
   play(
    ObjectAnimator.ofFloat(
    it.view,
    "y",
    0F,
    this@ForegroundView.height / 2f
    )
   ).with(
    ObjectAnimator.ofFloat(it.view, "rotation", 0F, 360F)
   )
   doOnEnd { _ -> it.view.rotation = 0F }
   duration = 1000
   }.start()
  }
  }
 }
 }
相机(Camera)
相机部分主要有TextureView和CameraHelper组成。TextureView提供给Camera承载preview;工具类CameraHelper主要完成以下功能:
相机硬件提供的可预览尺寸与屏幕实际尺寸(即TextureView尺寸)可能不一致,所以需要在相机初始化时,选取最合适的PreviewSize,避免TextureView上发生画面拉伸等异常
class CameraHelper(val mActivity: Activity, private val mTextureView: TextureView) {

 private lateinit var mCameraManager: CameraManager
 private var mCameraDevice: CameraDevice? = null
 private var mCameraCaptureSession: CameraCaptureSession? = null

 private var canExchangeCamera = false      //是否可以切换摄像头
 private var mFaceDetectMatrix = Matrix()      //人脸检测坐标转换矩阵
 private var mFacesRect = ArrayList<RectF>()      //保存人脸坐标信息
 private var mFaceDetectListener: FaceDetectListener? = null    //人脸检测回调
 private lateinit var mPreviewSize: Size

 /**
 * 初始化
 */
 private fun initCameraInfo() {
 mCameraManager = mActivity.getSystemService(Context.CAMERA_SERVICE) as CameraManager
 val cameraIdList = mCameraManager.cameraIdList
 if (cameraIdList.isEmpty()) {
  mActivity.toast("没有可用相机")
  return
 }

 //获取摄像头方向
 mCameraSensorOrientation =
  mCameraCharacteristics.get(CameraCharacteristics.SENSOR_ORIENTATION)!!
 //获取StreamConfigurationMap,它是管理摄像头支持的所有输出格式和尺寸
 val configurationMap =
  mCameraCharacteristics.get(CameraCharacteristics.SCALER_STREAM_CONFIGURATION_MAP)!!

 val previewSize = configurationMap.getOutputSizes(SurfaceTexture::class.java) //预览尺寸

 // 当屏幕为垂直的时候需要把宽高值进行调换,保证宽大于高
 mPreviewSize = getBestSize(
  mTextureView.height,
  mTextureView.width,
  previewSize.toList()
 )

 //根据preview的size设置TextureView
 mTextureView.surfaceTexture.setDefaultBufferSize(mPreviewSize.width, mPreviewSize.height)
 mTextureView.setAspectRatio(mPreviewSize.height, mPreviewSize.width)
 }
选取preview尺寸的原则与TextureView的长宽比尽量一致,且面积尽量接近。
private fun getBestSize(
 targetWidth: Int,
 targetHeight: Int,
 sizeList: List<Size>
 ): Size {
 val bigEnough = ArrayList<Size>() //比指定宽高大的Size列表
 val notBigEnough = ArrayList<Size>() //比指定宽高小的Size列表

 for (size in sizeList) {

  //宽高比 == 目标值宽高比
  if (size.width == size.height * targetWidth / targetHeight
  ) {
  if (size.width >= targetWidth && size.height >= targetHeight)
   bigEnough.add(size)
  else
   notBigEnough.add(size)
  }
 }

 //选择bigEnough中最小的值 或 notBigEnough中最大的值
 return when {
  bigEnough.size > 0 -> Collections.min(bigEnough, CompareSizesByArea())
  notBigEnough.size > 0 -> Collections.max(notBigEnough, CompareSizesByArea())
  else -> sizeList[0]
 }

		initFaceDetect()
 }
initFaceDetect()用来进行人脸的Matrix初始化,后文介绍
人脸识别
为相机预览,创建一个CameraCaptureSession对象,会话通过CameraCaptureSession.CaptureCallback返回TotalCaptureResult,通过参数可以让其中包括人脸识别的相关信息
 /**
 * 创建预览会话
 */
 private fun createCaptureSession(cameraDevice: CameraDevice) {

 // 为相机预览,创建一个CameraCaptureSession对象
 cameraDevice.createCaptureSession(
  arrayListOf(surface),
  object : CameraCaptureSession.StateCallback() {

  override fun onConfigured(session: CameraCaptureSession) {
   mCameraCaptureSession = session
   session.setRepeatingRequest(
   captureRequestBuilder.build(),
   mCaptureCallBack,
   mCameraHandler
   )
  }

  },
  mCameraHandler
 )
 }

 private val mCaptureCallBack = object : CameraCaptureSession.CaptureCallback() {
 override fun onCaptureCompleted(
  session: CameraCaptureSession,
  request: CaptureRequest,
  result: TotalCaptureResult
 ) {
  super.onCaptureCompleted(session, request, result)
  if (mFaceDetectMode != CaptureRequest.STATISTICS_FACE_DETECT_MODE_OFF)
  handleFaces(result)

 }
 }
通过mFaceDetectMatrix对人脸信息进行矩阵变化,确定人脸坐标以使其准确应用到TextureView。
 /**
 * 处理人脸信息
 */
 private fun handleFaces(result: TotalCaptureResult) {
 val faces = result.get(CaptureResult.STATISTICS_FACES)!!
 mFacesRect.clear()

 for (face in faces) {
  val bounds = face.bounds

  val left = bounds.left
  val top = bounds.top
  val right = bounds.right
  val bottom = bounds.bottom

  val rawFaceRect =
  RectF(left.toFloat(), top.toFloat(), right.toFloat(), bottom.toFloat())
  mFaceDetectMatrix.mapRect(rawFaceRect)

  var resultFaceRect = if (mCameraFacing == CaptureRequest.LENS_FACING_FRONT) {
  rawFaceRect
  } else {
  RectF(
   rawFaceRect.left,
   rawFaceRect.top - mPreviewSize.width,
   rawFaceRect.right,
   rawFaceRect.bottom - mPreviewSize.width
  )
  }

  mFacesRect.add(resultFaceRect)

 }

 		mActivity.runOnUiThread {
  mFaceDetectListener?.onFaceDetect(faces, mFacesRect)
 }
 }
最后,在UI线程将包含人脸坐标的Rect通过回调传出:
mActivity.runOnUiThread {
 mFaceDetectListener?.onFaceDetect(faces, mFacesRect)
 }
FaceDetectMatrix
mFaceDetectMatrix是在获取PreviewSize之后创建的
 /**
 * 初始化人脸检测相关信息
 */
 private fun initFaceDetect() {

 val faceDetectModes =
  mCameraCharacteristics.get(CameraCharacteristics.STATISTICS_INFO_AVAILABLE_FACE_DETECT_MODES) //人脸检测的模式

 mFaceDetectMode = when {
  faceDetectModes!!.contains(CaptureRequest.STATISTICS_FACE_DETECT_MODE_FULL) -> CaptureRequest.STATISTICS_FACE_DETECT_MODE_FULL
  faceDetectModes!!.contains(CaptureRequest.STATISTICS_FACE_DETECT_MODE_SIMPLE) -> CaptureRequest.STATISTICS_FACE_DETECT_MODE_FULL
  else -> CaptureRequest.STATISTICS_FACE_DETECT_MODE_OFF
 }

 if (mFaceDetectMode == CaptureRequest.STATISTICS_FACE_DETECT_MODE_OFF) {
  mActivity.toast("相机硬件不支持人脸检测")
  return
 }

 val activeArraySizeRect =
  mCameraCharacteristics.get(CameraCharacteristics.SENSOR_INFO_ACTIVE_ARRAY_SIZE)!! //获取成像区域
 val scaledWidth = mPreviewSize.width / activeArraySizeRect.width().toFloat()
 val scaledHeight = mPreviewSize.height / activeArraySizeRect.height().toFloat()

 val mirror = mCameraFacing == CameraCharacteristics.LENS_FACING_FRONT

 mFaceDetectMatrix.setRotate(mCameraSensorOrientation.toFloat())
 mFaceDetectMatrix.postScale(if (mirror) -scaledHeight else scaledHeight, scaledWidth)// 注意交换width和height的位置!
 mFaceDetectMatrix.postTranslate(
  mPreviewSize.height.toFloat(),
  mPreviewSize.width.toFloat()
 )

 }
控制类(GameController)
三大视图层组装完毕,最后需要一个总控类,对游戏进行逻辑控制
GameController
主要完成以下工作:
游戏开始时进行相机的初始化,创建GameHelper类并建立setFaceDetectListener回调到ForegroundView
class GameController(
 private val activity: AppCompatActivity,
 private val textureView: AutoFitTextureView,
 private val bg: BackgroundView,
 private val fg: ForegroundView
) {

 private var camera2HelperFace: CameraHelper? = null
 /**
 * 相机初始化
 */
 private fun initCamera() {
 cameraHelper ?: run {
  cameraHelper = CameraHelper(activity, textureView).apply {
  setFaceDetectListener(object : CameraHelper.FaceDetectListener {
   override fun onFaceDetect(faces: Array<Face>, facesRect: ArrayList<RectF>) {
   if (facesRect.isNotEmpty()) {
    fg.onFaceDetect(faces, facesRect)
   }
   }
  })
  }
 }
 }
游戏状态
定义GameState,对外提供状态的监听。目前支持三种状态
sealed class GameState(open val score: Long) {
 object Start : GameState(0)
 data class Over(override val score: Long) : GameState(score)
 data class Score(override val score: Long) : GameState(score)
}
可以在stop、start的时候,更新状态
/**
 * 游戏状态
 */
 private val _state = MutableLiveData<GameState>()
 internal val gameState: LiveData<GameState>
 get() = _state

 /**
 * 游戏停止
 */
 fun stop() {
 bg.stop()
 fg.stop()
 _state.value = GameState.Over(_score)
 _score = 0L
 }

 /**
 * 游戏再开
 */
 fun start() {
 initCamera()
 fg.start()
 bg.start()
 _state.value = GameState.Start
 handler.postDelayed({
  startScoring()
 }, FIRST_APPEAR_DELAY_MILLIS)
 }
计算得分
游戏启动时通过startScoring开始计算得分并通过GameState上报。
目前的规则设置很简单,存活时间即游戏得分
 /**
 * 开始计分
 */
 private fun startScoring() {
 handler.postDelayed(
  {
  fg.boat?.run {
   bg.barsList.flatMap { listOf(it.up, it.down) }
   .forEach { bar ->
    if (isCollision(
     bar.x, bar.y, bar.w, bar.h,
     this.x, this.y, this.w, this.h
    )
    ) {
    stop()
    return@postDelayed
    }
   }
  }
  _score++
  _state.value = GameState.Score(_score)
  startScoring()
  }, 100
 )
 }
检测碰撞
isCollision根据潜艇和障碍物当前位置,计算是否发生了碰撞,发生碰撞则GameOver
/**
 * 碰撞检测
 */
 private fun isCollision(
 x1: Float,
 y1: Float,
 w1: Float,
 h1: Float,
 x2: Float,
 y2: Float,
 w2: Float,
 h2: Float
 ): Boolean {
 if (x1 > x2 + w2 || x1 + w1 < x2 || y1 > y2 + h2 || y1 + h1 < y2) {
  return false
 }
 return true
 }
Activity
Activity的工作简单:
private fun startGame() {
 PermissionUtils.checkPermission(this, Runnable {
  gameController.start()
  gameController.gameState.observe(this, Observer {
  when (it) {
   is GameState.Start ->
   score.text = "DANGER\nAHEAD"
   is GameState.Score ->
   score.text = "${it.score / 10f} m"
   is GameState.Over ->
   AlertDialog.Builder(this)
    .setMessage("游戏结束!成功推进 ${it.score / 10f} 米! ")
    .setNegativeButton("结束游戏") { _: DialogInterface, _: Int ->
    finish()
    }.setCancelable(false)
    .setPositiveButton("再来一把") { _: DialogInterface, _: Int ->
    gameController.start()
    }.show()
  }
  })
 })
 }
最后

项目结构很清晰,用到的大都是常规技术,即使是新入坑Android的同学看起来也不费力。在现有基础上还可以通过添加BGM、增加障碍物种类等,进一步提高游戏性。喜欢的话留个star鼓励一下作者吧 ^^
https://github.com/vitaviva/ugame

