Spring Security是一个功能强大且高度可定制的身份验证和访问控制框架,Spring Security主要做两个事情,认证、授权。我之前写过一篇关于SpringSecurity的博客,但是当时只是介绍了基于mock数据的案例,本期就来介绍一下基于真实数据的认证授权实现。
为了更好的展示SpringSecurity,我们先搭建一个简单的web项目出来。引入thymeleaf依赖
<dependency>
    <groupId>org.springframework.boot</groupId>
    <artifactId>spring-boot-starter-thymeleaf</artifactId>
</dependency>
<dependency>
    <groupId>org.thymeleaf</groupId>
    <artifactId>thymeleaf-spring5</artifactId>
</dependency>
<dependency>
    <groupId>org.thymeleaf.extras</groupId>
    <artifactId>thymeleaf-extras-java8time</artifactId>
</dependency>
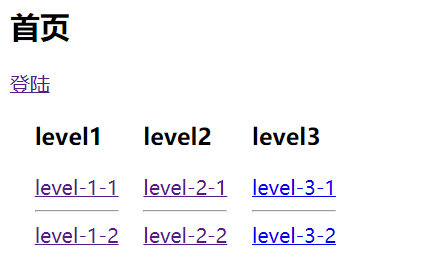
新建一个登陆页,一个首页,然后几个不同等级的展示页面:
login.html
<!DOCTYPE html>
<html lang="en">
<head>
    <meta charset="UTF-8">
    <title>登陆页</title>
</head>
<body>
<div>
    <form>
        <h2>登陆页</h2>
        <input type="text" id="username" placeholder="username">
        <input type="password" id="password" placeholder="password">
        <button type="button">登陆</button>
    </form>
</div>
</body>
</html>
index.html
<!DOCTYPE html>
<html lang="en">
<head>
    <meta charset="UTF-8">
    <title>首页</title>
</head>
<body>
<div>
    <h2>首页</h2>
    <a href="/login" rel="external nofollow" >登陆</a>
    <div style="overflow: hidden">
        <div style="float: left;margin-left: 20px">
            <h3>level1</h3>
            <a href="/level1/1" rel="external nofollow" >level-1-1</a>
            <hr>
            <a href="/level1/2" rel="external nofollow" >level-1-2</a>
        </div>
        <div style="float: left;margin-left: 20px">
            <h3>level2</h3>
            <a href="/level2/1" rel="external nofollow" >level-2-1</a>
            <hr>
            <a href="/level2/2" rel="external nofollow" >level-2-2</a>
        </div>
        <div style="float: left;margin-left: 20px">
            <h3>level3</h3>
            <a href="/level3/1" rel="external nofollow" >level-3-1</a>
            <hr>
            <a href="/level3/2" rel="external nofollow" >level-3-2</a>
        </div>
    </div>
</div>
</body>
</html>
另外还有几个不同等级的页面

分别在body中写上自己对应的编号。
<!DOCTYPE html>
<html lang="en">
<head>
    <meta charset="UTF-8">
    <title>Title</title>
</head>
<body>
level-1-1
</body>
</html>
最后编写一个controller来接收请求:
@Controller
public class RouteController {

    @RequestMapping({"/","/index"})
    public String index(){
        return "index";
    }

    @RequestMapping("/login")
    public String toLogin(){
        return "login";
    }

    @RequestMapping("/level1/{id}")
    public String level1(@PathVariable("id")String id){
        return "level1/"+id;
    }
    @RequestMapping("/level2/{id}")
    public String level2(@PathVariable("id")String id){
        return "level2/"+id;
    }
    @RequestMapping("/level3/{id}")
    public String level3(@PathVariable("id")String id){
        return "level3/"+id;
    }
}
最终的效果如下:
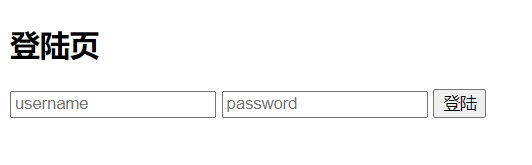
最终实现等级不同的level页面根据不同权限进行跳转。
后台基于Mybatis和Mysql数据库实现,因此我们除了引入SpringSecurity的依赖之外,还需要引入Mybatis相关依赖:
<dependency>
    <groupId>org.springframework.boot</groupId>
    <artifactId>spring-boot-starter-security</artifactId>
</dependency>
<dependency>
    <groupId>org.springframework.boot</groupId>
    <artifactId>spring-boot-starter-jdbc</artifactId>
</dependency>
<dependency>
    <groupId>mysql</groupId>
    <artifactId>mysql-connector-java</artifactId>
    <scope>runtime</scope>
</dependency>
<dependency>
    <groupId>org.mybatis.spring.boot</groupId>
    <artifactId>mybatis-spring-boot-starter</artifactId>
    <version>2.1.3</version>
</dependency>
在配置文件中添加数据源相关信息,以及Mybatis的配置:
spring.datasource.url=jdbc:mysql://localhost:3306/security?serverTimezone=UTC&useUnicode=true&characterEncoding=utf-8
spring.datasource.username=root
spring.datasource.password=123456
spring.datasource.driver-class-name=com.mysql.cj.jdbc.Driver

mybatis.mapper-locations=classpath:mapper/*.xml
3.1 表结构设计
认证和授权在表设计上应该分在两个表内,一个表存储用户信息包括密码等,另一个表存储授权信息,还需要一个表建立用户和授权之间的关联,给出最终的表结构:
CREATE TABLE `roles` (
  `id` int(4) NOT NULL,
  `rolename` varchar(255) DEFAULT NULL,
  PRIMARY KEY (`id`)
) ENGINE=InnoDB DEFAULT CHARSET=utf8mb4;

CREATE TABLE `sysuser` (
  `id` int(4) NOT NULL,
  `username` varchar(255) NOT NULL,
  `password` varchar(255) NOT NULL,
  PRIMARY KEY (`id`)
) ENGINE=InnoDB DEFAULT CHARSET=utf8mb4;

CREATE TABLE `user_role` (
  `id` int(4) NOT NULL,
  `user_id` int(4) DEFAULT NULL,
  `role_id` int(4) DEFAULT NULL,
  PRIMARY KEY (`id`)
) ENGINE=InnoDB DEFAULT CHARSET=utf8mb4;
接下来是针对这三张表的实体类,Mapper接口以及xml文件,你可以不看代码,主要实现一个通过用户名查找用户以及相关权限的操作:
@Data
public class Roles {
    private Integer id;
    private String roleName;
}

@Data
public class SysUser {
    private Integer id;
    private String userName;
    private String password;
    private List<Roles> roles;
}
Mapper接口:
public interface UserMapper {
    public SysUser getUserByUserName(@Param("userName") String userName);
}
xml实现:
<?xml version="1.0" encoding="UTF-8" ?>
<!DOCTYPE mapper PUBLIC "-//mybatis.org//DTD Mapper 3.0//EN" "http://mybatis.org/dtd/mybatis-3-mapper.dtd">
<mapper namespace="com.javayz.springsecurity.mapper.UserMapper">
    <resultMap id="userMap" type="com.javayz.springsecurity.entity.SysUser">
        <id property="id" column="ID"/>
        <result property="userName" column="username"/>
        <result property="password" column="password"/>
        <collection property="roles" ofType="com.javayz.springsecurity.entity.Roles">
            <result column="name" property="roleName"/>
        </collection>
    </resultMap>
    <select id="getUserByUserName" parameterType="String"  resultMap="userMap">
        select sysuser.*,roles.rolename
        from sysuser
        LEFT JOIN user_role on sysuser.id= user_role.user_id
        LEFT JOIN roles on user_role.role_id=roles.id
        where username= #{userName}
    </select>
</mapper>
3.2 认证过程
SpringSecurity的认证过程是这样的,首先通过用户名或者其他唯一的ID在数据库里找到这个用户,用户的密码以非对称加密的方式存储。取到用户后将前台传入的密码加密后和数据库中已经加密好的字段进行对比,从而通过认证。
上面这个过程中的第一步通过用户名找到用户的操作需要通过Service服务来实现,并且这个Service服务需要继承SpringSecurity中的UserDetailsService接口。这个接口返回一个SpringSecurity的User对象。
@Service
public class UserService implements UserDetailsService {

    @Resource
    private UserMapper userMapper;
    //根据用户名找到对应的用户信息
    @Override
    public UserDetails loadUserByUsername(String s) throws UsernameNotFoundException {
        SysUser sysUser = userMapper.getUserByUserName(s);
        if (sysUser!=null){
            List<GrantedAuthority> roles=new ArrayList<>();
            sysUser.getRoles().stream().forEach(x->{
                roles.add(new SimpleGrantedAuthority(x.getRoleName()));
            });
            return new User(sysUser.getUserName(),sysUser.getPassword(),roles);
        }
        throw new UsernameNotFoundException("用户未找到");
    }
}
3.3 Security拦截配置
上面的步骤都完成后就开始配置Security了,写一个配置方法SecurityConfig,代码层面很简单,认证传入userService对象,会自动把数据库中取出的密码和前端传过来的密码进行对照。同时在userService中还传入了roles集合,在授权处给不同的页面附上不同的权限即可。
@EnableWebSecurity
public class SecurityConfig extends WebSecurityConfigurerAdapter {

    @Autowired
    private UserService userService;
    //授权
    @Override
    protected void configure(HttpSecurity http) throws Exception {
        //首页所有人都能访问,level页面只有有权限的人才能访问
        http.authorizeRequests()
                .antMatchers("/").permitAll()
                .antMatchers("/level1/**").hasRole("vip1")
                .antMatchers("/level2/**").hasRole("vip2")
                .antMatchers("/level3/**").hasRole("vip3");
        //没有权限默认跳到登陆页,默认会重定向到/login
        http.formLogin();
    }

    //认证
    @Override
    protected void configure(AuthenticationManagerBuilder auth) throws Exception {
        auth.userDetailsService(userService).passwordEncoder(new BCryptPasswordEncoder());

    }
}
3.4 其他注意点
我在认证的时候使用的密码加密方式是BCryptPasswordEncoder,因此存入数据库中的密码也需要被加密,常用的方式就是在注册时通过同样的方式对密码进行加密存入数据库中:
String password="xxx";
BCryptPasswordEncoder bCryptPasswordEncoder = new BCryptPasswordEncoder();
String encode=bCryptPasswordEncoder.encode(password);
SpringSecurity很强大,除了这种方式之外,还支持集成JWT、Oauth2等等。后续我会继续更新,我是鱼仔,我们下期再见。

