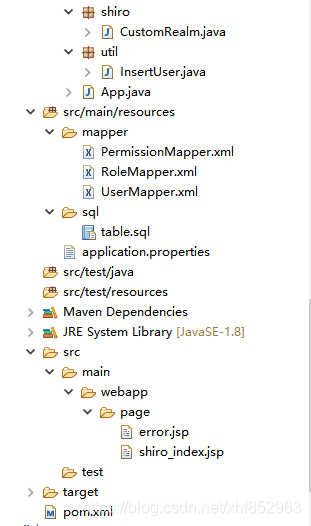
项目整体的结构如下图所示,项目整体采用 springboot + mybatis + jsp + mysql 来完成的,下面会详细介绍下:

先在数据库中创建 user、role、permission 这三张表,table.sql 的内容如下所示:
DROP DATABASE IF EXISTS shiro_test;
CREATE DATABASE shiro_test;
USE shiro_test;

SET NAMES utf8mb4;
SET FOREIGN_KEY_CHECKS = 0;

-- ----------------------------
-- Table structure for user
-- ----------------------------
DROP TABLE IF EXISTS `user`;
CREATE TABLE `user`  (
  `ID` bigint(20) NOT NULL AUTO_INCREMENT,
  `USER_NAME` varchar(64) CHARACTER SET utf8 COLLATE utf8_bin NULL DEFAULT NULL,
  `PASSWORD` varchar(64) CHARACTER SET utf8 COLLATE utf8_bin NULL DEFAULT NULL,
  `ROLE_IDS` varchar(64) CHARACTER SET utf8 COLLATE utf8_bin NULL DEFAULT NULL,
  `STATUS` varchar(64) CHARACTER SET utf8 COLLATE utf8_bin NULL DEFAULT NULL,
  PRIMARY KEY (`ID`) USING BTREE
) ENGINE = InnoDB AUTO_INCREMENT = 1 CHARACTER SET = utf8 COLLATE = utf8_bin ROW_FORMAT = Dynamic;
-- ----------------------------
-- Table structure for role
-- ----------------------------
DROP TABLE IF EXISTS `role`;
CREATE TABLE `role`  (
  `ID` bigint(20) NOT NULL AUTO_INCREMENT,
  `ROLE_NAME` varchar(64) CHARACTER SET utf8 COLLATE utf8_bin NULL DEFAULT NULL,
  `PERMISSIONS_IDS` varchar(64) CHARACTER SET utf8 COLLATE utf8_bin NULL DEFAULT NULL,
  PRIMARY KEY (`ID`) USING BTREE
) ENGINE = InnoDB AUTO_INCREMENT = 1 CHARACTER SET = utf8 COLLATE = utf8_bin ROW_FORMAT = Dynamic;

-- ----------------------------
-- Table structure for permission
-- ----------------------------
DROP TABLE IF EXISTS `permission`;
CREATE TABLE `permission`  (
  `ID` bigint(20) NOT NULL AUTO_INCREMENT,
  `PERMISSION_NAME` varchar(64) CHARACTER SET utf8 COLLATE utf8_bin NULL DEFAULT NULL,
  PRIMARY KEY (`ID`) USING BTREE
) ENGINE = InnoDB AUTO_INCREMENT = 1 CHARACTER SET = utf8 COLLATE = utf8_bin ROW_FORMAT = Dynamic;

INSERT INTO `shiro_test`.`permission` (`ID`, `PERMISSION_NAME`) VALUES ('1', 'add');
INSERT INTO `shiro_test`.`permission` (`ID`, `PERMISSION_NAME`) VALUES ('2', 'delete');
INSERT INTO `shiro_test`.`permission` (`ID`, `PERMISSION_NAME`) VALUES ('3', 'update');
INSERT INTO `shiro_test`.`permission` (`ID`, `PERMISSION_NAME`) VALUES ('4', 'query');

INSERT INTO `shiro_test`.`role` (`ID`, `ROLE_NAME`, `PERMISSIONS_IDS`) VALUES ('1', 'administrator', '1,2,3,4');
INSERT INTO `shiro_test`.`role` (`ID`, `ROLE_NAME`, `PERMISSIONS_IDS`) VALUES ('2', 'normalUser', '4');
pom.xml 的内容如下所示:
<parent>
		<groupId>org.springframework.boot</groupId>
		<artifactId>spring-boot-starter-parent</artifactId>
		<version>2.0.1.RELEASE</version>
		<relativePath />
	</parent>
	<dependencies>
		<dependency>
			<groupId>org.springframework.boot</groupId>
			<artifactId>spring-boot-starter</artifactId>
		</dependency>
		<dependency>
			<groupId>org.springframework.boot</groupId>
			<artifactId>spring-boot-starter-test</artifactId>
			<scope>test</scope>
		</dependency>
		<dependency>
			<groupId>org.springframework.boot</groupId>
			<artifactId>spring-boot-starter-web</artifactId>
		</dependency>
		<!-- https://mvnrepository.com/artifact/org.apache.shiro/shiro-core -->
		<dependency>
			<groupId>org.apache.shiro</groupId>
			<artifactId>shiro-core</artifactId>
			<version>1.6.0</version>
		</dependency>
		<!-- https://mvnrepository.com/artifact/org.apache.shiro/shiro-ehcache -->
		<dependency>
			<groupId>org.apache.shiro</groupId>
			<artifactId>shiro-ehcache</artifactId>
			<version>1.6.0</version>
		</dependency>
		<!-- shiro -->
		<dependency>
			<groupId>org.apache.shiro</groupId>
			<artifactId>shiro-spring</artifactId>
			<version>1.6.0</version>
		</dependency>
		<!-- 添加shiro web支持 -->
        <dependency>
            <groupId>org.apache.shiro</groupId>
            <artifactId>shiro-web</artifactId>
            <version>1.6.0</version>
        </dependency>
		<!-- 简化model类的setter和getter -->
		<dependency>
			<groupId>org.projectlombok</groupId>
			<artifactId>lombok</artifactId>
			<scope>provided</scope>
		</dependency>
		<!--热部署依赖 -->
		<dependency>
			<groupId>org.springframework.boot</groupId>
			<artifactId>spring-boot-devtools</artifactId>
			<scope>runtime</scope>
		</dependency>
		<dependency>
			<groupId>org.mybatis.spring.boot</groupId>
			<artifactId>mybatis-spring-boot-starter</artifactId>
			<version>1.3.2</version>
		</dependency>
		<dependency>
			<groupId>mysql</groupId>
			<artifactId>mysql-connector-java</artifactId>
		</dependency>
		<dependency>
			<groupId>javax.servlet</groupId>
			<artifactId>javax.servlet-api</artifactId>
			<scope>priveded</scope>
		</dependency>
		<dependency>
			<groupId>javax.servlet</groupId>
			<artifactId>jstl</artifactId>
		</dependency>
		<dependency>
			<groupId>org.apache.tomcat.embed</groupId>
			<artifactId>tomcat-embed-jasper</artifactId>
			<scope>priveded</scope>
		</dependency>
	</dependencies>
	<build>
		<plugins>
			<plugin>
				<groupId>org.apache.maven.plugins</groupId>
				<artifactId>maven-compiler-plugin</artifactId>
				<configuration>
					<source>1.8</source>
					<target>1.8</target>
				</configuration>
			</plugin>
			<plugin>
				<groupId>org.springframework.boot</groupId>
				<artifactId>spring-boot-maven-plugin</artifactId>
			</plugin>
		</plugins>
	</build>
application.properties 的内容如下所示:
spring.mvc.view.prefix=/page/
spring.mvc.view.suffix=.jsp
spring.resources.static-locations=classpath:/page/


spring.datasource.driver-class-name=com.mysql.jdbc.Driver
spring.datasource.url=jdbc:mysql://localhost:3306/shiro_test?useUnicode=true&characterEncoding=utf-8&useSSL=false&serverTimezone=UTC&nullCatalogMeansCurrent=true
spring.datasource.username=root
spring.datasource.password=Rfid123456

mybatis.mapper-locations=classpath*:mapper/*Mapper.xml
mybatis.configuration.map-underscore-to-camel-case: true
mybatis.configuration.jdbc-type-for-null=null
mybatis.configuration.log-impl=org.apache.ibatis.logging.stdout.StdOutImpl
mybatis.configuration.call-setters-on-nulls=true
我这块使用的是 mybatis 的生成工具自动生成的 entity、dao 和 mapper 文件,我这块就一并粘出来了,其中,我的 entity 里面的注解比较特殊,如果运行不起来,请参考我的 lombok 的那篇文章,也算是学习了一个新的知识点。
entity 的代码如下所示:
import java.util.Set;

import lombok.Data;
import lombok.NoArgsConstructor;

@Data
@NoArgsConstructor
public class User {
	private Long id;
	private String userName;
	private String password;
	private String roleIds;
	private Set<Role> roles;
	private String status;
}
import java.util.Set;

import lombok.Data;
import lombok.NoArgsConstructor;

@Data
@NoArgsConstructor
public class Role {
	private Long id;
	private String roleName;
	private String permissionsIds;
	private Set<Permission> permissions;
}
import lombok.Data;
import lombok.NoArgsConstructor;

@Data
@NoArgsConstructor
public class Permission {
	public  Long id;
	public String permissionName;
}
service 层以及其实现类的代码如下所示:
public interface UserService {
	User selectByUserName(String userName);
	int insert(User record);
	int deleteAll();
}
@Service
public class UserServiceImpl implements UserService {

	@Autowired
	UserMapper mapper;
	@Autowired
	RoleMapper roleMapper;
	@Autowired
	PermissionMapper permissionsMapper;

	@Override
	public User selectByUserName(String userName) {
		User user = mapper.selectByUserName(userName);
		if(user != null) {
			Set<Role> roleSet = new HashSet<>();
			String [] roleIds = user.getRoleIds().split(",");
			for(int i=0;i<roleIds.length;i++) {
				Role role = roleMapper.selectByPrimaryKey(Long.valueOf(roleIds[i]));
				Set<Permission> permissionsSet = new HashSet<>();
				String [] permissionsIds = role.getPermissionsIds().split(",");
				for(int j=0;j<permissionsIds.length;j++) {
					Permission p = permissionsMapper.selectByPrimaryKey(Long.valueOf(permissionsIds[j]));
					permissionsSet.add(p);
				}
				role.setPermissions(permissionsSet);
				roleSet.add(role);
			}
			user.setRoles(roleSet);
			return user;
		}
		return null;
	}

	@Override
	public int insert(User record) {
		return mapper.insert(record);
	}

	@Override
	public int deleteAll() {
		return mapper.deleteAll();
	}
}
public interface RoleService {

}

@Service
public class RoleServiceImpl implements RoleService {

	@Autowired
	RoleMapper mapper;
}
public interface PermissionService {

}
@Service
public class PermissionServiceImpl implements PermissionService {

	@Autowired
	PermissionMapper mapper;
}
dao 层的代码如下所示:
@Mapper
public interface UserMapper {

    int deleteByPrimaryKey(Long id);
    int insert(User record);
    User selectByPrimaryKey(Long id);
    List<User> selectAll();
    int updateByPrimaryKey(User record);
    User selectByUserName(String userName);
    int  deleteAll();
}
@Mapper
public interface RoleMapper {

    int deleteByPrimaryKey(Long id);
    int insert(Role record);
    Role selectByPrimaryKey(Long id);
    List<Role> selectAll();
    int updateByPrimaryKey(Role record);
}
@Mapper
public interface PermissionMapper {

    int deleteByPrimaryKey(Long id);
    int insert(Permission record);
    Permission selectByPrimaryKey(Long id);
    List<Permission> selectAll();
    int updateByPrimaryKey(Permission record);
}
mapper.xlm 内容如下所示:
@Mapper
public interface PermissionMapper {

    int deleteByPrimaryKey(Long id);
    int insert(Permission record);
    Permission selectByPrimaryKey(Long id);
    List<Permission> selectAll();
    int updateByPrimaryKey(Permission record);
}
<?xml version="1.0" encoding="UTF-8"?>
<!DOCTYPE mapper PUBLIC "-//mybatis.org//DTD Mapper 3.0//EN" "http://mybatis.org/dtd/mybatis-3-mapper.dtd">
<mapper namespace="com.dao.RoleMapper">
  <resultMap id="BaseResultMap" type="com.entity.Role">
    <id column="ID" jdbcType="BIGINT" property="id" />
    <result column="ROLE_NAME" jdbcType="VARCHAR" property="roleName" />
    <result column="PERMISSIONS_IDS" jdbcType="VARCHAR" property="permissionsIds" />
  </resultMap>
  <delete id="deleteByPrimaryKey" parameterType="java.lang.Long">
    delete from role
    where ID = #{id,jdbcType=BIGINT}
  </delete>
  <insert id="insert" parameterType="com.entity.Role">
    insert into role (ID, ROLE_NAME,PERMISSIONS_IDS)
    values (#{id,jdbcType=BIGINT}, #{roleName,jdbcType=VARCHAR}, #{permissionsIds,jdbcType=VARCHAR})
  </insert>
  <update id="updateByPrimaryKey" parameterType="com.entity.Role">
    update role
    set ROLE_NAME = #{roleName,jdbcType=VARCHAR},
    PERMISSIONS_IDS = #{permissionsIds,jdbcType=VARCHAR},
    where ID = #{id,jdbcType=BIGINT}
  </update>
  <select id="selectByPrimaryKey" parameterType="java.lang.Long" resultMap="BaseResultMap">
    select ID, ROLE_NAME,PERMISSIONS_IDS
    from role
    where ID = #{id,jdbcType=BIGINT}
  </select>
  <select id="selectAll" resultMap="BaseResultMap">
    select ID, ROLE_NAME,PERMISSIONS_IDS
    from role
  </select>
</mapper>
<?xml version="1.0" encoding="UTF-8"?>
<!DOCTYPE mapper PUBLIC "-//mybatis.org//DTD Mapper 3.0//EN" "http://mybatis.org/dtd/mybatis-3-mapper.dtd">
<mapper namespace="com.dao.PermissionMapper">
  <resultMap id="BaseResultMap" type="com.entity.Permission">
    <id column="ID" jdbcType="BIGINT" property="id" />
    <result column="PERMISSION_NAME" jdbcType="VARCHAR" property="permissionName" />
  </resultMap>
  <delete id="deleteByPrimaryKey" parameterType="java.lang.Long">
    delete from permission
    where ID = #{id,jdbcType=BIGINT}
  </delete>
  <insert id="insert" parameterType="com.entity.Permission">
    insert into permission (ID, PERMISSION_NAME)
    values (#{id,jdbcType=BIGINT}, #{permissionName,jdbcType=VARCHAR})
  </insert>
  <update id="updateByPrimaryKey" parameterType="com.entity.Permission">
    update permission
    set PERMISSION_NAME = #{permissionName,jdbcType=VARCHAR}
    where ID = #{id,jdbcType=BIGINT}
  </update>
  <select id="selectByPrimaryKey" parameterType="java.lang.Long" resultMap="BaseResultMap">
    select ID, PERMISSION_NAME
    from permission
    where ID = #{id,jdbcType=BIGINT}
  </select>
  <select id="selectAll" resultMap="BaseResultMap">
    select ID, PERMISSION_NAME
    from permission
  </select>
</mapper>
我们在初始化的 table.sql 中已经插入了权限和角色的数据,但是用户的数据的密码需要加密存储,所以这块我们我们采用代码来插入数据,InsertUser 类的内容如下所示,这段代码的意思是每次启动工程的时候先把数据库里面 user 表的数据清除掉,然后重新插入。
import org.apache.shiro.crypto.hash.SimpleHash;
import org.apache.shiro.util.ByteSource;
import org.springframework.beans.factory.InitializingBean;
import org.springframework.beans.factory.annotation.Autowired;
import org.springframework.stereotype.Component;

import com.entity.User;
import com.service.UserService;

@Component
public class InsertUser implements InitializingBean{

	@Autowired
	UserService userService;

	@Override
	public void afterPropertiesSet() throws Exception {

		userService.deleteAll();

		User user = new User();
		// 这里我们假设username+"salt"的值为盐值。
		String salt1 = "zhangsan";
		String password1 = "123456";
		String encryp_password1 = MD5Pwd(salt1,password1);

		user.setUserName(salt1);
		user.setPassword(encryp_password1);
		user.setRoleIds("1,2");
		user.setStatus("1");
		userService.insert(user);

		User user2 = new User();
		String salt2 = "lisi";
		String password2 = "123456";
		String encryp_password2 = MD5Pwd(salt2,password2);

		user2.setUserName(salt2);
		user2.setPassword(encryp_password2);
		user2.setRoleIds("2");
		user2.setStatus("1");
		userService.insert(user2);

		User user3 = new User();
		String salt3 = "wangwu";
		String password3 = "123456";
		String encryp_password3 = MD5Pwd(salt3,password3);

		user3.setUserName(salt3);
		user3.setPassword(encryp_password3);
		user3.setRoleIds("1");
		user3.setStatus("1");
		userService.insert(user3);
	}
	public static String MD5Pwd(String username, String pwd) {
        // 加密算法MD5
        // 盐值= username + "salt"
        // 迭代次数,这个地方的迭代次数要和后面自定义Relam里面的迭代此时一致
        String md5Pwd = new SimpleHash("MD5", pwd,
                ByteSource.Util.bytes(username + "salt"), 2).toHex();
        return md5Pwd;
    }

}
这里我们自己实现了 CustomRealm,其代码内容如下所示:
import java.util.ArrayList;
import java.util.List;

import org.apache.shiro.authc.AuthenticationException;
import org.apache.shiro.authc.AuthenticationInfo;
import org.apache.shiro.authc.AuthenticationToken;
import org.apache.shiro.authc.DisabledAccountException;
import org.apache.shiro.authc.LockedAccountException;
import org.apache.shiro.authc.SimpleAuthenticationInfo;
import org.apache.shiro.authc.UnknownAccountException;
import org.apache.shiro.authz.AuthorizationInfo;
import org.apache.shiro.authz.SimpleAuthorizationInfo;
import org.apache.shiro.realm.AuthorizingRealm;
import org.apache.shiro.subject.PrincipalCollection;
import org.apache.shiro.util.ByteSource;
import org.springframework.beans.factory.annotation.Autowired;
import org.springframework.util.StringUtils;

import com.entity.Permission;
import com.entity.Role;
import com.entity.User;
import com.service.UserService;

public class CustomRealm extends AuthorizingRealm{

	@Autowired
	UserService  userService;
	/*
	 * 权限配置类
	 */
	@Override
	protected AuthorizationInfo doGetAuthorizationInfo(PrincipalCollection principalCollection) {
		// 获取登录用户名
		String name = (String)principalCollection.getPrimaryPrincipal();
		// 查询用户名称
		User user = userService.selectByUserName(name);
		// 添加角色和权限
		SimpleAuthorizationInfo simpleAuthorizationInfo = new SimpleAuthorizationInfo();
		List<String> roleNameList = new ArrayList<>();
		List<String> permissionNameList = new ArrayList<>();

		for (Role role : user.getRoles()) {
			roleNameList.add(role.getRoleName());
			for (Permission permission : role.getPermissions()) {
				permissionNameList.add(role.getRoleName()+":"+permission.getPermissionName());
			}
		}
		// 添加角色
		simpleAuthorizationInfo.addRoles(roleNameList);
		// 添加权限
		simpleAuthorizationInfo.addStringPermissions(permissionNameList);
		return simpleAuthorizationInfo;
	}

	/*
	 * 认证配置类
	 */
	@Override
	protected AuthenticationInfo doGetAuthenticationInfo(AuthenticationToken authenticationToken) throws AuthenticationException {
		if(StringUtils.isEmpty(authenticationToken.getPrincipal())) {
			return null;
		}
		// 获取用户信息
		String name = authenticationToken.getPrincipal().toString();
		User user = userService.selectByUserName(name);
		// 用户是否存在
		if(user == null) {
			throw new UnknownAccountException();
		}
		// 是否激活
		if(user !=null && user.getStatus().equals("0")){
			throw new  DisabledAccountException();
		}
		// 是否锁定
		if(user!=null && user.getStatus().equals("3")){
			throw new  LockedAccountException();
		}
		// 若存在将此用户存放到登录认证info中,无需做密码比对shiro会为我们进行密码比对校验
		if(user !=null && user.getStatus().equals("1")){
			ByteSource credentialsSalt = ByteSource.Util.bytes(user.getUserName()+ "salt");
			// 这里验证authenticationToken和simpleAuthenticationInfo的信息
			SimpleAuthenticationInfo simpleAuthenticationInfo = new SimpleAuthenticationInfo(name, user.getPassword().toString(),credentialsSalt, getName());
			return simpleAuthenticationInfo;
		}
		return null;
	}
}
编写 ShiroConfig 的配置类,内容如下所示:
import java.util.HashMap;
import java.util.Map;

import org.apache.shiro.authc.credential.HashedCredentialsMatcher;
import org.apache.shiro.mgt.SecurityManager;
import org.apache.shiro.spring.security.interceptor.AuthorizationAttributeSourceAdvisor;
import org.apache.shiro.spring.web.ShiroFilterFactoryBean;
import org.apache.shiro.web.mgt.DefaultWebSecurityManager;
import org.springframework.aop.framework.autoproxy.DefaultAdvisorAutoProxyCreator;
import org.springframework.boot.autoconfigure.condition.ConditionalOnMissingBean;
import org.springframework.context.annotation.Bean;
import org.springframework.context.annotation.Configuration;

import com.shiro.CustomRealm;

@Configuration
public class ShiroConfig {

	@Bean
	@ConditionalOnMissingBean
	public DefaultAdvisorAutoProxyCreator defaultAdvisorAutoProxyCreator() {
		DefaultAdvisorAutoProxyCreator defaultAAP = new DefaultAdvisorAutoProxyCreator();
		defaultAAP.setProxyTargetClass(true);
		return defaultAAP;
	}

	// 将自己的验证方式加入容器
	@Bean
	public CustomRealm myShiroRealm() {
		CustomRealm customRealm = new CustomRealm();
		// 告诉realm,使用credentialsMatcher加密算法类来验证密文
		customRealm.setCredentialsMatcher(hashedCredentialsMatcher());
		return customRealm;
	}

	// 权限管理,配置主要是Realm的管理认证
	@Bean
	public SecurityManager securityManager() {
		DefaultWebSecurityManager securityManager = new DefaultWebSecurityManager();
		securityManager.setRealm(myShiroRealm());
		return securityManager;
	}
	// Filter工厂,设置对应的过滤条件和跳转条件
	@Bean
	public ShiroFilterFactoryBean shiroFilterFactoryBean(SecurityManager securityManager) {
		ShiroFilterFactoryBean shiroFilterFactoryBean = new ShiroFilterFactoryBean();
		shiroFilterFactoryBean.setSecurityManager(securityManager);
		Map<String, String> map = new HashMap<>();
		//登出
		map.put("/logout", "logout");
		//对所有用户认证
		map.put("/**", "authc");
		//登录
		shiroFilterFactoryBean.setLoginUrl("/login");
		//首页
		shiroFilterFactoryBean.setSuccessUrl("/index");
		//错误页面,认证不通过跳转
		shiroFilterFactoryBean.setUnauthorizedUrl("/error");
		shiroFilterFactoryBean.setFilterChainDefinitionMap(map);
		return shiroFilterFactoryBean;
	}

	@Bean
	public AuthorizationAttributeSourceAdvisor authorizationAttributeSourceAdvisor(SecurityManager securityManager) {
		AuthorizationAttributeSourceAdvisor authorizationAttributeSourceAdvisor = new AuthorizationAttributeSourceAdvisor();
		authorizationAttributeSourceAdvisor.setSecurityManager(securityManager);
		return authorizationAttributeSourceAdvisor;
	}
	@Bean
	public HashedCredentialsMatcher hashedCredentialsMatcher() {
		HashedCredentialsMatcher hashedCredentialsMatcher = new HashedCredentialsMatcher();
		// 散列算法:这里使用MD5算法;
		hashedCredentialsMatcher.setHashAlgorithmName("md5");
		// 散列的次数,比如散列两次,相当于 md5(md5(""));
		hashedCredentialsMatcher.setHashIterations(2);
		// storedCredentialsHexEncoded默认是true,此时用的是密码加密用的是Hex编码;false时用Base64编码
		hashedCredentialsMatcher.setStoredCredentialsHexEncoded(true);
		return hashedCredentialsMatcher;
	}
}
创建 LoginController 来拦截用户的前端请求,其代码内容如下所示:
import org.apache.shiro.SecurityUtils;
import org.apache.shiro.authc.AuthenticationException;
import org.apache.shiro.authc.UnknownAccountException;
import org.apache.shiro.authc.UsernamePasswordToken;
import org.apache.shiro.authz.AuthorizationException;
import org.apache.shiro.subject.Subject;
import org.springframework.stereotype.Controller;
import org.springframework.util.StringUtils;
import org.springframework.web.bind.annotation.RequestMapping;

import com.entity.User;

import lombok.extern.slf4j.Slf4j;

@Controller
@Slf4j
public class LoginController {

	@RequestMapping("/login")
	public String login(User user) {
		if (StringUtils.isEmpty(user.getUserName()) || StringUtils.isEmpty(user.getPassword())) {
			return "error";
		}
		//用户认证信息
		Subject subject = SecurityUtils.getSubject();
		UsernamePasswordToken usernamePasswordToken = new UsernamePasswordToken(
				user.getUserName(),
				user.getPassword());
		usernamePasswordToken.setRememberMe(true);
		try {
			//进行验证,这里可以捕获异常,然后返回对应信息
			subject.login(usernamePasswordToken);
		} catch (UnknownAccountException e) {
			log.error("用户名不存在!", e);
			return "error";
		} catch (AuthenticationException e) {
			log.error("账号或密码错误!", e);
			return "error";
		} catch (AuthorizationException e) {
			log.error("没有权限!", e);
			return "error";
		}
		return "shiro_index";
	}
}
前端用户展示的 shiro_index.jsp 内容如下所示:
<%@ page language="java" contentType="text/html; charset=UTF-8"%>
<!DOCTYPE html>
<html>
<head>
<meta charset="ISO-8859-1">
<title>Insert title here</title>
</head>
<body>
<%@ taglib prefix="shiro" uri="http://shiro.apache.org/tags"%>
<shiro:guest>
<h1>欢迎游客访问</h1>
</shiro:guest>
</br>
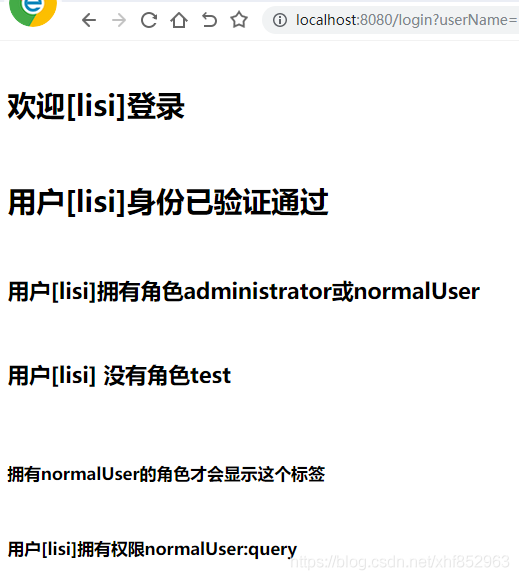
<shiro:user>
<h1>欢迎[<shiro:principal/>]登录</h1>
</shiro:user>
</br>
<shiro:authenticated>
<h1>用户[<shiro:principal/>]身份已验证通过</h1>
</shiro:authenticated>
</br>
<shiro:hasAnyRoles name="administrator,normalUser">
<h2>用户[<shiro:principal/>]拥有角色administrator或normalUser</h2>
</shiro:hasAnyRoles>
</br>
<shiro:lacksRole name="test">
<h2> 用户[<shiro:principal/>] 没有角色test </h2>
</shiro:lacksRole>
</br>
<shiro:hasRole name="administrator">
<h3>拥有administrator的角色才会显示这个标签</h3>
</shiro:hasRole>
</br>
<shiro:hasRole name="normalUser">
<h3>拥有normalUser的角色才会显示这个标签</h3>
</shiro:hasRole>
</br>
<shiro:hasPermission name="normalUser:query">
<h3>用户[<shiro:principal/>]拥有权限normalUser:query</h3>
</shiro:hasPermission>
</br>
<shiro:hasPermission name="normalUser:add">
<h3>用户[<shiro:principal/>]拥有权限normalUser:add</h3>
</shiro:hasPermission>
</br>
<shiro:hasPermission name="administrator:add">
<h3>用户[<shiro:principal/>]拥有权限administrator:add</h3>
</shiro:hasPermission>
</br>
<shiro:hasPermission name="administrator:delete">
<h3>用户[<shiro:principal/>]拥有权限administrator:delete</h3>
</shiro:hasPermission>
</br>
<shiro:hasPermission name="administrator:update">
<h3>用户[<shiro:principal/>]拥有权限administrator:update</h3>
</shiro:hasPermission>
</br>
<shiro:hasPermission name="administrator:query">
<h3>用户[<shiro:principal/>]拥有权限administrator:query</h3>
</shiro:hasPermission>
</body>
</html>
error.jsp 的内容如下所示:
<%@ page language="java" contentType="text/html; charset=UTF-8"%>
<!DOCTYPE html>
<html>
<head>
<meta charset="ISO-8859-1">
<title>Insert title here</title>
</head>
<body>
<%@ taglib prefix="shiro" uri="http://shiro.apache.org/tags"%>

<h1>账号或者密码错误!</h1>

</body>
</html>
启动类 App 的代码内容如下所示:
@SpringBootApplication
@MapperScan({"com.dao"})
public class App {
    public static void main( String[] args ){
        SpringApplication.run(App.class, args);
    }
}
在浏览器输入:http://localhost:8080/login?userName=zhangsan&password=123456 展示内容如下所示:
在浏览器输入:http://localhost:8080/login?userName=zhangsan&password=123456 内容如下所示:


