springCloud config项目,用来为分布式的微服务系统中提供集成式外部配置支持,分为客户端和服务端
spring官方如下介绍:
Spring Cloud Config provides server and client-side support for externalized configuration in a distributed system. With the Config Server you have a central place to manage external properties for applications across all environments. The concepts on both client and server map identically to the Spring Environment and PropertySource abstractions, so they fit very well with Spring applications, but can be used with any application running in any language. As an application moves through the deployment pipeline from dev to test and into production you can manage the configuration between those environments and be certain that applications have everything they need to run when they migrate. The default implementation of the server storage backend uses git so it easily supports labelled versions of configuration environments, as well as being accessible to a wide range of tooling for managing the content. It is easy to add alternative implementations and plug them in with Spring configuration.
简而言之: 通过配置服务(Config Server)来为所有的环境和应用提供外部配置的集中管理,这些概念都通过spring的Environment和PropertySource来抽象,所以他可以适用于各类Spring应用,它也能对应用的开发环境、测试环境、生成环境的配置做切换、迁移
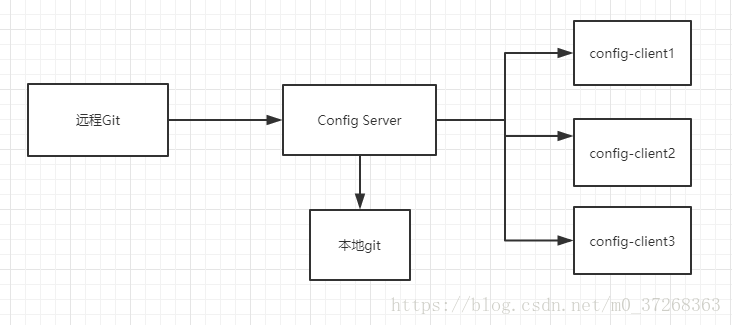
git服务器会从远程git拉取配置文件,并存入到本地git文件库,当远程git不可用时,会从本地git文件库拉取配置信息
<dependency>
	<groupId>org.springframework.cloud</groupId>
	<artifactId>spring-cloud-config-server</artifactId>
</dependency>
<dependency>
      <groupId>org.springframework.cloud</groupId>
       <artifactId>spring-cloud-starter-eureka</artifactId>
 </dependency>
接入配置中心,让客户端可以发现服务端,启动类加上@EnableConfigServer,@EnableDiscoveryClient注解,命名chu-config
配置中心服务器,会根据spring.cloud.config.server.git.uri来找到配置数据(它可以是git存储库的位置,也可以是本地文件),这是必须的,Config server才能从远程Git服务pull资源来配置在远程码云仓储中新建application.yml和chu-user.yml配置文件
在项目中,基本上所有的基础微服务都是config client,它们都通过config server做外部配置集中管理和动态环境切换
客户端默认拉取规则如下:
/{name}-{profile}.yml
/{label}-{name}-{profile}.ymlname:即spring.application.nameprofile: 激活的剖面label: git分支,默认是master例如,这里搭建一个chu-user服务:
引入客户端依赖
 <dependency>
     <groupId>org.springframework.cloud</groupId>
      <artifactId>spring-cloud-config-client</artifactId>
 </dependency>
在配置文件中通过spring.cloud.config.discovery.enabled=true和spring.cloud.config.discovery.service-id=chu-config来注册发现配置中心服务端
测试:
上头我们介绍了配置中心的拉取规则
远程码云chu-user.yml上有个test:123的属性,在chu-user服务上可通过@Value("${test}")注解获取到,如果chu-user服务上的配置文件中也有个test:456的属性,默认情况下,Config Server优先
经过测试,我们证明了config client可以成功的拉取到远程服务器的配置文件,那么不同环境的配置切换拉取怎么做呢?
1.在远程码云上改造chu-user.yml配置文件如下:
---
spring:
  profiles: dev
isDev: true

---
spring:
  profiles: pro
isDev: false
重启config server,在浏览器输入localhost:8888/chu-user-dev.yml可以成功拉取到配置信息
2.客户端通过spring.cloud.config.profile=pro/dev来指定拉取的环境配置
测试:启动config server和config client,并在chu-user服务控制台看到

分别拉取到application#pro环境和chu-user#pro环境信息,同时程序通过@Value("${isDev}")读取配置值为false
每个资源也可以选择在子目录存储配置文件,通过关键字searchPaths来查询定义的目录,例如
spring:
  cloud:
    config:
      server:
        git:
          uri: https://gitee.com/China_shenzhen_git/one-config-server
          search-paths: /config,'{application}'
将会从config目录和与application相同名字的目录中开始查询配置文件
Config server如果希望客户端能够授权访问配置中心库,可以引入security配置,引入依赖
<dependency>
	<groupId>org.springframework.boot</groupId>
	<artifactId>spring-boot-starter-security</artifactId>
</dependency>
security:
  basic:
    enabled: true
  user:
    name: config-repo
    password: 123456
那么客户端就需要增加spring.cloud.config.username=config-repo ,password=123456配置来授权访问配置中心服务器
spring profiles进行不同环境版本配置分离、切换,通过spring.profiles.active=dev,mysql,如果配置文件基于文件的,服务器将优先根据{applicationName}.yml,在根据application.yml创建一个Environment对象,如果这些yml文件中有了指定的spring profiles,那么这些profiles将有较高优先级spring.profile.avtive是指定spring boot运行的环境,而spring.cloud.config.profile是客户端指定拉取资源库的profile配置,如果有多个profiles,最后一个起作用以下将详细说明简易配置中心原理及流程说明。
在启动后优先于spring默认配置扫描器增加所需配置项,spring将读取第一个值使之生效。
源码详解
对spring有了解的朋友都知道,spring对于默认组件或一些配置都是写在META-INF文件夹下的spring.factories文件中,spring默认配置项也是配置在此。
在spring-boot-1.5.9.RELEASE.jar!/META-INF/spring.factories文件中,有一项与配置相关的配置
# Application Listeners 监听
org.springframework.context.ApplicationListener=\
org.springframework.boot.context.config.ConfigFileApplicationListener
# Environment Post Processors 环境处理
org.springframework.boot.env.EnvironmentPostProcessor=\
org.springframework.boot.cloud.CloudFoundryVcapEnvironmentPostProcessor,\
org.springframework.boot.env.SpringApplicationJsonEnvironmentPostProcessor
此监听类为配置文件关键类。
public class ConfigFileApplicationListener implements EnvironmentPostProcessor, SmartApplicationListener, Ordered {}可以看到,此监听实现了EnvironmentPostProcessor,SmartApplicationListener与Ordered。
// 监听回调函数
@Override
public void onApplicationEvent(ApplicationEvent event) {
    if (event instanceof ApplicationEnvironmentPreparedEvent) {
        //在此初始化配置项
        onApplicationEnvironmentPreparedEvent(
                (ApplicationEnvironmentPreparedEvent) event);
    }
    if (event instanceof ApplicationPreparedEvent) {
        onApplicationPreparedEvent(event);
    }
}
//配置文件初始化读取
private void onApplicationEnvironmentPreparedEvent(
    ApplicationEnvironmentPreparedEvent event) {
    //加载所有EnvironmentPostProcessor类型bean,此时扫描还未开始,获取到的都必须是上面说的spring.factories中配置的Environment Post Processors。
    List<EnvironmentPostProcessor> postProcessors = loadPostProcessors();
    //增加自己
    postProcessors.add(this);
    //排序
    AnnotationAwareOrderComparator.sort(postProcessors);
    for (EnvironmentPostProcessor postProcessor : postProcessors) {
        //执行
        postProcessor.postProcessEnvironment(event.getEnvironment(),
                event.getSpringApplication());
    }
}
//加载application.yml及指定profile文件
@Override
public void postProcessEnvironment(ConfigurableEnvironment environment,
        SpringApplication application) {
        //加载
    addPropertySources(environment, application.getResourceLoader());
    configureIgnoreBeanInfo(environment);
    bindToSpringApplication(environment, application);
}
配置中心思路
加载流程及优先级清楚了,那么可以开始动手了~
由于执行到这步的时候,还未开始扫描,所以使用注解是无效的。那么新建一个/META-INF/spring.factories文件,并增加相应配置,在ConfigFileApplicationListener之前执行即可。
老规矩,不会写详细的步骤,更希望大家能明白原理,举一反三哟
以修改tomcat端口为例子,由于时间关系,只在代码中模拟获得配置项。
新建配置类PropertiesConfigPostProcessor
public class PropertiesConfigPostProcessor implements EnvironmentPostProcessor, Ordered {
    //优先于ConfigFileApplicationListener
    public static final int DEFAULT_ORDER = Ordered.HIGHEST_PRECEDENCE + 9;
    @Override
    public void postProcessEnvironment(ConfigurableEnvironment environment, SpringApplication application) {
       //此时PropertySources中无application配置项,我们新增一个server.port为8999的配置。此步骤如为真实配置中心则可自行获得。
        environment.getPropertySources().addLast(new MapPropertySource("configServerInitProperties", new QuickHashMap<String, Object>().quickPut("server.port", 8999)));
    }
    @Override
    public int getOrder() {
        return DEFAULT_ORDER;
    }
}
新建一个/META-INF/spring.factories文件,内容为
org.springframework.boot.env.EnvironmentPostProcessor=\
top.wboost.example.PropertiesConfigPostProcessor
-application.yml配置
server:
  port: 8000
启动后,日志显示端口为8999.
我们查看系统中存在的配置项为如下所示(省略其他配置项)
{
    "data": {
        "applicationConfigurationProperties": {
            "server.port,class org.springframework.boot.context.config.ConfigFileApplicationListener$ConfigurationPropertySources": 8000
        },
        "configServerInitProperties,class org.springframework.core.env.MapPropertySource": {
            "server.port": 8999
        }
    },
    "info": {
        "code": 10906,
        "message": "执行成功",
        "systemCode": "DO_OK"
    },
    "status": 0
}
以上就是简易流程,懂得原理,可自行扩展!希望能给大家一个参考,也希望大家多多支持。

