本文将以 C# 语言来实现一个简单的布隆过滤器,为简化说明,设计得很简单,仅供学习使用。
感谢@时总百忙之中的指导。
布隆过滤器(Bloom filter)是一种特殊的 Hash Table,能够以较小的存储空间较快地判断出数据是否存在。常用于允许一定误判率的数据过滤及防止缓存击穿及等场景。
相较于 .NET 中的 HashSet 这样传统的 Hash Table,存在以下的优劣势。
优势:
劣势:
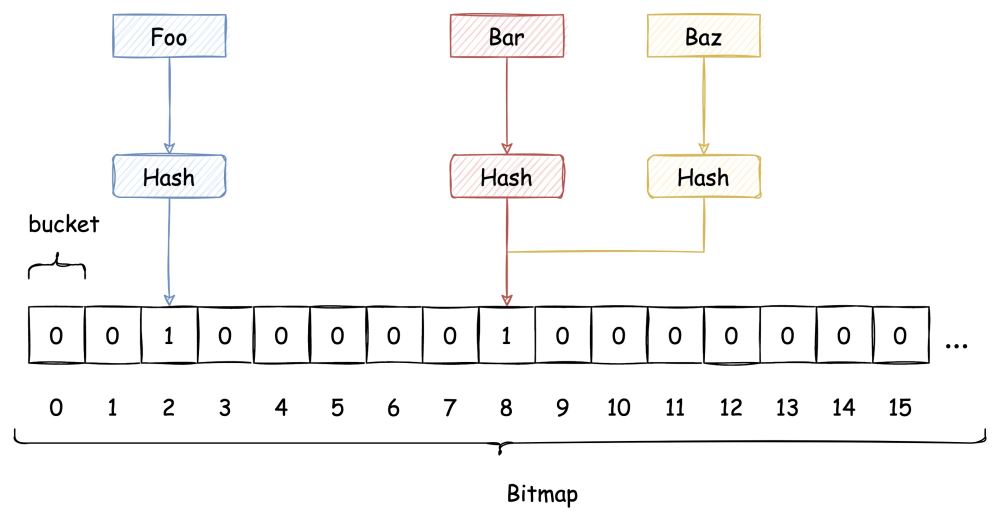
布隆过滤器的数据保存在 位图(Bitmap)上。Bitmap 简而言之是二进制位(bit)的数组。Hash Table 保存每个元素的位置,我们称之为 桶(bucket), Bitmap 上的每一位就是布隆过滤器的 bucket。
布隆过滤器的每一个 bucket 只能存储 0 或 1。数据插入时,布隆过滤器会通过 Hash 函数计算出插入的 key 对应的 bucket,并将该 bucket 设置为 1。
查询时,再次根据 Hash 函数计算出 key 对应的 bucket,如果 bucket 的值是 1,则认为 key 存在。
布隆过滤器使用了 Hash 函数,自然也逃不过 Hash 冲突的问题。对布隆过滤器而言,发生 Hash 冲突也就意味着会发生误判。
传统 Hash 算法解决 Hash 冲突的方式有 开放定址法、链表法等。而布隆过滤器解决 Hash 冲突的方式比较特殊,它使用了多个 Hash 函数来解决冲突问题。
下图中插入布隆过滤器的 Bar 和 Baz 经过 Hash2 计算出的位置是同一个,但 Hash3 计算出的位置是不一样的,Bar 和 Baz 得以区分。

即使布隆过滤器使用了这种方式来解决 Hash冲突,冲突的可能性依旧存在,如下图所示:
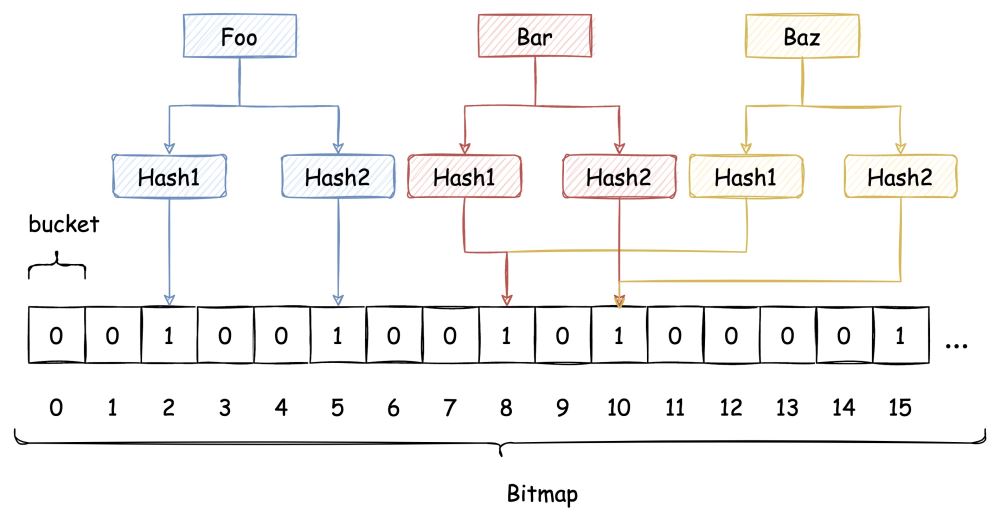
由于布隆过滤器不保留插入的 Key 的原始值,Hash 冲突是无法避免的。我们只能通过增加 Hash 函数的数量来减少冲突的概率,也就是减少误判率。
假设布隆过滤器有 m 个 bucket,包含 k 个哈希函数,已经插入了 n 个 key。经数学推导可得误判率 ε 的公式如下:

具体推断过程可参考 https://en.wikipedia.org/wiki/Bloom_filter。
布隆过滤器的误判概率大致和 已经插入的 key 的数量 n 成正比,和 hash函数数量 k、bucket 数 m 成反比。为了减少误判率,我们可以增加 m 或 增加 k,增加 m 意味着过滤器占用存储空间会增加,增加 k 则意味着插入和查询时的效率会降低。
布隆过滤器通过多个 Hash 函数来解决冲突的设计,也意味着多着插入元素可能会共享同样的 bucket,删掉一个元素的同时,也会被其他元素的一部分 bucket 给删掉。因此基于 Bitmap 实现的布隆过滤器是不支持删除的。
在实现布隆过滤器之前,我们首先要实现一个 Bitmap。
在 C# 中,我们并不能直接用 bit 作为最小的数据存储单元,但借助位运算的话,我们就可以基于其他数据类型来表示,比如 byte。下文用 byte 作为例子来描述 Bitmap 的实现,但不仅限于 byte,int、long 等等也是可以的。
下面是 C# 中位运算的简单介绍:
| 符号 | 描述 | 运算规则 |
|---|---|---|
| & | 与 | 两个位都为1时,结果才为1 |
| | | 或 | 两个位都为0时,结果才为0 |
| ^ | 异或 | 两个位相同为0,相异为1 |
| ~ | 取反 | 0变1,1变0 |
| << | 左移 | 各二进位全部左移若干位,低位补0 |
| >> | 右移 | 各二进位全部右移若干位,高位补0 |
一般来说,我们要进行位运算计算的数据通常都是由多个二进位组成的。对两个数字使用 &、|、^ 这三个运算符时,需要对齐两个数字的右边,一位位地进行计算。
// 0b 代表值用二进制表示数字
short a =                     0b0111111111111001;
byte  b =                            0b011111111;
short c = (short)(a & b);  // 0b0111111111111001
short d = (short)(a | b);  // 0b0111111111111111
short e = (short)(a ^ b);  // 0b0000000000000110
byte  f = (byte)~b;                  0b011111111;
short g = (short)(b << 1); // 0b0000000111111111;
short h = (short)(b >> 1); // 0b0000000001111111;
借助 byte 实现 Bitmap,也就是要能够修改和查看 byte 上的每一个 bit 的值,同时,修改要能够实现幂等。
1.指定位设置成 1
按前面说的位运算的规则,是不能够单独修改 bit 序列中某一位的。位运算需要从右到左一对对计算。
使用 | 可以实现这个功能。假设我们要改变从右开始下标为 3(初始位置0) 的 bit 的值,则需要准备一个该位置为 1,其他位置都是 0 的 bit 序列,与要改变的 bit 序列进行 | 运算。
// 为了将 a 的右边数起第 3 位改成 1,需要准备一个 b
byte a =            0b010100010;
byte b = 1 << 3; // 0b000001000
a |= b;          // 0b010101010
2.指定位设置成 0
和设置成 1 正好相反,需要准备一个指定位置为 0,其他位置都是 1 的 bit 序列,与要改变的 bit 序列进行 & 运算。
byte a =            0b010101010;
byte b = 1 << 3; // 0b000001000
b = ~b;          // 0b111110111
a &= b;          // 0b010100010
3.查看指定位的值
利用 & 运算符,只要计算结果不为 0,就代表指定位置的值为 1。
byte a =            0b010101010;
byte b = 1 << 3; // 0b000001000;
a &= b;          // 0b000001000;
了解了基本的操作之后,我们把数据存储到 byte 数组上。

class Bitmap
{
    private readonly byte[] _bytes;
    private readonly long _capacity;

    public Bitmap(long capacity)
    {
        _capacity = capacity;
        _bytes = new byte[_capacity / 8 + 1];
    }

    public long Capacity => _capacity;

    public void Set(long index)
    {
        if (index >= _capacity)
        {
            throw new IndexOutOfRangeException();
        }

        // 计算出数据存在第几个 byte 上
        long byteIndex = index / 8;
        // 计算出数据存在第几个 bit 上
        int bitIndex = (int)(index % 8);
        _bytes[byteIndex] |= (byte)(1 << bitIndex);
    }

    public void Remove(long index)
    {
        if (index >= _capacity)
        {
            throw new IndexOutOfRangeException();
        }

        long byteIndex = index / 8;
        int bitIndex = (int)(index % 8);
        _bytes[byteIndex] &= (byte)~(1 << bitIndex);
    }

    public bool Get(long index)
    {
        if (index >= _capacity)
        {
            throw new IndexOutOfRangeException();
        }

        long byteIndex = index / 8;
        int bitIndex = (int)(index % 8);

        return (_bytes[byteIndex] & (byte)(1 << bitIndex)) != 0;
    }
}
有了 Bitmap,我们再把 Hash 函数的实现准备好,一个简单的布隆过滤器就可以完成了。这里,我们参考 guava 这个 java 库的实现。
https://github.com/google/guava/blob/master/guava/src/com/google/common/hash/BloomFilter.java
我们使用和 guava 一样的 MurmurHash3 作为 Hash 函数的实现。
下面是笔者在 github 上找到的一个可用实现。
https://github.com/darrenkopp/murmurhash-net
使用这个库,我们可以将任意长的 byte 数组转换成 128 位的二进制位,也就是 16 byte。
byte[] data = Guid.NewGuid().ToByteArray();
// returns a 128-bit algorithm using "unsafe" code with default seed
HashAlgorithm murmur128 = MurmurHash.Create128(managed: false);
byte[] hash = murmur128.ComputeHash(data);
我们需要将各种类型 key 转换成 MurmurHash 能够直接处理的 byte 数组。为此我们参考 guava 引入下面两个概念:
1.Funnel:将各类数据转换成 byte 数组,包括 int、bool、string 等built-in 类型及自定义的复杂类型。
2.Sink:Funnel 的核心组件,作为数据的缓冲区。Funnel 在将自定义的复杂类型实例转换成 byte 数组时,就需要将数据拆解分批写入 sink。
Funnel 可以定义成如下的委托,接受原始值,并将其写入 sink 中。
delegate void Funnel<in T>(T from, ISink sink);
Sink 将不同类型的数据转换成 byte 数组并汇总到一起。
interface ISink
{
    ISink PutByte(byte b);

    ISink PutBytes(byte[] bytes);

    ISink PutBool(bool b);

    ISink PutShort(short s);

    ISink PutInt(int i);

    ISink PutString(string s, Encoding encoding);

    ISink PutObject<T>(T obj, Funnel<T> funnel);

    /// ... 其他 built-in 类型,读者可自行补充
}
简单的 Funnel 实现如下所示:
public class Funnels
{
    public static Funnel<string> StringFunnel = (from, sink) =>
        sink.PutString(from, Encoding.UTF8);

    public static Funnel<int> IntFunnel = (from, sink) =>
        sink.PutInt(from);
}
自定义复杂类型的 Funnel 实现则可以数据拆解分批写入 sink。复杂类型的实例成员依旧可能是复杂类型,因此我们要在 Sink 上实现一个 PutObject 来提供套娃式拆解。
Funnel<Foo> funnelFoo = (foo, sink) =>
{
    sink.PutString(foo.A, Encoding.UTF8);
    sink.PutInt(foo.B);

    Funnel<Bar> funnelBar = (bar, barSink) => barSink.PutBool(bar.C);
    sink.PutObject(foo.Bar, funnelBar);
};

class Foo
{
    public string A { get; set; }

    public int B { get; set; }

    public Bar Bar { get; set; }
}

class Bar
{
    public bool C { get; set; }
}
Sink 的核心是 byte 数组缓冲区的实现,利用 ArrayPool 我们可以很方便的实现一个 ByteBuffer。
class ByteBuffer : IDisposable
{
    private readonly int _capacity;
    private readonly byte[] _buffer;
    private int _offset;
    private bool _disposed;

    public ByteBuffer(int capacity)
    {
        _capacity = capacity;
        _buffer = ArrayPool<byte>.Shared.Rent(capacity);
    }

    public void Put(byte b)
    {
        CheckInsertable();
        _buffer[_offset] = b;
        _offset++;
    }

    public void Put(byte[] bytes)
    {
        CheckInsertable();
        bytes.CopyTo(_buffer.AsSpan(_offset, bytes.Length));
        _offset += bytes.Length;
    }

    public void PutInt(int i)
    {
        CheckInsertable();
        BinaryPrimitives.WriteInt32BigEndian(GetRemainingAsSpan(), i);
        _offset += sizeof(int);
    }

    public void PutShort(short s)
    {
        CheckInsertable();
        BinaryPrimitives.WriteInt32BigEndian(GetRemainingAsSpan(), s);
        _offset += sizeof(short);
    }

    // ... 其他的 primitive type 的实现

    public Span<byte> GetBuffer() =>
        _buffer.AsSpan(.._offset);

    public bool HasRemaining() => _offset < _capacity;

    public void Dispose()
    {
        _disposed = true;
        ArrayPool<byte>.Shared.Return(_buffer);
    }

    private void CheckInsertable()
    {
        if (_disposed)
        {
            throw new ObjectDisposedException(typeof(ByteBuffer).FullName);
        }

        if (_offset >= _capacity)
        {
            throw new OverflowException("Byte buffer overflow");
        }
    }

    private Span<byte> GetRemainingAsSpan() => _buffer.AsSpan(_offset..);
}
Sink 则是对 ByteBuffer 的进一步封装,来适配当前使用场景。
class Sink : ISink, IDisposable
{
    private readonly ByteBuffer _byteBuffer;

    /// <summary>
    /// 创建一个新的 <see cref="Sink"/> 实例
    /// </summary>
    /// <param name="expectedInputSize">预计输入的单个元素的最大大小</param>
    public Sink(int expectedInputSize)
    {
        _byteBuffer = new ByteBuffer(expectedInputSize);
    }

    public ISink PutByte(byte b)
    {
        _byteBuffer.Put(b);
        return this;
    }

    public ISink PutBytes(byte[] bytes)
    {
        _byteBuffer.Put(bytes);
        return this;
    }

    public ISink PutBool(bool b)
    {
        _byteBuffer.Put((byte)(b ? 1 : 0));
        return this;
    }

    public ISink PutShort(short s)
    {
        _byteBuffer.PutShort(s);
        return this;
    }

    public ISink PutInt(int i)
    {
        _byteBuffer.PutInt(i);
        return this;
    }

    public ISink PutString(string s, Encoding encoding)
    {
        _byteBuffer.Put(encoding.GetBytes(s));
        return this;
    }

    public ISink PutObject<T>(T obj, Funnel<T> funnel)
    {
        funnel(obj, this);
        return this;
    }

    public byte[] GetBytes() => _byteBuffer.GetBuffer().ToArray();

    public void Dispose()
    {
        _byteBuffer.Dispose();
    }
}
上文提到了 布隆过滤器 通过 k 个 hash 函数来解决 hash 冲突问题。实践中,我们可以把一次 murmur hash 的计算结果(16 byte)拆分为两部分并转换为 long 类型(一个 long 是 8 byte)。
这两部分结果分别保存到 hash2 和 hash3,第 k 个 hash 函数是对 hash2 和 hash3 的重新组合。
hash(k) = hash2 + (k-1) * hash3
public class BloomFilter<T>
{
    private readonly int _hashFunctions;
    private readonly Funnel<T> _funnel;
    private readonly int _expectedInputSize;
    private readonly Bitmap _bitmap;
    private readonly HashAlgorithm _murmur128;

    /// <summary>
    /// 创建一个新的 <see cref="BloomFilter"/> 实例
    /// </summary>
    /// <param name="funnel">与插入元素类型相关的<see cref="Funnel"/>的实现</param>
    /// <param name="buckets">BloomFilter 内部 Bitmap 的 bucket 数量,越大,误判率越低</param>
    /// <param name="hashFunctions">hash 函数的数量,越多,误判率越低</param>
    /// <param name="expectedInputSize">预计插入的单个元素的最大大小</param>
    public BloomFilter(Funnel<T> funnel, int buckets, int hashFunctions = 2, int expectedInputSize = 128)
    {
        _hashFunctions = hashFunctions;
        _funnel = funnel;
        _expectedInputSize = expectedInputSize;

        _bitmap = new Bitmap(buckets);
        _murmur128 = MurmurHash.Create128(managed: false);
    }

    public void Add(T item)
    {
        long bitSize = _bitmap.Capacity;

        var (hash1, hash2) = Hash(item);

        long combinedHash = hash1;
        for (int i = 0; i < _hashFunctions; i++)
        {
            _bitmap.Set((combinedHash & long.MaxValue) % bitSize);
            combinedHash += hash2;
        }
    }


    public bool MightContains(T item)
    {
        long bitSize = _bitmap.Capacity;

        var (hash1, hash2) = Hash(item);

        long combinedHash = hash1;
        for (int i = 0; i < _hashFunctions; i++)
        {
            if (!_bitmap.Get((combinedHash & long.MaxValue) % bitSize))
            {
                return false;
            }

            combinedHash += hash2;
        }

        return true;
    }


    [MethodImpl(MethodImplOptions.AggressiveInlining)]
    private (long Hash1, long Hash2) Hash(T item)
    {
        byte[] inputBytes;
        using (var sink = new Sink(_expectedInputSize))
        {
            sink.PutObject(item, _funnel);
            inputBytes = sink.GetBytes();
        }

        var hashSpan = _murmur128.ComputeHash(inputBytes).AsSpan();

        long lowerEight = BinaryPrimitives.ReadInt64LittleEndian(hashSpan.Slice(0,8));
        long upperEight = BinaryPrimitives.ReadInt64LittleEndian(hashSpan.Slice(8,8));
        return (lowerEight, upperEight);
    }
}
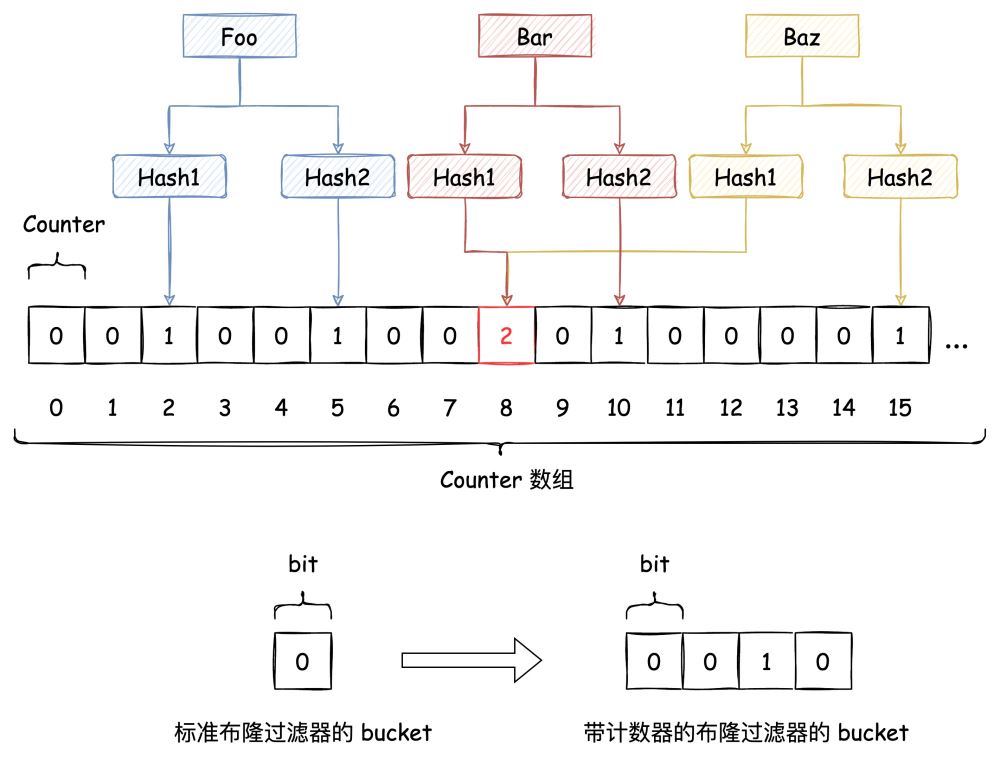
上文讲到基于 Bitmap 实现的布隆过滤器不支持删除,但如果把 Bitmap 这个 bit 数组换成 n 个 bit 作为一个bucket的数组,那单个 bucket 就具备了计数能力。这样删掉一个元素的时候,就是在这个计数器上减一,借此能够在有限的范围内实现带删除功能的布隆过滤器,代价是,存储空间会变成原来的 n 倍。
如果你有布隆过滤器的实际使用需求,并且是在分布式环境,笔者推荐下面这个库,它是作为 redis 的插件提供的,详情点击下方链接。https://github.com/RedisBloom/RedisBloom
为方便学习,本文所有的代码均已整理在 github:https://github.com/eventhorizon-cli/EventHorizon.BloomFilter

