文件存储是Android中最基本的数据存储方式,它不对存储的内容进行任何格式化处理,有数据都是原封不动地保存在文件当中的,因此它比较适合存储一些简单的文本数据或者二进制数据。
(1)将数据存储在文件中
Context类中提供了一个openFileOutput()方法,用于将数据存储到指定的文件中。
第一个参数:文件名(系统会自动创建这个文件)。
第二个参数:文件的操作模式。
文件的操作模式有以下几种:
具体实现:
private fun save(inputText: String) {
            try {
                val output=openFileOutput("data", Context.MODE_PRIVATE)
                val writer=BufferedWriter(OutputStreamWriter(output))
                //这里使用了kotlin的内置函数use,它会保证在Lambda
                //表达式中的代码全部执行完之后自动将外层的流关闭,这
                //样就不再需要我们写一个finally语句,手动关闭流。
                writer.use {
                    it.write(inputText)
                }
                Toast.makeText(this,inputText,Toast.LENGTH_SHORT).show()
            }catch (e:IOException){
                e.printStackTrace()
            }
    }
如何证实数据是否已经保存成功了呢?
使用快捷键Ctrl+Shift+A(Mac系统是command+shift+A)打开搜索功能,在搜索框输入“Device File Explorer”即可找到这个工具,我们在这工具里找到/data/data/com.example.filepersistencetest/files/目录,里面有一个生成的data文件,双击打开,查看里面的内容。
(2)从文件中读取数据
Context类提供的openFileinput()方法,用于从文件中读取数据。
参数:文件名。
具体实现:
private fun load():String{
        val content=StringBuilder()
        try {
            val input=openFileInput("data")
            val reader=BufferedReader(InputStreamReader(input))
            //kotlin提供的内置扩展函数forEachLine,它会将读到的内容都回调到Lambda表达式中。
            reader.use {
                reader.forEachLine {
                    content.append(it)
                }
            }
        }catch(e:IOException){
            e.printStackTrace()
        }
        return content.toString()
    }
(3)实战演练:重新启动程序时EditText中能保留我们上次输入的内容。、
class MainActivity : AppCompatActivity() {
    override fun onCreate(savedInstanceState: Bundle?) {
        super.onCreate(savedInstanceState)
        setContentView(R.layout.activity_main)
        val  inputText=load()
        if(inputText.isNotEmpty()){
            val editText:EditText=findViewById(R.id.editText)
            editText.setText(inputText)
            editText.setSelection(inputText.length)
        }
    }
    override fun onDestroy() {
        super.onDestroy()
        val editText:EditText=findViewById(R.id.editText)
        val inputText=editText.text.toString()
        save(inputText)
    }
    private fun save(inputText: String) {
            try {
                val output=openFileOutput("data", Context.MODE_PRIVATE)
                val writer=BufferedWriter(OutputStreamWriter(output))
                writer.use {
                    it.write(inputText)
                }
                Toast.makeText(this,inputText,Toast.LENGTH_SHORT).show()
            }catch (e:IOException){
                e.printStackTrace()
            }
    }
    private fun load():String{
        val content=StringBuilder()
        try {
            val input=openFileInput("data")
            val reader=BufferedReader(InputStreamReader(input))
            reader.use {
                reader.forEachLine {
                    content.append(it)
                }
            }
        }catch(e:IOException){
            e.printStackTrace()
        }
        return content.toString()
    }
}不同于文件存储,SharedPreferences是使用键值对的方式来存储数据的。
Context类中的getSharedPreferences()方法,获取SharedPreferences对象。
第一个参数:指定SharedPreferences文件的名称。(如果指定文件的名称不存在就会创建一个,SharedPreferences文件都是存放在/data/data/<package name>/shared_prefs目录)。
第二个参数:指定操作模式。只有MODE_PRIVATE可选,MODE_PRIVATE:只有当前的应用程序才可以对这个SharedPreferences文件进行读写。
具体实现:
val editor=getSharedPreferences("data", Context.MODE_PRIVATE).edit()
            editor.putString("name","Tom")
            editor.putInt("age",28)
            editor.putBoolean("married",false)
            editor.apply()//提交
如何证实数据是否已经保存成功了呢?
使用快捷键Ctrl+Shift+A(Mac系统是command+shift+A)打开搜索功能,在搜索框输入“Device File Explorer”即可找到这个工具,我们在这工具里找到/data/data/com.example.sharedpreferencestest/shared_prefs/目录,里面有一个生成的data.xml文件,双击打开,查看里面的内容。
具体实现
val prefs=getSharedPreferences("data",Context.MODE_PRIVATE)
            val name=prefs.getString("name","")
            val age=prefs.getInt("age",0)
            val married=prefs.getBoolean("married",false)
            Log.d("MainActivity","name is $name")
            Log.d("MainActivity","age is $age")
            Log.d("MainActivity","married is $married")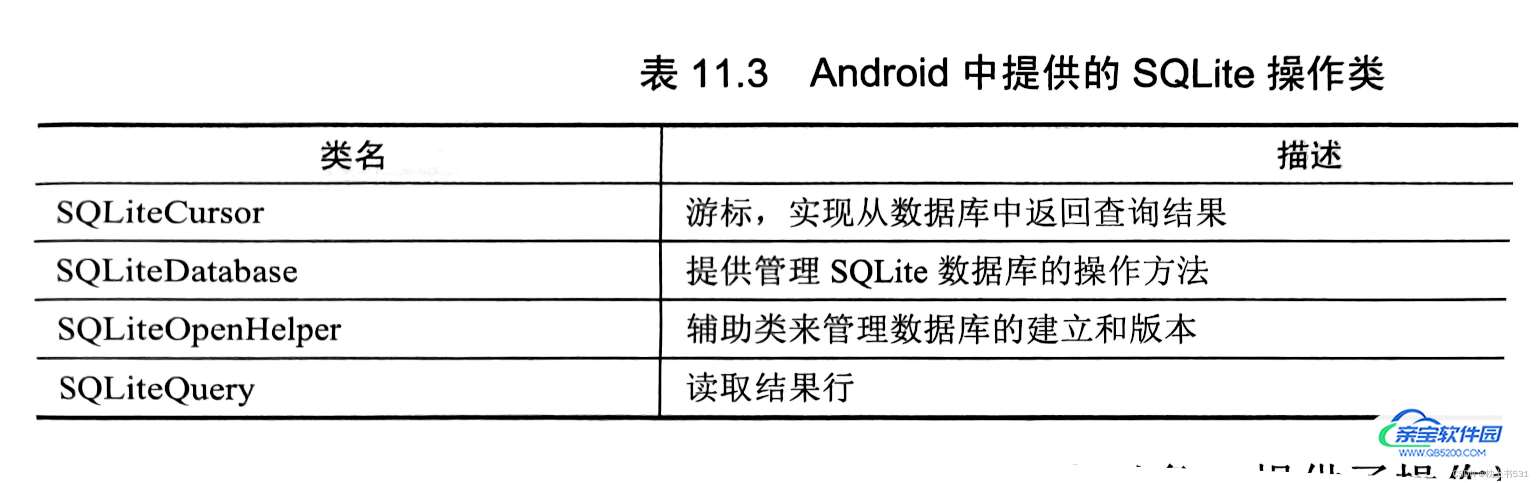
SQLiteOpenHelper类是一个抽象类,有两个抽象方法,onCreate()和onUpgrade()。
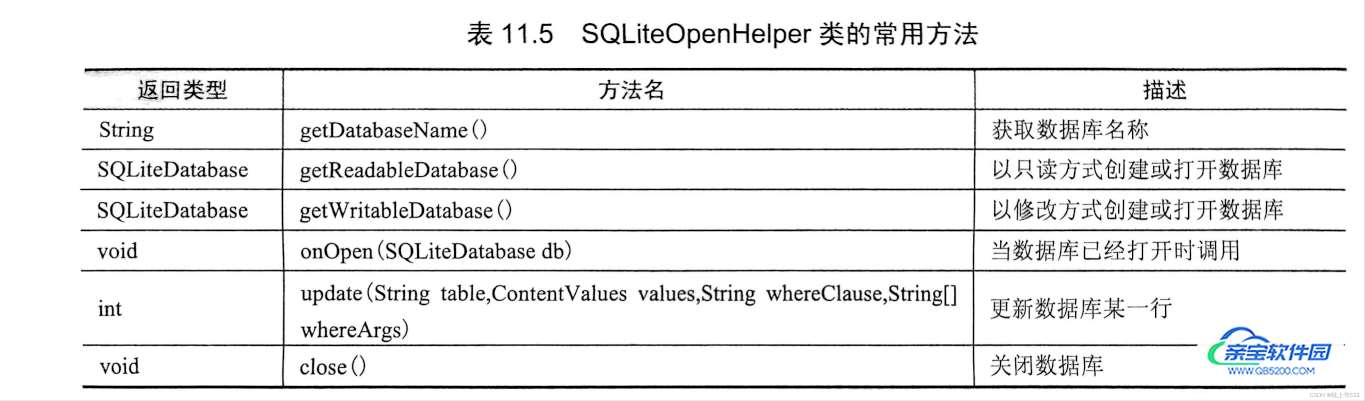
SQLiteOpenHelper类的构造方法:
第一个参数:Context
第二个参数:数据库名
第三个参数:运行我们在查询数据时放回一个自定义的Cursor,一般传入null即可
第四个参数:表明当前数据库的版本号
步骤
定义SQLiteOpenHelper的子类,在该类中创建一个名为BookStore.db的数据库
class MyDatabaseHelper(val context: Context,name:String,version:Int) :SQLiteOpenHelper(context,name,null,version) {
    private val createBook = "create table Book(" +
            " id integer primary key autoincrement," +
            "author text," +
            "price real," +
            "pages integer," +
            "name text)"
    private val createCategory = "create table Category(" +
            "id integer primary key autoincrement," +
            "category_name text," +
             "category_code integer)"
    override fun onCreate(p0: SQLiteDatabase?) {
        if (p0 != null) {
            p0.execSQL(createBook)
            p0.execSQL(createCategory)
        }
        Toast.makeText(context,"Create succeeded",Toast.LENGTH_SHORT).show()
    }
    override fun onUpgrade(p0: SQLiteDatabase?, p1: Int, p2: Int) {
        if (p0 != null) {
            p0.execSQL("drop table if exists Book")
            p0.execSQL("drop table if exists Category")
            onCreate(p0)
        }
    }
}
调用MyDatabaseHelper类完成表的创建
class MainActivity : AppCompatActivity() {
    override fun onCreate(savedInstanceState: Bundle?) {
        super.onCreate(savedInstanceState)
        setContentView(R.layout.activity_main)
        val dbHelper=MyDatabaseHelper(this,"BookStore.db",1)
        dbHelper.writableDatabase
    }
}把
val dbHelper=MyDatabaseHelper(this,"BookStore.db",1)
改为
val dbHelper=MyDatabaseHelper(this,"BookStore.db",2)
表示数据库升级
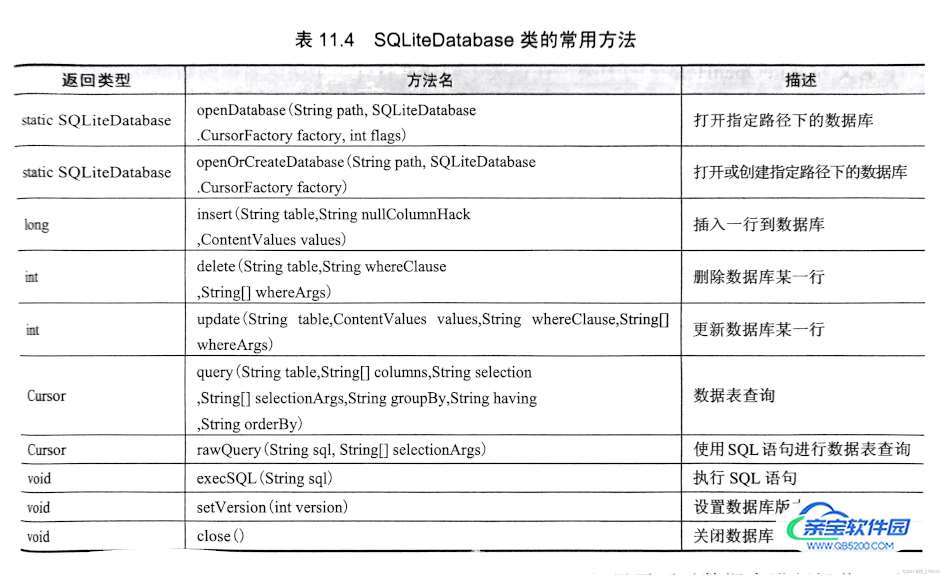
insert():专门用于添加数据。
第一个参数:表名
第二个参数:用于在未指定添加数据的情况下给某些可为空的列自动赋值给NULL,一般用不到这个功能,传入null即可。
第三个参数:ContentValues对象
步骤
获取SQLiteDatabase对象
val dbHelper=MyDatabaseHelper(this,"BookStore.db",1)
val db=dbHelper.writableDatabase
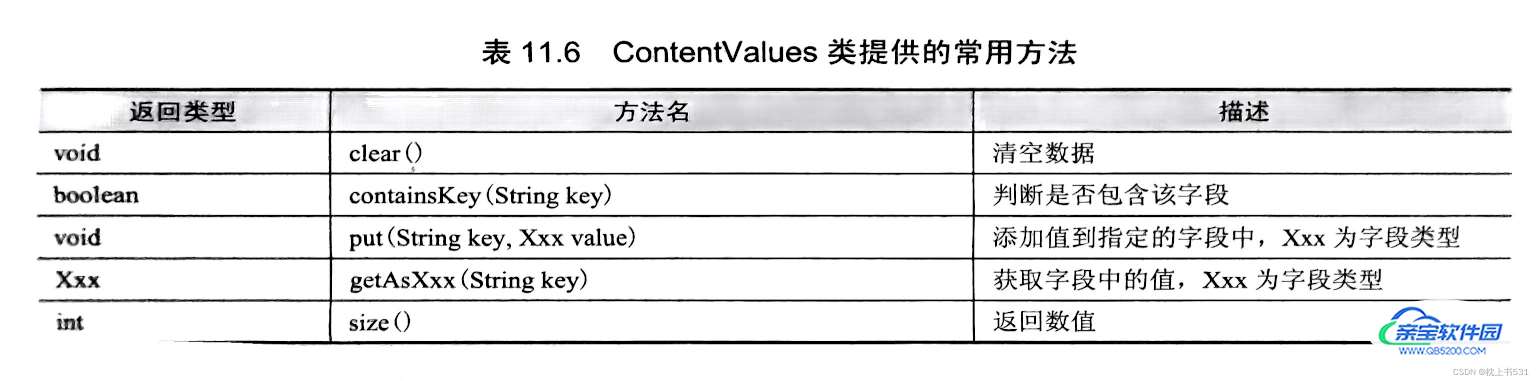
使用ContentValues对要添加的数据进行组装
val values1=ContentValues().apply {
                put("name","The Da Vinci Code")
                put("author","Dan Brown")
                put("pages",454)
                put("price",16.96)
            }
调用insert()方法将数据添加到表中
db.insert("Book",null,values1)updata():对数据进行更新。
参数:第一个参数:表名,指定更新哪张表的数据。
第二个参数:ContentValues对象,要把更新数据在这里组装进去。
第三、四个参数:用于约束更新某一行或某几行的数据,不指定的话默认会更新所有行。
步骤
获取SQLiteDatabase对象
val dbHelper=MyDatabaseHelper(this,"BookStore.db",1)
val db=dbHelper.writableDatabase
构建ContentValues对象,并且给它指定一组数据,说明把价格这一系列的数据更新成10.99。
val values=ContentValues()
values.put("price",10.99)
调用SQLiteDatabase的updata()执行具体的更新操作。
db.update("Book",values,"name=?", arrayOf("The Da Vinci Code"))delete()方法:专门用于删除数据。
第一个参数:表名
第二、三个参数:用于约束删除某一行或者某几行的数据,不指定的话会默认删除所有行。
val dbHelper=MyDatabaseHelper(this,"BookStore.db",1)
val db=dbHelper.writableDatabase
db.delete("Book","pages>?", arrayOf("500"))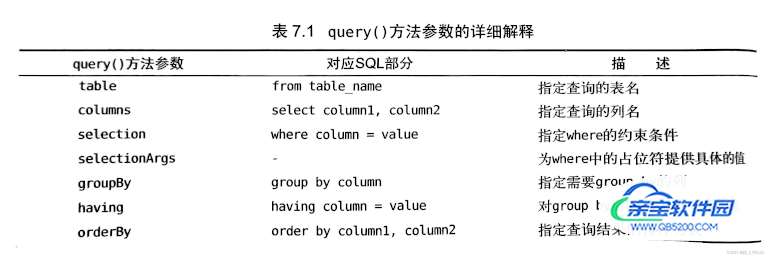
步骤
获取SQLiteDatabase对象
val dbHelper=MyDatabaseHelper(this,"BookStore.db",1)
val db=dbHelper.writableDatabase
调用query()方法后会返回一个Cursor对象,查询到的所有数据都可以从这个对象中取出。
        val cursor=db.query("Book",null,null,null,null,null,null)
         //查询完后获得一个Cursor对象,接着我们调用它的moveToFirst()方法,
         //将数据的指针移动到第一行的位置,
         //然后进入一个循环当中,去遍历查询到的每一行数据
        if(cursor.moveToFirst()){
             do{
                    val name=cursor.getString(cursor.getColumnIndex("name"))
                    val author=cursor.getString(cursor.getColumnIndex("author"))
                    val pages=cursor.getInt(cursor.getColumnIndex("pages"))
                    val price=cursor.getDouble(cursor.getColumnIndex("price"))
                    Log.d("MainActivity","Book name is $name")
                    Log.d("MainActivity","Book author is $author")
                    Log.d("MainActivity","Book pages is $pages")
                    Log.d("MainActivity","Book price is $price")
              }while (cursor.moveToNext())
          }
cursor.close()使用SQL来完成前面学过的CRUD操作。
添加数据:
db.execSQL("insert  into Book(name, author, pages, price)  values(?,?,?,?)",
array0f("The  Da  Vinci  Code","Dan  Brown","454","16.96")
)
db.execSQL("insert into Book(name, author, pages, price) values(?,?,?,?)",
array0f("The  Lost  Symbol","Dan  Brown","510","19.95")
)
更新数据:
db.execSQL("update Book set price=? where name=?",array0f("10.99","The Da Vinci Code"))删除数据:
db.execSQL("delete from Book where pages>?",array0f("500"))查询数据:
val cursor=db.rawQuery("select*from Book", null)
