tree-sharking 简介
tree-sharking 是 Webpack 2 后续版本的优化功能,顾名思义,就是将多余的代码给 “摇晃” 掉,在开发中我们经常使用一些第三方库,而这些第三方库只使用了这个库的一部门功能或代码,未使用的代码也要被打包进来,这样出口文件会非常大,tree-sharking 帮我们解决了这个问题,它可以将各个模块中没有使用的方法过滤掉,只对有效代码进行打包。
AST 语法树分析
假设我们现在使用了 ElementUI 库的两个组件,通常会使用解构赋值来引入。
优化前
import { Button, Alert } from "element-ui";
这样引用资源, Webpack 在打包的时候会找到 element-ui 并把里面所有的代码全部打包到出口文件,我们只使用了两个组件,全部打包不是我们所希望的,tree-sharking 是通过在 Webpack 中配置 babel-plugin-import 插件来实现的,它可以将解构的代码转换成下面的形式。
优化后
import Button from "element-ui/lib/button";
import Alert from "element-ui/lib/Alert";
转化后会去 node_modules 中的 element-ui 模块找到 Button 和 Alert 两个组件对应的文件,并打包到出口文件中。
通过上面的转换可以看出,其实 tree-sharking 的实现原理是通过改变 AST 语法树的结构来实现的,我们可以通过在线转换网站 http://esprima.orghttps://img.qb5200.com/download-x/demo/parse.html 将 JS 代码装换成 AST 语法树。
优化前的 AST 语法树
 {
  "type": "Program",
  "body": [
    {
      "type": "ImportDeclaration",
      "specifiers": [
        {
          "type": "ImportSpecifier",
          "local": {
            "type": "Identifier",
            "name": "Button"
          },
          "imported": {
            "type": "Identifier",
            "name": "Button"
          }
        },
        {
          "type": "ImportSpecifier",
          "local": {
            "type": "Identifier",
            "name": "Alert"
          },
          "imported": {
            "type": "Identifier",
            "name": "Alert"
          }
        }
      ],
      "source": {
        "type": "Literal",
        "value": "element-ui",
        "raw": "\"element-ui\""
      }
    }
  ],
  "sourceType": "module"
}
优化后的 AST 语法树
 {
  "type": "Program",
  "body": [
    {
      "type": "ImportDeclaration",
      "specifiers": [
        {
          "type": "ImportDefaultSpecifier",
          "local": {
            "type": "Identifier",
            "name": "Button"
          }
        }
      ],
      "source": {
        "type": "Literal",
        "value": "element-ui/lib/button",
        "raw": "\"element-ui/lib/button\""
      }
    },
    {
      "type": "ImportDeclaration",
      "specifiers": [
        {
          "type": "ImportDefaultSpecifier",
          "local": {
            "type": "Identifier",
            "name": "Alert"
          }
        }
      ],
      "source": {
        "type": "Literal",
        "value": "element-ui/lib/Alert",
        "raw": "\"element-ui/lib/Alert\""
      }
    }
  ],
  "sourceType": "module"
}
从上面的语法树对比,可以看出在优化前 body 里面只有一个对象,使用的组件信息存在 specifiers 里,source 指向了 element-ui,而在优化后,将两个组件分别拆成了两个对象存在 body 中,每个对象的的 specifiers 只存储一个组件,并在 source 里面指向了当前组件对应的路径。
模拟 tree-starking
既然我们已经清楚要修改语法树的位置,下面就使用 AST 来模拟 tree-sharking 功能,对语法树的操作是依赖于 babel-core 和 babel-types 两个核心模块的,下面先安装依赖。
npm install babel-core babel-types
文件:babel-plugin-my-import.js
const babel = require("babel-core");
const types = require("babel-types");

let code = `import { Button, Alert } from "element-ui"`;

let importPlugin = {
  visitor: {
    ImportDeclaration(path) {
      let node = path.node;
      let source = node.source.value;
      let specifiers = node.specifiers;

      // 判断是否是默认导出,其中一个不是默认导出,则都不是默认导出
      if (!types.isImportDefaultSpecifier(specifiers[0])) {
        // 如果不是默认导出,则需要转换
        specifiers = specifiers.map(specifier => {
          // 数组内容:当前默认导出的标识、从哪里导入
          return types.importDeclaration(
            [types.importDefaultSpecifier(specifier.local)],
            types.stringLiteral(`${source}/lib/${specifier.local.name.toLowerCase()}`)
          );
        });

        // 替换树结构
        path.replaceWithMultiple(specifiers);
      }
    }
  }
};

let result = babel.transform(code, {
  plugins: [importPlugin]
});

console.log(result.code);

// import Button from "element-ui/lib/button";
// import Alert from "element-ui/lib/alert";
通过上面的代码可以发现我们使用 babel-core 和 babel-types 两个模块的核心方法对语法书进行了遍历、修改和替换,更详细的 API 可以查看 https://github.com/babel/babel/tree/6.x/packages/babel-types。
结合 Webpack 使用插件
前面只是验证了 tree-sharking 中 JS 语法的转换过程,接下来将上面的代码转换成插件配合 Webpack 使用,来彻底感受 tree-sharking 的工作过程。
文件:~node_modules/babel-plugin-my-import.js
const babel = require("babel-core");
const types = require("babel-types");

let importPlugin = {
  visitor: {
    ImportDeclaration(path) {
      let node = path.node;
      let source = node.source.value;
      let specifiers = node.specifiers;

      // 判断是否是默认导出,其中一个不是默认导出,则都不是默认导出
      if (!types.isImportDefaultSpecifier(specifiers[0])) {
        // 如果不是默认导出,则需要转换
        specifiers = specifiers.map(specifier => {
          // 数组内容:当前默认导出的标识、从哪里导入
          return types.importDeclaration(
            [types.importDefaultSpecifier(specifier.local)],
            types.stringLiteral(`${source}/lib/${specifier.local.name.toLowerCase()}`)
          );
        });

        // 替换树解构
        path.replaceWithMultiple(specifiers);
      }
    }
  }
};

module.exports = importPlugin;
上面删掉了多余的测试代码,将模块中的 importPlugin 插件导出,并把 babel-plugin-my-import.js 移入了 node_modules 当中。
接下来安装需要的依赖:
npm install webpack webpack-cli babel-loader babel-presets-env
npm install vue element-ui --save
安装完依赖,写一个要编译的文件,使用 Webpack 进行打包,查看使用插件前和使用插件后出口文件的大小。
文件:import.js
import Vue from "vue";
import { Button, Alert } from "element-ui";
下面来写一个简单的 Webpack 配置文件。
文件:webpcak.config.js
module.exports = {
  mode: "development",
  entry: "import.js",
  output: {
    filename: "bundle.js",
    path: __dirname
  },
  module: {
    rules: [{
      test: /\.js$/,
      use: {
        loader: "babel-loader",
        options: {
          presets: [
            "env",
          ],
          plugins: [
            // 插件:不使用插件打包注释掉该行即可
            ["my-import", { libararyName: "element-ui" }]
          ]
        }
      },
      exclude: /node_modules/
    }]
  }
};
为了防止 babel 相关的依赖升级 7.0 后出现一些问题导致 Webpack 无法启动,再此贴出 package.json 文件,按照对应版本下载依赖保证上面 Webpack 配置生效。
文件:package.json
{
 "name": "ast-lesson",
 "version": "1.0.0",
 "description": "tree-starking",
 "main": "index.js",
 "scripts": {
  "test": "echo \"Error: no test specified\" && exit 1"
 },
 "keywords": [],
 "author": "",
 "license": "ISC",
 "dependencies": {
  "babel-core": "^6.26.3",
  "babel-loader": "^7.1.5",
  "babel-preset-env": "^1.7.0",
  "babel-types": "^6.26.0",
  "escodegen": "^1.10.0",
  "esprima": "^4.0.0",
  "estraverse": "^4.2.0",
  "webpack": "^4.16.0",
  "webpack-cli": "^3.0.8"
 },
 "devDependencies": {
  "vue": "^2.5.17",
  "element-ui": "^2.4.6"
 }
}
对比使用插件前后的出口文件
接下来分别在使用插件和不使用插件时执行打包命令,查看出口文件 bondle.js 的大小。
npx webpack
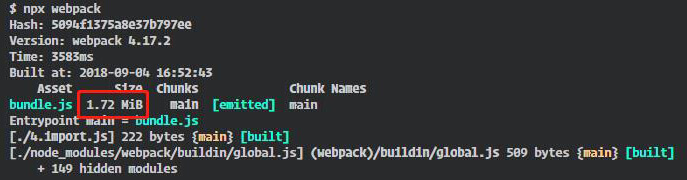
使用 babel-plugin-my-import 前:
使用 babel-plugin-my-import 后:
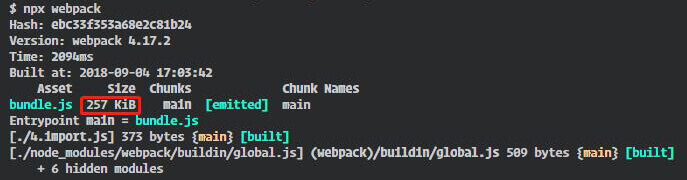
通过对比,可以看到使用 tree-sharking 即我们自己实现的 babel-plugin-my-import 插件后,打包的出口文件大大减小,其原因是将引入第三方库没有使用的代码全都过滤掉了,只打包了有效代码。
总结
上面对 Webpack 的 tree-sharking 进行了分析,并模拟 babel-plugin-import 简易的实现了一版 tree-sharking 的优化插件,这个过程中相信大家已经了解了 tree-sharking 的原理以及实现类似插件的思路,并已经具备了开发类似插件的基本条件,最后还有一点需要补充,tree-sharking 优化的方式是根据 ES6 语法 import “静态” 引入的特性实现的,如果要说 tree-sharking 很强大,还不如说 ES6 模块化规范 “静态” 引入的特性强大,正由于是基于 “静态” 引入,所以目前 tree-sharking 只支持遍历一层 import 关键字。

