介绍
采用集中式存储管理应用的所有组件的状态, 就能实现组件间数据共享
实现
逻辑图
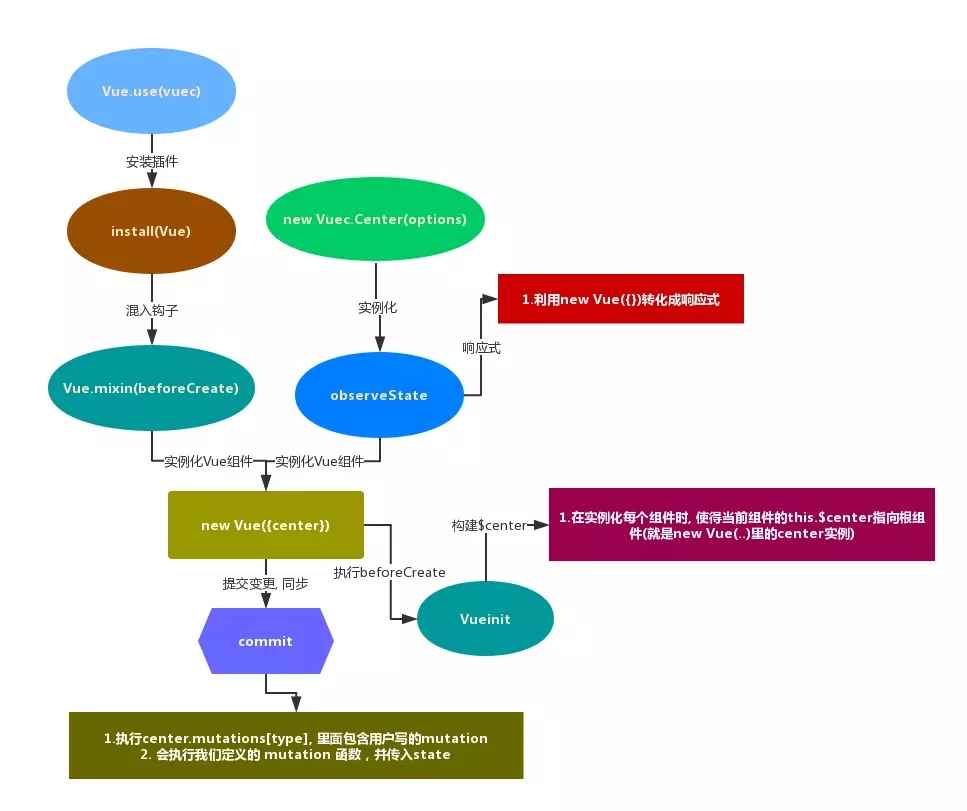
从图上有两条线: Vue.use(vuec), 与 new Vuec.center(options)
第一条线Vue.use(vuec)安装插件
使用Vue.use(vuec)时, 会执行vuec的install方法,会注入参数Vue 所以vuec是这样的,
// index.js
import {Center, install} from './center'
export default {Center, install}
Center对象将实例化成center(下面再说),我们先看看install方法
// center.js
let Vue // 全局变量, 保存install里的Vue
export function install (_Vue) {
 if (!Vue) {
  _Vue.mixin({
   beforeCreate: applyMixin // 在beforeCreate钩子上混入applyMixin函数
  })
 }
 Vue = _Vue
}
install在Vue原型的beforeCreate混入applyMixin函数, 也就是说在生成每个Vue组件时,在它的生命周期beforeCreate钩子上就会执行applyMixin方法
第二条线 new Vuec.center(options)实例化Center对象
先看看用户传入的options, 下面例子
export default new Vuec.Center({
 state: {
  name: 'liuyang'
 },
 mutations: {
  changeName (state) {
   state.name = 'jike'
  }
 }
})
上面代码会生成center实例, 该实例上应该包括:state状态,commit方法提交变更等
// center.js
export class Center {
 constructor (options= {}) {
  let center = this
  this.mutations = options.mutations
  observeState(center, options.state)
 }
 get state () { // 代理了this.$center.state的最终访问值
  return this._vm.$data.$$state
 }
 commit (_type, _payload) {
  this.mutations[_type](this.state, _payload)
 }
}
function observeState(center, state) { // 响应式state
 center._vm = new Vue({
  data: {
   $$state: state
  }
 })
}
在执行new Vuec.Center({..})时,就是执行Center的构造函数
首先执行let center = this, 定义center保存当前实例
接着执行this.mutations = options.mutations, 在实例center上添加mutations属性, 值就是用户输入mutations,
按上面例子, this.mutations长成这样
this.mutations = {
  changeName (state) {
   state.name = 'jike'
  }
}
最后执行observeState(center, options.state), 作用:让center实例的state属性指向options.state并且是响应式的
  function observeState(center, state) { // 响应式state
   center._vm = new Vue({ // 利用Vue的响应系统,将state转化成响应式
    data: {
     $$state: state
    }
   })
  }
在center实例上添加_vm属性, 值是一个Vue实例, 在该Vue实例的data下定义了$$state, 它的值是options.state用户输入的state; 结合上面的这段代码
// center.js
export class Center {
 ...省略
 get state () { // 代理了this.$center.state的最终访问值
  return this._vm.$data.$$state
 }
 ...省略
}
所以我们在组件中访问center.state其实就是访问center._vm.$data.$$state
OK, center就构建好了
创建Vue组件
用户输入
import Vue from 'vue'
import App from './App'
import router from './router'
import center from './center'

new Vue({
 el: '#app',
 router,
 center, // 构建好的center实例
 template: '<App/>',
 components: {App}
})
在beforeCreate生命周期时会触发上面混入的applyMixin函数
// mixins.js
export default function applyMixin() {
 vuecInit.call(this) //
}

function vuecInit () {
 const options = this.$options
 // vue的实例化是从外往内, 所以父组件的$center一定是options的center
 this.$center = options.parent?options.parent.$center: options.center
}
applyMixin里会执行vuecInit.call(this), 这里的this指向当前组件的实例,
接着看vuecInit, 定义了options等于用户输入选项,因为先创建根组件, 所以根组件this.$center的值的引用就是我们在new Vue({..center})时传入的center实例, 下面所有组件都指向它
OK, 你就可以在组件里使用this.$center访问了
commit变更
// center.js
export class Center {
 ... 省略
 commit (_type, _payload) {
  this.mutations[_type](this.state, _payload)
 }
}
通常我们变更时: this.$center.commit('changeName', 'jike'), 这样的话, this.mutations[_type]就是对应方法函数, 往该函数里传入state以及payload,
举上面的例子
// this.mutations[_type] , _type = 'changeName', payload= 'jike'
this.mutations = {
  changeName (state, payload) {
   state.name = payload
  }
}
说明
上面只是一个简单的状态管理, 还有很多地方没有实现: actions异步变更,getters函数,modules模块分割, 辅助函数mapState..等
源码地址: github

