如今,互联网项目对于安全的要求越来越严格,这就是对后端开发提出了更多的要求,目前比较成熟的几种大家比较熟悉的模式,像RBAC 基于角色权限的验证,shiro框架专门用于处理权限方面的,另一个比较流行的后端框架是Spring-Security,该框架提供了一整套比较成熟,也很完整的机制用于处理各类场景下的可以基于权限,资源路径,以及授权方面的解决方案,部分模块支持定制化,而且在和oauth2.0进行了很好的无缝连接,在移动互联网的授权认证方面有很强的优势,具体的使用大家可以结合自己的业务场景进行选取和使用
下面来说说关于单点登录中目前比较流行的一种使用方式,就是springsecurity+jwt实现无状态下用户登录;
JWT
在之前的篇章中大致提到过,使用jwt在分布式项目中进行用户信息的认证很方便,各个模块只需要知道配置的秘钥,就可以解密token中用户的基本信息,完成认证,很方便,关于使用jwt的基本内容可以查阅相关资料,或者参考我之前的一篇;
整理一下思路
1、搭建springboot工程
2、导入springSecurity跟jwt的依赖
3、用户的实体类,dao层,service层(真正开发时再写,这里就直接调用dao层操作数据库)
4、实现UserDetailsService接口
5、实现UserDetails接口
6、验证用户登录信息的拦截器
7、验证用户权限的拦截器
8、springSecurity配置
9、认证的Controller以及测试的controller
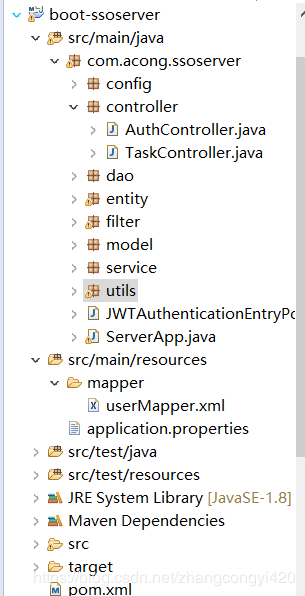
项目结构
pom文件
<dependencies>
		<dependency>
			<groupId>org.springframework.boot</groupId>
			<artifactId>spring-boot-starter-web</artifactId>
		<https://img.qb5200.com/download-x/dependency>

		<dependency>
			<groupId>org.springframework.boot</groupId>
			<artifactId>spring-boot-starter-test</artifactId>
			<scope>test</scope>
		<https://img.qb5200.com/download-x/dependency>

		<dependency>
			<groupId>org.springframework.boot</groupId>
			<artifactId>spring-boot-starter</artifactId>
		<https://img.qb5200.com/download-x/dependency>

		<dependency>
			<groupId>org.springframework.boot</groupId>
			<artifactId>spring-boot-starter-security</artifactId>
		<https://img.qb5200.com/download-x/dependency>

		<!-- https://mvnrepository.com/artifact/org.springframework.security.oauth/spring-security-oauth2 -->
		<dependency>
			<groupId>org.springframework.security.oauth</groupId>
			<artifactId>spring-security-oauth2</artifactId>
			<version>2.3.5.RELEASE</version>
		<https://img.qb5200.com/download-x/dependency>

		<!-- https://mvnrepository.com/artifact/org.springframework.security/spring-security-jwt -->
		<dependency>
			<groupId>org.springframework.security</groupId>
			<artifactId>spring-security-jwt</artifactId>
			<version>1.0.10.RELEASE</version>
		<https://img.qb5200.com/download-x/dependency>

		<!-- https://mvnrepository.com/artifact/org.springframework.security.oauth.boot/spring-security-oauth2-autoconfigure -->
		<dependency>
			<groupId>org.springframework.security.oauth.boot</groupId>
			<artifactId>spring-security-oauth2-autoconfigure</artifactId>
			<version>2.1.4.RELEASE</version>
		<https://img.qb5200.com/download-x/dependency>

		<dependency>
			<groupId>io.jsonwebtoken</groupId>
			<artifactId>jjwt</artifactId>
			<version>0.9.1</version>
		<https://img.qb5200.com/download-x/dependency>

		<dependency>
			<groupId>org.springframework.boot</groupId>
			<artifactId>spring-boot-starter-data-jpa</artifactId>
		<https://img.qb5200.com/download-x/dependency>

		<dependency>
			<groupId>mysql</groupId>
			<artifactId>mysql-connector-java</artifactId>
		<https://img.qb5200.com/download-x/dependency>

		<!-- mybatis依赖 -->
		<dependency>
			<groupId>org.mybatis.spring.boot</groupId>
			<artifactId>mybatis-spring-boot-starter</artifactId>
			<version>1.3.0</version>
		<https://img.qb5200.com/download-x/dependency>

		<dependency>
			<groupId>org.springframework.boot</groupId>
			<artifactId>spring-boot-starter-jdbc</artifactId>
		<https://img.qb5200.com/download-x/dependency>

		<!-- redis依赖 -->
		<dependency>
			<groupId>org.springframework.boot</groupId>
			<artifactId>spring-boot-starter-data-redis</artifactId>
		<https://img.qb5200.com/download-x/dependency>

	<https://img.qb5200.com/download-x/dependencies>
application.properties
server.port=8091

#数据库连接
spring.datasource.url=jdbc:mysql://localhost:3306/test?useUnicode=true
spring.datasource.driver-class-name=com.mysql.jdbc.Driver
spring.datasource.username=root
spring.datasource.password=root

#mybatis配置
mybatis.type-aliases-package=com.congge.entity
mybatis.mapper-locations=classpath:mybatis/*.xml

#redis配置
spring.session.store-type=redis
spring.redis.database=0
spring,redis.host=127.0.0.1
spring.redis.port=6379
spring.redis.pool.min-idle=10000
spring.redis.timeout=30000
为模拟用户登录,这里提前创建了一个测试使用的表,user

实体类User
public class User {

  private Integer id;

  private String username;

  private String password;

  private String role;

  public Integer getId() {
    return id;
  }

  public void setId(Integer id) {
    this.id = id;
  }

  public String getUsername() {
    return username;
  }

  public void setUsername(String username) {
    this.username = username;
  }

  public String getPassword() {
    return password;
  }

  public void setPassword(String password) {
    this.password = password;
  }

  public String getRole() {
    return role;
  }

  public void setRole(String role) {
    this.role = role;
  }

  @Override
  public String toString() {
    return "User{" +
        "id=" + id +
        ", username='" + username + '\'' +
        ", password='" + password + '\'' +
        ", role='" + role + '\'' +
        '}';
  }
}
Jwt工具类,用于管理token相关的操作,可以单测使用
public class TestJwtUtils {

	public static final String TOKEN_HEADER = "Authorization";
  public static final String TOKEN_PREFIX = "Bearer ";

	public static final String SUBJECT = "congge";

	public static final long EXPIRITION = 1000 * 24 * 60 * 60 * 7;

	public static final String APPSECRET_KEY = "congge_secret";

  private static final String ROLE_CLAIMS = "rol";

	public static String generateJsonWebToken(Users user) {

		if (user.getId() == null || user.getUserName() == null || user.getFaceImage() == null) {
			return null;
		}

		Map<String,Object> map = new HashMap<>();
		map.put(ROLE_CLAIMS, "rol");

		String token = Jwts
				.builder()
				.setSubject(SUBJECT)
				.setClaims(map)
				.claim("id", user.getId())
				.claim("name", user.getUserName())
				.claim("img", user.getFaceImage())
				.setIssuedAt(new Date())
				.setExpiration(new Date(System.currentTimeMillis() + EXPIRITION))
				.signWith(SignatureAlgorithm.HS256, APPSECRET_KEY).compact();
		return token;
	}

	/**
	 * 生成token
	 * @param username
	 * @param role
	 * @return
	 */
	public static String createToken(String username,String role) {

		Map<String,Object> map = new HashMap<>();
		map.put(ROLE_CLAIMS, role);

		String token = Jwts
				.builder()
				.setSubject(username)
				.setClaims(map)
				.claim("username",username)
				.setIssuedAt(new Date())
				.setExpiration(new Date(System.currentTimeMillis() + EXPIRITION))
				.signWith(SignatureAlgorithm.HS256, APPSECRET_KEY).compact();
		return token;
	}

	public static Claims checkJWT(String token) {
		try {
			final Claims claims = Jwts.parser().setSigningKey(APPSECRET_KEY).parseClaimsJws(token).getBody();
			return claims;
		} catch (Exception e) {
			e.printStackTrace();
			return null;
		}
	}

	/**
	 * 获取用户名
	 * @param token
	 * @return
	 */
	public static String getUsername(String token){
  	Claims claims = Jwts.parser().setSigningKey(APPSECRET_KEY).parseClaimsJws(token).getBody();
  	return claims.get("username").toString();
  }

	/**
	 * 获取用户角色
	 * @param token
	 * @return
	 */
  public static String getUserRole(String token){
  	Claims claims = Jwts.parser().setSigningKey(APPSECRET_KEY).parseClaimsJws(token).getBody();
  	return claims.get("rol").toString();
  }

  /**
   * 是否过期
   * @param token
   * @return
   */
  public static boolean isExpiration(String token){
  	Claims claims = Jwts.parser().setSigningKey(APPSECRET_KEY).parseClaimsJws(token).getBody();
  	return claims.getExpiration().before(new Date());
  }

	public static void main(String[] args) {
		String name = "acong";
		String role = "rol";
		String token = createToken(name,role);
		System.out.println(token);

		Claims claims = checkJWT(token);
		System.out.println(claims.get("username"));

		System.out.println(getUsername(token));
		System.out.println(getUserRole(token));
		System.out.println(isExpiration(token));

	}


	/**
	 * eyJhbGciOiJIUzI1NiJ9.
	 * eyJzdWIiOiJjb25nZ2UiLCJpZCI6IjExMDExIiwibmFtZSI6Im51b3dlaXNpa2kiLCJpbWciOiJ3d3cudW9rby5jb20vMS5wbmciLCJpYXQiOjE1NTQ5OTI1NzksImV4cCI6MTU1NTU5NzM3OX0.
	 * 6DJ9En-UBcTiMRldZeevJq3e1NxJgOWryUyim4_-tEE
	 *
	 * @param args
	 */

	/*public static void main(String[] args) {

		Users user = new Users();
		user.setId("11011");
		user.setUserName("nuoweisiki");
		user.setFaceImage("www.uoko.com/1.png");
		String token = generateJsonWebToken(user);

		System.out.println(token);

		Claims claims = checkJWT(token);
		if (claims != null) {
			String id = claims.get("id").toString();
			String name = claims.get("name").toString();
			String img = claims.get("img").toString();

			String rol = claims.get("rol").toString();

			System.out.println("id:" + id);
			System.out.println("name:" + name);
			System.out.println("img:" + img);

			System.out.println("rol:" + rol);


		}

	}*/

}
操作数据库的类
,这里主要是提供用户注册的一个save用户的方法,
@Service
public class UserService {

	@Autowired
	private UserDao userDao;

	public void save(User user) {
		user.setId(1);
		userDao.save(user);
	}

}
JwtUser
该类封装登录用户相关信息,例如用户名,密码,权限集合等,需要实现UserDetails 接口,
public class JwtUser implements UserDetails {

  private Integer id;
  private String username;
  private String password;
  private Collection<? extends GrantedAuthority> authorities;

  public JwtUser() {
  }

  // 写一个能直接使用user创建jwtUser的构造器
  public JwtUser(User user) {
    id = user.getId();
    username = user.getUsername();
    password = user.getPassword();
    authorities = Collections.singleton(new SimpleGrantedAuthority(user.getRole()));
  }

  public Collection<? extends GrantedAuthority> getAuthorities() {
    return authorities;
  }

  public String getPassword() {
    return password;
  }

  public String getUsername() {
    return username;
  }

  public boolean isAccountNonExpired() {
    return true;
  }

  public boolean isAccountNonLocked() {
    return true;
  }

  public boolean isCredentialsNonExpired() {
    return true;
  }

  public boolean isEnabled() {
    return true;
  }

  @Override
  public String toString() {
    return "JwtUser{" +
        "id=" + id +
        ", username='" + username + '\'' +
        ", password='" + password + '\'' +
        ", authorities=" + authorities +
        '}';
  }

}
配置拦截器
JWTAuthenticationFilter
JWTAuthenticationFilter继承于UsernamePasswordAuthenticationFilter
该拦截器用于获取用户登录的信息,只需创建一个token并调用authenticationManager.authenticate()让spring-security去进行验证就可以了,不用自己查数据库再对比密码了,这一步交给spring去操作。 这个操作有点像是shiro的subject.login(new UsernamePasswordToken()),验证的事情交给框架。
/**
 * 验证用户名密码正确后,生成一个token,并将token返回给客户端
 * 该类继承自UsernamePasswordAuthenticationFilter,重写了其中的2个方法 ,
 * attemptAuthentication:接收并解析用户凭证。
 * successfulAuthentication:用户成功登录后,这个方法会被调用,我们在这个方法里生成token并返回。
 */
public class JWTAuthenticationFilter extends UsernamePasswordAuthenticationFilter {

  private AuthenticationManager authenticationManager;

  public JWTAuthenticationFilter(AuthenticationManager authenticationManager) {
    this.authenticationManager = authenticationManager;
    super.setFilterProcessesUrl("/auth/login");
  }

  @Override
  public Authentication attemptAuthentication(HttpServletRequest request,
                        HttpServletResponse response) throws AuthenticationException {

    // 从输入流中获取到登录的信息
    try {
      LoginUser loginUser = new ObjectMapper().readValue(request.getInputStream(), LoginUser.class);
      return authenticationManager.authenticate(
          new UsernamePasswordAuthenticationToken(loginUser.getUsername(), loginUser.getPassword())
      );
    } catch (IOException e) {
      e.printStackTrace();
      return null;
    }
  }

  // 成功验证后调用的方法
  // 如果验证成功,就生成token并返回
  @Override
  protected void successfulAuthentication(HttpServletRequest request,
                      HttpServletResponse response,
                      FilterChain chain,
                      Authentication authResult) throws IOException, ServletException {

    JwtUser jwtUser = (JwtUser) authResult.getPrincipal();
    System.out.println("jwtUser:" + jwtUser.toString());

    String role = "";
    Collection<? extends GrantedAuthority> authorities = jwtUser.getAuthorities();
    for (GrantedAuthority authority : authorities){
      role = authority.getAuthority();
    }

    String token = TestJwtUtils.createToken(jwtUser.getUsername(), role);
    //String token = JwtTokenUtils.createToken(jwtUser.getUsername(), false);
    // 返回创建成功的token
    // 但是这里创建的token只是单纯的token
    // 按照jwt的规定,最后请求的时候应该是 `Bearer token`
    response.setCharacterEncoding("UTF-8");
    response.setContentType("application/json; charset=utf-8");
    String tokenStr = JwtTokenUtils.TOKEN_PREFIX + token;
    response.setHeader("token",tokenStr);
  }

  @Override
  protected void unsuccessfulAuthentication(HttpServletRequest request, HttpServletResponse response, AuthenticationException failed) throws IOException, ServletException {
    response.getWriter().write("authentication failed, reason: " + failed.getMessage());
  }
}
JWTAuthorizationFilter
验证成功当然就是进行鉴权了,每一次需要权限的请求都需要检查该用户是否有该权限去操作该资源,当然这也是框架帮我们做的,那么我们需要做什么呢?很简单,只要告诉spring-security该用户是否已登录,是什么角色,拥有什么权限就可以了。
JWTAuthenticationFilter继承于BasicAuthenticationFilter,至于为什么要继承这个我也不太清楚了,这个我也是网上看到的其中一种实现,实在springSecurity苦手,不过我觉得不继承这个也没事呢(实现以下filter接口或者继承其他filter实现子类也可以吧)只要确保过滤器的顺序,JWTAuthorizationFilter在JWTAuthenticationFilter后面就没问题了。
/**
 * 验证成功当然就是进行鉴权了
 * 登录成功之后走此类进行鉴权操作
 */
public class JWTAuthorizationFilter extends BasicAuthenticationFilter {

  public JWTAuthorizationFilter(AuthenticationManager authenticationManager) {
    super(authenticationManager);
  }

  @Override
  protected void doFilterInternal(HttpServletRequest request,
                  HttpServletResponse response,
                  FilterChain chain) throws IOException, ServletException {

    String tokenHeader = request.getHeader(TestJwtUtils.TOKEN_HEADER);
    // 如果请求头中没有Authorization信息则直接放行了
    if (tokenHeader == null || !tokenHeader.startsWith(TestJwtUtils.TOKEN_PREFIX)) {
      chain.doFilter(request, response);
      return;
    }
    // 如果请求头中有token,则进行解析,并且设置认证信息
    SecurityContextHolder.getContext().setAuthentication(getAuthentication(tokenHeader));
    super.doFilterInternal(request, response, chain);
  }

  // 这里从token中获取用户信息并新建一个token
  private UsernamePasswordAuthenticationToken getAuthentication(String tokenHeader) {
    String token = tokenHeader.replace(TestJwtUtils.TOKEN_PREFIX, "");
    String username = TestJwtUtils.getUsername(token);
    String role = TestJwtUtils.getUserRole(token);
    if (username != null){
      return new UsernamePasswordAuthenticationToken(username, null,
          Collections.singleton(new SimpleGrantedAuthority(role))
      );
    }
    return null;
  }
}
配置SpringSecurity
到这里基本操作都写好啦,现在就需要我们将这些辛苦写好的“组件”组合到一起发挥作用了,那就需要配置了。需要开启一下注解@EnableWebSecurity然后再继承一下WebSecurityConfigurerAdapter就可以啦,
@EnableWebSecurity
@EnableGlobalMethodSecurity(prePostEnabled = true)
public class SecurityConfig extends WebSecurityConfigurerAdapter {

  @Autowired
  @Qualifier("userDetailsServiceImpl")
  private UserDetailsService userDetailsService;

  @Bean
  public BCryptPasswordEncoder bCryptPasswordEncoder(){
    return new BCryptPasswordEncoder();
  }

  @Override
  protected void configure(AuthenticationManagerBuilder auth) throws Exception {
    auth.userDetailsService(userDetailsService).passwordEncoder(bCryptPasswordEncoder());
  }

  @Override
  protected void configure(HttpSecurity http) throws Exception {
    http.cors().and().csrf().disable()
        .authorizeRequests()
        // 测试用资源,需要验证了的用户才能访问
        .antMatchers("/tasks/**")
        .authenticated()
        .antMatchers(HttpMethod.DELETE, "/tasks/**")
        .hasRole("ADMIN")
        // 其他都放行了
        .anyRequest().permitAll()
        .and()
        .addFilter(new JWTAuthenticationFilter(authenticationManager()))
        .addFilter(new JWTAuthorizationFilter(authenticationManager()))
        // 不需要session
        .sessionManagement()
        .sessionCreationPolicy(SessionCreationPolicy.STATELESS)
        .and()
        .exceptionHandling()
        .authenticationEntryPoint(new JWTAuthenticationEntryPoint());
  }

  @Bean
  CorsConfigurationSource corsConfigurationSource() {
    final UrlBasedCorsConfigurationSource source = new UrlBasedCorsConfigurationSource();
    source.registerCorsConfiguration("/**", new CorsConfiguration().applyPermitDefaultValues());
    return source;
  }
}
AuthController
测试类,模拟用户注册,
@RestController
@RequestMapping("/auth")
public class AuthController {

  @Autowired
  private UserService userService;

  @Autowired
  private BCryptPasswordEncoder bCryptPasswordEncoder;

  @PostMapping("/register")
  public String registerUser(@RequestBody Map<String,String> registerUser){
    User user = new User();
    user.setUsername(registerUser.get("username"));
    user.setPassword(bCryptPasswordEncoder.encode(registerUser.get("password")));
    user.setRole("ROLE_USER");
    userService.save(user);
    return "success";
  }
}
注册是有了,那登录在哪呢?我们看一下UsernamePasswordAuthenticationFilter的源代码
public UsernamePasswordAuthenticationFilter() {
    super(new AntPathRequestMatcher("/login", "POST"));
  }
可以看出来默认是/login,所以登录直接使用这个路径就可以啦~当然也可以自定义
只需要在JWTAuthenticationFilter的构造方法中加入下面那一句话就可以啦
 public JWTAuthenticationFilter(AuthenticationManager authenticationManager) {
    this.authenticationManager = authenticationManager;
    super.setFilterProcessesUrl("/auth/login");
  }
所以现在认证的路径统一了一下也是挺好的~看起来相当舒服了
注册:/auth/register
登录:/auth/login
TaskController
提供一个外部访问的API资源接口,即用户要访问该类下面的接口必须要先通过认证,后面的测试中也可以看出来,直接贴代码,
@RequestMapping("/tasks")
public class TaskController {

  @GetMapping("/getTasks")
  @ResponseBody
  public String listTasks(){
    return "任务列表";
  }

  @PostMapping
  @PreAuthorize("hasRole('ADMIN')")
  public String newTasks(){
    return "创建了一个新的任务";
  }
}
下面我们来测试一下,为了模拟效果比较直观点,我们使用postMan进行测试,
1、首先,我们调用注册的方法注册一个用户,

注册成功之后,我们看到数据库已经有了一个用户,

2、使用该用户进行登录,我们希望的是登录成功之后,后台生成一个token并返回给前端,这样后面的接口调用中直接带上这个token即可,
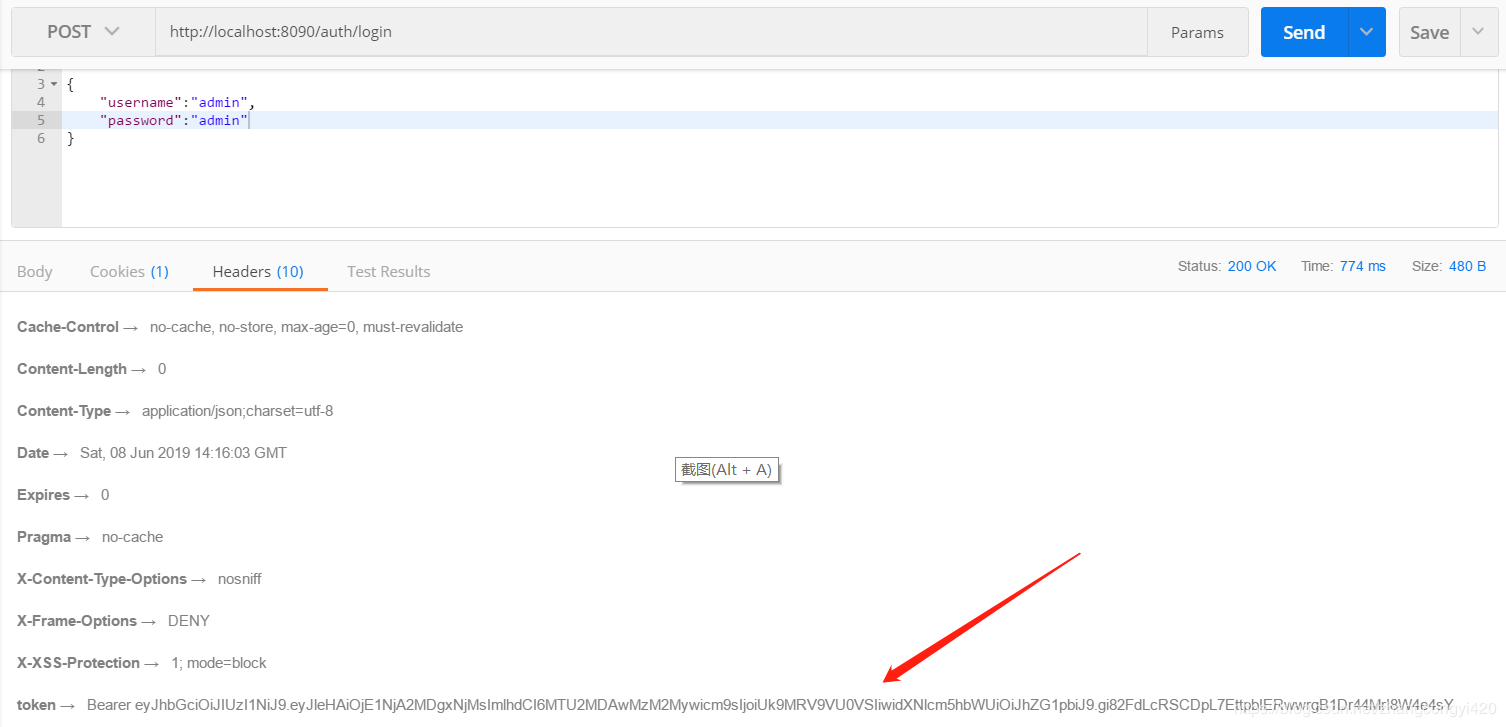
可以看到登录成功,后台反返回了token,下面我们使用这个token请求其他的接口,测试一下getTasks这个接口,注意需要在postMan的请求header里面带上token信息,这里是全部的token,即包含Bearer 的整个字符串,

这时候,成功请求到了接口的数据,大家可以测试一下将过期时间调整的短一点,然后再去请求看看会有什么样的效果,这里就不做演示了。
本篇到这里基本就结束了,关于springsecurity其实内容还是很多的,里面的用法也比较复杂,大家抽空可以做深入的研究,篇幅原因不做过多介绍了。最后感谢观看。
附上源码地址:boot-ssoserver_jb51.rar

