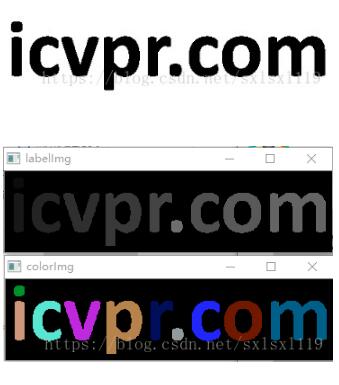
一,原图和效果图
二,代码
//#########################产生随机颜色#########################
cv::Scalar icvprGetRandomColor()
{
	uchar r = 255 * (rand() / (1.0 + RAND_MAX));
	uchar g = 255 * (rand() / (1.0 + RAND_MAX));
	uchar b = 255 * (rand() / (1.0 + RAND_MAX));
	return cv::Scalar(b, g, r);
}
//#########################产生随机颜色#########################

//########################种子填充法)#########################
void ConnectedCountBySeedFill(const cv::Mat& _binImg, cv::Mat& _lableImg, int &iConnectedAreaCount)
{
  //拓宽1个像素的原因是:如果连通域在边缘,运行此函数会异常崩溃,所以需要在周围加一圈0值,确保连通域不在边上
	//==========图像周围拓宽1个像素============================================
	int top, bottom;      //【添加边界后的图像尺寸】
	int leftImage, rightImage;
	int borderType = BORDER_CONSTANT; //BORDER_REPLICATE
	//【初始化参数】
	top = (int)(1); bottom = (int)(1);
	leftImage = (int)(1); rightImage = (int)(1);
	Mat _binImg2, _binImg3;
	_binImg.copyTo(_binImg2);
		//初始化参数value
		Scalar value(0); //填充值
		//创建图像边界
		copyMakeBorder(_binImg2, _binImg3, top, bottom, leftImage, rightImage, borderType, value);

	//==========图像周围拓宽1个像素============================================

	// connected component analysis (4-component)
	// use seed filling algorithm
	// 1. begin with a foreground pixel and push its foreground neighbors into a stack;
	// 2. pop the top pixel on the stack and label it with the same label until the stack is empty
	//
	// foreground pixel: _binImg(x,y) = 1
	// background pixel: _binImg(x,y) = 0

	if (_binImg3.empty() ||
		_binImg3.type() != CV_8UC1)
	{
		return;
	}

	_lableImg.release();
	_binImg3.convertTo(_lableImg, CV_32SC1);
	int icount = 0;
	int label = 1; // start by 2

	int rows = _binImg3.rows - 1;
	int cols = _binImg3.cols - 1;
	for (int i = 1; i < rows - 1; i++)
	{
		int* data = _lableImg.ptr<int>(i);  //取一行数据
		for (int j = 1; j < cols - 1; j++)
		{
			if (data[j] == 1)  //像素不为0
			{
				std::stack<std::pair<int, int>> neighborPixels;   //新建一个栈
				neighborPixels.push(std::pair<int, int>(i, j));   // 像素坐标: <i,j> ,以该像素为起点,寻找连通域
				++label; // 开始一个新标签,各连通域区别的标志
				while (!neighborPixels.empty())
				{
					// 获取堆栈中的顶部像素并使用相同的标签对其进行标记
					std::pair<int, int> curPixel = neighborPixels.top();
					int curX = curPixel.first;
					int curY = curPixel.second;
					_lableImg.at<int>(curX, curY) = label; //对图像对应位置的点进行标记

					// 弹出顶部像素  (顶部像素出栈)
					neighborPixels.pop();

						// 加入8邻域点
						if (_lableImg.at<int>(curX, curY - 1) == 1)
						{// 左点
							neighborPixels.push(std::pair<int, int>(curX, curY - 1)); //左边点入栈
						}

						if (_lableImg.at<int>(curX, curY + 1) == 1)
						{// 右点
							neighborPixels.push(std::pair<int, int>(curX, curY + 1)); //右边点入栈
						}

						if (_lableImg.at<int>(curX - 1, curY) == 1)
						{// 上点
							neighborPixels.push(std::pair<int, int>(curX - 1, curY)); //上边点入栈
						}

						if (_lableImg.at<int>(curX + 1, curY) == 1)
						{// 下点
							neighborPixels.push(std::pair<int, int>(curX + 1, curY)); //下边点入栈
						}
						//===============补充到8连通域======================================================
						if (_lableImg.at<int>(curX - 1, curY - 1) == 1)
						{// 左上点
							neighborPixels.push(std::pair<int, int>(curX - 1, curY - 1)); //左上点入栈
						}

						if (_lableImg.at<int>(curX - 1, curY + 1) == 1)
						{// 右上点
							neighborPixels.push(std::pair<int, int>(curX - 1, curY + 1)); //右上点入栈
						}

						if (_lableImg.at<int>(curX + 1, curY - 1) == 1)
						{// 左下点
							neighborPixels.push(std::pair<int, int>(curX + 1, curY - 1)); //左下点入栈
						}

						if (_lableImg.at<int>(curX + 1, curY + 1) == 1)
						{// 右下点
							neighborPixels.push(std::pair<int, int>(curX + 1, curY + 1)); //右下点入栈
						}
					//===============补充到8连通域======================================================
				}
			}
		}
	}
	iConnectedAreaCount = label - 1; //因为label从2开始计数的
	int a = 0;
}
###########################################################
//#############添加颜色#####################################
Mat PaintColor(Mat src, int iConnectedAreaCount)
{
	int rows = src.rows;
	int cols = src.cols;

	//cv::Scalar(b, g, r);
	std::map<int, cv::Scalar> colors;
	for (int n = 1; n <= iConnectedAreaCount + 1; n++)
	{
		colors[n] = icvprGetRandomColor(); //根据不同标志位产生随机颜色

		cv::Scalar color = colors[n];
		int a = color[0];
		int b = color[1];
		int c = color[2];
		int d = 0;
	}

	Mat dst2(rows, cols, CV_8UC3);
	dst2 = cv::Scalar::all(0);
	for (int i = 0; i < rows; i++)
	{
		for (int j = 0; j < cols; j++)
		{
			int value = src.at<int>(i, j);
			if (value>1)
			{
				cv::Scalar color = colors[value];
				int a = color[0];
				int b = color[1];
				int c = color[2];
				dst2.at<Vec3b>(i, j)[0] = color[0];
				dst2.at<Vec3b>(i, j)[1] = color[1];
				dst2.at<Vec3b>(i, j)[2] = color[2];
			}
		}
	}
	return dst2;
}
//#############添加颜色##################################

//########调用##########################################
  Mat binImage = cv::imread("D:\\sxl\\处理图片\\testImages\\22.jpg", 0);
	threshold(binImage, binImage, 50, 1, CV_THRESH_BINARY_INV);

	// 连通域标记
	Mat labelImg;
	int iConnectedAreaCount = 0; //连通域个数
	ConnectedCountBySeedFill(binImage, labelImg, iConnectedAreaCount);//针对黑底白字
	int a=iConnectedAreaCount;

	// 显示结果
	Mat dstColor2=PaintColor(labelImg,iConnectedAreaCount);
	imshow("colorImg", dstColor2);

	Mat grayImg;
	labelImg *= 10;
	labelImg.convertTo(grayImg, CV_8UC1);
	imshow("labelImg", grayImg);

	waitKey(0);
//########调用##########################################
补充知识:Opencv快速获取连通域
对于ndarray数据中的连通域查找,opencv提供了接口,非常方便。
import cv2
import numpy as np

img = np.array([
  [0, 255, 255, 0, 0, 0, 255, 255,],
  [0, 0, 255, 0, 255, 255, 255, 0],
  [0, 0, 0, 0, 255, 255, 0, 255],
  [255, 255, 0, 0, 0, 0, 0, 0],
  [255, 255, 0, 0, 0, 0, 0, 0],
  [255, 255, 0, 0, 0, 0, 0, 0]
], dtype=np.uint8)

num, labels = cv2.connectedComponents(img)
labels_dict = {i:[] for i in range(1, num+1)}
height, width = img.shape
for h in range(height):
  for w in range(width):
    if labels[h][w] in labels_dict:
      labels_dict[labels[h][w]].append([h,w])
cv2.connectedComponents()函数返回查找到的连通域个数和对应的label。
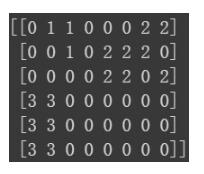
上面代码返回连通域个数为4(包含值为0区域,可通过lables过滤), labels结果如图所示:
以上这篇使用OpenCV获取图片连通域数量,并用不同颜色标记函就是小编分享给大家的全部内容了,希望能给大家一个参考,也希望大家多多支持。

