前言
至于什么是Spring security ,主要两个作用,用户认证和授权。即我们常说的,用户只有登录了才能进行其他操作,没有登录的话就重定向到登录界面。有的用户有权限执行某一操作,而有的用户不能执行则是授权。算是一个项目安全框架。和shiro 框架一样。二者的不同大家可以百度小。Spring security 是Spring家族的一员,所以Springboot算是对Spring security 进行的天然的支持。
之所以这样说,spring security 被人诟病的配置繁琐复杂,在springboot中变的简单起来。如果我们只是demo 效果,可以做到0配置实现。
下面我们就一起来见识一下吧
依赖
我们在pom.xml 文件中引入Spring security 的statter
<dependency>
   <groupId>org.springframework.boot</groupId>
    <artifactId>spring-boot-starter-security</artifactId>
<https://img.qb5200.com/download-x/dependency>
<dependency>
    <groupId>org.springframework.boot</groupId>
    <artifactId>spring-boot-starter-web</artifactId>
<https://img.qb5200.com/download-x/dependency>
测试
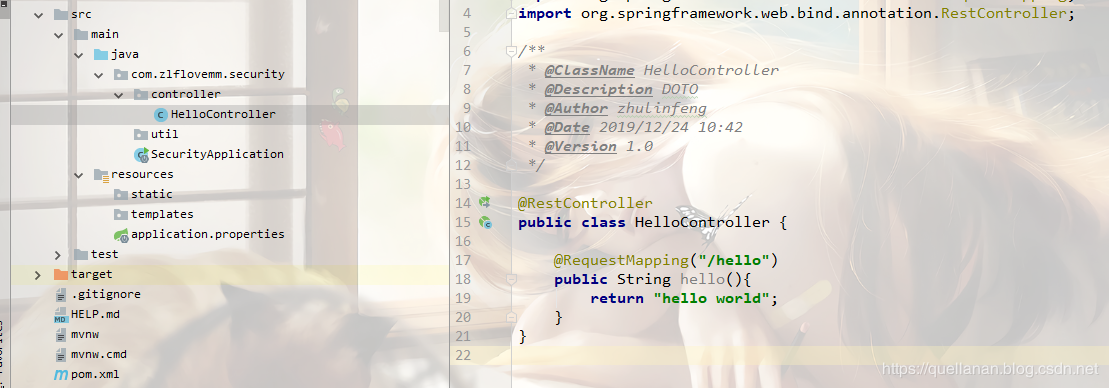
我们先来0配置的看看。引入依赖以后,我们创建一个HelloController 内容如下:
@RestController
public class HelloController {

    @RequestMapping("/hello")
    public String hello(){
        return "hello world";
    }
}
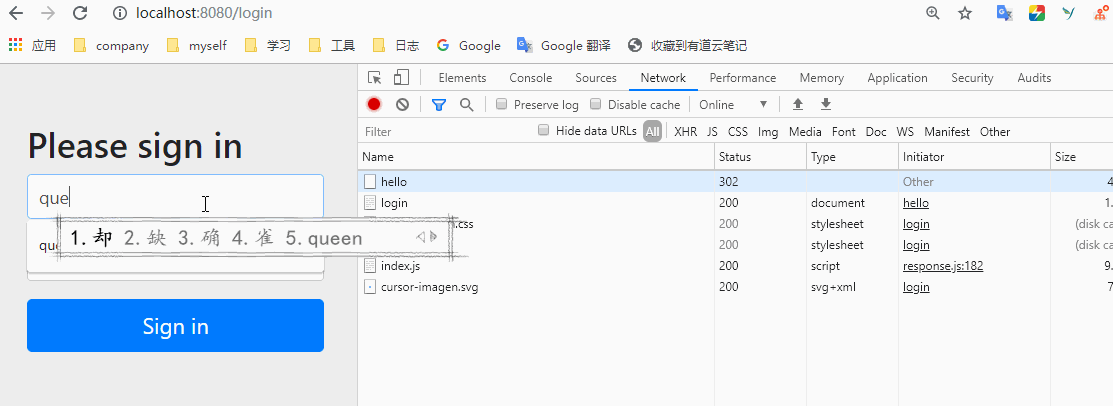
然后我们启动项目,按照我们正常的理解,直接访问
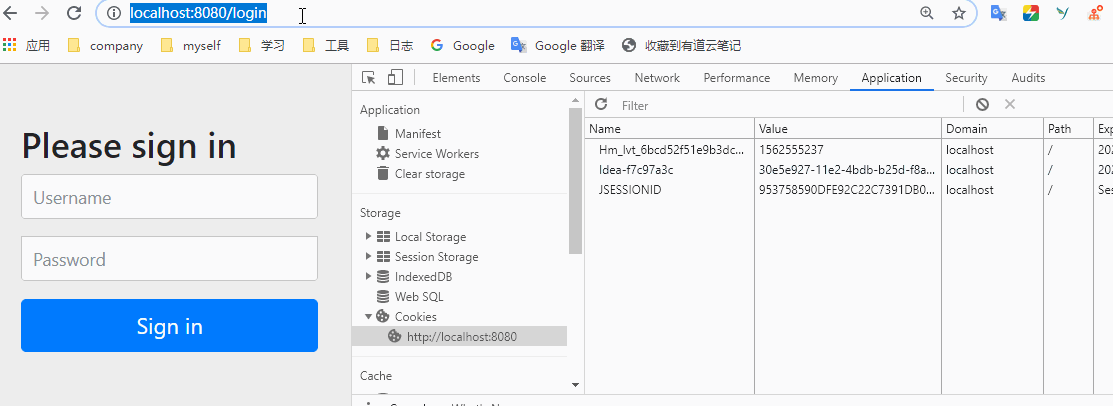
localhost:8080/hello 会返回hello world 。但结果却是重定向到了/login 。下面的界面是Spring security 自带的。
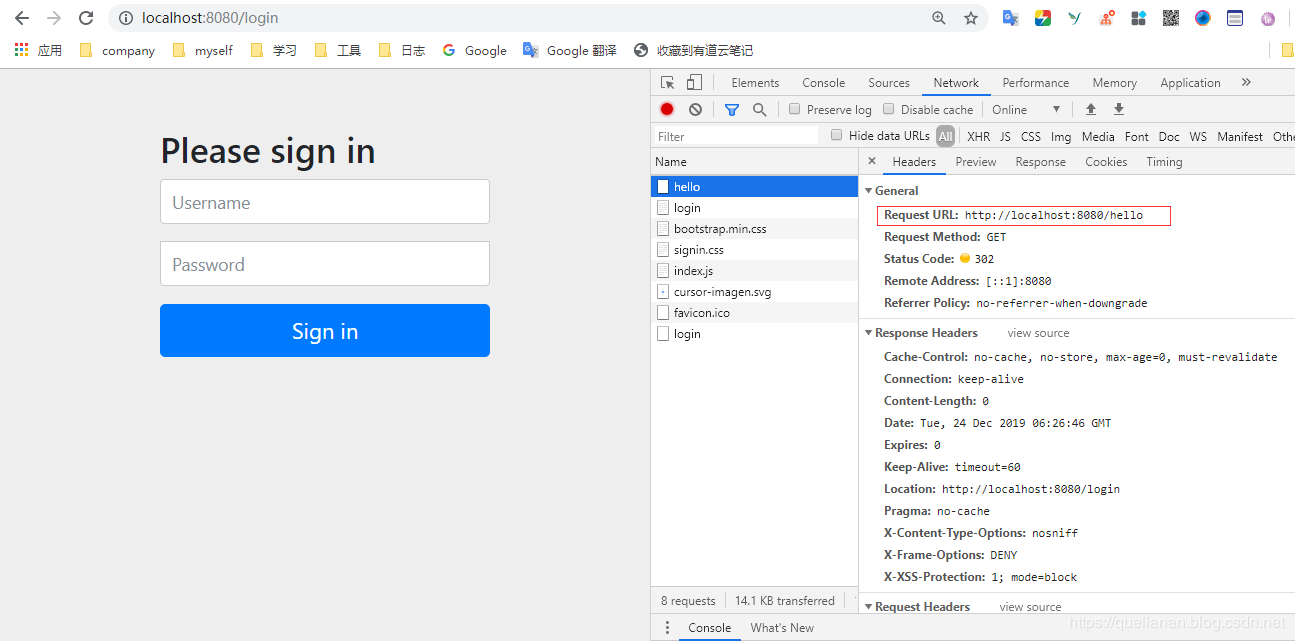
其实上面可以看到,Spring security 已经起作用了,没有登录不能访问 /hello 接口。
默认的用户名为 user;
密码在我们项目启动时控制台有打印,每次都会不一样,随机生成的。

我们输入账号密码,再试试
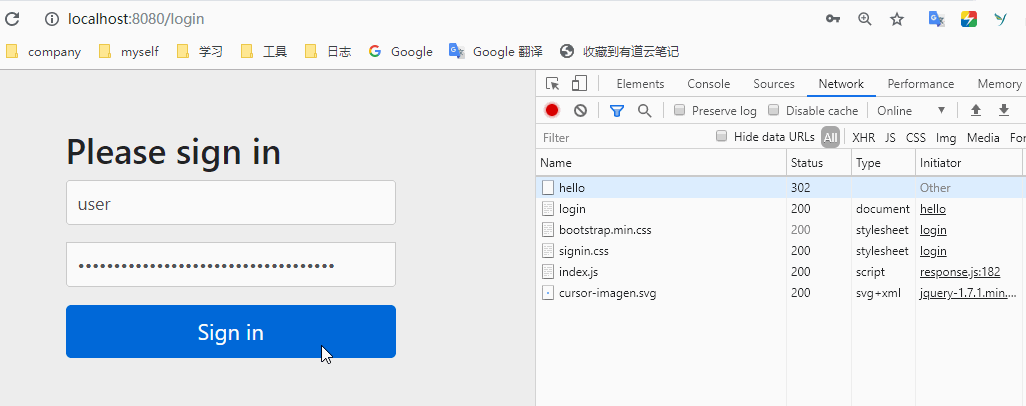
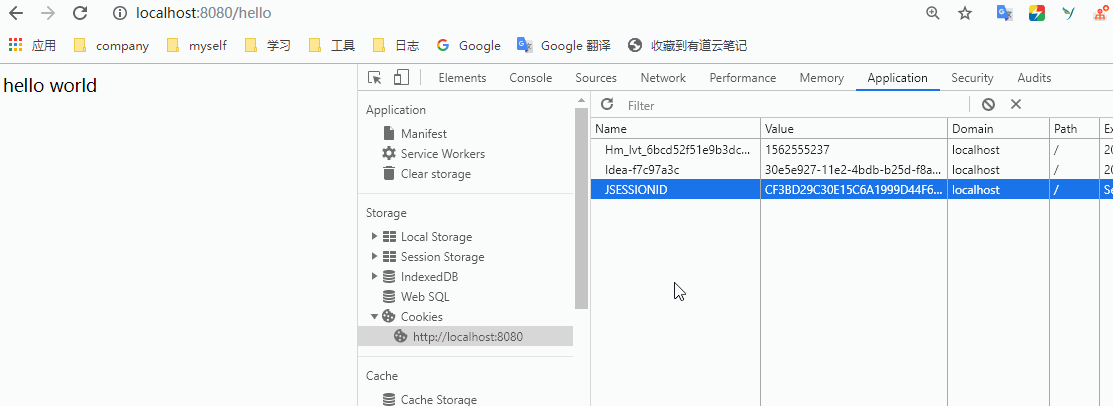
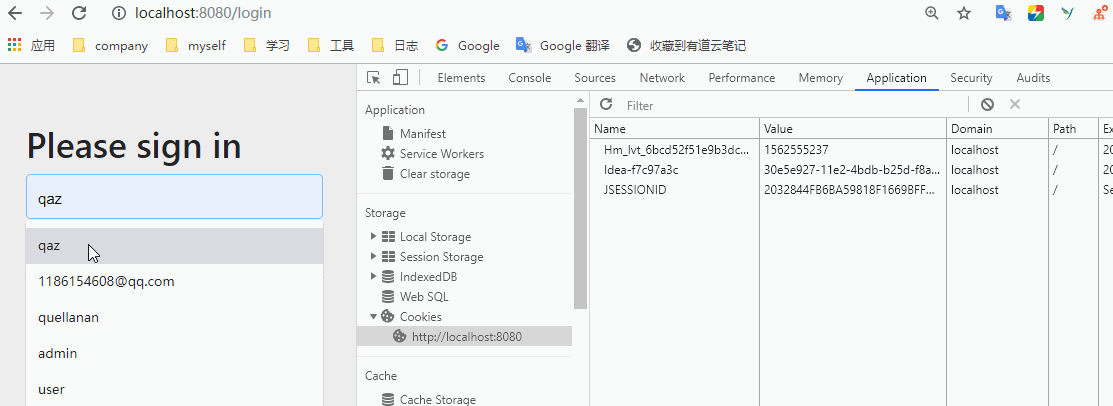
可以看到,在登录之后,我们在请求 /hello 会直接返回hello world , 那是不是只要登录一次,后面就可以一直访问呢?当然不是的,登录成功之后,会将信息保存在session 中,再登录的时候,就会通过session 校验,这样就可以访问到了,当session过期获取我们手动清理掉后,就需要重新登录了。我们来试试。打开控制台,application 中的cookies 中的jsessionid 清理掉。

我们接着请求试试,可以发现删除后,就会重新回到登录界面。
简单配置用户和密码
上面我们使用的默认的用户名和密码,但是实际上我们肯定不会这么做的,上面只是说明springboot 完全的集成了Spring security 。下面我们先来简单的配置用户名密码,之所以这样说,因为我们实际过程中应该还是不会这么用的。之所以要讲,让大家了解的更全面,也为下面铺垫。
application.properties 中配置
首先我们来简单的,我们可以直接在application.properties 中配置用户名和密码。来代替默认用户名和密码的效果。
spring.security.user.name=quellanan
spring.security.user.password=123456
spring.security.user.roles=admin
分别是设置用户名,密码,角色。我们这里暂时只用了用户认证,所以角色设不设置无所谓。配置好这些之后我们重启项目在界面上试试再。
没有问题,但是没有什么用,我们实际中是不会这么干的吧。
内存中配置
在内存中配置的话,相对来说要复杂点,我们创建一个config 包,在包下创建SecurityConfig 类继承 WebSecurityConfigurerAdapter
@Configuration
public class SecurityConfig extends WebSecurityConfigurerAdapter {

    @Override
    protected void configure(AuthenticationManagerBuilder auth) throws Exception {
        auth.inMemoryAuthentication()
                .passwordEncoder(passwordEncoder()) // 指定加密方式
                .withUser("qaz").password(passwordEncoder().encode("123456")).roles("admin")
                .and()
                .withUser("test").password(passwordEncoder().encode("123456")).roles("USER");
    }


    @Bean
    public PasswordEncoder passwordEncoder() {
        // BCryptPasswordEncoder:Spring Security 提供的加密工具
        return new BCryptPasswordEncoder();
    }
}
这里我们重写了configure(AuthenticationManagerBuilder auth) 方法,就是将定义的用户配置到内存中。这里有一个问题需要说明一下,就是这里配置的话,密码需要用BCryptPasswordEncoder 加密。如果不加密的话,项目编译启动不会报错,但是登陆的时候就会提示账号密码错误。
还有一个问题就是,如果我们在这配置了,那我们在application.peoperties 中配置的就会失效。
上面说的这两种方法,其实都是不常用的,我们在实际项目中根本不会在项目中写死用户信息的。基本上都是存在数据库中。所以下面我们就开始讲解我们最常用的模式吧。
由于这一类,涉及的较多,就单独一级标题出来,不放在二级标题里面了。
从数据库进行用户认证
既然是用到数据库,项目中自然要引入数据的配置啦,我这里用的是mysql 和mybatis.
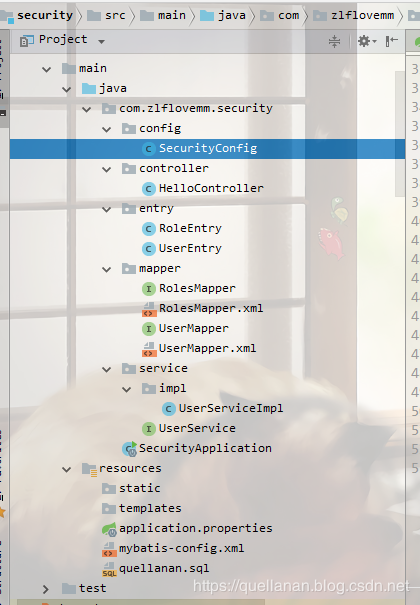
这是整个项目成型后的目录结构,先放出来,大家心里有底,然后一步一步的来。
建库建表
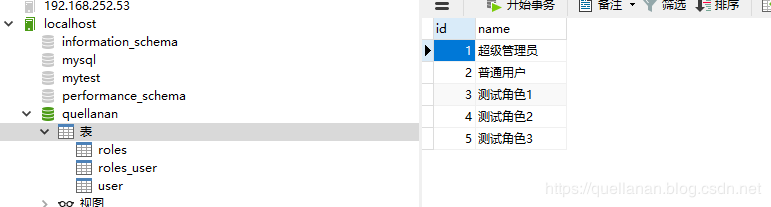
简单的三张表,user,roles,roles_user 。
下面是 sql。直接执行就可以
/*
Date: 2017-12-26 18:36:12
*/

CREATE DATABASE `quellanan` DEFAULT CHARACTER SET utf8;

USE `quellanan`;

SET FOREIGN_KEY_CHECKS=0;

-- ----------------------------
-- Table structure for roles
-- ----------------------------
DROP TABLE IF EXISTS `roles`;
CREATE TABLE `roles` (
  `id` int(11) NOT NULL AUTO_INCREMENT,
  `name` varchar(32) DEFAULT NULL,
  PRIMARY KEY (`id`)
) ENGINE=InnoDB AUTO_INCREMENT=6 DEFAULT CHARSET=utf8;

-- ----------------------------
-- Records of roles
-- ----------------------------
INSERT INTO `roles` VALUES ('1', '超级管理员');
INSERT INTO `roles` VALUES ('2', '普通用户');
INSERT INTO `roles` VALUES ('3', '测试角色1');
INSERT INTO `roles` VALUES ('4', '测试角色2');
INSERT INTO `roles` VALUES ('5', '测试角色3');

-- ----------------------------
-- Table structure for roles_user
-- ----------------------------
DROP TABLE IF EXISTS `roles_user`;
CREATE TABLE `roles_user` (
  `id` int(11) NOT NULL AUTO_INCREMENT,
  `rid` int(11) DEFAULT '2',
  `uid` int(11) DEFAULT NULL,
  PRIMARY KEY (`id`),
  KEY `rid` (`rid`),
  KEY `roles_user_ibfk_2` (`uid`),
  CONSTRAINT `roles_user_ibfk_1` FOREIGN KEY (`rid`) REFERENCES `roles` (`id`),
  CONSTRAINT `roles_user_ibfk_2` FOREIGN KEY (`uid`) REFERENCES `user` (`id`) ON DELETE CASCADE
) ENGINE=InnoDB AUTO_INCREMENT=131 DEFAULT CHARSET=utf8;

-- ----------------------------
-- Records of roles_user
-- ----------------------------
INSERT INTO `roles_user` VALUES ('1', '1', '1');
INSERT INTO `roles_user` VALUES ('2', '2', '2');
INSERT INTO `roles_user` VALUES ('3', '3', '3');
INSERT INTO `roles_user` VALUES ('4', '1', '4');


-- ----------------------------
-- Table structure for user
-- ----------------------------
DROP TABLE IF EXISTS `user`;
CREATE TABLE `user` (
  `id` int(11) NOT NULL AUTO_INCREMENT,
  `username` varchar(64) DEFAULT NULL,
  `nickname` varchar(64) DEFAULT NULL,
  `password` varchar(255) DEFAULT NULL,
  `enabled` tinyint(1) DEFAULT '1',
  `email` varchar(64) DEFAULT NULL,
  `userface` varchar(255) DEFAULT NULL,
  `regTime` datetime DEFAULT NULL,
  PRIMARY KEY (`id`)
) ENGINE=InnoDB AUTO_INCREMENT=21 DEFAULT CHARSET=utf8;

-- ----------------------------
-- Records of user
-- ----------------------------
INSERT INTO `user` VALUES ('1', 'quellanan', '', '$2a$10$Hv0YGLi/siOswCTP236MtOTWbClcM6rN1LCyqwfRmrwCJZqXHsj5a', '1', 'quellanan@qq.com','', '2017-12-08 09:30:22');

INSERT INTO `user` VALUES ('2', 'qaz', '', '$2a$10$6H69XLebCrGhHeHzDXEoH.0x8tMFS0XfdDPwI5s.Eu9pbqRpncA.G', '1', 'quellanan@qq.com','', '2017-12-08 09:30:22');

INSERT INTO `user` VALUES ('3', 'wsx', '', '$2a$10$6H69XLebCrGhHeHzDXEoH.0x8tMFS0XfdDPwI5s.Eu9pbqRpncA.G', '1', 'quellanan@qq.com','', '2017-12-08 09:30:22');

INSERT INTO `user` VALUES ('4', 'test', '', '$2a$10$6H69XLebCrGhHeHzDXEoH.0x8tMFS0XfdDPwI5s.Eu9pbqRpncA.G', '1', 'quellanan@qq.com','', '2017-12-08 09:30:22');


SET FOREIGN_KEY_CHECKS=1;
pom.xml 增加依赖
我们首先在原先pom 文件基础上增加,如下依赖。
        <dependency>
            <groupId>mysql</groupId>
            <artifactId>mysql-connector-java</artifactId>
            <scope>runtime</scope>
        <https://img.qb5200.com/download-x/dependency>

        <dependency>
            <groupId>org.mybatis.spring.boot</groupId>
            <artifactId>mybatis-spring-boot-starter</artifactId>
            <version>2.1.0</version>
        <https://img.qb5200.com/download-x/dependency>

        <dependency>
            <groupId>org.apache.commons</groupId>
            <artifactId>commons-pool2</artifactId>
        <https://img.qb5200.com/download-x/dependency>

        <dependency>
            <groupId>org.projectlombok</groupId>
            <artifactId>lombok</artifactId>
        <https://img.qb5200.com/download-x/dependency>
前面三个是mysql 和mybatis的依赖。lombok 是一个工具类插件。
同时我们需要修改一下pom 文件中的build ,不然我们项目可能会找不到mybatis 的xml文件。
    <build>
        <resources>
            <resource>
                <directory>src/main/java<https://img.qb5200.com/download-x/directory>
                <includes>
                    <include>**/*.xml</include>
                </includes>
            </resource>
            <resource>
                <directory>src/main/resources<https://img.qb5200.com/download-x/directory>
            </resource>
        </resources>

        <plugins>
            <plugin>
                <groupId>org.springframework.boot</groupId>
                <artifactId>spring-boot-maven-plugin</artifactId>
            </plugin>
        </plugins>
    </build>
配置application.properties
spring.datasource.driver-class-name=com.mysql.jdbc.Driver
spring.datasource.url=jdbc:mysql://127.0.0.1:3306/quellanan?allowMultiQueries=true&useUnicode=true&characterEncoding=utf8&serverTimezone=UTC
spring.datasource.username=root
spring.datasource.password=123456
spring.datasource.max-idle=10
spring.datasource.max-wait=10000
spring.datasource.min-idle=5
spring.datasource.initial-size=5
这里如果想要打印mybatis 的sql 日志。可以添加一个mybatis-config.xml文件,和application.properties 同目录
<?xml version="1.0" encoding="UTF-8" ?>
<!DOCTYPE configuration PUBLIC "-//mybatis.org//DTD Config 3.0//EN" "http://mybatis.orghttps://img.qb5200.com/download-x/dtd/mybatis-3-config.dtd">
<configuration>
    <settings>
        <setting name="logImpl" value="STDOUT_LOGGING" />
    </settings>
</configuration>
并在application.properties 中加上
mybatis.config-location=classpath:/mybatis-config.xmlentry
我们在entry 包下创建 RoleEntry。代码如下:
@Getter
@Setter
public class RoleEntry {
    private Long id;
    private String name;
}
我们在创建 UserEntry ,但是UserEntry 比较特殊,因为我们需要使用Spring security 。所以这里,UserEntry 需要实现 UserDetails。
代码如下:
@Setter
@Getter
public class UserEntry implements UserDetails {

    private Long id;
    private String username;
    private String password;
    private String nickname;
    private boolean enabled;
    private List<RoleEntry> roles;
    private String email;
    private String userface;
    private Timestamp regTime;

    /**
     * 获取角色权限
     * @return
     */
    @Override
    public Collection<? extends GrantedAuthority> getAuthorities() {
        List<GrantedAuthority> authorities = new ArrayList<>();
        for (RoleEntry role : roles) {
            authorities.add(new SimpleGrantedAuthority("ROLE_" + role.getName()));
        }
        return authorities;
    }

    /**
     * 获取密码
     * @return
     */
    @Override
    public String getPassword() {
        return password;
    }

    /**
     * 获取用户名
     * @return
     */
    @Override
    public String getUsername() {
        return username;
    }


    /**
     * 用户账号是否过期
     */
    @Override
    public boolean isAccountNonExpired() {
        return true;
    }

    /**
     * 用户账号是否被锁定
     */
    @Override
    public boolean isAccountNonLocked() {
        return true;
    }

    /**
     * 用户密码是否过期
     */
    @Override
    public boolean isCredentialsNonExpired() {
        return true;
    }

    /**
     * 用户是否可用
     */
    @Override
    public boolean isEnabled() {
        return enabled;
    }
}
可以看到,基本上都是重写的方法。也比较简单。
mapper
这里我将xml 文件和接口放在一起了,你们也可以在resources 中创建一个mapper,将xml 文件放在哪里。
mapper层没有什么好说的,是mybatis 的一些知识,我们这里讲代码贴出来。
RolesMapper
@Mapper
public interface RolesMapper {
    List<RoleEntry> getRolesByUid(Long uid);
}
RolesMapper.xml
<?xml version="1.0" encoding="UTF-8" ?>
<!DOCTYPE mapper
        PUBLIC "-//mybatis.org//DTD Mapper 3.0//EN"
        "http://mybatis.orghttps://img.qb5200.com/download-x/dtd/mybatis-3-mapper.dtd">
<mapper namespace="com.zlflovemm.security.mapper.RolesMapper">
    <select id="getRolesByUid" parameterType="long" resultType="com.zlflovemm.security.entry.RoleEntry">
        SELECT r.* FROM roles r,roles_user ru WHERE r.`id`=ru.`rid` AND ru.`uid`=#{uid}
    </select>
</mapper>
UserMapper
@Mapper
public interface UserMapper {
    UserEntry loadUserByUsername(@Param("username") String username);
}
UserMapper.xml
<?xml version="1.0" encoding="UTF-8" ?>
<!DOCTYPE mapper
        PUBLIC "-//mybatis.org//DTD Mapper 3.0//EN"
        "http://mybatis.orghttps://img.qb5200.com/download-x/dtd/mybatis-3-mapper.dtd">
<mapper namespace="com.zlflovemm.security.mapper.UserMapper">
    <select id="loadUserByUsername" resultType="com.zlflovemm.security.entry.UserEntry">
        SELECT * FROM user WHERE username=#{username}
    </select>
</mapper>
service
在service 层我们要注意一点,我们需要实现 UserDetailsService 接口。
我们先创建一个UserService 继承 UserDetailsService。然后创建一个UserServiceImpl 来时实现UserService 从而达到实现UserDetailsService的目的。这样做是为了保证项目结构的统一层次。
UserService
public interface UserService extends UserDetailsService {
}
UserServiceImpl
@Service
@Slf4j
@Transactional
public class UserServiceImpl implements UserService {

    @Autowired
    UserMapper userMapper;
    @Autowired
    RolesMapper rolesMapper;

    @Override
    public UserDetails loadUserByUsername(String s) throws UsernameNotFoundException {
        UserEntry user = userMapper.loadUserByUsername(s);
        if (user == null) {
            //避免返回null,这里返回一个不含有任何值的User对象,在后期的密码比对过程中一样会验证失败
            return new UserEntry();
        }
        //查询用户的角色信息,并返回存入user中
        List<RoleEntry> roles = rolesMapper.getRolesByUid(user.getId());
        user.setRoles(roles);
        return user;
    }
}
可以看到,主要是为了实现 loadUserByUsername的方法。在这个方法中我们 loadUserByUsername和getRolesByUid 就是我们在mapper 定义的查询数据库数据的方法。
SecurityConfig
前面做了这么多,其实都是准备工作,主要的目的就是提供一个Bean 。做完上面这些,我们再回到 SecurityConfig 中,其实我们现在需要修改的很少了。
我们将用户写在内存的方法注释掉。通过数据库查询。
@Configuration
public class SecurityConfig extends WebSecurityConfigurerAdapter {

    @Autowired
    UserService userService;

    @Bean
    public PasswordEncoder passwordEncoder() {
        // BCryptPasswordEncoder:Spring Security 提供的加密工具
        return new BCryptPasswordEncoder();
    }

    @Override
    public void configure(AuthenticationManagerBuilder auth) throws Exception {
        auth.userDetailsService(userService)
                .passwordEncoder(passwordEncoder());//passwoldEncoder是对密码的加密处理,如果user中密码没有加密,则可以不加此方法。注意加密请使用security自带的加密方式。
    }

}
可以和开始的 SecurityConfig 文件对比下,其实你就是多了一个userService,然后configure(AuthenticationManagerBuilder auth)中是通过userService 进行校验的。
测试
好了,其实到这里,我们就已经完成了,我们启动项目,就可以看到和之前写在内存中达到一样的效果。

过滤
以为到这就完了,其实还有一点哈哈。我们现在是所有的接口都需要先登录才能访问,没有登录的话就跳转到login界面。实际上我们肯定有些是不需要认证也可以访问的,比如以下静态文件或者注册的请求。
所以我们还是要配置一下过滤。
其实也很简单,一样的在 SecurityConfig 文件中 重写 configure(HttpSecurity http) 方法。
这里我直接参考官网上的。
https://spring.io/guides/gs/securing-web/
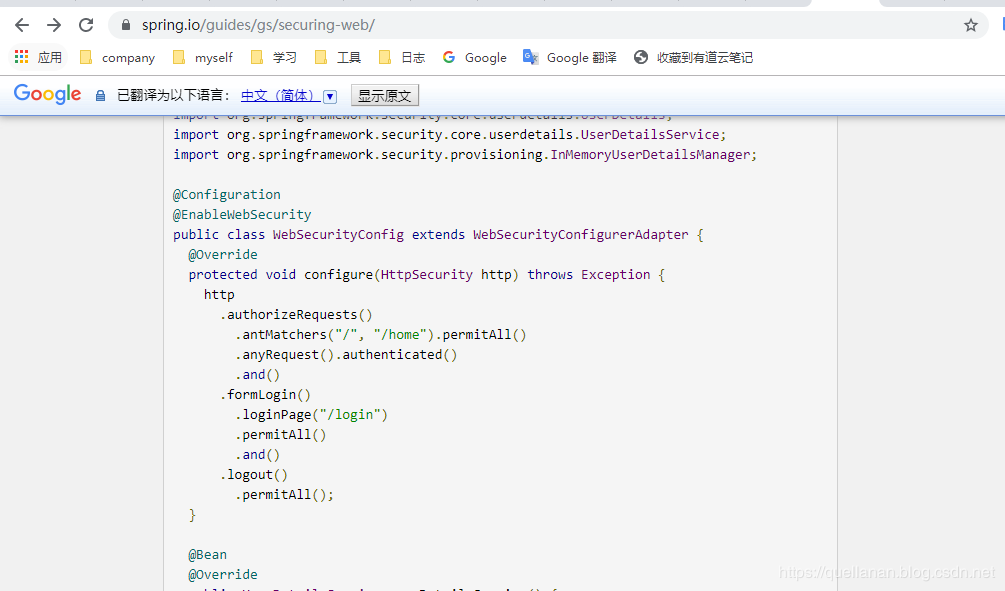
该configure(HttpSecurity)方法定义应保护哪些URL路径,不应该保护哪些URL路径。具体而言,“ /”和“ / home”路径配置为不需要任何身份验证。所有其他路径必须经过验证。
用户成功登录后,他们将被重定向到之前要求身份验证的页面。有一个由指定的自定义“ /登录”页面loginPage(),每个人都可以查看它。
我们代码中 把 loginPage("/login") 注释掉就好了,如果不注释的话,就需要我们自己写login 界面和请求。我们这里就用框架自带的。
    @Override
    protected void configure(HttpSecurity http) throws Exception {
        http.authorizeRequests()
            .antMatchers("/", "/hello").permitAll()
            .anyRequest().authenticated()
            .and()
            .formLogin()
            //.loginPage("/login")
            .permitAll()
            .and()
            .logout()
            .permitAll();
    }
这样配置就说明 /hell 和 / 请求不会拦截,其他的请求,需要先登录才能访问。
为了更方便的看到效果,我们在HelloController 中再加两个方法
    @RequestMapping("/hello2")
    public String hello2(){
        return "hello adada";
    }

    @RequestMapping("/")
    public String hello3(){
        return " qazqeee";
    }
}
现在我们启动来看下效果。
证明我们配置的过滤是有效果的。
番外
到此算是差不多结束了,其实还有很多知识点,不是一篇文章能讲完的,这里算是抛转引玉,希望对大家有帮助。后面我也会持续更新
好了,源码我上传到github 上啦
https://github.com/QuellanAn/security
后续加油♡
欢迎大家关注个人公众号 "程序员爱酸奶"
分享各种学习资料,包含java,linux,大数据等。资料包含视频文档以及源码,同时分享本人及投递的优质技术博文。
如果大家喜欢记得关注和分享哟❤