初级第一次在Linux下安装MySQL-5.7.19版本教程请看上一篇,如果已经会安装了,那么请看这篇linux下安装多个mysql-5.7.19
环境:centos 6.5
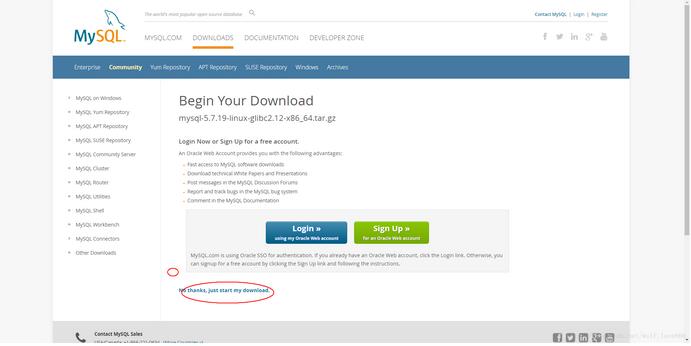
1-下载

2-跳过登陆
3-1安装多个数据库需要配置自己的my.cnf,如果只安装一个,系统没有安装过直接这个命令就可以
shell> groupadd mysql
shell> useradd -r -g mysql -s /bin/false mysql
shell> cd /usr/local
shell> tar zxvf /path/to/mysql-VERSION-OS.tar.gz
shell> ln -s full-path-to-mysql-VERSION-OS mysql
shell> cd mysql
shell> mkdir mysql-files
查看下有没有data目录如果没有的话增加个命令(mkdir data)
shell> chmod 750 mysql-files
shell> chown -R mysql .
shell> chgrp -R mysql .
shell> bin/mysql_install_db --user=mysql # MySQL 5.7.5
shell> bin/mysqld --initialize --user=mysql # MySQL 5.7.6 and up
shell> bin/mysql_ssl_rsa_setup # MySQL 5.7.6 and up
shell> chown -R root .
shell> chown -R mysql data mysql-files
shell> bin/mysqld_safe --user=mysql &
# Next command is optional
shell> cp support-files/mysql.server /etc/init.d/mysql.server
安装好了就可以直接跳到登陆 步骤5
下面说安装多个mysql情况:
3-2安装多个数据库需要安照如下命令:
1-增加配置文件 my.cnf (在mysql目录下命令touch my.cnf):
下面配置文件可以直接使用粘贴复制进去
然后创建log文件 /xcxyz/log/mysql/error.log
[mysqld]
basedir= /usr/local/mysql-5.7.19-3307
datadir = /usr/local/mysql-5.7.19-3307/data
port = 3307
character-set-server=utf8
server_id = 11
#该socket最好指定,不指定的话默认的话 是使用的默认的socket文件 而且登陆数据库的时候会有我下面的问题
socket = /tmp/mysql3307.sock
log-error = /xcxyz/log/mysql/error.log
pid-file = /usr/local/mysql-5.7.19-3307/data/mysql-5.7.19-3307.pid
2-执行如下命令
2-1增加用户 组 我的用户和组都使用的是mysqlosf这个随意
shell> groupadd mysql
shell> useradd -r -g mysql -s /bin/false mysql
shell> cd /usr/local
shell> tar zxvf /path/to/mysql-VERSION-OS.tar.gz
2-2建立软连接:
shell> ln -s full-path-to-mysql-VERSION-OS mysql
shell> cd mysql
shell> mkdir mysql-files
查看下有没有data目录如果没有的话增加个命令(mkdir data)
2-3授权当前目录:
shell> chmod 750 mysql-files
shell> chown -R mysqlosf .
shell> chgrp -R mysqlosf .
2-4编译
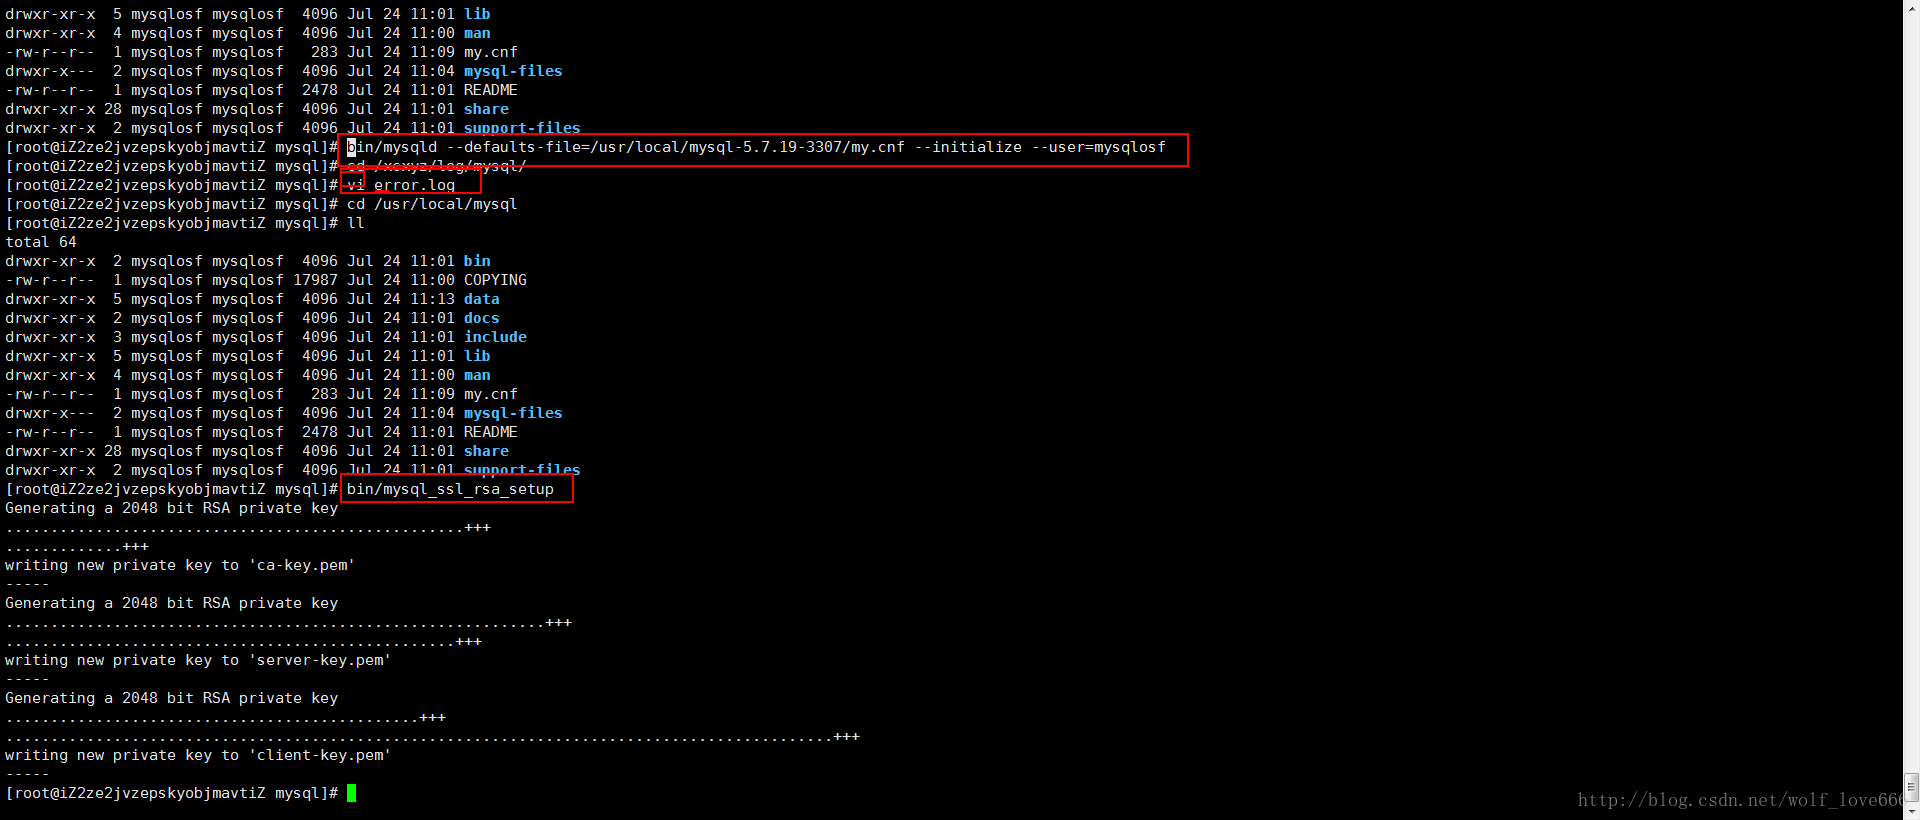
bin/mysqld --defaults-file=/usr/local/full-path-to-mysql-VERSION-OS/my.cnf --initialize --user=mysqlosf
查看日志输出:vi /xcxyz/log/mysql/error.log
2017-07-24T03:13:47.933684Z 0 [Warning] TIMESTAMP with implicit DEFAULT value is deprecated. Please use --explicit_defaults_for_timestamp server option (see documentation for more details).
2017-07-24T03:13:49.979892Z 0 [Warning] InnoDB: New log files created, LSN=45790
2017-07-24T03:13:50.262941Z 0 [Warning] InnoDB: Creating foreign key constraint system tables.
2017-07-24T03:13:50.330756Z 0 [Warning] No existing UUID has been found, so we assume that this is the first time that this server has been started. Generating a new UUID: 1d702294-701e-11e7-98a1-00163e30bbf6.
2017-07-24T03:13:50.340474Z 0 [Warning] Gtid table is not ready to be used. Table 'mysql.gtid_executed' cannot be opened.
2017-07-24T03:13:50.344419Z 1 [Note] A temporary password is generated for root@localhost: jZpgHhigx5>i(特别重要一会初始化密码)
2-5建立密钥
shell> bin/mysql_ssl_rsa_setup --defaults-file=/usr/local/mysql-5.7.19-3307/my.cnf
2-6重新授权分配
shell> chown -R root .
shell> chown -R mysql data mysql-files
2-7启动后台mysql
bin/mysqld_safe --defaults-file=/usr/local/full-path-to-mysql-VERSION-OS/my.cnf --user=mysqlosf &

Next command is optional
shell> cp support-files/mysql.server /etc/init.d/mysql.server
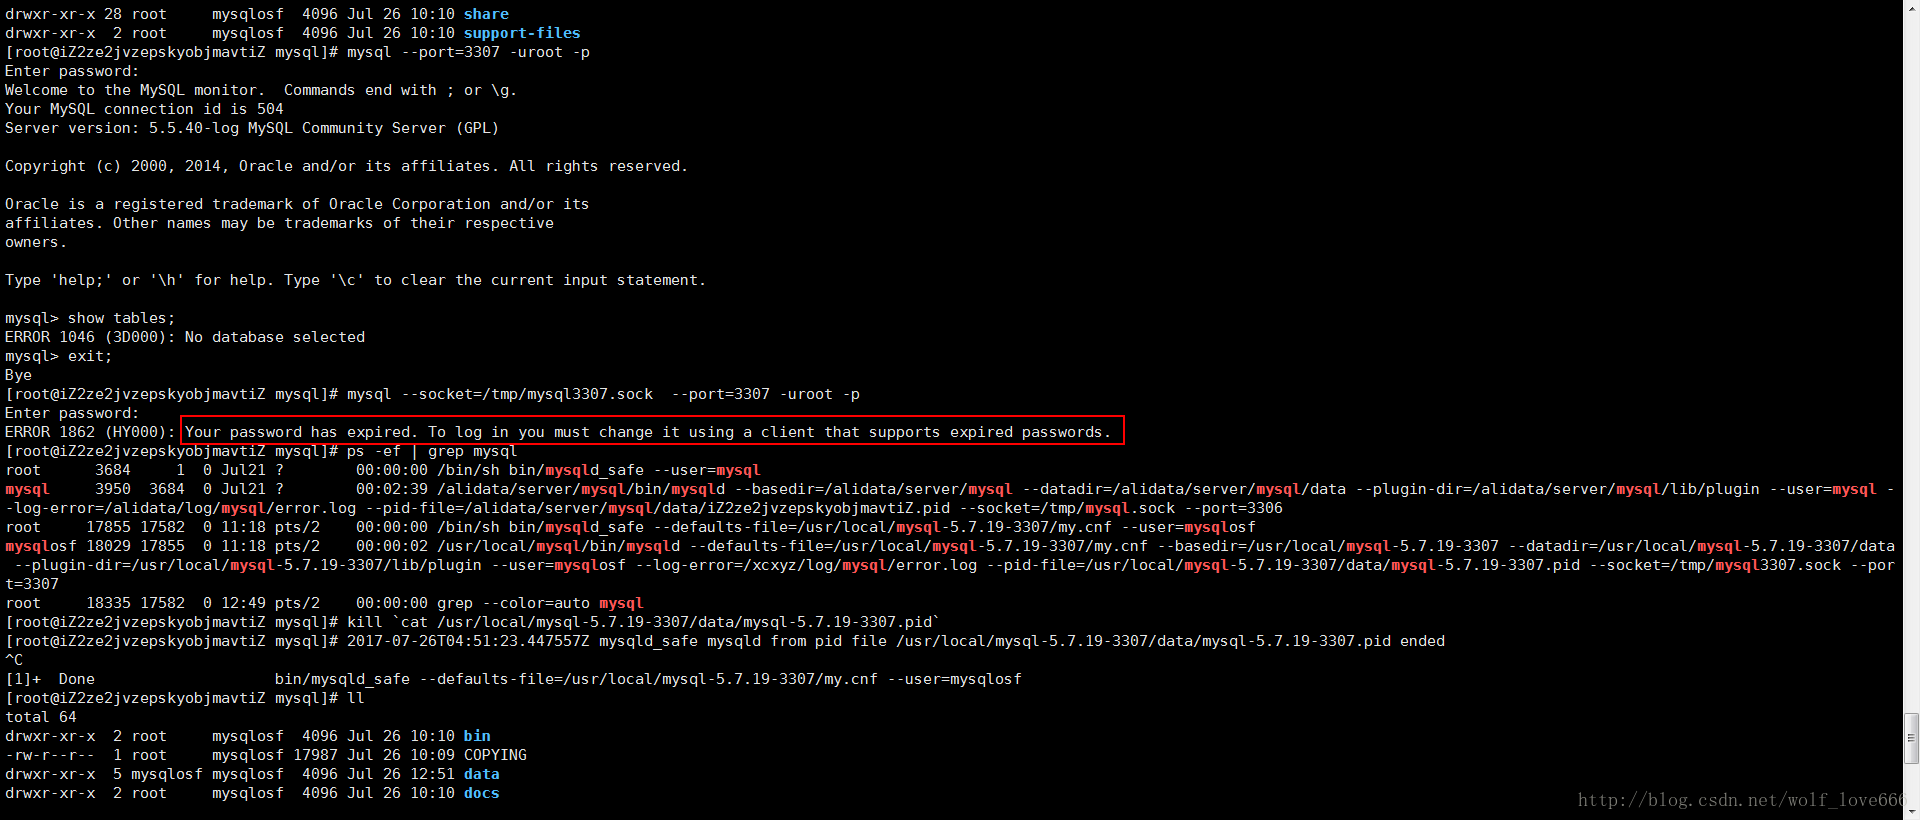
2-8查看mysql是否启动 ps -ef | grep mysql
4登陆mysql修改密码使用刚才的临时密码
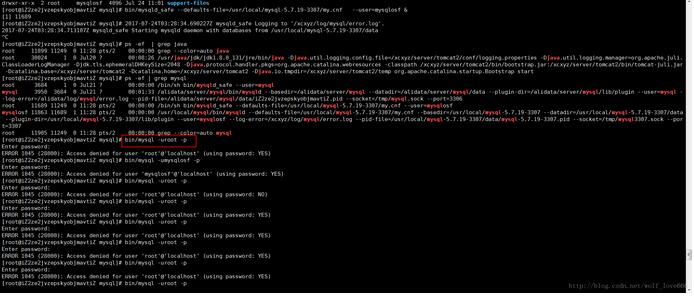
我这里又出问题了哈哈,始终登陆不上去
Access denied for user 'root'@'localhost' (using password:YES)解决方法最下面
如果登陆上去了可以直接使用刚才的临时密码登陆并且设置密码
5-登录MySQL之后,要求立即修改密码,否则不能进行任何操作。执行下面的命令修改'root'@'localhost'的密码:
SET PASSWORD = PASSWORD('root');
 ALTER USER 'root'@'localhost' PASSWORD EXPIRE NEVER;
flush privileges;
6-为了可以远程登录,增加一个'root'@'%'账号:
grant all privileges on *.* to 'root'@'%' identified by 'root' with grant option;
7-本地测试连接
按照上面的办法,继续解压安装mysql-5.7.19-linux-glibc2.5-x86_64.tar.gz,并且配置为3308,3309端口,就可以安装多个mysql了。
解决方案安装好了登陆不上去:
如果像我上面一样的话
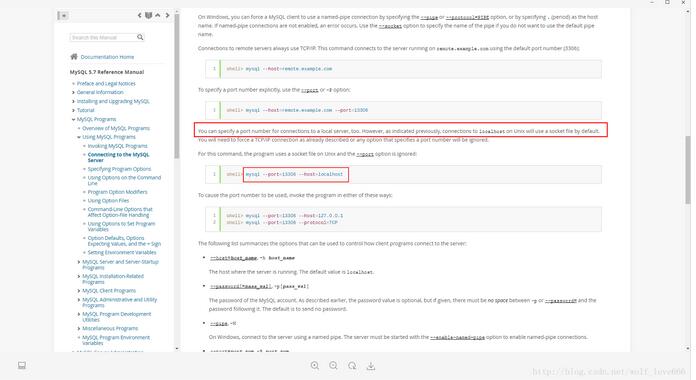
原因是如下红色框内的英文 我的是第二个mysql需要指定socket和port,英文意思就是说 如果你没有指定socket的话那么会选择默认的 因为我们安装多个mysql 所以这个必须指定
mysql --socket=/tmp/mysql3307.sock --port=3307 -uroot -p
如果这里不小心丢失了密码了或者密码过期了那么可以通过这个方式重置密码:
5-重置密码:
5-1关闭进程
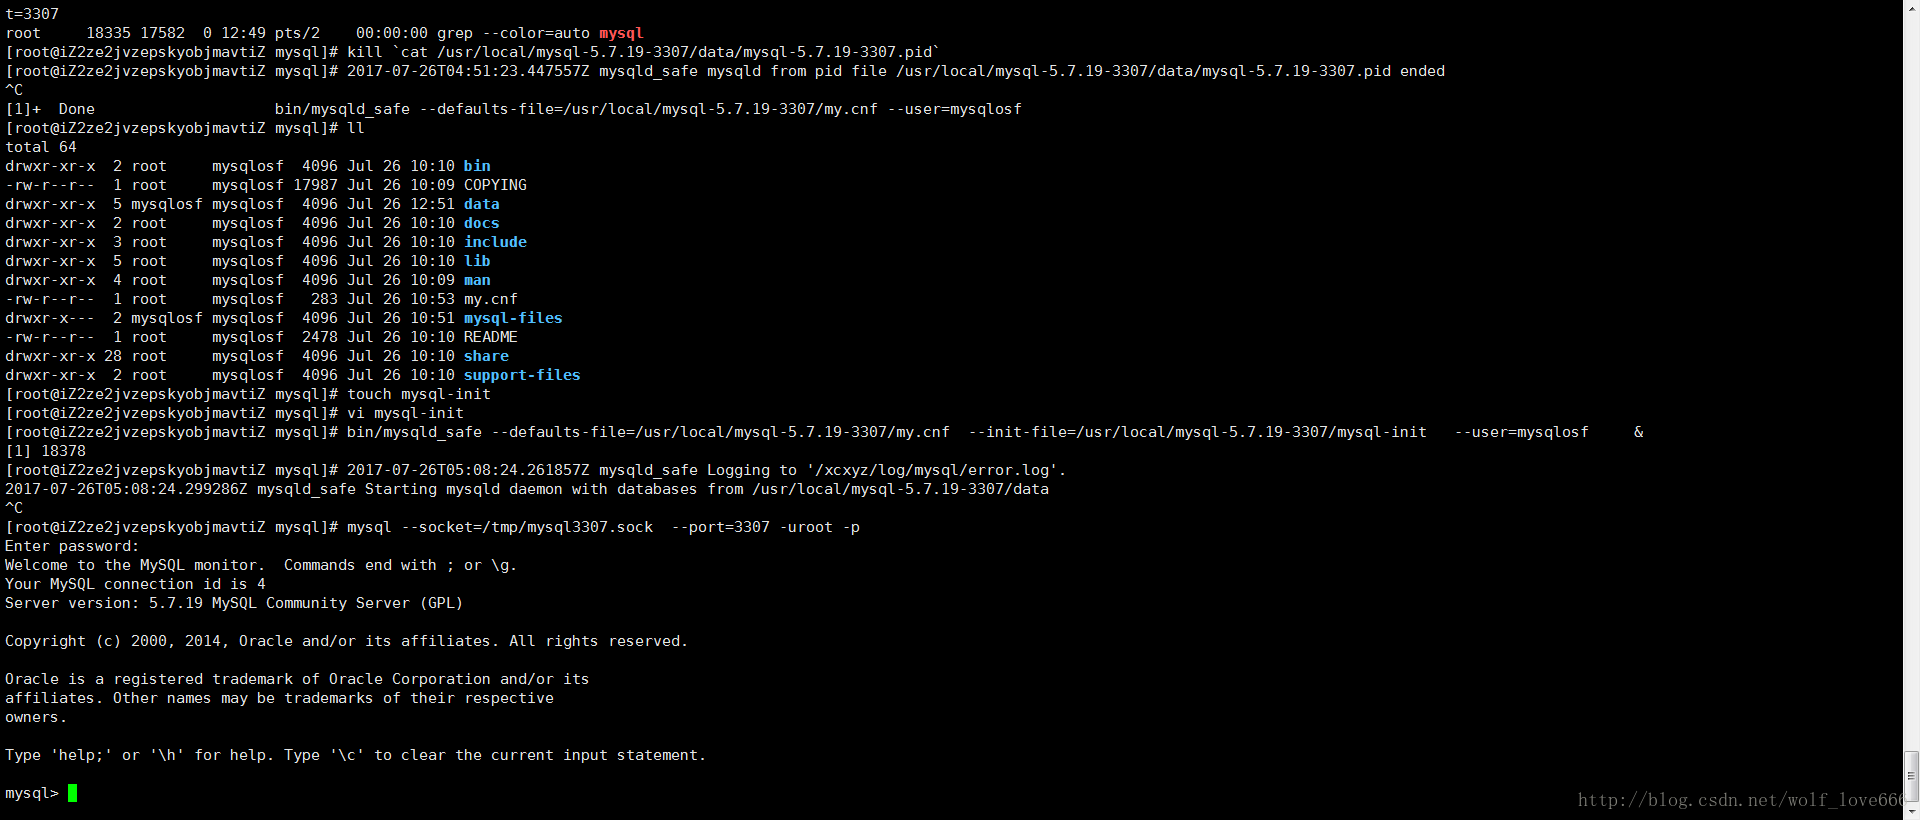
kill `cat /usr/local/mysql-5.7.19-3307/data/mysql-5.7.19-3307.pid`
5-2创建文件mysql-init

5-2-1文件内容
第一种内容:
ALTER USER 'root'@'localhost' IDENTIFIED BY 'mysqlosf';
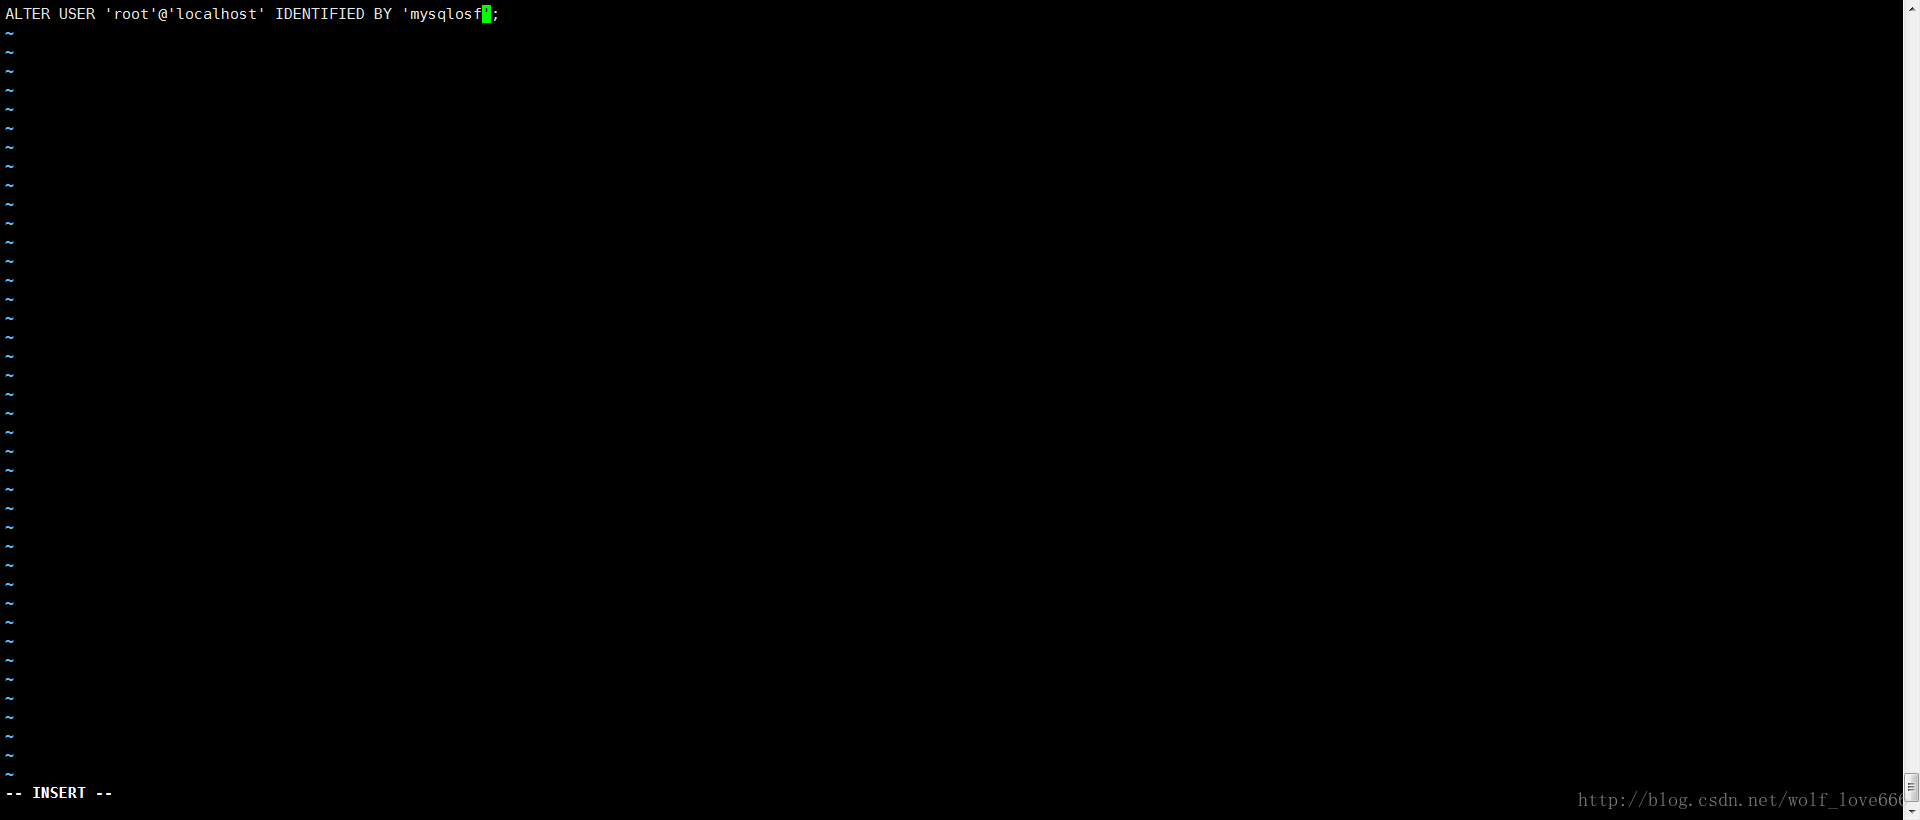
保存内容之后启动
UPDATE mysql.user
 SET authentication_string = PASSWORD('MyNewPass'), password_expired = 'N'
 WHERE User = 'root' AND Host = 'localhost';
FLUSH PRIVILEGES;
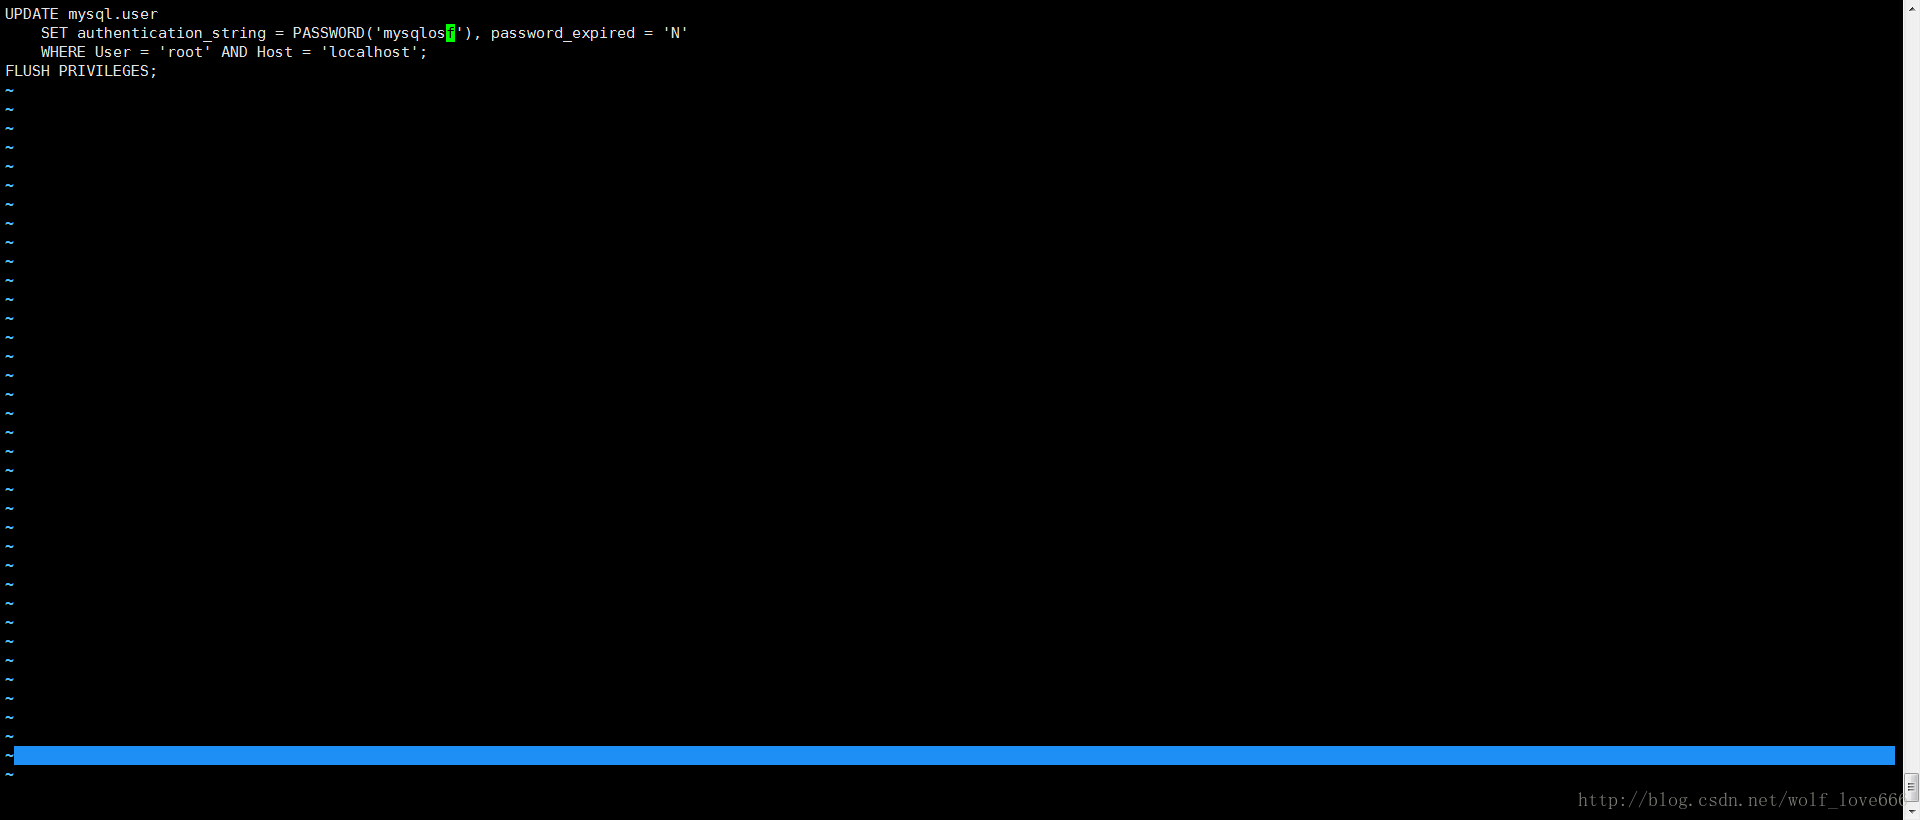
保存内容之后启动
精彩专题分享:mysql不同版本安装教程 mysql5.7各版本安装教程 mysql5.6各版本安装教程

