欢迎访问我的GitHub
https://github.com/zq2599/blog_demos
内容:所有原创文章分类汇总及配套源码,涉及Java、Docker、Kubernetes、DevOPS等;
欢迎访问我的GitHub
https://github.com/zq2599/blog_demos
内容:所有原创文章分类汇总及配套源码,涉及Java、Docker、Kubernetes、DevOPS等;
能独立运行的jar文件
在开发springboot应用时,通过java -jar命令启动应用是常用的方式,今天就来一起了解这个简单操作背后的技术;
开发demo
开发一个springboot应用作为本次研究的对象,对应的版本信息如下:
接下来开发springboot应用,这个应用非常简单:
springboot应用名为springbootstarterdemo,pom.xml文件内容:
<?xml version="1.0" encoding="UTF-8"?>
<project xmlns="http://maven.apache.org/POM/4.0.0" xmlns:xsi="http://www.w3.org/2001/XMLSchema-instance"
     xsi:schemaLocation="http://maven.apache.org/POM/4.0.0 https://maven.apache.org/xsd/maven-4.0.0.xsd">
  <modelVersion>4.0.0</modelVersion>
  <parent>
    <groupId>org.springframework.boot</groupId>
    <artifactId>spring-boot-starter-parent</artifactId>
    <version>2.3.1.RELEASE</version>
    <relativePath/> <!-- lookup parent from repository -->
  </parent>
  <groupId>com.bolingcavalry</groupId>
  <artifactId>springbootstarterdemo</artifactId>
  <version>0.0.1-SNAPSHOT</version>
  <name>springbootstarterdemo</name>
  <description>Demo project for Spring Boot</description>
  <properties>
    <java.version>1.8</java.version>
  </properties>
  <dependencies>
    <dependency>
      <groupId>org.springframework.boot</groupId>
      <artifactId>spring-boot-starter-web</artifactId>
    </dependency>
  </dependencies>
  <build>
    <plugins>
      <plugin>
        <groupId>org.springframework.boot</groupId>
        <artifactId>spring-boot-maven-plugin</artifactId>
      </plugin>
    </plugins>
  </build>
</project>
只有一个java类,里面有个http接口:
package com.bolingcavalry.springbootstarterdemo;

import org.springframework.boot.SpringApplication;
import org.springframework.boot.autoconfigure.SpringBootApplication;
import org.springframework.web.bind.annotation.RequestMapping;
import org.springframework.web.bind.annotation.RestController;

import java.util.Date;

@SpringBootApplication
@RestController
public class SpringbootstarterdemoApplication {

  public static void main(String[] args) {
    SpringApplication.run(SpringbootstarterdemoApplication.class, args);
  }
  @RequestMapping(value = "/hello")
  public String hello(){
    return "hello " + new Date();
  }
}
编码完成,在pom.xml所在目录执行命令
mvn clean package -U -DskipTests
构建成功后,在target目录下得到文件springbootstarterdemo-0.0.1-SNAPSHOT.jar就是这个springbootstarterdemo-0.0.1-SNAPSHOT.jar,此时执行java -jar springbootstarterdemo-0.0.1-SNAPSHOT.jar就能启动应用,如下图:
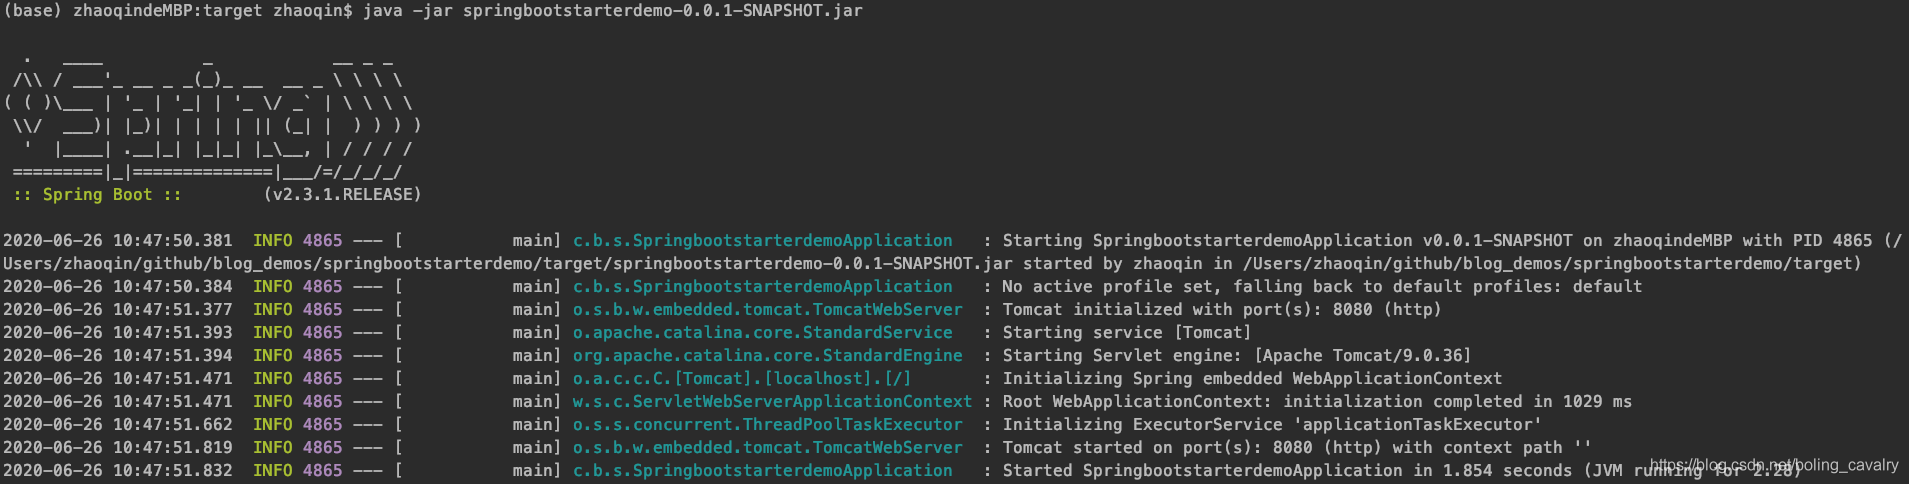
接下来就用这个springbootstarterdemo-0.0.1-SNAPSHOT.jar来分析jar文件能够独立启动的原因;
java -jar做了什么
先要弄清楚java -jar命令做了什么,在oracle官网找到了该命令的描述:
If the -jar option is specified, its argument is the name of the JAR file containing class and resource files for the application. The startup class must be indicated by the Main-Class manifest header in its source code.
再次秀出我蹩脚的英文翻译:
小结一下:
java -jar会去找jar中的manifest文件,在那里面找到真正的启动类;
探查springbootstarterdemo-0.0.1-SNAPSHOT.jarspringbootstarterdemo-0.0.1-SNAPSHOT.jar是前面的springboot工程的构建结果,是个压缩包,用常见的压缩工具就能解压,我这里的环境是MacBook Pro,用unzip即可解压;解压后有很多内容,我们先关注manifest相关的,下图红框中就是manifest文件:
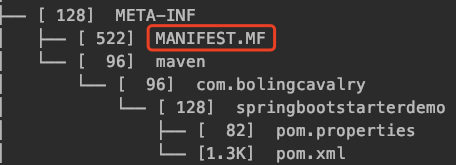
打开上图红框中的文件,内容如下:
Spring-Boot-Classpath-Index: BOOT-INF/classpath.idx
Implementation-Title: springbootstarterdemo
Implementation-Version: 0.0.1-SNAPSHOT
Start-Class: com.bolingcavalry.springbootstarterdemo.Springbootstarter
 demoApplication
Spring-Boot-Classes: BOOT-INF/classes/
Spring-Boot-Lib: BOOT-INF/lib/
Build-Jdk-Spec: 1.8
Spring-Boot-Version: 2.3.1.RELEASE
Created-By: Maven Jar Plugin 3.2.0
Implementation-Vendor: Pivotal Software, Inc.
Main-Class: org.springframework.boot.loader.JarLauncher
4.在上述内容可见Main-Class的值org.springframework.boot.loader.JarLauncher,这个和前面的java官方文档对应上了,正是这个JarLauncher类的代码中指定了真正的启动类;
疑惑出现
1.在MANIFEST.MF文件中有这么一行内容:
Start-Class: com.bolingcavalry.springbootstarterdemo.Springbootstarter
 demoApplication
2.前面的java官方文档中,只提到过Main-Class ,并没有提到Start-Class;
3.Start-Class的值是SpringbootstarterdemoApplication,这是我们的java代码中的唯一类,也只真正的应用启动类;
4.所以问题就来了:理论上看,执行java -jar命令时JarLauncher类会被执行,但实际上是SpringbootstarterdemoApplication被执行了,这其中发生了什么呢?
猜测
动手之前先猜一下,个人觉得原因应该如下:
分析JarLauncher先下载SpringBoot源码,我下载的是2.3.1版本,地址:https://github.com/spring-projects/spring-boot/releases/tag/v2.3.1.RELEASEJarLauncher所在的工程是spring-boot-loader,先弄明白JarLauncher的继承关系,如下图,可见JarLauncher继承自ExecutableArchiveLauncher,而ExecutableArchiveLauncher的父类Launcher位于最顶层,是个抽象类:

3. java -jar执行的是JarLauncher的main方法,如下,会实例化一个JarLauncher对象,然后执行其launch方法,并且将所有入参都带入:
public static void main(String[] args) throws Exception {
	new JarLauncher().launch(args);
}
4.上面的launch方法在父类Launcher中:
protected void launch(String[] args) throws Exception {
  // 将jar解压后运行的方式叫做exploded mode
  // 如果是exploded mode,就不能支持通过URL加载jar
  // 如果不是exploded mode,就可以通过URL加载jar
	if (!isExploded()) {
	  // 如果允许通过URL加载jar,就在此注册对应的处理类
		JarFile.registerUrlProtocolHandler();
	}
	// 创建classLoader
	ClassLoader classLoader = createClassLoader(getClassPathArchivesIterator());
	// jarmode是创建docker镜像时用到的参数,使用该参数是为了生成带有多个layer信息的镜像
	// 这里暂时不关注jarmode
	String jarMode = System.getProperty("jarmode");
	//如果没有jarmode参数,launchClass的值就来自getMainClass()返回
	String launchClass = (jarMode != null && !jarMode.isEmpty()) ? JAR_MODE_LAUNCHER : getMainClass();
	launch(args, launchClass, classLoader);
}
5.可见要重点关注的是getMainClass()方法,在看这个方法之前,我们先去关注一个重要的成员变量archive,是JarLauncher的父类ExecutableArchiveLauncher的archive,如下可见,该变量又来自方法createArchive:
public ExecutableArchiveLauncher() {
		try {
			this.archive = createArchive();
			this.classPathIndex = getClassPathIndex(this.archive);
		}
		catch (Exception ex) {
			throw new IllegalStateException(ex);
		}
	}
6.方法来自Launcher.createArchive,如下所示,可见成员变量archive实际上是个JarFileArchive对象:
protected final Archive createArchive() throws Exception {
		ProtectionDomain protectionDomain = getClass().getProtectionDomain();
		CodeSource codeSource = protectionDomain.getCodeSource();
		URI location = (codeSource != null) ? codeSource.getLocation().toURI() : null;
		String path = (location != null) ? location.getSchemeSpecificPart() : null;
		if (path == null) {
			throw new IllegalStateException("Unable to determine code source archive");
		}
		File root = new File(path);
		if (!root.exists()) {
			throw new IllegalStateException("Unable to determine code source archive from " + root);
		}
		return (root.isDirectory() ? new ExplodedArchive(root) : new JarFileArchive(root));
	}
7.现在回到getMainClass()方法,可见this.archive.getManifest方法返回的是META-INF/MANIFEST.MF文件的内容,然后getValue(START_CLASS_ATTRIBUTE)方法实际上就是从META-INF/MANIFEST.MF中取得了Start-Class的属性:
@Override
	protected String getMainClass() throws Exception {
	  // 对应的是JarFileArchive.getManifest方法,
	  // 进去后发现对应的就是JarFile.getManifest方法,
	  // JarFile.getManifest对应的就是META-INF/MANIFEST.MF文件的内容
		Manifest manifest = this.archive.getManifest();
		String mainClass = null;
		if (manifest != null) {
		  // 对应的是META-INF/MANIFEST.MF文件中的Start-Class的属性
			mainClass = manifest.getMainAttributes().getValue(START_CLASS_ATTRIBUTE);
		}
		if (mainClass == null) {
			throw new IllegalStateException("No 'Start-Class' manifest entry specified in " + this);
		}
		return mainClass;
	}
8.从上述分析可知:getMainClass()方法返回的是META-INF/MANIFEST.MF中取得了Start-Class的属性com.bolingcavalry.springbootstarterdemo.SpringbootstarterdemoApplication,再次回到launch方法中,可见最终运行的代码是launch(args, launchClass, classLoader),它的launchClass参数就是com.bolingcavalry.springbootstarterdemo.SpringbootstarterdemoApplication:
protected void launch(String[] args) throws Exception {
		if (!isExploded()) {
			JarFile.registerUrlProtocolHandler();
		}
		ClassLoader classLoader = createClassLoader(getClassPathArchivesIterator());
		String jarMode = System.getProperty("jarmode");
		// 这里的launchClass等于"com.bolingcavalry.springbootstarterdemo.SpringbootstarterdemoApplication"
		String launchClass = (jarMode != null && !jarMode.isEmpty()) ? JAR_MODE_LAUNCHER : getMainClass();
		// 这里就是启动SpringbootstarterdemoApplication的地方
		launch(args, launchClass, classLoader);
	}
9.展开launch(args, launchClass, classLoader),最终查到了MainMethodRunner类:
public class MainMethodRunner {

	private final String mainClassName;

	private final String[] args;

	/**
	 * Create a new {@link MainMethodRunner} instance.
	 * @param mainClass the main class
	 * @param args incoming arguments
	 */
	public MainMethodRunner(String mainClass, String[] args) {
	  // mainClassName被赋值为"com.bolingcavalry.springbootstarterdemo.SpringbootstarterdemoApplication"
		this.mainClassName = mainClass;
		this.args = (args != null) ? args.clone() : null;
	}

	public void run() throws Exception {
	  // 得到SpringbootstarterdemoApplication的Class对象
		Class<?> mainClass = Class.forName(this.mainClassName, false, Thread.currentThread().getContextClassLoader());
		// 得到SpringbootstarterdemoApplication的main方法对象
		Method mainMethod = mainClass.getDeclaredMethod("main", String[].class);
		mainMethod.setAccessible(true);
		// 通过反射执行main方法
		mainMethod.invoke(null, new Object[] { this.args });
	}
}
终于,真相大白了;
小结
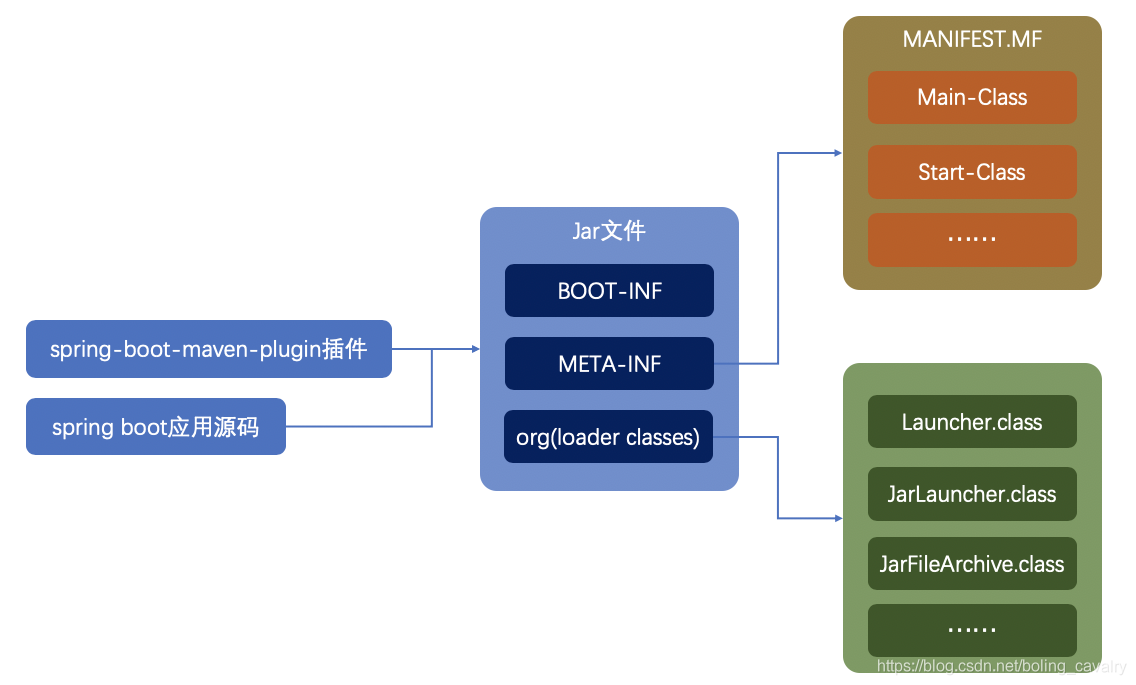
最后尽可能简短做个小结,先看jar是如何产生的,如下图,maven插件生成的jar文件中,有常见的class、jar,也有符合java规范的MANIFEST.MF文件,并且,还在MANIFEST.MF文件中额外生成了名为Start-Class的配置,这里面是我们编写的应用启动类SpringbootstarterdemoApplication:
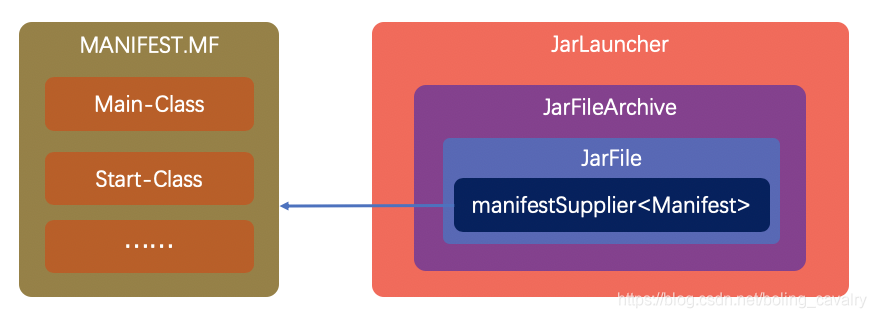
启动类是JarLauncher,它是如何与MANIFEST.MF文件关联的呢?从下图可以看出,最终是通过JarFile类的成员变量manifestSupplier关联上的:
再来看看关键代码的执行情况,如下图:

至此,SpringBoot的jar独立运行的基本原理已经清楚,探究的过程中,除了熟悉关键代码流程,还对jar中的文件有了更多了解,如果您正在学习SpringBoot,希望本文能给您一些参考;
官方文档最后附上SpringBoot官方文档,可以看到Start-Class描述信息:

上述文档明确提到:Start-Class定义的是实际的启动类,此时的您应该对一切都了然于胸,产生本该如此的感慨;

