我们在安卓开发中安卓自带的控件满足不了我们的需求,因此我们就需要用到自定义View来满足我们的需求,在这里我要讲解的是自定义View实现选座功能,在安卓中一个会使用自定义View的人一定会开发出与众不同以及美观的项目
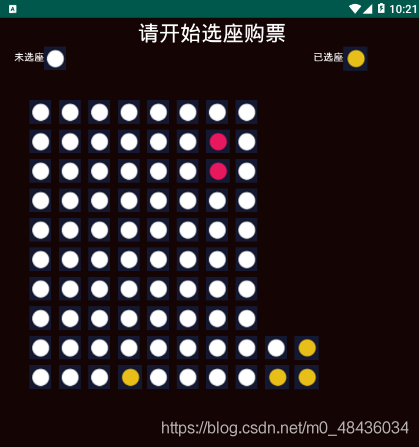
首先,我展示一下效果
以上主要就是我们需要创建一个我们自己的View继承自Viewgroup控件并实现onMeasure以及onDraw方法
具体的代码是这样的
public class SearView extends ViewGroup {
  private Context context;
  public SearView(@NonNull Context context) {
    super(context);
  }

  public SearView(@NonNull Context context, @Nullable AttributeSet attrs) {
    super(context, attrs);
    this.context=getContext();
  }

  public SearView(@NonNull Context context, @Nullable AttributeSet attrs, int defStyleAttr) {
    super(context, attrs, defStyleAttr);
  }

  @Override
  protected void onLayout(boolean changed, int l, int t, int r, int b) {

  }


  @Override
  protected void onMeasure(int widthMeasureSpec, int heightMeasureSpec) {
    super.onMeasure(widthMeasureSpec, heightMeasureSpec);

  }
  private ArrayList<SeatinfoBean.ResultBean> mlist;
  public void setData(ArrayList<SeatinfoBean.ResultBean> list){
    this.mlist = list;
    invalidate();
  }


  @Override
  protected void onDraw(Canvas canvas) {
    super.onDraw(canvas);
    if (mlist != null && mlist.size() > 0) {
      for (int i = 0; i < mlist.size(); i++) {
        SeatinfoBean.ResultBean resultBean = mlist.get(i);
        resultBean.draw(canvas,context);
      }
    }
  }

  @Override
  public boolean onTouchEvent(MotionEvent event) {
    switch (event.getAction()){
      case MotionEvent.ACTION_DOWN:

        break;
      case MotionEvent.ACTION_MOVE:
        break;
      case MotionEvent.ACTION_UP:

        float x = event.getX();
        float y = event.getY();
        completeByXY(x,y);
        break;
    }
    return true;
  }
  public void completeByXY(float x,float y){
    for (int i=0;i<mlist.size();i++){
      SeatinfoBean.ResultBean resultBean1 = mlist.get(i);
      int left = resultBean1.getLeft();
      int right = resultBean1.getRight();
      int bottom = resultBean1.getBottom();
      int top = resultBean1.getTop();
      if (x>=left&&x<right&&y>=top&&y<=bottom){
        clickedSeat.clickedSeat(resultBean1);
        int status = resultBean1.getStatus();
        if (status==1){
          status=3;
          resultBean1.setStatus(status);
        }else if (status==3){
          status=1;
          resultBean1.setStatus(status);
        }
        break;
      }
    }
    postInvalidate();
  }
  public interface ClickedSeat{
    void clickedSeat(SeatinfoBean.ResultBean resultBean);
  }
  private ClickedSeat clickedSeat;

  public void setClickedSeat(ClickedSeat clickedSeat) {
    this.clickedSeat = clickedSeat;
  }
}
以上的resultBean是我们根据选座接口中的返回值判断座位是否已经被选,大家可以参考一下我的Bean类,但具体的做法还要以自己的接口文件为主
public static class ResultBean {
    /**
     * row : 1
     * seat : 1
     * status : 2
     */

    private String row;
    private String seat;
    private int status;
    private int left;
    private int top;
    private int right;
    private int bottom;
    private Context context;
    private boolean ist = false;

    public String getRow() {
      return row;
    }

    public void setRow(String row) {
      this.row = row;
    }

    public String getSeat() {
      return seat;
    }

    public void setSeat(String seat) {
      this.seat = seat;
    }

    public int getStatus() {
      return status;
    }

    public void setStatus(int status) {
      this.status = status;
    }

    public int getLeft() {
      return left;
    }

    public void setLeft(int left) {
      this.left = left;
    }

    public int getTop() {
      return top;
    }

    public void setTop(int top) {
      this.top = top;
    }

    public int getRight() {
      return right;
    }

    public void setRight(int right) {
      this.right = right;
    }

    public int getBottom() {
      return bottom;
    }

    public void setBottom(int bottom) {
      this.bottom = bottom;
    }

    public Context getContext() {
      return context;
    }

    public void setContext(Context context) {
      this.context = context;
    }

    public boolean isIst() {
      return ist;
    }

    public void setIst(boolean ist) {
      this.ist = ist;
    }
    public void draw(Canvas canvas,Context context){
      if (status==2){
        BitmapDrawable drawable = (BitmapDrawable) context.getResources().getDrawable(R.drawable.xuan);
        Bitmap bitmap = drawable.getBitmap();
        int width = bitmap.getWidth();
        int height = bitmap.getHeight();
        int row = Integer.parseInt(getRow());
        int seat = Integer.parseInt(getSeat());
        row = row*50;
        seat = seat*50;
        canvas.drawBitmap(bitmap,seat,row,new Paint());
        left = seat;
        top = row;
        right = seat+width;
        bottom = row+height;
      }
      if (status==1){
        BitmapDrawable drawable = (BitmapDrawable) context.getResources().getDrawable(R.drawable.xuan1);
        Bitmap bitmap = drawable.getBitmap();
        int width = bitmap.getWidth();
        int height = bitmap.getHeight();
        int row = Integer.parseInt(getRow());
        int seat = Integer.parseInt(getSeat());
        row = row*50;
        seat = seat*50;
        canvas.drawBitmap(bitmap,seat,row,new Paint());
        left = seat;
        top = row;
        right = seat+width;
        bottom = row+height;
      }
      if (status==3){
        BitmapDrawable drawable = (BitmapDrawable) context.getResources().getDrawable(R.drawable.xuan3);
        Bitmap bitmap = drawable.getBitmap();
        int width = bitmap.getWidth();
        int height = bitmap.getHeight();
        int row = Integer.parseInt(getRow());
        int seat = Integer.parseInt(getSeat());
        row = row*50;
        seat = seat*50;
        canvas.drawBitmap(bitmap,seat,row,new Paint());
        left = seat;
        top = row;
        right = seat+width;
        bottom = row+height;
      }
    }
  }
}
最后,我们需要在布局文件里进行调用,我的布局文件是这样的
<?xml version="1.0" encoding="utf-8"?>
<LinearLayout xmlns:android="http://schemas.android.com/apk/res/android"
  xmlns:app="http://schemas.android.com/apk/res-auto"
  xmlns:tools="http://schemas.android.com/tools"
  android:layout_width="match_parent"
  android:layout_height="match_parent"
  tools:context=".activity.XuanZuoActivity"
  android:orientation="vertical">
  <TextView
    android:id="@+id/xuanzuotext"
    android:layout_width="match_parent"
    android:layout_height="wrap_content"
    android:text="请开始选座购票"
    android:background="#140404"
    android:gravity="center"
    android:textSize="@dimen/permission_dp_30"
    android:textColor="#fff"/>
  <LinearLayout
    android:layout_width="match_parent"
    android:layout_height="wrap_content"
    android:orientation="horizontal"
    android:background="#140404">
    <TextView
      android:id="@+id/weixuan"
      android:layout_width="wrap_content"
      android:layout_height="wrap_content"
      android:text="未选座"
      android:textColor="#fff"
      android:layout_marginLeft="@dimen/permission_dp_20"
      android:layout_marginTop="@dimen/dp_3"/>
    <ImageView
      android:layout_width="wrap_content"
      android:layout_height="wrap_content"
      android:src="@drawable/xuan1"/>
    <TextView
      android:id="@+id/weixuan2"
      android:layout_width="wrap_content"
      android:layout_height="wrap_content"
      android:text="已选座"
      android:textColor="#fff"
      android:layout_marginLeft="@dimen/dp_210"
      android:layout_marginTop="@dimen/dp_3"/>
    <ImageView
      android:layout_width="wrap_content"
      android:layout_height="wrap_content"
      android:src="@drawable/xuan"/>
  </LinearLayout>
  <com.bw.movie.SearView
    android:id="@+id/xuanzuo"
    android:background="#140404"
    android:layout_width="match_parent"
    android:layout_height="@dimen/dp_0"
    android:layout_weight="6"
    />

  <Button
    android:id="@+id/button_xuanzuo"
    android:layout_width="match_parent"
    android:layout_height="@dimen/dp_0"
    android:layout_weight="0.5"
    android:text="立即支付"
    android:background="#E91E63"/>

</LinearLayout>
以上就是我的选座功能实现的全过程,欢迎大家提问
总结

