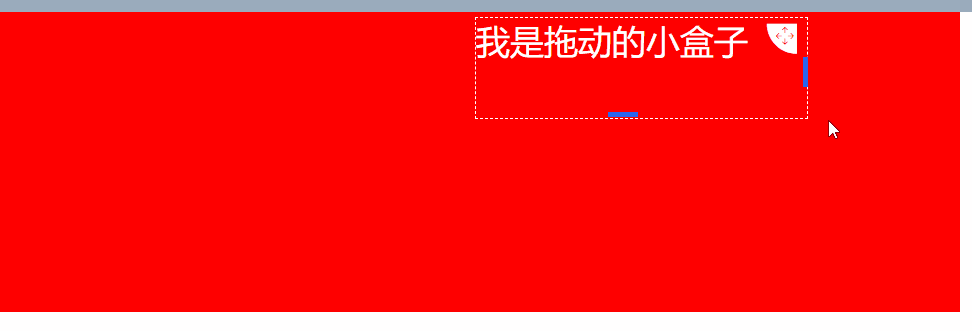
以下是效果图:实现了div盒子在固定区域的拖动,也可改变盒子的高度和宽度,当超出边距后无法继续改变大小
这里说一下大致原理:拖动和改变大小是分开来操作的,接下来分别说一下
盒子拖动
这里用到了js的三个鼠标事件,分别是onmousedown(鼠标按下)、onmousemove(鼠标移动)以及onmouseup(鼠标松开),大致流程就是鼠标按下拖动图标进行拖动时,动态获取当前div的left和top再重新赋值给当前div的top、left值,当鼠标松开再清除事件,至于固定在某个区域内拖动,在赋值的时候判断当前top及left值是否超过限制区域的值,如果超过给最大值最小值
盒子改变大小
这里用到的也是盒子拖动的三个事件,当鼠标移入盒子左边框触发mousemove事件,动态计算盒子宽度重新赋值,鼠标松开注销mousrmove事件,我将宽度和高度改变分别封装了组件,用的时候直接调用就好
博主用的vue写的,这里展示的也是铜鼓vue书写的,其他都是大同小异,知道原理就好
// index.vue
<template>
 <!-- demo -->
 <div class="demo" id="maxBoxId">
  <div
   :id="moveInfo.dragId"
   :style="
    'width:' +
    moveInfo.width +
    'px; left:' +
    moveInfo.coordinate.x +
    'px; top:' +
    moveInfo.coordinate.y +
    'px; height:' +
    moveInfo.height +
    'px'
   "
   class="drag-class"
  >
   <div class="drag-content">
    <div class="content-text">
     <!-- 拖拽图标 -->
     <div class="drag-icon">
      <i
       class="iconfont icon-tuodong1 down-dragger"
       @mousedown.stop="dragDiv($event)"
       @mouseup.stop="dragUp($event)"
      ></i>
     </div>
     {{ moveInfo.text }}
    </div>
    <!-- 宽度改变组件 -->
    <ChangeWidth :moveId="moveInfo.moveId" index="0" @widthChange="changeWidth" @clearEvent="clearEvent" />
    <!-- 高度改变组件 -->
    <ChangeHeight :moveId="moveInfo.moveId" index="1" @heightChange="heightChange" @clearEvent="clearEvent" />
   </div>
  </div>
 </div>
</template>

<script>
import ChangeWidth from '../component/ChangeWidth'
import ChangeHeight from '../component/ChangeHeight'
export default {
 components: { ChangeWidth, ChangeHeight },
 name: 'demo',
 data() {
  return {
   moveInfo: {
    dragId: 'smallDragBoxId',
    moveId: 'smallMoveBoxId',
    text: '我是拖动的小盒子',
    width: 400,
    height: 100,
    // 上边距和左边距
    coordinate: {
     x: 180,
     y: 10
    }
   }
  }
 },
 methods: {
  // 区块拖动
  dragDiv(el, index) {
   // dragId: 可拖动区域唯一标识
   // moveId: 改变宽度组件唯一标识
   const { dragId, coordinate } = this.moveInfo
   let obig = document.getElementById('maxBoxId')
   let osmall = document.getElementById(dragId)
   // 用于保存小的div拖拽前的坐标
   osmall.startX = el.clientX - osmall.offsetLeft
   osmall.startY = el.clientY - osmall.offsetTop
   document.onmousemove = e => {
    let left, top
    left = e.clientX - osmall.startX
    top = e.clientY - osmall.startY
    osmall.style.left = left + 'px'
    osmall.style.top = top + 'px'
    coordinate.x = left
    coordinate.y = top
    if (left <= 0) {
     osmall.style.left = 0 + 'px'
     coordinate.x = 0
    }
    if (top <= 0) {
     osmall.style.top = 0 + 'px'
     coordinate.y = 0
    }
    if (left >= obig.offsetWidth - osmall.offsetWidth) {
     osmall.style.left = obig.offsetWidth - osmall.offsetWidth + 'px'
     coordinate.x = obig.offsetWidth - osmall.offsetWidth
    }
    if (top >= obig.offsetHeight - osmall.offsetHeight) {
     osmall.style.top = obig.offsetHeight - osmall.offsetHeight + 'px'
     coordinate.y = obig.offsetHeight - osmall.offsetHeight
    }
   }
  },
  dragUp(el) {
   document.onmousemove = null
   document.onmouseup = null
   // 调用接口保存数据
  },
  // 改变drag宽度尺寸
  changeWidth(params) {
   const { index, width } = params
   let left
   const { dragId } = this.moveInfo
   // let obig = document.getElementById('maxBoxId')

   let osmall = document.getElementById(dragId)
   let boxWidth = document.getElementById('maxBoxId').offsetWidth
   left = osmall.style.left
   const newWidth = this.moveInfo.width + width
   // outWidth拖动宽度时超出box的宽度
   const outWidth = Number(left.slice(0, left.length - 2)) + Number(newWidth) - Number(boxWidth)
   // 如果超出box将截取留下的
   if (outWidth >= 0) {
    this.moveInfo.width = Number(boxWidth) - Number(left.slice(0, left.length - 2))
   } else {
    this.moveInfo.width = newWidth
   }
   // 设置div的最小宽度和最大宽度
   if (this.moveInfo.width < 200) {
    this.moveInfo.width = 200
   }
   if (this.moveInfo.width > 900) {
    this.moveInfo.width = 900
   }
  },
  // 改变drag高度
  heightChange(params) {
   const { index, height } = params
   let top
   let osmall = document.getElementById(this.moveInfo.dragId)
   let boxHeight = document.getElementById('maxBoxId').offsetHeight
   top = osmall.style.top
   const newHeight = this.moveInfo.height + height
   // outHeight拖动宽度时超出box的高度
   const outHeight = Number(top.slice(0, top.length - 2)) + Number(newHeight) - Number(boxHeight)
   // 如果超出box将截取留下的
   if (outHeight >= 0) {
    this.moveInfo.height = Number(boxHeight) - Number(top.slice(0, top.length - 2))
   } else {
    this.moveInfo.height = newHeight
   }
   // 设置div的最小宽度和最大宽度
   if (this.moveInfo.height < 100) {
    this.moveInfo.height = 100
   }
   if (this.moveInfo.height > 200) {
    this.moveInfo.height = 200
   }
  },
  // 清除鼠标事件
  clearEvent() {
   document.onmousemove = null
   document.onmouseup = null
  }
 }
}
</script>
<style lang="scss" scoped>
.demo {
 position: relative;
 width: 100%;
 z-index: 10;
 width: 1200px;
 background: red;
 height: 300px;
 margin-bottom: 1000px;
 margin-left: 100px;
 .drag-class {
  background: rgba(255, 255, 255, 0);
  position: absolute;
  .drag-content {
   position: relative;
   height: 100%;
   .content-text {
    border: 1px dashed #ffffff;
    font-size: 34px;
    color: #ffffff;
    margin-top: 5px;
    position: relative;
    height: 100%;
    .drag-icon {
     position: absolute;
     right: 10px;
     top: 5px;
     float: left;
     // margin-right: 10px;
     .down-dragger {
      cursor: move;
      font-size: 30px;
      color: #dbdce0;
      color: #ffffff;
     }
    }
   }
  }
 }
}
</style>
以下是改变大小的组件
<template>
 <!-- 拖动右边距改变div宽度 -->
 <div :id="`width${moveId}`" class="x-handle" @mousedown="mouseDown"></div>
</template>

<script>
export default {
 name: 'ChangeWidth',
 props: ['index', 'moveId'],
 data() {
  return {
   lastX: ''
  }
 },

 created() {
  document.addEventListener('mouseup', this.mouseUp)
 },

 destroyed() {
  document.removeEventListener('mouseup', this.mouseUp)
 },

 methods: {
  mouseDown(event) {
   document.addEventListener('mousemove', this.mouseMove)
   this.lastX = event.screenX
  },
  mouseMove(e) {
   this.$emit('widthChange', { width: e.screenX - this.lastX, index: this.index })
   this.lastX = e.screenX
  },
  mouseUp() {
   this.lastX = ''
   document.removeEventListener('mousemove', this.mouseMove)
   this.$emit('clearEvent')
  }
 }
}
</script>
<style lang="less" scoped>
.x-handle {
 width: 5px;
 cursor: e-resize;
 background: #2866f0;
 height: 30px;
 position: absolute;
 right: 0;
 top: 40%;
}
</style>
改变高度的组件原理和宽度一样,避免代码重复就不上传了
上面就是大致流程和源码。
总结

