想了解Repeater与ListView功能概述及使用介绍的相关内容吗,在本文为您仔细讲解Repeater ListView的相关知识和一些Code实例,欢迎阅读和指正,我们先划重点:Repeater,ListView,下面大家一起来学习吧。
Repeater
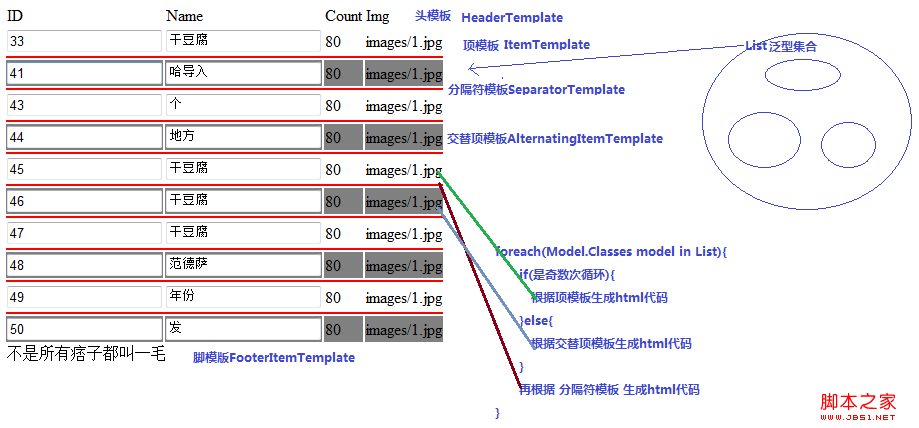
Repeater(foreach)用于对绑定数据源中的数据进行遍历并按格式显示,每条数据以什么格式显示是由Repeater的<ItemTemplate>来决定的,模板会多次显示,就像foreach, ItemTemplate 中相当于{}中的语句。<ItemTemplate>姓名:<%#Eval(“Name”)%><b>年龄:<%#Eval(“Age”)%></b><br /></ItemTemplate>。注意:%和#中间不能有空格。
<%#Eval("Name")%>表示在这个位置显示当前实体对象的Name属性,注意调用Eval、Bind这些数据绑定方法的时候要用#。
因为Eval就是将属性显示到指定的位置,因此也可以显示到文本框中<ItemTemplate>姓名:
<asp:TextBox runat="server"Text='<%#Eval("Name") %>' />
</ItemTemplate>
注意不要写成Text="<%#Eval('Name')%>" 因为<%%>中的是C#代码,''是字符,而不是字符串
还可以用在服务器控件中<asp:TextBox Text='<%#Eval("Name") %>'runat="server"></asp:TextBox>
DemoCode及注意点
Repeater.aspx
<% @ Page Language="C#" AutoEventWireup="true" CodeBehind="Repeater.aspx.cs" Inherits ="WebForm.Repeater" %>
<! DOCTYPE html PUBLIC "-//W3C//DTD XHTML 1.0 Transitional//EN" "http://www.w3.org/TR/xhtml1/DTD/xhtml1-transitional.dtd">
< html xmlns ="http://www.w3.org/1999/xhtml">
< head runat ="server">
<title ></ title>
< style type ="text/css">
#tblist{ border-top :1px solid #000 ; border-left : 1px solid #000 ; margin: 0px auto ;width : 600px;}
#tblist td {border-bottom : 1px solid #000 ; border-right: 1px solid #000; padding :5px }
#didPanel {position : absolute; left :350px ; top: 200px ;width : 500px; height :70px ; border: 1px solid #000; background-color :Window ; padding: 15px ;display : none}
</style >
</ head>
< body>
<form id="form1" runat="server">
<asp : ObjectDataSource ID ="ObjectDataSource1" runat ="server"
SelectMethod ="getAllClasses" TypeName ="BLL.Classes">
< SelectParameters>
< asp: Parameter DefaultValue ="false" Name ="isDel" Type ="Boolean" />
</ SelectParameters>
</asp : ObjectDataSource>
<div >
<table id="tbList">
< asp: Repeater ID ="Repeater1" runat ="server" DataSourceID ="ObjectDataSource1">
< HeaderTemplate> <!--头模板-->
< tr>
< td> ID </td >
< td> Name </td >
< td> Count </td >
< td> Img </td >
< td> 操作 </td >
</ tr>
</ HeaderTemplate>
< ItemTemplate> <!--项模板-->
< tr>
< td>< input type ="text" value =" <%# Eval("CID")%> " /></ td >
< td>
< asp: TextBox ID ="TextBox1" runat ="server" Text ='<% # Eval("CName")%> '></asp : TextBox></ td >
< td> <% #Eval( "CCount" )%> </td >
< td>
<%--<img src="images/<%#Eval("CImg")%>" style="width:100px;height:80px;"/>--%>
<!--服务器端图片路径需要添加images/文件路径时 需要放在#号后 如果images/《% 会导致《%被作为字符串解析-->
< asp: Image ID ="Image1" runat ="server" ImageUrl ='<% # "images/"+Eval("CImg")%> ' Width ="100px" Height ="80px"/>
<!--补充:模板中的按钮一般不写OnClick事件响应,而是响应Repeater的ItemCommand事件。-->
</ td>
</ tr>
</ ItemTemplate>
< SeparatorTemplate> <!--两项数据间的间隔模板-->
< tr>
< td colspan ="5" style ="background-color :red; height:2px; line-height :3px;"></td >
</ tr>
</ SeparatorTemplate>
< AlternatingItemTemplate> <!--交替项模板-->
< tr style ="background-color :Gray">
< td>< input type ="text" value =" <%# Eval("CID")%> " /></ td >
< td>
< asp: TextBox ID ="TextBox1" runat ="server" Text ='<% # Eval("CName")%> '></asp : TextBox></ td >
< td> <% #Eval( "CCount" )%> </td >
< td> <% #Eval( "CImg" )%> </td >
< td>
< asp: Button ID ="btnDel" runat ="server" Text ="删除" OnCommand ="Button_OnClick" CommandName ="Del" CommandArgument ='<% # Eval("CID")%> '/>
</ td>
</ tr>
</ AlternatingItemTemplate>
< FooterTemplate> <!--脚模板-->
< tr>
< td colspan ="5">不是所有痞子都叫一毛 </ td>
</ tr>
</ FooterTemplate>
</ asp: Repeater >
</table >
</div >
</form >
</ body>
</ html>
Repeater.aspx.cs
using System;
using System.Web.UI.WebControls;
namespace WebForm {
public partial class Repeater : System.Web.UI. Page {
protected void Page_Load( object sender, EventArgs e) {
}
protected void Button_OnClick( object sender, CommandEventArgs e) {
//Response.Write("CommandArgument" + e.CommandArgument + "CommandName" + e.CommandName + "删除了" + DateTime.Now);需前台设置CommandArgument及CommandName属性
if (new BLL. Classes().SoftDel( Convert .ToInt32(e.CommandArgument)) > 0) {
Response.Write( "删除成功" );
Repeater1.DataBind(); //重新绑定数据 否则服务器不会重新生成Repeater数据 而是返回__VIEWSTATE中原有数据
} else {
Response.Write( "删除失败" );
}
}
}
}
效果图:
ListView
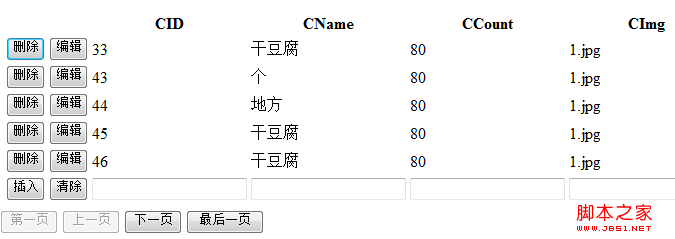
Repeater一般只用来展示数据,如果要增删改查(CRUD)则用ListView更方便。使用向导来使ListView会自动生成很多模板,免去手写模板代码的麻烦,必要时进行手工调整即可。
同Repeater一样设定数据源,然后点击智能提示中的“配置ListView”,选择一种布局和样式,然后根据需要勾选“启用编辑”、“启用删除”、“启用插入”、“启用分页”,就会自动生成常用的模板。
效果图类似:
ListView默认的分页是先从数据源取得所有数据,然后再截取当前页面的部分,在数据量非常大的情况下效率非常低,因此默认分页基本不能用。应该是只从数据源取得要显示的数据。详见下章《如何实现ListView高效分页》
同样内容点可参见《如何实现ListView高效分页》贴出的代码
LayoutTemplate为布局模板,布局模板中必须有一个ID为itemPlaceholder的服务端控件,项占位符(FrameWork4.0以后不需要),itemPlaceholder前面就是相当于Repeater中的HeaderTemplate,itemPlaceholder后面就是相当于Repeater中的FooterTemplate,因此ListView中没有这两个模板。
ItemTemplate是每一项的模板,AlternatingItemTemplate是隔行显示的模板,和Repeater一样。
EmptyDataTemplate为数据源没有数据的时候显示的内容(Insert也算数据),这样的话可以实现“没有查找结果”、“对不起,找不到您要找的数据”等提示内容
InsertItemTemplate为插入数据界面的模板,
EditItemTemplate为编辑数据的模板,
SelectedItemTemplate为标记为Selected的行的模板。
数据源配置见上章 Asp.Net中的数据源

