[TOC]
## 前言
最近在学习C# Socket相关的知识,学习之余,动手做了一个简单的局域网聊天器。有萌生做这个的想法,主要是由于之前家里两台电脑之间想要传输文件十分麻烦,需要借助QQ,微信或者其他第三方应用,基本都要登录,而且可能传输的文件还有大小限制,压缩问题。所以本聊天器的首要目标就是解决这两个问题,做到使用方便(双击启动即用),传文件无限制。
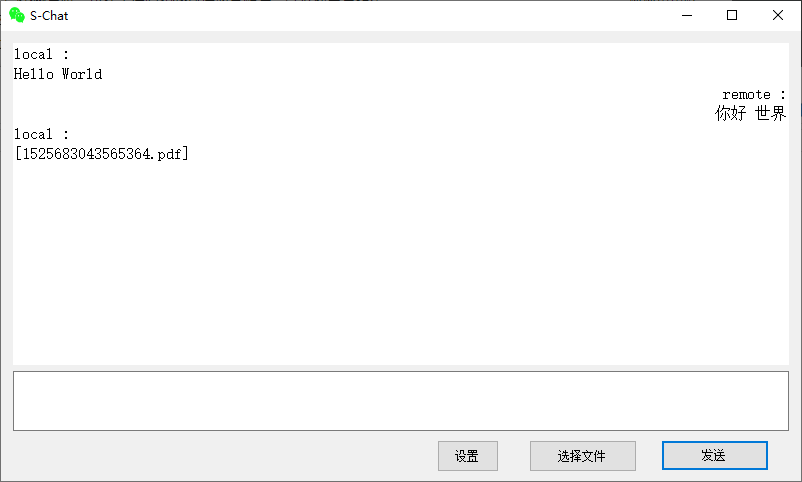
废话不多说,先上图。S-Chat是服务端,C-Chat是客户端,两者除了客户端首次启动后需要设置一下连接的IP地址外,无其他区别。操作与界面都完全相同,对于用户来说,基本不用在意谁是服务端谁是客户端。

## 编码
### 服务端监听接口
服务端主要负责开启监听线程,等待客户端接入
```c#
public void StartListen()
{
// 创建Socket对象 new Socket(AddressFamily.InterNetwork, SocketType.Stream, ProtocolType.Tcp)
Socket socket = GetSocket();
// 将套接字与IPEndPoint绑定
socket.Bind(this.GetIPEndPoint());
// 开启监听 仅支持一个连接
socket.Listen(1);
// 开启线程等待客户端接入,避免堵塞
Thread acceptThread = new Thread(new ThreadStart(TryAccept));
acceptThread.IsBackground = true;
acceptThread.Start();
}
public void TryAccept()
{
Socket socket = GetSocket();
while (true)
{
try
{
Socket connectedSocket = socket.Accept()
this.ConnectedSocket = connectedSocket;
OnConnect(); // 连接成功回调
this.StartReceive(); // 开始接收线程
break;
}
catch (Exception e)
{
}
}
}
```
### 客户端连接接口
客户端主要负责开启连接线程,每隔2秒,自动尝试连接服务端
```c#
public void StartConnect()
{
Thread connectThread = new Thread(new ThreadStart(TryConnect));
connectThread.IsBackground = true;
connectThread.Start();
}
public void TryConnect()
{
Socket socket = GetSocket();
while (true)
{
try
{
socket.Connect(this.GetIPEndPoint());
this.ConnectedSocket = socket;
OnConnect(); // 连接成功回调
this.StartReceive();
break;
}
catch (Exception e)
{
Thread.Sleep(TryConnectInterval); // 指定间隔后重新尝试连接
}
}
}
```
文字发送,文件发送,接收文字,接收文件等通用接口主要实现在`ChatBase`类中,是服务端与客户端的共同父类。
### 文字发送接口
发送数据的第一位表示发送信息的类型,0表示字符串文字,1表示文件
然后获取待发送字符串的长度,使用long类型表示,占用8个字节
共发送的字节数据可以表示为头部(类型 + 字符串字节长度,共9个字节)+ 实际字符串字节数据
```c#
public bool Send(string msg)
{
if (ConnectedSocket != null && ConnectedSocket.Connected)
{
byte[] buffer = UTF8.GetBytes(msg);
byte[] len = BitConverter.GetBytes((long)buffer.Length);
byte[] content = new byte[1 + len.Length + buffer.Length];
content[0] = (byte)ChatType.Str; // 发送信息类型,字符串
Array.Copy(len, 0, content, 1, len.Length); // 字符串字节长度
Array.Copy(buffer, 0, content, 1 + len.Length, buffer.Length); // 实际字符串字节数据
try
{
ConnectedSocket.Send(content);
return true;
}
catch (Exception e)
{
}
}
return false;
}
```
### 文件发送接口
与字符串发送相同的头部可以表示为(类型 + 文件长度,共9个字节)
还需要再加上待发送的文件名的长度,与文件名字节数据
共发送的字节数据可以表示为头部(类型 + 文件长度,共9个字节)+ 文件名头部(文件名长度 + 文件名字节数据)+ 实际文件数据
```c#
public bool SendFile(string path)
{
if (ConnectedSocket != null && ConnectedSocket.Connected)
{
try
{
FileInfo fi = new FileInfo(path);
byte[] len = BitConverter.GetBytes(fi.Length);
byte[] name = UTF8.GetBytes(fi.Name);
byte[] nameLen = BitConverter.GetBytes(name.Length);
byte[] head = new byte[1 + len.Length + nameLen.Length + name.Length];
head[0] = (byte)ChatType.File; // 加上信息发送类型
Array.Copy(len, 0, head, 1, len.Length); // 加上文件长度
Array.Copy(nameLen, 0, head, 1 + len.Length, nameLen.Length); // 加上文件名长度
Array.Copy(name, 0, head, 1 + len.Length + nameLen.Length, name.Length); // 加上文件名字节数据
ConnectedSocket.SendFile(
path,
head,
null,
TransmitFileOptions.UseDefaultWorkerThread
);
return true;
}
catch(Exception e)
{
}
}
return false;
}
```
### 信息接收接口(文字与文件)
主要是解析接收到的字节数据,根据字符串或文件的类型进行处理
```c#
public void Receive()
{
if (ConnectedSocket != null)
{
while (true)
{
try
{
// 读取公共头部
byte[] head = new byte[9];
ConnectedSocket.Receive(head, head.Length, SocketFlags.None);
int len = BitConverter.ToInt32(head, 1);
if (head[0] == (byte) ChatType.Str)
{
// 接收字符串
byte[] buffer = new byte[len];
ConnectedSocket.Receive(buffer, len, SocketFlags.None);
OnReceive(ChatType.Str, UTF8.GetString(buffer));
}
else if(head[0] == (byte)ChatType.File)
{
// 接收文件
if (!Directory.Exists(dirName))
{
Directory.CreateDirectory(dirName);
}
// 读取文件名信息
byte[] nameLen = new byte[4];
ConnectedSocket.Receive(nameLen, nameLen.Length, SocketFlags.None);
byte[] name = new byte[BitConverter.ToInt32(nameLen, 0)];
ConnectedSocket.Receive(name, name.Length, SocketFlags.None);
string fileName = UTF8.GetString(name);
// 读取文件内容并写入
int readByte = 0;
int count = 0;
byte[] buffer = new byte[1024 * 8];
string filePath = Path.Combine(dirName, fileName);
if (File.Exists(filePath))
{
File.Delete(filePath);
}
using (FileStream fs = new FileStream(filePath, FileMode.Append, FileAccess.Write))
{
while (count != len)
{
int readLength = buffer.Length;
if(len - count < readLength)
{
readLength = len - count;
}
readByte = ConnectedSocket.Receive(buffer, readLength, SocketFlags.None);
fs.Write(buffer, 0, readByte);
count += readByte;
}
}
OnReceive(ChatType.File, fileName);
}
else
{
// 未知类型
}
}
catch (Exception e)
{
}
}
}
}
```
## 使用
* 第一次使用,客户端需要设置待连接的IP地址。之后再启动会自动连接
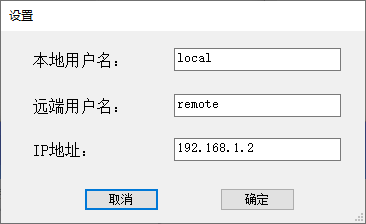
1. 双击服务端exe启动,点击`设置`,查看IP地址项

2. 双击客户端exe启动,点击`设置`,在`IP地址`项,输入服务端查看到的IP地址
* 设置成功后,等待大约一两秒,**应用cion变成绿色**,即表示连接成功,可以正常发送文字和文件了
* 可以点击`选择文件`(支持选择多个文件),发送文件
* 支持直接拖拽文件到输入框,发送文件
* 支持Ctrl+Enter快捷键发送
* 接收到的文件自动存放在exe所在目录的**ChatFiles**文件夹下
### 注意事项
* 客户端服务端需要在同一个局域网下才能实现连接
* 服务端IP地址是不支持修改的,自动读取本机的IP地址
## 源码
* 完整代码放在GitHub上,[点击查看](https://github.com/iwiniwin/Chat)
* 预编译好的可运行exe程序,在仓库的[Release](https://github.com/iwiniwin/Chat/tree/master/Release)目录,也可以直接通过百度云[下载](http://pan.baidu.com/s/1PEf7sEX2ZU_w1LhJEZsaEg#list/path=%2F),提取码`v4pe`

