之前写了两篇关于自定义view的文章,本篇讲讲自定义ViewGroup的实现。
我们知道ViewGroup就是View的容器类,我们经常用的LinearLayout,RelativeLayout等都是ViewGroup的子类。并且我们在写布局xml的时候,会告诉容器(凡是以layout为开头的属性,都是为用于告诉容器的),我们的宽度(layout_width)、高度(layout_height)、对齐方式(layout_gravity)等;于是乎,ViewGroup的职能为:给childView计算出建议的宽和高和测量模式 ;决定childView的位置;为什么只是建议的宽和高,而不是直接确定呢,别忘了childView宽和高可以设置为wrap_content,这样只有childView才能计算出自己的宽和高。
View的根据ViewGroup传入的测量值和模式,对自己宽高进行确定(onMeasure中完成),然后在onDraw中完成对自己的绘制。ViewGroup需要给View传入view的测量值和模式(onMeasure中完成),而且对于此ViewGroup的父布局,自己也需要在onMeasure中完成对自己宽和高的确定。此外,需要在onLayout中完成对其childView的位置的指定。
因为ViewGroup有很多子View,所以它的整个绘制过程相对于View会复杂一点,但是还是遵循三个步骤measure,layout,draw,我们依次说明。
本文我们来写一个类似于GridView的网格容器吧,姑且叫做CustomGridView。
自定义属性/获取属性值
<?xml version="1.0" encoding="utf-8"?>
<resources>
 <declare-styleable name="CustomGridView">
 <attr name="numColumns" format="integer" />
 <attr name="hSpace" format="integer" />
 <attr name="vSpace" format="integer" />
 </declare-styleable>
</resources>
 public CustomGridView(Context context, AttributeSet attrs, int defStyle) {
 super(context, attrs, defStyle);
 if (attrs != null) {
  TypedArray a = getContext().obtainStyledAttributes(attrs,
   R.styleable.CustomGridView);
  colums = a.getInteger(R.styleable.CustomGridLayout_numColumns, 3);
  hSpace = a.getInteger(R.styleable.CustomGridLayout_hSpace, 10);
  vSpace = a.getInteger(R.styleable.CustomGridLayout_vSpace, 10);
  a.recycle();
 }
 }

 public MyGridLayout(Context context, AttributeSet attrs) {
 this(context, attrs, 0);
 }

 public MyGridLayout(Context context) {
 this(context, null);
 }
LayoutParams
ViewGroup还有一个很重要的知识LayoutParams,LayoutParams存储了子View在加入ViewGroup中时的一些参数信息,在继承ViewGroup类时,一般也需要新建一个新的LayoutParams类,就像SDK中我们熟悉的LinearLayout.LayoutParams,RelativeLayout.LayoutParams类等一样,那么可以这样做,在你定义的ViewGroup子类中,新建一个LayoutParams类继承与ViewGroup.LayoutParams。
public static class LayoutParams extends ViewGroup.LayoutParams {
  public int left = 0;
  public int top = 0;

  public LayoutParams(Context arg0, AttributeSet arg1) {
  super(arg0, arg1);
  }

  public LayoutParams(int arg0, int arg1) {
  super(arg0, arg1);
  }

  public LayoutParams(android.view.ViewGroup.LayoutParams arg0) {
  super(arg0);
  }
 }
那么现在新的LayoutParams类已经有了,如何让我们自定义的ViewGroup使用我们自定义的LayoutParams类来添加子View呢,ViewGroup同样提供了下面这几个方法供我们重写,我们重写返回我们自定义的LayoutParams对象即可。
 @Override
 public ViewGroup.LayoutParams generateLayoutParams(AttributeSet attrs) {
 return new CustomGridLayout.LayoutParams(getContext(), attrs);
 }

 @Override
 protected ViewGroup.LayoutParams generateDefaultLayoutParams() {
 return new LayoutParams(LayoutParams.WRAP_CONTENT, LayoutParams.WRAP_CONTENT);
 }

 @Override
 protected ViewGroup.LayoutParams generateLayoutParams(ViewGroup.LayoutParams p) {
 return new LayoutParams(p);
 }

 @Override
 protected boolean checkLayoutParams(ViewGroup.LayoutParams p) {
 return p instanceof CustomGridLayout.LayoutParams;
 }
measure
在onMeasure中需要做两件事:
•计算childView的测量值以及模式
measureChildren(widthMeasureSpec, heightMeasureSpec);
measureChild(child, widthMeasureSpec, heightMeasureSpec);
child.measure(WidthMeasureSpec, HeightMeasureSpec);
•设置ViewGroup自己的宽和高
测量ViewGroup的大小,如果layout_width和layout_height是match_parent或具体的xxxdp,就很简答了,直接调用setMeasuredDimension()方法,设置ViewGroup的宽高即可,如果是wrap_content,就比较麻烦了,我们需要遍历所有的子View,然后对每个子View进行测量,然后根据子View的排列规则,计算出最终ViewGroup的大小。
注意:在自定义View第一篇讲SpecMode时,曾说到UNSPECIFIED一般都是父控件是AdapterView,通过measure方法传入的模式。在这里恰好就用到了。
@Override
 protected void onMeasure(int widthMeasureSpec, int heightMeasureSpec) {
 int widthMode = MeasureSpec.getMode(widthMeasureSpec);
 int heightMode = MeasureSpec.getMode(heightMeasureSpec);
 int sizeWidth = MeasureSpec.getSize(widthMeasureSpec);
 int sizeHeight = MeasureSpec.getSize(heightMeasureSpec);

 //UNSPECIFIED一般都是父控件是AdapterView,通过measure方法传入的模式
 final int childWidthMeasureSpec = MeasureSpec.makeMeasureSpec(sizeWidth, MeasureSpec.UNSPECIFIED);
 final int childHeightMeasureSpec = MeasureSpec.makeMeasureSpec(sizeHeight, MeasureSpec.UNSPECIFIED);
 measureChildren(childWidthMeasureSpec, childHeightMeasureSpec);

 int childCount = this.getChildCount();
 int line = childCount % colums == 0 ? childCount / colums : (childCount + colums) / colums;

 //宽布局为wrap_content时,childWidth取childView宽的最大值,否则动态计算
 if (widthMode == MeasureSpec.AT_MOST) {
  for (int i = 0; i < childCount; i++) {
  View child = this.getChildAt(i);
  childWidth = Math.max(childWidth, child.getMeasuredWidth());
  }
 } else if (widthMode == MeasureSpec.EXACTLY) {
  childWidth = (sizeWidth - (colums - 1) * hSpace) / colums;
 }
 //高布局为wrap_content时,childHeight取childView高的最大值,否则动态计算
 if (heightMode == MeasureSpec.AT_MOST) {
  for (int i = 0; i < childCount; i++) {
  View child = this.getChildAt(i);
  childHeight = Math.max(childHeight, child.getMeasuredHeight());
  }
 } else if (heightMode == MeasureSpec.EXACTLY) {
  childHeight = (sizeHeight - (line - 1) * vSpace) / line;
 }

 //遍历每个子view,将它们左上角坐标保存在它们的LayoutParams中,为后面onLayout服务
 for (int i = 0; i < childCount; i++) {
  View child = this.getChildAt(i);
  LayoutParams lParams = (LayoutParams) child.getLayoutParams();
  lParams.left = (i % colums) * (childWidth + hSpace);
  lParams.top = (i / colums) * (childHeight + vSpace);
 }
 //当宽高为wrap_content时,分别计算出的viewGroup宽高
 int wrapWidth;
 int wrapHeight;
 if (childCount < colums) {
  wrapWidth = childCount * childWidth + (childCount - 1) * hSpace;
 } else {
  wrapWidth = colums * childWidth + (colums - 1) * hSpace;
 }
 wrapHeight = line * childHeight + (line - 1) * vSpace;
 setMeasuredDimension(widthMode == MeasureSpec.AT_MOST? wrapWidth:sizeWidth,heightMode == MeasureSpec.AT_MOST? wrapHeight:sizeHeight);
 }
layout
最核心的就是调用layout方法,根据我们measure阶段获得的LayoutParams中的left和top字段,也很好对每个子View进行位置排列。
@Override
 protected void onLayout(boolean changed, int l, int t, int r, int b) {
 int childCount = this.getChildCount();
 for (int i = 0; i < childCount; i++) {
  View child = this.getChildAt(i);
  LayoutParams lParams = (LayoutParams) child.getLayoutParams();
  child.layout(lParams.left, lParams.top, lParams.left + childWidth, lParams.top + childHeight);
 }
 }
draw
ViewGroup在draw阶段,其实就是按照子类的排列顺序,调用子类的onDraw方法,因为我们只是View的容器,本身一般不需要draw额外的修饰,所以往往在onDraw方法里面,只需要调用ViewGroup的onDraw默认实现方法即可。不需要重写。
最后,在自定义ViewGroup中定义GridAdatper接口,以便在外部可以为ViewGroup设置适配器。
 public interface GridAdatper {
 View getView(int index);
 int getCount();
 }

 /** 设置适配器 */
 public void setGridAdapter(GridAdatper adapter) {
 this.adapter = adapter;
 // 动态添加视图
 int size = adapter.getCount();
 for (int i = 0; i < size; i++) {
  addView(adapter.getView(i));
 }
 }
并且在自定义ViewGroup中定义OnItemClickListener接口,以便在外部可以获取到childView的点击事件。
public interface OnItemClickListener {
 void onItemClick(View v, int index);
 }

 public void setOnItemClickListener(final OnItemClickListener listener) {
 if (this.adapter == null)
  return;
 for (int i = 0; i < adapter.getCount(); i++) {
  final int index = i;
  View view = getChildAt(i);
  view.setOnClickListener(new OnClickListener() {
  @Override
  public void onClick(View v) {
   listener.onItemClick(v, index);
  }
  });
 }
 }
使用自定义的CustomViewGroup
布局文件:
<?xml version="1.0" encoding="utf-8"?>
<LinearLayout xmlns:android="http://schemas.android.com/apk/res/android" xmlns:app="http://schemas.android.com/apk/res/com.hx.customgridview"
 android:layout_width="match_parent"
 android:layout_height="match_parent"
 android:background="#303030"
 android:orientation="vertical" >

 <com.hx.customgridview.CustomGridLayout
 android:id="@+id/gridview"
 android:layout_width="200dp"
 android:layout_height="300dp"
 android:background="#1e1d1d"
 app:hSpace="10"
 app:vSpace="10"
 app:numColumns="3"/>
</LinearLayout>
grid_item:
<?xml version="1.0" encoding="utf-8"?>
<LinearLayout xmlns:android="http://schemas.android.com/apk/res/android"
 android:layout_width="match_parent"
 android:layout_height="match_parent"
 android:gravity="center"
 android:orientation="vertical" >
 <ImageView
 android:id="@+id/iv"
 android:layout_width="match_parent"
 android:layout_height="match_parent"
 android:scaleType="fitXY"/>
</LinearLayout>
Java文件:
protected void onCreate(Bundle savedInstanceState) {
super.onCreate(savedInstanceState);
setContentView(R.layout.activity_main);
grid = (CustomGridLayout) findViewById(R.id.gridview);
grid.setGridAdapter(new GridAdatper() {
@Override
public View getView(int index) {
View view = getLayoutInflater().inflate(R.layout.grid_item, null);
ImageView iv = (ImageView) view.findViewById(R.id.iv);
iv.setImageResource(srcs[index]);
return view;
}
@Override
public int getCount() {
return srcs.length;
}
});
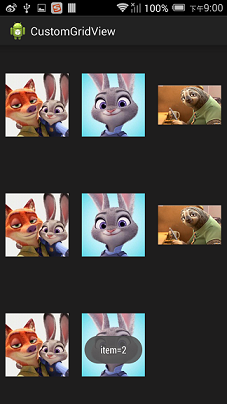
grid.setOnItemClickListener(new OnItemClickListener() {
@Override
public void onItemClick(View v, int index) {
Toast.makeText(MainActivity.this, "item="+index, Toast.LENGTH_SHORT).show();
}
});
}
}
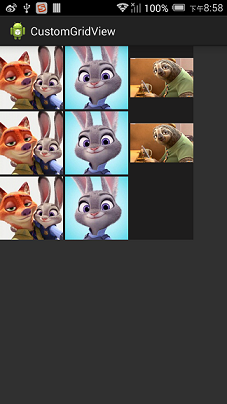
运行后效果图如下:
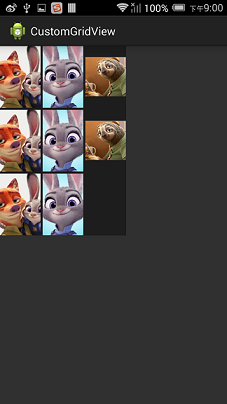
改变一下布局:
<com.hx.customgridview.CustomGridLayout
  android:id="@+id/gridview"
  android:layout_width="wrap_content"
  android:layout_height="wrap_content"
  android:background="#1e1d1d"
  app:hSpace="10"
  app:vSpace="10"
  app:numColumns="3"/>
再改变
<com.hx.customgridview.CustomGridLayout
  android:id="@+id/gridview"
  android:layout_width="match_parent"
  android:layout_height="match_parent"
  android:background="#1e1d1d"
  app:hSpace="10"
  app:vSpace="10"
  app:numColumns="3"/>
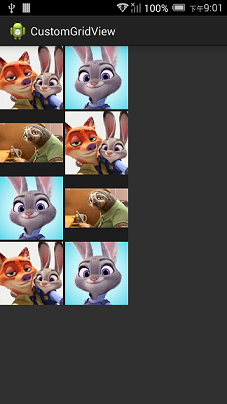
再变
<com.hx.customgridview.CustomGridLayout
  android:id="@+id/gridview"
  android:layout_width="wrap_content"

  android:layout_height="wrap_content"
  android:background="#1e1d1d"
  app:hSpace="10"
  app:vSpace="10"
  app:numColumns="4"/>
Demo下载地址:http://xiazai.jb51.net/201609/yuanma/CustomGridLayout(jb51.net).rar

