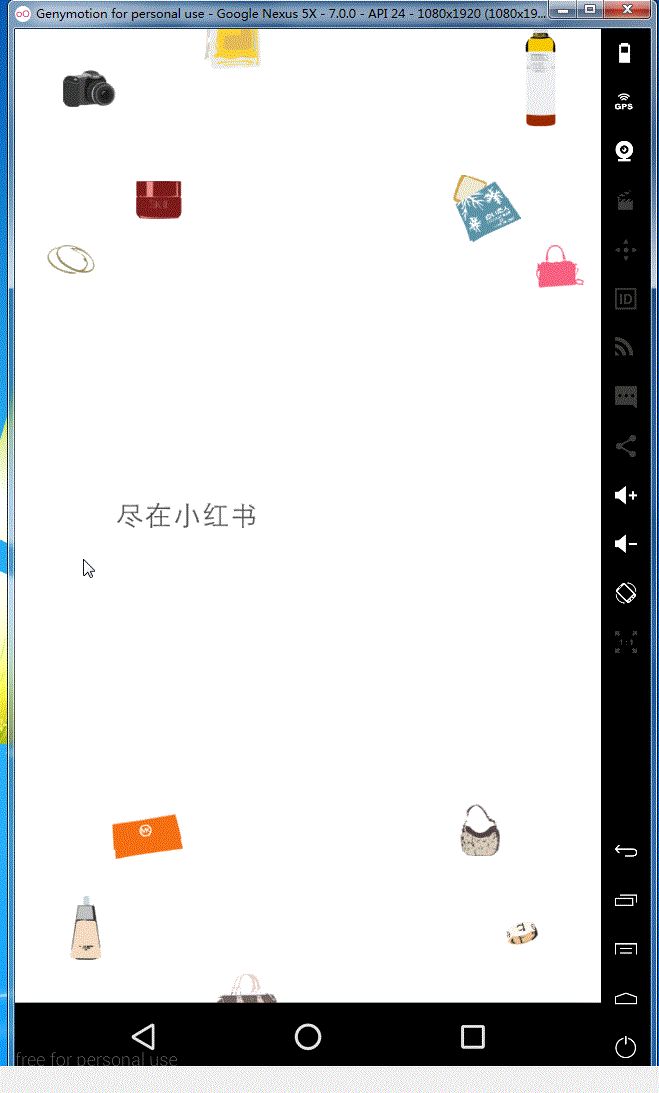
1,觉得小红书的欢迎界面感觉很漂亮,就想来学习学习一下来实现类似于这种效果 。 原效果图如下:

2,根据效果我们来一点点分析
第一步:首先看一下我们的主界面布局文件视图效果如下:

main_activity.xml文件代码如下:
<?xml version="1.0" encoding="utf-8"?>
<RelativeLayout xmlns:android="http://schemas.android.com/apk/res/android"
 android:layout_width="fill_parent"
 android:layout_height="fill_parent"
 android:background="@color/white"
 android:orientation="vertical" >
<com.qianmo.xiaohongshuwelcome.parallaxpager.ParallaxContainer
 android:id="@+id/parallax_container"
 android:layout_width="match_parent"
 android:layout_height="match_parent"/>
 <ImageView
 android:id="@+id/iv_man"
 android:layout_width="67dp"
 android:layout_height="202dp"
 android:layout_alignParentBottom="true"
 android:layout_centerHorizontal="true"
 android:layout_marginBottom="10dp"
android:background="@drawable/intro_item_manrun_1"
 android:visibility="visible" />
</RelativeLayout>
可以看到我们主界面的布局文件主要是两个控件,一个是包含上面小人行走效果的ImageView,然后是一个自定义ParallaxContainer控件,这个自定义控件的具体是什么我们先不要管,后面再和大家来慢慢解释
第二步:看一下我们主界面的MainActivity的代码
MainActivity.java
package com.qianmo.xiaohongshuwelcome;
import android.app.Activity;
import android.content.ActivityNotFoundException;
import android.content.Intent;
import android.net.Uri;
import android.os.Bundle;
import android.view.View;
import android.view.Window;
import android.view.WindowManager;
import android.widget.ImageView;
import com.qianmo.xiaohongshuwelcome.parallaxpager.ParallaxContainer;
/**
 * @author zhongdaxia 2014-12-15
 */
public class MainActivity extends Activity {
 ImageView iv_man;
 ImageView rl_weibo;
 ParallaxContainer parallaxContainer;
 @Override
 protected void onCreate(Bundle savedInstanceState) {
 super.onCreate(savedInstanceState);
 //获取当前窗体
 final Window window = getWindow();
 window.setFlags(WindowManager.LayoutParams.FLAG_FULLSCREEN, WindowManager.LayoutParams.FLAG_FULLSCREEN);
 setContentView(R.layout.activity_main);
 /**
 * 动画支持11以上sdk,11以下默认不显示动画
 * 若需要支持11以下动画,也可导入https://github.com/JakeWharton/NineOldAndroids
 */
 if (android.os.Build.VERSION.SDK_INT > 10) {
 iv_man = (ImageView) findViewById(R.id.iv_man);
 parallaxContainer = (ParallaxContainer) findViewById(R.id.parallax_container);
 if (parallaxContainer != null) {
 parallaxContainer.setImage(iv_man);
 parallaxContainer.setLooping(false);
 iv_man.setVisibility(View.VISIBLE);
 parallaxContainer.setupChildren(getLayoutInflater(),
  R.layout.view_intro_1, R.layout.view_intro_2,
  R.layout.view_intro_3, R.layout.view_intro_4,
  R.layout.view_intro_5, R.layout.view_intro_6 ,R.layout.view_login);
 }
 }
 else{
 setContentView(R.layout.view_login);
 }
 }
}
我们看到代码很简单,主要是这几句有用的代码:
if (parallaxContainer != null) {
 parallaxContainer.setImage(iv_man);
 parallaxContainer.setLooping(false);
 iv_man.setVisibility(View.VISIBLE);
 parallaxContainer.setupChildren(getLayoutInflater(),
  R.layout.view_intro_1, R.layout.view_intro_2,
  R.layout.view_intro_3, R.layout.view_intro_4,
  R.layout.view_intro_5, R.layout.view_intro_6 ,R.layout.view_login);
}
① 将我们小人走路的那个ImageView添加到自定义控件ParallaxContainer中
② 将我们每一个的布局文件set到ParallaxContainer控件中去
这里给出R.layout.view_intro_1.xml文件代码,其他的类似,就不给出来了(这里的x_in、x_out、y_in等属性注意一下)
<?xml version="1.0" encoding="utf-8"?>
<RelativeLayout xmlns:android="http://schemas.android.com/apk/res/android"
 xmlns:app="http://schemas.android.com/apk/res-auto"
 android:layout_width="fill_parent"
 android:layout_height="fill_parent" >
 <ImageView
 android:id="@+id/iv_0"
 android:layout_width="103dp"
 android:layout_height="19dp"
 android:layout_centerInParent="true"
 android:src="@drawable/intro1_item_0"
 app:x_in="1.2"
 app:x_out="1.2" />
 <ImageView
 android:id="@+id/iv_1"
 android:layout_width="181dp"
 android:layout_height="84dp"
 android:layout_alignParentLeft="true"
 android:layout_alignParentTop="true"
 android:layout_marginLeft="13dp"
 android:layout_marginTop="60dp"
 android:src="@drawable/intro1_item_1"
 app:x_in="0.8"
 app:x_out="0.8" />
 <ImageView
 android:id="@+id/iv_2"
 android:layout_width="143dp"
 android:layout_height="58dp"
 android:layout_alignParentRight="true"
 android:layout_alignParentTop="true"
 android:layout_marginTop="109dp"
 android:src="@drawable/intro1_item_2"
 app:x_in="1.1"
 app:x_out="1.1" />
 <ImageView
 android:id="@+id/iv_3"
 android:layout_width="48dp"
 android:layout_height="48dp"
 android:src="@drawable/intro1_item_3"
 app:x_in="0.8"
 app:x_out="0.8"
 app:a_in="0.8"
 app:a_out="0.8"
 android:layout_below="@+id/iv_0"
 android:layout_toRightOf="@+id/iv_5"
 android:layout_toEndOf="@+id/iv_5"
 android:layout_marginLeft="21dp"
 android:layout_marginStart="21dp"
 android:layout_marginTop="12dp"/>
 <ImageView
 android:id="@+id/iv_4"
 android:layout_width="fill_parent"
 android:layout_height="128dp"
 android:layout_alignParentBottom="true"
 android:layout_marginBottom="29dp"
 android:background="@drawable/intro1_item_4"
 app:a_in="0.8"
 app:a_out="0.8"
 app:x_in="0.8"
 app:x_out="0.8" />
 <ImageView
 android:id="@+id/iv_5"
 android:layout_width="260dp"
 android:layout_height="18dp"
 android:layout_alignParentBottom="true"
 android:layout_alignParentLeft="true"
 android:layout_marginBottom="16dp"
 android:layout_marginLeft="15dp"
 android:src="@drawable/intro1_item_5"
 app:a_in="0.9"
 app:a_out="0.9"
 app:x_in="0.9"
 app:x_out="0.9" />
 <ImageView
 android:id="@+id/iv_6"
 android:layout_width="24dp"
 android:layout_height="116dp"
 android:layout_alignParentBottom="true"
 android:layout_alignParentLeft="true"
 android:layout_marginBottom="35dp"
 android:layout_marginLeft="46dp"
 android:src="@drawable/intro1_item_6"
 app:x_in="0.6"
 app:x_out="0.6" />
 <ImageView
 android:id="@+id/iv_7"
 android:layout_width="45dp"
 android:layout_height="40dp"
 android:layout_alignParentBottom="true"
 android:layout_alignParentLeft="true"
 android:layout_marginBottom="23dp"
 android:layout_marginLeft="76dp"
 android:src="@drawable/intro1_item_7"
 app:a_in="0.3"
 app:a_out="0.3"
 app:x_in="0.5"
 app:x_out="0.5" />
</RelativeLayout>
第三步:好了现在我们一定很好奇ParallaxContainer里面的内容,那我们从上面的方法慢慢去看,首先看一下ParallaxContainer中的setImage()方法,代码如下:
ImageView iv;
//将小人图片添加进来
public void setImage(ImageView iv) {
 this.iv = iv;
}
貌似没有什么,只是将它赋值给成员变量iv,我们接着看下一个setUpChildren()方法
//添加子view
public void setupChildren(LayoutInflater inflater, int... childIds) {
 if (getChildCount() > 0) {
 throw new RuntimeException("setupChildren should only be called once when ParallaxContainer is empty");
 }
 //创建打气筒
 ParallaxLayoutInflater parallaxLayoutInflater = new ParallaxLayoutInflater(
 inflater, getContext());

 //将所有的view添加到本控件上去
 for (int childId : childIds) {
 View view = parallaxLayoutInflater.inflate(childId, this);
 viewlist.add(view);
 }
 //添加视觉view
 pageCount = getChildCount();
 for (int i = 0; i < pageCount; i++) {
 View view = getChildAt(i);
 addParallaxView(view, i);
 }
 //更新ViewPagerAdapter的数量
 updateAdapterCount();
 //创建viewpager
 viewPager = new ViewPager(getContext());
 viewPager.setLayoutParams(new LayoutParams(LayoutParams.MATCH_PARENT, LayoutParams.MATCH_PARENT));
 viewPager.setId(R.id.parallax_pager);
 //给viewpager添加滑动监听
 attachOnPageChangeListener();
 //设置适配器
 viewPager.setAdapter(adapter);
 //将viewpager添加到主控件中
 addView(viewPager, 0);
}
让我们一行行代码慢慢分析
if (getChildCount() > 0) {
 throw new RuntimeException("setupChildren should only be called once when ParallaxContainer is empty");
 }
//创建打气筒
 ParallaxLayoutInflater parallaxLayoutInflater = new ParallaxLayoutInflater(
 inflater, getContext());
首先看一下这段代码只是if判断是否已经调用过setUpChildren()方法,没什么重要的,在看创建ParallaxLayoutInflater打气筒对象,我们来看看ParallaxLayoutInflater的具体代码,没什么重要的,只是里面有一个ParallaxFactory类我们没见过,留心一下!
package com.qianmo.xiaohongshuwelcome.parallaxpager;
import android.content.Context;
import android.view.LayoutInflater;
public class ParallaxLayoutInflater extends LayoutInflater {
 protected ParallaxLayoutInflater(LayoutInflater original, Context newContext) {
 super(original, newContext);
 setUpLayoutFactory();
 }
 private void setUpLayoutFactory() {
 if (!(getFactory() instanceof ParallaxFactory)) {
 setFactory(new ParallaxFactory(this, getFactory()));
 }
 }
 @Override
 public LayoutInflater cloneInContext(Context newContext) {
 return new ParallaxLayoutInflater(this, newContext);
 }
}
再看下面一段代码,主要是将所有的布局文件添加到viewList集合中去,并填充到我们的布局中,我们继续往下看
//将所有的view添加到本控件上去
 for (int childId : childIds) {
 View view = parallaxLayoutInflater.inflate(childId, this);
 viewlist.add(view);
 }
下面一段代码主要是看拿到对应所有的子view,关键是我们的addParallaxView()方法,具体代码如下:
//添加视觉view
 pageCount = getChildCount();
 for (int i = 0; i < pageCount; i++) {
 View view = getChildAt(i);
 addParallaxView(view, i);
 }
/**
 * 添加视觉view方法
 *
 * @param view
 * @param pageIndex
 */
 private void addParallaxView(View view, int pageIndex) {
 //通过递归方法拿到最小单元的view
 if (view instanceof ViewGroup) {
 ViewGroup viewGroup = (ViewGroup) view;
 for (int i = 0, childCount = viewGroup.getChildCount(); i < childCount; i++) {
 addParallaxView(viewGroup.getChildAt(i), pageIndex);
 }
 }
 //创建视觉差view绑定,并添加到集合中去
 ParallaxViewTag tag = (ParallaxViewTag) view.getTag(R.id.parallax_view_tag);
 if (tag != null) {
 tag.index = pageIndex;
 parallaxViews.add(view);
 }
 }
通过递归将每个布局文件中的最小单元view保存到parallaxView集合中去,但是等等,这里我们又发现了一个新的类ParallaxViewTag,让我们来具体代码
package com.qianmo.xiaohongshuwelcome.parallaxpager;
public class ParallaxViewTag {
 //绑定每一个view对应的是哪一个下标的
 protected int index;
 //x轴进入的速度
 protected float xIn;
 protected float xOut;
 protected float yIn;
 protected float yOut;
 protected float alphaIn;
 protected float alphaOut;
}
貌似很简单,xIn、xOut貌似很熟悉和我们之前的布局文件属性app:x_in等属性对应了, 这样我们就懂了,这个类是相当于一个tag类,用于记录我们设置的特殊一些属性,然是我们这里有一个疑问,下面这个代码是get到tag,那我们是在哪里set里面的属性呢?
ParallaxViewTag tag = (ParallaxViewTag) view.getTag(R.id.parallax_view_tag);
这时候我们要看看我们前面提到过的一个陌生类ParallaxFactory,看一下具体代码
package com.qianmo.xiaohongshuwelcome.parallaxpager;
import android.content.Context;
import android.content.res.TypedArray;
import android.util.AttributeSet;
import android.view.LayoutInflater;
import android.view.View;
import com.qianmo.xiaohongshuwelcome.R;
public class ParallaxFactory implements LayoutInflater.Factory {
 private final LayoutInflater.Factory factory;
 private ParallaxLayoutInflater mInflater;
 private static final String[] sClassPrefixList = {
 "android.widget.",
 "android.webkit.",
 "android.view."
 };
 public ParallaxFactory(ParallaxLayoutInflater inflater, LayoutInflater.Factory factory) {
 mInflater = inflater;
 this.factory = factory;
 }
 @Override
 public View onCreateView(String name, Context context, AttributeSet attrs) {
 View view = null;
 if (context instanceof LayoutInflater.Factory) {
 view = ((LayoutInflater.Factory) context).onCreateView(name, context, attrs);
 }
 if (factory != null && view == null) {
 view = factory.onCreateView(name, context, attrs);
 }
 if (view == null) {
 view = createViewOrFailQuietly(name, context, attrs);
 }
 if (view != null) {
 onViewCreated(view, context, attrs);
 }
 return view;
 }
 protected View createViewOrFailQuietly(String name, Context context, AttributeSet attrs) {
 if (name.contains(".")) {
 return createViewOrFailQuietly(name, null, context, attrs);
 }
 for (final String prefix : sClassPrefixList) {
 final View view = createViewOrFailQuietly(name, prefix, context, attrs);

 if (view != null) {
 return view;
 }
 }
 return null;
 }
 protected View createViewOrFailQuietly(String name, String prefix, Context context,
AttributeSet attrs) {
 try {
 return mInflater.createView(name, prefix, attrs);
 } catch (Exception ignore) {
 return null;
 }
 }
 /**
 * 主要是在viewCreated的时候将tag和view绑定起来
 *
 * @param view
 * @param context
 * @param attrs
 */
 protected void onViewCreated(View view, Context context, AttributeSet attrs) {
 int[] attrIds =
 {R.attr.a_in, R.attr.a_out, R.attr.x_in, R.attr.x_out, R.attr.y_in, R.attr.y_out,};
 TypedArray a = context.obtainStyledAttributes(attrs, attrIds);
 if (a != null) {
 if (a.length() > 0) {
 ParallaxViewTag tag = new ParallaxViewTag();
 tag.alphaIn = a.getFloat(0, 0f);
 tag.alphaOut = a.getFloat(1, 0f);
 tag.xIn = a.getFloat(2, 0f);
 tag.xOut = a.getFloat(3, 0f);
 tag.yIn = a.getFloat(4, 0f);
 tag.yOut = a.getFloat(5, 0f);
 view.setTag(R.id.parallax_view_tag, tag);
 }
 a.recycle();
 }
 }
}
主要看onViewCreated()方法,可以看到,这里我们将对应的每个属性的值都set到了我们ParallaxViewTag中,我们接着看下面的代码,调用updateAdapterCount()方法让适配器去更新adapter的数量,这里我们可以看到适配器是继承PagerAdapter类,用于ViewPager的适配器,这里使用LinkedList来存储View,这个方法很好,赞一下
//更新ViewPagerAdapter的数量
 updateAdapterCount();
//具体代码
//被调用的时候好像是0
 private void updateAdapterCount() {
 adapter.setCount(isLooping ? Integer.MAX_VALUE : pageCount);
 }
//下面是adapter的具体代码
package com.qianmo.xiaohongshuwelcome.parallaxpager;
import android.content.Context;
import android.support.v4.view.PagerAdapter;
import android.view.View;
import android.view.ViewGroup;
import java.util.LinkedList;
import static android.view.ViewGroup.LayoutParams;
import static android.view.ViewGroup.LayoutParams.MATCH_PARENT;
public class ParallaxPagerAdapter extends PagerAdapter {
 private int count = 0;
 private final Context context;
 private final LinkedList<View> recycleBin = new LinkedList<View>();
 public ParallaxPagerAdapter(Context context) {
 this.context = context;
 }
 public void setCount(int count) {
 this.count = count;
 }
 @Override public int getCount() {
 return count;
 }
 @Override public Object instantiateItem(ViewGroup container, int position) {
 View view;
 if (!recycleBin.isEmpty()) {
 view = recycleBin.pop();
 } else {
 view = new View(context);
 view.setLayoutParams(new LayoutParams(MATCH_PARENT, MATCH_PARENT));
 }
 container.addView(view);
 return view;
 }
 @Override public void destroyItem(ViewGroup container, int position, Object object) {
 View view = (View) object;
 container.removeView(view);
 recycleBin.push(view);
 }
 @Override public boolean isViewFromObject(View view, Object object) {
 return view.equals(object);
 }
}
我们继续往下看,后面的就是创建viewpager对象,并addview到主控件上,在attachOnPagerChangeListener()方法中添加viewpager的滑动监听
/创建viewpager
viewPager = new ViewPager(getContext());
viewPager.setLayoutParams(new LayoutParams(LayoutParams.MATCH_PARENT, LayoutParams.MATCH_PARENT));
viewPager.setId(R.id.parallax_pager);
//给viewpager添加滑动监听
attachOnPageChangeListener();
//设置适配器
viewPager.setAdapter(adapter);
//将viewpager添加到主控件中
addView(viewPager, 0);
这里我们在onPageScrollStateChanged()方法判断是否开启下面小人行走的动画,通过onPageScrolled()方法监听滑动的具体偏移量,通过view.setTranslationX()方法来改变对应的属性
protected void attachOnPageChangeListener() {
 mCommonPageChangeListener = new ViewPager.OnPageChangeListener() {
 /**
 * 此方法是在状态改变的时候调用,其中arg0这个参数
 有三种状态(0,1,2)。arg0 ==1的时辰默示正在滑动,arg0==2的时辰默示滑动完毕了,arg0==0的时辰默示什么都没做。
 * @param state
 */
 @Override
 public void onPageScrollStateChanged(int state) {
 Log.v(TAG, "onPageScrollStateChanged" + state);
 iv.setBackgroundResource(R.drawable.man_run);
 final AnimationDrawable animationDrawable = (AnimationDrawable) iv.getBackground();
 switch (state) {
  case 0:
  //处于展示阶段
  finishAnim(animationDrawable);
  break;
  case 1:
  //正在滑动
  isEnd = false;
  animationDrawable.start();
  break;
  case 2:
  //滑动完毕
  finishAnim(animationDrawable);
  break;
 }
 }
 //判断是否还是在左边
 boolean isleft = false;
 /**
 * onPageScrolled(int arg0,float arg1,int arg2) ,当页面在滑动的时候会调用此方法,在滑动被停止之前,此方法回一直得到调用。其中三个参数的含义分别为:
 * @param pageIndex 当前页面,及你点击滑动的页面
 * @param offset 当前页面偏移的百分比
 * @param offsetPixels 当前页面偏移的像素位置
 */
 @Override
 public void onPageScrolled(int pageIndex, float offset, int offsetPixels) {
// Log.v(TAG, "onPageScrolled" + pageIndex + " offset" + offset + " offsetPixels" + offsetPixels);
 if (offsetPixels < 10) {
  isleft = false;
 }
 if (pageCount > 0) {
  pageIndex = pageIndex % pageCount;
 }
 if (pageIndex == 3) {
  if (isleft) {

  } else {
  iv.setX(iv.getLeft() - offsetPixels);
  }
 }
 ParallaxViewTag tag;
 for (View view : parallaxViews) {
  tag = (ParallaxViewTag) view.getTag(R.id.parallax_view_tag);
  if (tag == null) {
  continue;
  }
  if ((pageIndex == tag.index - 1 || (isLooping && (pageIndex == tag.index
  - 1 + pageCount)))
  && containerWidth != 0) {
  // make visible
  view.setVisibility(VISIBLE);
  // slide in from right
  view.setTranslationX((containerWidth - offsetPixels) * tag.xIn);
  // slide in from top
  view.setTranslationY(0 - (containerWidth - offsetPixels) * tag.yIn);
  // fade in
  view.setAlpha(1.0f - (containerWidth - offsetPixels) * tag.alphaIn / containerWidth);
  } else if (pageIndex == tag.index) {
  // make visible
  view.setVisibility(VISIBLE);
  // slide out to left
  view.setTranslationX(0 - offsetPixels * tag.xOut);
  // slide out to top
  view.setTranslationY(0 - offsetPixels * tag.yOut);
  // fade out
  view.setAlpha(1.0f - offsetPixels * tag.alphaOut / containerWidth);

  } else {
  view.setVisibility(GONE);
  }
 }
 }
 @Override
 public void onPageSelected(int position) {
 Log.v(TAG, "onPageSelected" + position);
 currentPosition = position;
 }
 };
 viewPager.setOnPageChangeListener(mCommonPageChangeListener);
 }
4,这里基本上就把源码分析完了,so,既然分析完别人的源码了下面就是结合到自己项目中去用了,当我们,想要实现一个翻页从顶部斜飞入的view,那我们的布局文件代码可以如下:
<?xml version="1.0" encoding="utf-8"?>
<RelativeLayout xmlns:android="http://schemas.android.com/apk/res/android" xmlns:app="http://schemas.android.com/apk/res-auto"
 android:layout_width="fill_parent"
 android:layout_height="fill_parent"
android:background="@color/transparent">
 <ImageView
 android:id="@+id/iv_2"
 android:layout_width="wrap_content"
 android:layout_height="wrap_content"
 android:layout_alignParentTop="true"
 android:layout_centerHorizontal="true"
 android:layout_marginLeft="133dp"
 android:layout_marginTop="39dp"
 android:src="@drawable/ic_launcher"
 app:x_in="1"
 app:x_out="1"
 app:y_in="0.6"
 app:y_out="0.9"/>
 <ImageView
 android:id="@+id/iv_11"
 android:layout_width="44dp"
 android:layout_height="47dp"
 android:layout_alignParentBottom="true"
 android:layout_centerHorizontal="true"
 android:layout_marginBottom="66dp"
 android:layout_marginLeft="140dp"
 android:src="@drawable/ic_launcher"
 app:x_in="1"
 app:x_out="1"
 app:y_in="-1.3"
 app:y_out="-1.3"/>
</RelativeLayout>
来看一下我们的效果:
这是Github下载地址,由于要源码的同学可以去下载一下,See You Next Time !!!
以上就是本文的全部内容,希望本文的内容对大家的学习或者工作能带来一定的帮助,同时也希望多多支持!

