前言
所谓的服务组件(Service Component)— 就是用于处理系统业务逻辑的类,如果按照系统分层设计理论来划分,服务组件是位于业务层当中的类。在Spring Boot中,服务组件是一个被**@Service**注解进行注释的类,这些类用于编写系统的业务代码。在本章节中,将讲解如何创建并使用服务组件。
在开始正文之前,先来看两段示例代码。使用服务组件之前,我们需要定义服务组件接口类,用于索引服务组件提供的服务,代码如下所示:
public interface UserService{
 // TODO ...
}
然后,需要使用**@Service**注解对服务组件接口实现类进行注释,演示代码如下:
@Service(value="userService")
public class UserServiceImpl implements UserService{
 //TODO ...
}
最后,使用**@Autowired**注解来自动引用服务组件,代码如下:
@Controller
public class DemoController{
 @Autowired
 UserService userService;
 //TODO ...
}
在本次讲解中,我们依然以对用户的增、删、改、查为案例,将控制器中的业务方法迁移到服务组件中。
1. 创建服务接口
创建一个包含添加用户、更新用户、删除用户和查询用户的服务接口类 — 用户服务组件接口类。详细代码如下:
package com.ramostear.application.service;

import com.ramostear.application.model.User;

import java.util.Collection;

/**
 * Created by ramostear on 2019/3/11 0011.
 */
public interface UserService {

 /**
 * create user
 * @param user
 */
 void create(User user);

 /**
 * update user info by ID
 * @param id
 * @param user
 */
 void update(long id,User user);

 /**
 * delete user by ID
 * @param id
 */
 void delete(long id);

 /**
 * query all user
 * @return
 */
 Collection<User> findAll();
}
2. 实现服务接口
创建一个接口实现类,用于实现其中的增、删、改、查四个业务方法,并用**@Service**注解进行标注,具体代码如下:
package com.ramostear.application.service.impl;

import com.ramostear.application.model.User;
import com.ramostear.application.service.UserService;
import org.springframework.stereotype.Service;

import javax.annotation.PostConstruct;
import java.util.Collection;
import java.util.HashMap;
import java.util.Map;

/**
 * @author ramostear
 * @create-time 2019/3/11 0011-4:29
 * @modify by :
 * @since:
 */
@Service(value="userService")
public class UserServiceImpl implements UserService {

 private static Map<Long,User> userRepo = new HashMap<>();

 @PostConstruct
 public void initUserRepo(){
 User admin = new User();
 admin.setId(1).setName("admin");
 userRepo.put(admin.getId(),admin);

 User editor = new User();
 editor.setId(2).setName("editor");
 userRepo.put(editor.getId(),editor);
 }
 @Override
 public void create(User user) {
 userRepo.put(user.getId(),user);
 }

 @Override
 public void update(long id, User user) {
 userRepo.remove(id);
 user.setId(id);
 userRepo.put(id,user);
 }

 @Override
 public void delete(long id) {
 userRepo.remove(id);
 }

 @Override
 public Collection<User> findAll() {
 return userRepo.values();
 }
}
3. 使用服务组件
接下来,定义一个用户控制器,使用**@Autowired**注解来应用用户服务组件,实现对用户的增、删、改、查功能:
package com.ramostear.application.controller;

import com.ramostear.application.model.User;
import com.ramostear.application.service.UserService;
import org.springframework.beans.factory.annotation.Autowired;
import org.springframework.http.HttpStatus;
import org.springframework.http.ResponseEntity;
import org.springframework.web.bind.annotation.*;

/**
 * @author ramostear
 * @create-time 2019/3/11 0011-4:42
 * @modify by :
 * @since:
 */
@RestController
public class UserController {

 @Autowired
 UserService userService;


 @GetMapping("/users")
 public ResponseEntity<Object> users(){
 return new ResponseEntity<>(userService.findAll(), HttpStatus.OK);
 }

 @PostMapping("/users")
 public ResponseEntity<Object> create(@RequestBody User user){
 userService.create(user);
 return new ResponseEntity<>("User is created successfully.",HttpStatus.CREATED);
 }

 @PutMapping("/users/{id}")
 public ResponseEntity<Object> update(@PathVariable(name="id") long id,@RequestBody User user){
 userService.update(id,user);
 return new ResponseEntity<>("User is updated successfully.",HttpStatus.OK);
 }

 @DeleteMapping("/users/{id}")
 public ResponseEntity<Object> delete(@PathVariable(name = "id")long id){
 userService.delete(id);
 return new ResponseEntity<>("User is deleted successfully.",HttpStatus.OK);
 }
}
4. 数据模型
用户对象的代码沿用以往章节的User.java代码:
package com.ramostear.application.model;

import lombok.Getter;
import lombok.NoArgsConstructor;
import lombok.Setter;

/**
 * @author ramostear
 * @create-time 2019/3/6 0006-3:12
 * @modify by :
 * @since:
 */
@Getter
@Setter
@NoArgsConstructor
public class User {
 private long id;
 private String name;

 public User setId(long id){
 this.id = id;
 return this;
 }

 public User setName(String name){
 this.name = name;
 return this;
 }
}
注:应用程序主类和Maven build文件与之前章节的代码形同,不再列举。
5. 运行测试
启动Spring Boot应用程序,然后打开Postman测试应用程序,分别进行如下的测试。
GET 请求:获取所有的用户信息。
URL地址:http://localhost:8080/users
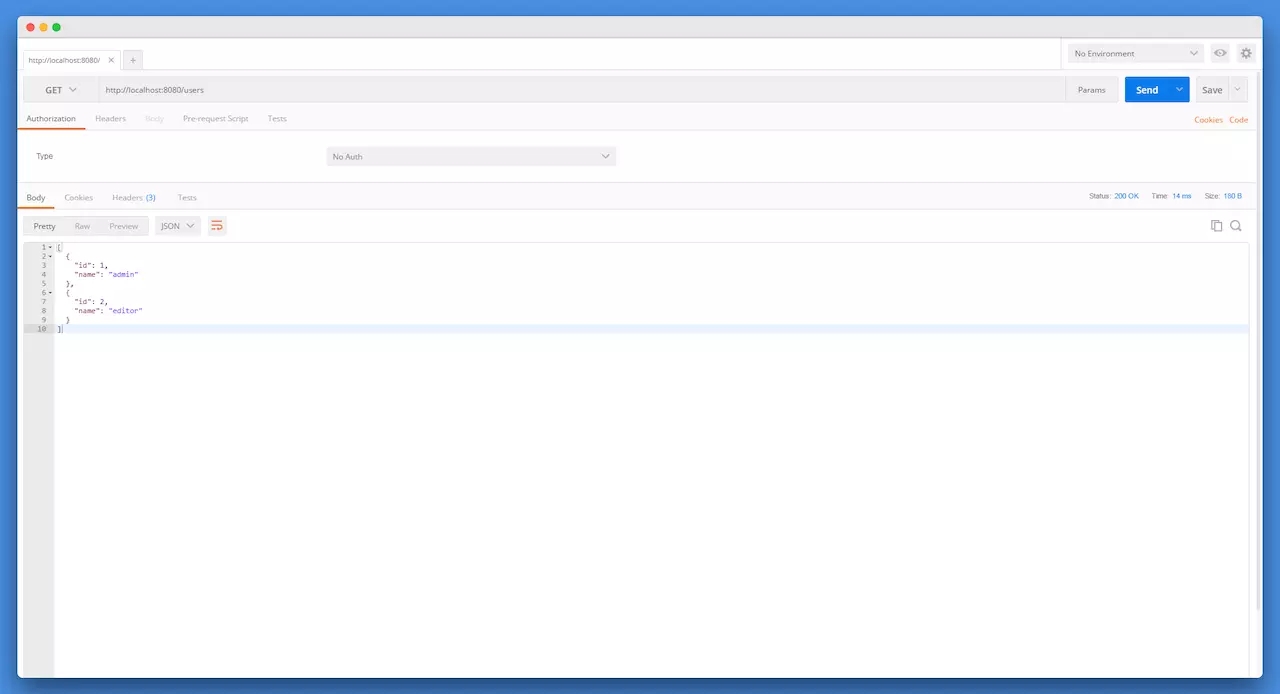
获取用户信息
POST 请求:新增一位用户信息
URL地址:http://localhost:8080/users
请求参数:{“id”:3,"name":"reader"}
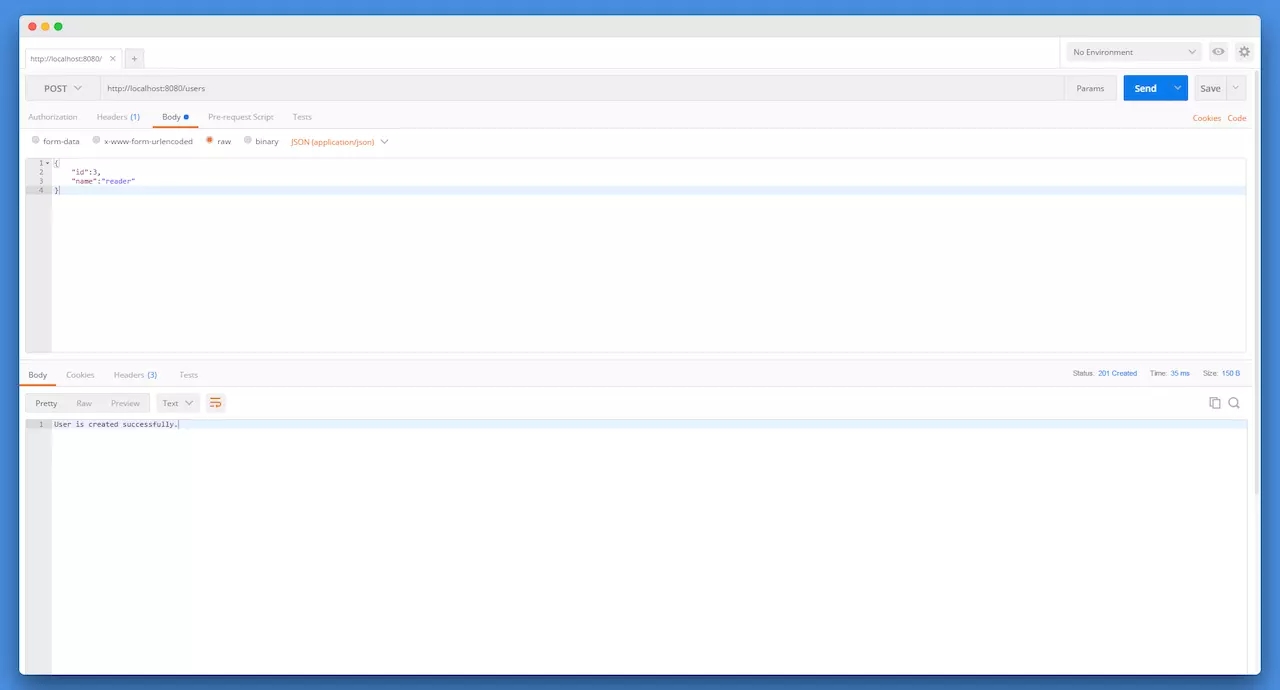
新增用户
PUT请求:修改用户信息
URL地址:http://localhost:8080/users/3
请求参数:{“id”:3,"name":"ramostear"}
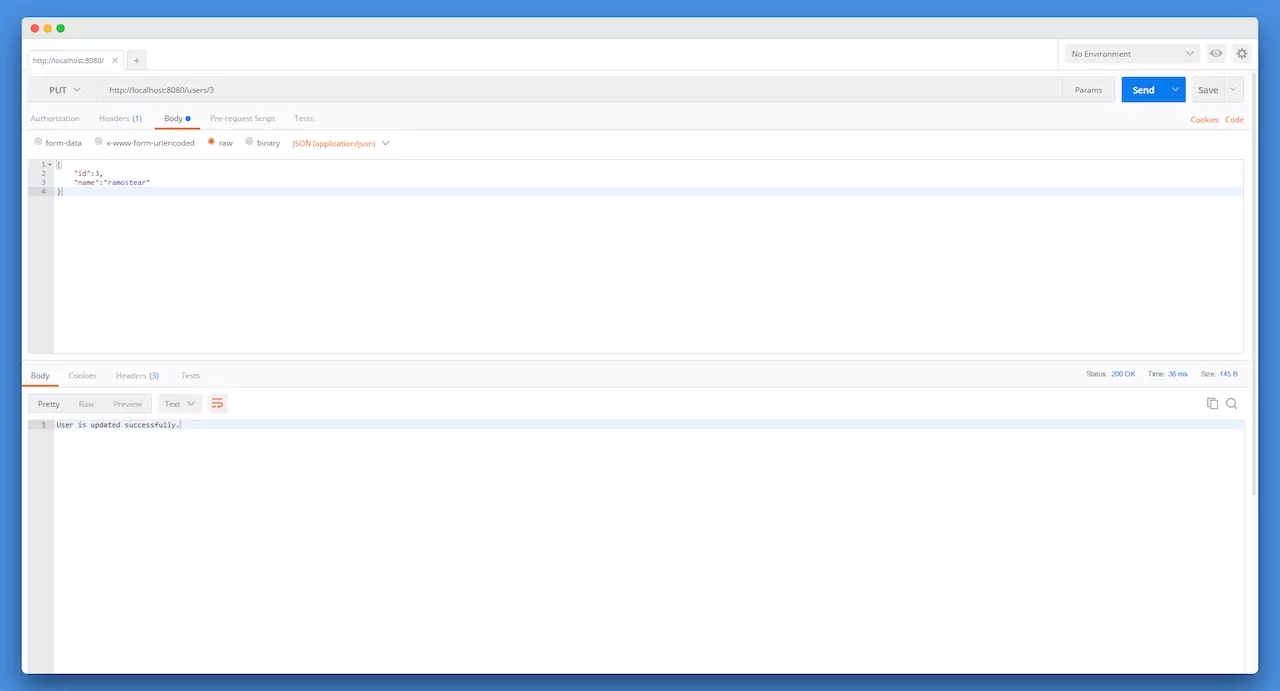
修改用户
DELETE请求:删除用户信息
URL地址:http://localhost:8080/users/3
 删除用户
删除用户
6. 附件
本章节用于演示的项目源码已经上传到Github代码仓库,你可以通过下面的地址链接免费获取本章节的全部源码信息:
github.com/ramostear/S …(本地下载)
好了,以上就是这篇文章的全部内容了,希望本文的内容对大家的学习或者工作具有一定的参考学习价值,谢谢大家对的支持。

