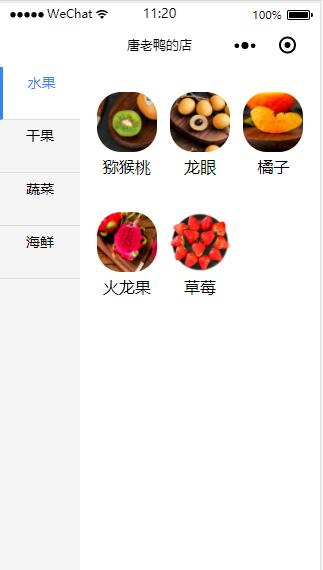
效果图
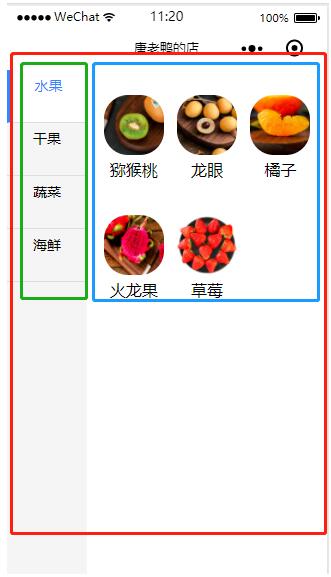
布局分析
分成三个盒子:
主盒子,左盒子,右盒子
–wxml–
<!--主盒子-->
<view class="container">
 <!-- 左侧栏 -->
 <view class='nav_left'>
 <view class="nav_left_items {{curNav == 1 ? 'active' : ''}}"
 bindtap="switchRightTab" data-id="1">
 水果
 </view>
 <view class="nav_left_items {{curNav == 2 ? 'active' : ''}}"
 bindtap="switchRightTab" data-id="2">
 干果
 </view>
 <view class="nav_left_items {{curNav == 3 ? 'active' : ''}}"
 bindtap="switchRightTab" data-id="3">
 蔬菜
 </view>
 <view class="nav_left_items {{curNav == 4 ? 'active' : ''}}"
 bindtap="switchRightTab" data-id="4">
 海鲜
 </view>
 </view>
 <!-- 右侧栏 -->
 <view class="nav_right">
 <view wx:if="{{curNav==1}}">
 <view class="nav_right_items">
 <image src="../images/mihoutao.png"></image>
 <text>猕猴桃</text>
 </view>
 <view class="nav_right_items">
 <image src="../images/longyan.png"></image>
 <text>龙眼</text>
 </view>
 <view class="nav_right_items">
 <image src="../images/juzi.png"></image>
 <text>橘子</text>
 </view>
 <view class="nav_right_items">
 <image src="../images/huolongguo.png"></image>
 <text>火龙果</text>
 </view>
 <view class="nav_right_items">
 <image src="../images/caomei.png"></image>
 <text>草莓</text>
 </view>
 </view>
 <view wx:if="{{curNav==2}}">
 <view class="nav_right_items">
 <image src="../images/xiaweiyi.png"></image>
 <text>夏威夷果</text>
 </view>
 <view class="nav_right_items">
 <image src="../images/kaixin.png"></image>
 <text>开心果</text>
 </view>
 <view class="nav_right_items">
 <image src="../images/bigen.png"></image>
 <text>碧根果</text>
 </view>
 <view class="nav_right_items">
 <image src="../images/mangguo.png"></image>
 <text>芒果</text>
 </view>
 </view>
 <view wx:if="{{curNav==3}}">
 <view class="nav_right_items">
 <image src="../images/huaye.png"></image>
 <text>花椰菜</text>
 </view>
 <view class="nav_right_items">
 <image src="../images/shengcai.png"></image>
 <text>生菜</text>
 </view>
 <view class="nav_right_items">
 <image src="../images/fanqie.png"></image>
 <text>番茄</text>
 </view>
 </view>
 </view>
</view>
–js–
// pages/stock/stock_main.js
Page({

 /* 页面的初始数据 */
 data: {
 curNav:1
 },
 /* 把点击到的某一项 设为当前curNav */
 switchRightTab:function(e){
 let id = e.target.dataset.id;
 console.log(id);
 this.setData({
 curNav: id
 })
 }
})
–wxss–
/* 1. 设置整个页面的背景颜色 */
page{
 background: #f5f5f5;
 /* 避免左侧Item不够时 被白色覆盖*/
}
/* 2.主盒子 */
.container {
 width: 100%; /* 宽度占屏幕的100% */
 height: 100%; /* 高度占屏幕的100% */
 background-color: #fff; /* 背景颜色 */
}
/* 3.左盒子*/
 /* 3.1. 左侧栏主盒子总体设置 */
.nav_left{
 position:absolute; /* 使用绝对定位 */
 top:0px; /* 距离上边距:0px */
 left:0px; /* 距离左边距:0px */
 width: 25%; /* 每个item所占的宽度 */
 background: #f5f5f5; /* 主盒子设置背景色为灰色 */
 text-align: center; /* 文字居中显示 */
}
/* 3.2. 左侧栏的每个item */
.nav_left .nav_left_items{
 height: 40px; /* 每个item高40px*/
 padding: 6px 0; /* 上内边距和下内边距是 6px[增加高度] 右内边距和左内边距是 0px*/
 border-bottom: 1px solid #dedede; /* 设置下边线 */
 font-size: 14px; /* 设置文字大小:14px */
}
/* 3.3. 左侧栏list的item被选中时*/
.nav_left .nav_left_items.active{
 background: #fff; /* 背景色变成白色 */
 color: #3385ff; /* 字体编程蓝色 */
 border-left: 3px solid #3385ff; /* 设置边框的宽度以及颜色 */
}
/* 4.右盒子 */
/* 4.1. 右侧栏主盒子总体设置 */
.nav_right{
 position: absolute; /* 使用绝对定位 */
 top: 0; /* 距离上边距:0px */
 left: 80px; /* 距离左边距:80px */
 width: 75%; /* 右侧主盒子所占宽度 */
 height: 600px; /* 右侧主盒子所占高度 */
 padding: 10px; /* 所有 4 个内边距都是 10px*/
 box-sizing: border-box; /* 为元素指定的任何内边距和边框都将在已设定的宽度和高度内进行绘制*/
 background: #fff; /* 右侧主盒子背景颜色 */
}
/* 4.2. 右侧栏中的每个item */
.nav_right .nav_right_items{
 float: left; /* 浮动向左 */
 width: 33.33%; /* 每个item设置宽度是33.33% */
 height: 120px; /* 每个item设置高度是120px */
 text-align: center; /* 设置图片下方的提示文字居中显示 */
}
/* 4.3. 右侧栏中的每个item的图样式设置 */
.nav_right .nav_right_items image{
 width: 60px; /* 给图片设置宽度 */
 height: 60px; /* 给图片设置高度 */
 margin-top: 15px; /* 图片距离上边距15px */
 border-radius: 40%; /* 给图片添加圆角边框 */
}
关于vue.js组件的教程,请大家点击专题vue.js组件学习教程进行学习。

