前两天写了关于组件库 iView Weapp的教程,其实也就是把文档上的例子拿出来体验了一遍,今天写一个具体的例子,调用一个免费的天气接口的api,并且把所获取的内容展示在前端的界面,前端界面与 iView Weapp结合,展示的一个小的demo.
先上效果

开始写代码:
1:找打一个免费的天气接口
免费接口api:
https://www.apiopen.top/api.html
https://www.apiopen.top/weatherApi?city=%E4%B8%8A%E6%B5%B7
2:写js代码
写一个request请求,把准备好的天气接口放在url里面,当请求成功的时候,在控制台打印一下返回的res.data数据
wx.request({
url: 'https://www.apiopen.top/weatherApi?city=%E4%B8%8A%E6%B5%B7',
header: {
'content-type': 'application/json'
},
success: res => {
console.log(res.data)
}
})
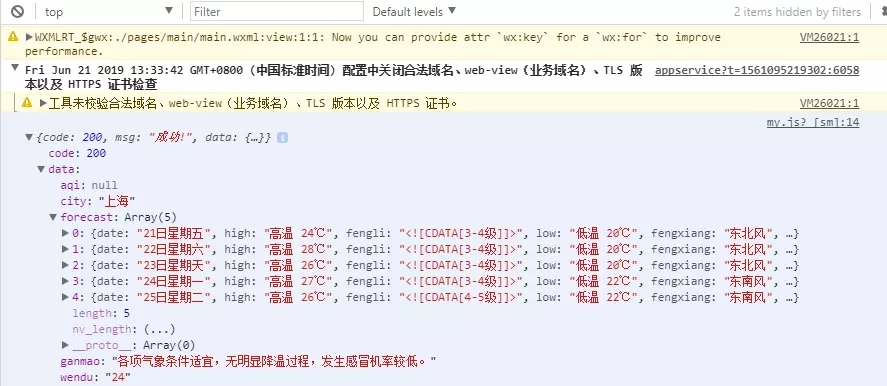
这个时候可以看到控制台已经有打印了接口数据了
3:接收到了数据之后,是对数据进行处理
在请求接口成功之后,用setData接收数据,并且需在data中声明一个接收数据的变量。

4:js写完之后,现在开始写wxml里面的内容,将数据渲染在界面
前面说用的是组件库 iView Weapp,样式可以自己选择,我这里选了一个卡片。
在使用组件的时候,需要在json里面引入一下:

https://weapp.iviewui.com/components/card
将里面的代码复制过来,放在wxml,并且根据改成自己需要的。
<view class='list-li mflex' wx:for="{{list.forecast}}" wx:key="index">
<i-card title="{{list.city}}天气" extra="{{list.city}}" thumb="https://i.loli.net/2017/08/21/599a521472424.jpg">
<view slot="content">
{{item.date}}
{{item.high}}
{{item.low}}
</view>
<view slot="footer">{{list.ganmao}}</view>
</i-card>
</view>
ok,到这里就完成了。
5:贴一下完整的代码:
json:
{
"usingComponents": {
"i-card": "../../dist/card/index"
}
}
js:
Page({
data: {
list: []
},
onLoad: function (options) {
wx.request({
url: 'https://www.apiopen.top/weatherApi?city=%E4%B8%8A%E6%B5%B7',
header: {
'content-type': 'application/json'
},
success: res => {
console.log(res.data)
this.setData({
//第一个data为固定用法,第二个data是json中的data
list: res.data.data
})
}
})
},
})
wxml:
<view class='list-li mflex' wx:for="{{list.forecast}}" wx:key="index">
<i-card title="{{list.city}}天气" extra="{{list.city}}" thumb="https://i.loli.net/2017/08/21/599a521472424.jpg">
<view slot="content">
{{item.date}}
{{item.high}}
{{item.low}}
</view>
<view slot="footer">{{list.ganmao}}</view>
</i-card>
</view>

