关于树莓派四驱小车的运动方向控制、摄像头方向控制已经在前面的两篇博文中介绍过。有需要的可以参考。本文也是基于上述两个python文件就绪的情况进行的。
本文主要讲述我是如何实现通过网页实现小车控制的。当前的实现方式比较简陋,只能支持控制网页和树莓派在同一个局域网中的场景。如果以后还有精力,可能会进行一些改进。
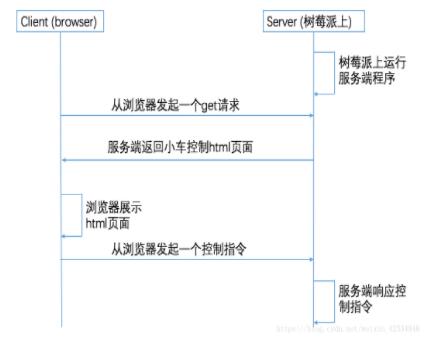
1. 基本思路
2. 服务端控制程序server.py
# --coding:utf-8--
from http.server import BaseHTTPRequestHandler, HTTPServer
import time
import socket
import urllib
from car_controler import FourWheelDriveCar
from camera_controler import Camera


class CarServer(BaseHTTPRequestHandler):

  carControler = FourWheelDriveCar()
  cameraControler = Camera()

  def get_host_ip(self):
    '''
    This method is used for getting local ip address
    The car server will deploy on this ip
    '''
    try:
      serverSocket = socket.socket(socket.AF_INET, socket.SOCK_DGRAM)
      serverSocket.connect(("8.8.8.8", 80))
      localIP = serverSocket.getsockname()[0]
    finally:
      return localIP

  def do_GET(self):
    '''
    Define the car control GUI for client
    For the first edition, it will only return direction contol GUI
    '''
    localIP = CarServer.get_host_ip(self)

    # When this GET method is called, then should init the car
    self.carControler.reset()

    # Read control page html file from control.html
    controlPageFile = open("control.html")
    controlPageGUI = controlPageFile.read()
    controlPageFile.close()
    controlPageGUI = controlPageGUI.replace(
      "requestAddress", "http://" + localIP + ":9090/")
    controlPageGUI = controlPageGUI.replace(
      "cameraAddress", "http://" + localIP + ":8080/")

    self.send_response(200)
    self.send_header("Content-type", "text/html")
    self.end_headers()
    self.wfile.write(controlPageGUI.encode())

  def do_POST(self):
    length = int(self.headers['Content-Length'])
    qs = self.rfile.read(length)
    direction = qs.decode()
    print(direction)

    cameraDirection = ['HR', 'HL', 'VU', 'VD', 'RESET']
    if direction in cameraDirection:
      # This is used to control the camera
      self.cameraControler.cameraRotate(direction)
    else:
      # This is used to control the car
      self.carControler.carMove(direction)

    self.send_response(200)


if __name__ == "__main__":
  raspCarServer = CarServer
  hostIP = raspCarServer.get_host_ip(raspCarServer)
  hostPort = 9090
  myServer = HTTPServer((hostIP, hostPort), raspCarServer)

  print(time.asctime(), "Server Starts - %s:%s" % (hostIP, hostPort))

  try:
    myServer.serve_forever()
  except KeyboardInterrupt:
    pass
3. 服务端返回的页面control.html
几点说明:
<html>
<script>
  function directionBtnDown(direction) {
    var url = "requestAddress"
    var request = new XMLHttpRequest();
    request.open("POST", url);

    request.send(direction)
  }

  function directionBtnUp() {
    var url = "requestAddress"
    var request = new XMLHttpRequest();
    request.open("POST", url);
    request.send("S")
  }
</script>
<style type="text/css">
  span.car {
    position: absolute;
    margin-top: 30%;
    height: 480px;
  }

  span.camera {
    position: absolute;
    margin-top: 5%;
    margin-left: 290px;
    height: 480px;
    width: 640px;
    background-color: blue
  }

  span.camera_control {
    position: absolute;
    margin-top: 30%;
    margin-left: 950px;
    height: 480px;
    background-color: blue
  }


  button.top {
    position: absolute;
    height: 50px;
    width: 90px;
    margin-left: 90px
  }

  button.left {
    position: absolute;
    height: 50px;
    width: 90px;
    margin-top: 50px;
  }

  button.right {
    position: absolute;
    height: 50px;
    width: 90px;
    margin-top: 50px;
    margin-left: 180px
  }

  button.bottom {
    position: absolute;
    height: 50px;
    width: 90px;
    margin-top: 100px;
    margin-left: 90px
  }
</style>

<head>
  <title>control page</title>
</head>

<body>
  <span id="car_control" class="car">
    <button class="top drectionBtn" id="F" οnmοusedοwn="directionBtnDown('F')" οnmοuseup="directionBtnUp()">F</button>
    <button class="left drectionBtn" id="L" οnmοusedοwn="directionBtnDown('L')" οnmοuseup="directionBtnUp()">L</button>
    <button class="right drectionBtn" id="R" οnmοusedοwn="directionBtnDown('R')" οnmοuseup="directionBtnUp()">R</button>
    <button class="bottom drectionBtn" id="B" οnmοusedοwn="directionBtnDown('B')" οnmοuseup="directionBtnUp()">B</button>
  </span>
  <span id="camera_view" class="camera">
    <img id="view" src="cameraAddress?action=stream" />
  </span>
  <span id="camera_control" class="camera_control">
    <button class="top drectionBtn" id="VU" οnmοusedοwn="directionBtnDown('VU')">Up</button>
    <button class="left drectionBtn" id="HL" οnmοusedοwn="directionBtnDown('HL')">Left</button>
    <button class="right drectionBtn" id="HR" οnmοusedοwn="directionBtnDown('HR')">Right</button>
    <button class="bottom drectionBtn" id="VD" οnmοusedοwn="directionBtnDown('VD')">Down</button>
  </span>

</body>

</html>
4. 使用方式简介

