效果
首先看看效果:

本文将介绍如何基于Angular 8和Bootstrap 4来实现上面的主题切换效果。
设计
遵循Bootstrap的设计,我们会使用 bootswatch.com 提供的免费主题来实现上面的效果。Bootswatch为前端程序员提供了多达21种免费的Bootstrap主题,并且提供了API文档 和 实例页面 ,介绍如何在HTML+jQuery的环境中实现主题切换。其实,我们也可以使用Bootstrap官网提供的主题设计工具来设计自己的主题,这些自定义的主题也是可以用在本文介绍的方法里的,只需要替换相关的资源地址就可以。如果你打开Bootswatch的API,你就会看到各种主题的元数据信息,我们可以使用其中的cssMin链接来替换主页的link地址,以达到切换主题的目的。
在开工之前,还是要做一些粗略的设计。为了简单起见,我使用Bootstrap的Navbar来完成这个功能,因为Navbar的代码可以直接从Bootstrap官网拷贝过来,稍微改改就行。不同的是,我将Navbar封装在一个组件(Component)里,这样做的好处是,可以将切换主题的功能封装起来,以实现模块化的设计。下图展示了这一设计:
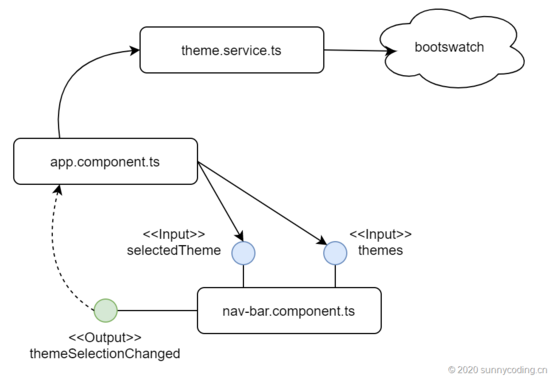
基本流程如下:
步骤
首先,根据Bootswatch API所返回的数据结构,定义一个数据模型:
export class ThemeDefinition {
 name: string;
 description: string;
 thumbnail: string;
 preview: string;
 css: string;
 cssMin: string;
 cssCdn: string;
 scss: string;
 scssVariables: string;
}

export class Themes {
 version: String;
 themes: ThemeDefinition[];
}
然后,创建theme.service.ts服务,用来调用Bootswatch API:
import { Injectable } from '@angular/core';
import { HttpClient } from '@angular/common/http';
import { Observable } from 'rxjs';
import { Themes } from '../models/themes';

@Injectable({
 providedIn: 'root'
})
export class ThemeService {

 constructor(private http: HttpClient) { }

 getThemes(): Observable<Themes> {
 return this.http.get<Themes>('https://bootswatch.com/api/4.json');
 }
}
接下来,创建Navbar组件,关键代码部分就是将主题的名称绑定到dropdown上,并根据选择的主题名称决定当前所显示的主题名称是否应该是active的。当然,dropdown的每个item还应该响应用户的点击事件:
<nav class="navbar navbar-expand-lg navbar-dark bg-dark">
 <a class="navbar-brand" href="#" rel="external nofollow" rel="external nofollow" rel="external nofollow" rel="external nofollow" rel="external nofollow" rel="external nofollow" ><i class="fab fa-acquisitions-incorporated"></i></a>
 <button class="navbar-toggler" type="button" data-toggle="collapse" data-target="#navbarSupportedContent"
 aria-controls="navbarSupportedContent" aria-expanded="false" aria-label="Toggle navigation">
 <span class="navbar-toggler-icon"></span>
 </button>
 <div class="collapse navbar-collapse" id="navbarSupportedContent">
 <ul class="navbar-nav mr-auto">
  <li class="nav-item active">
  <a class="nav-link" href="#" rel="external nofollow" rel="external nofollow" rel="external nofollow" rel="external nofollow" rel="external nofollow" rel="external nofollow" >Home <span class="sr-only">(current)</span></a>
  </li>
  <li class="nav-item">
  <a class="nav-link" href="#" rel="external nofollow" rel="external nofollow" rel="external nofollow" rel="external nofollow" rel="external nofollow" rel="external nofollow" >Link</a>
  </li>
  <li *ngIf="themes" class="nav-item dropdown">
  <a class="nav-link dropdown-toggle" href="#" rel="external nofollow" rel="external nofollow" rel="external nofollow" rel="external nofollow" rel="external nofollow" rel="external nofollow" id="navbarDropdown" role="button" data-toggle="dropdown"
   aria-haspopup="true" aria-expanded="false">
   主题
  </a>
  <div class="dropdown-menu" aria-labelledby="navbarDropdown">
   <a *ngFor="let theme of themes.themes"
   [className]="theme.name === selectedTheme ? 'dropdown-item active' : 'dropdown-item'" href="#" rel="external nofollow" rel="external nofollow" rel="external nofollow" rel="external nofollow" rel="external nofollow" rel="external nofollow"
   (click)="onThemeItemSelected($event)">{{theme.name}}</a>
  </div>
  </li>
 </ul>
 </div>
</nav>
Navbar组件的代码如下:
import { Component, OnInit, Output, EventEmitter, Input } from '@angular/core';
import { Themes } from 'src/app/models/themes';
import { ThemeService } from 'src/app/services/theme.service';
import { ThemeDefinition } from 'src/app/models/theme-definition';

@Component({
 selector: 'app-nav-bar',
 templateUrl: './nav-bar.component.html',
 styleUrls: ['./nav-bar.component.css']
})
export class NavBarComponent implements OnInit {

 @Input() themes: Themes;
 @Input() selectedTheme:string;
 @Output() themeSelectionChanged : EventEmitter<ThemeDefinition> = new EventEmitter();

 constructor(private themeService: ThemeService) { }

 ngOnInit() {
 }

 onThemeItemSelected(event: any) {
 const selectedThemeName = event.target.text;
 const selectedTheme = this.themes.themes.find(t => t.name === selectedThemeName);
 this.themeSelectionChanged.emit(selectedTheme);
 }
}
在onThemeItemSelected事件处理函数中,会读取被点击dropdown item的名称,根据该名称找到所选的主题,然后将其作为事件数据,发起themeSelectionChanged事件,然后,就是app.component.ts来处理这个事件了。在该事件处理函数中,从事件数据获取主题信息,然后调用applyTheme方法来应用主题:
import { Component, OnInit } from '@angular/core';
import { ThemeDefinition } from './models/theme-definition';
import { Themes } from './models/themes';
import { ThemeService } from './services/theme.service';
import { environment } from 'src/environments/environment';
import { StorageMap } from '@ngx-pwa/local-storage';

@Component({
 selector: 'app-root',
 templateUrl: './app.component.html',
 styleUrls: ['./app.component.css']
})
export class AppComponent implements OnInit {
 title = 'nblogger';
 themes: Themes;
 selectedTheme: string;

 constructor(private themeService: ThemeService,
 private storage: StorageMap) {

 }

 ngOnInit() {
 this.themeService.getThemes()
 .subscribe(data => {
  this.themes = data;
  this.storage.get('app-theme-name').subscribe(name => {
  const themeName = name ? name : environment.defaultTheme;
  const currentTheme = this.themes.themes.find(t => t.name === themeName);
  this.applyTheme(currentTheme);
  });

 });
 }

 onThemeSelectionChanged(event: ThemeDefinition) {
 this.applyTheme(event);
 }

 private applyTheme(def: ThemeDefinition): void {
 this.storage.set('app-theme-name', def.name).subscribe(()=>{});
 this.selectedTheme = def.name;
 const links = document.getElementsByTagName('link');
 for(let i = 0; i < links.length; i++) {
  const link = links[i];
  if (link.getAttribute('rel').indexOf('style') !== -1 &&
  link.getAttribute('type').indexOf('text') !== -1) {
   link.setAttribute('href', def.cssMin);
  }
 }
 }
}
在applyTheme方法中,首先会将所选主题名称设置到LocalStorage中,以便下次打开页面的时候能够直接应用主题;然后,从当前document中找到所需的link tag,并将其href值替换为所选主题信息的cssMin链接地址(内容可以参考Bootswatch的API结果)以此完成主题替换。
当重新打开页面时,app.component.ts中的ngOnInit初始化方法会被首先调用,它会通过theme.service.ts来读取主题信息,之后判断LocalStorage中是否有已经设置好的主题。如果有,则使用该主题,否则就从environment.ts的默认值中选择主题名称进行设置。
app.component.ts所使用的template就比较简单,主体是对Navbar组件的引用,还可以加一些额外的HTML元素进行效果测试:
<app-nav-bar [themes]="themes" [selectedTheme]="selectedTheme" (themeSelectionChanged)="onThemeSelectionChanged($event)"></app-nav-bar>
<div class="container">
 <article>
 <h1>Heading 1</h1>
 <h2>Heading 2</h2>
 <h3>Heading 3</h3>
 <h4>Heading 4</h4>
 </article>
 <div class="alert alert-primary" role="alert">
 这是一个警告框
 </div>
 <div class="alert alert-secondary" role="alert">
 A simple secondary alert—check it out!
 </div>
 <div class="alert alert-success" role="alert">
 A simple success alert—check it out!
 </div>
 <div class="alert alert-danger" role="alert">
 A simple danger alert—check it out!
 </div>
 <div class="alert alert-warning" role="alert">
 A simple warning alert—check it out!
 </div>
 <div class="alert alert-info" role="alert">
 A simple info alert—check it out!
 </div>
 <div class="alert alert-light" role="alert">
 A simple light alert—check it out!
 </div>
 <div class="alert alert-dark" role="alert">
 A simple dark alert—check it out!
 </div>

 <button type="button" class="btn btn-primary">Primary</button>
 <button type="button" class="btn btn-secondary">Secondary</button>
 <button type="button" class="btn btn-success">成功</button>
 <button type="button" class="btn btn-danger">失败</button>
 <button type="button" class="btn btn-warning">警告</button>
 <button type="button" class="btn btn-info">信息</button>
 <button type="button" class="btn btn-light">Light</button>
 <button type="button" class="btn btn-dark">Dark</button>

 <button type="button" class="btn btn-link">Link</button>
</div>
当然,记得在index.html中加入link的占位符,以便上面的applyTheme方法能够找到它:
<!doctype html>
<html lang="en">
<head>
 <meta charset="utf-8">
 <title>Nblogger</title>
 <base href="/" rel="external nofollow" >
 <meta name="viewport" content="width=device-width, initial-scale=1">
 <link rel="icon" type="image/x-icon" href="favicon.ico" rel="external nofollow" >
 <link rel="stylesheet" type="text/css" href="#" rel="external nofollow" rel="external nofollow" rel="external nofollow" rel="external nofollow" rel="external nofollow" rel="external nofollow" >
</head>
<body>
 <app-root></app-root>
</body>
</html>
总结
我们可以将Bootswatch的所有主题下载到本地,由本地服务来提供主题的API,这样切换主题会变得更快,也可以自己自定义主题然后扩展这个自制的本地API来提供更丰富的主题,根据需要来定吧。

