相信每天工作都要用spring框架的大家一定使用过spring aop,aop的概念是面向切面编程,相对与传统的面向对象编程oop,aop更关注的是横向的逻辑,比如说一个大型系统中的日志记录,异常处理,性能监控等等,都是各个模块都需要的操作,那样代表着这些操作会散落在系统的各个地方,不易管理且杂乱无章,而aop就是关注的这些,aop将这些操作与业务代码分离,统一成一个个的切面,针对这些个切面进行编程处理。spring aop使得我们的aop开发工作变得简单,这次我就给大家讲讲spring aop的底层原理和实现
要分析spring aop的底层原理,首先要会使用,先创建一个普通maven webapp项目,引入spring-context依赖,版本为5.1.1RELEASE
<dependency>
      <groupId>org.springframework</groupId>
      <artifactId>spring-context</artifactId>
      <version>5.1.1.RELEASE</version>
    </dependency>
然后我使用aspectj作为aop的语法实现,和spring整合起来
<dependency>
      <groupId>org.aspectj</groupId>
      <artifactId>aspectjweaver</artifactId>
      <version>1.9.4</version>
    </dependency>
接下来我全称用注解的形式来模拟spring aop的使用,先创建一个配置类去扫描包,开启aspectJ的自动代理支持
@Configuration
@EnableAspectJAutoProxy
@ComponentScan("com.ww")
public class Wconfig {

}
然后新建一个接口和接口的实现类
public interface Dao {
    void query();
}

@Component
public class IndexDao implements Dao{

    @Override
    public void query() {
        System.out.println("query......");
    }
}
创建切面
//代表是一个切面
@Aspect
@Component
public class WAspect {

    /**
     * execution表达式,可以百度写法
     */
    @Pointcut("execution(* com.ww.dao.*.*(..))")
    public void point(){

    }

    /**
     * 在切点上进行前置通知
     */
    @Before("point()")
    public void beforeAd(){
        System.out.println("before-------------");
    }
}
创建测试方法
public class TestAspect {
    public static void main(String[] args) {
        AnnotationConfigApplicationContext configApplicationContext = new AnnotationConfigApplicationContext(Wconfig.class);
        Dao dao = configApplicationContext.getBean(Dao.class);
        dao.query();
    }
}
执行方法,可以看到在打印query...之前打印了before----------

这个时候我们很想知道为什么这句before会打印在query之前呢,稍微对spring aop有所了解的人应该知道,spring是通过动态代理和字节码技术来实现aop操作的,也就是经常说的jdk动态代理和cglib动态代理两种模式,那么,spring究竟是怎么创建的代理对象,又是什么时候产生的代理对象呢,下面我们来一起探究一下源码,来揭开这个谜底
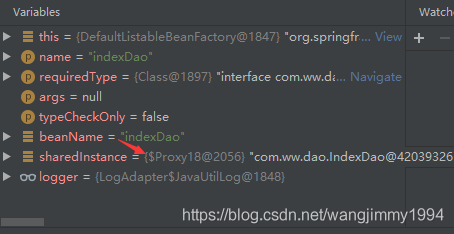
首先我们透过现象看本质,我先把断点打在测试方法的最后一行,我们来看这个时候的dao对象

那么接下来我们就要去找到什么时候这个dao对象变成了动态代理对象的,既然在最后一行的时候对象已经变成了代理对象,那么我门自然就猜想是在上一句代码的位置spring执行了创建代理对象的操作,我们把断点移到上一行,debug进去

再往下走

这行代码我看方法名觉得应该是有用的代码,方法意思应该是spring处理好的bean,跟进去看看
@Nullable
	private <T> T resolveBean(ResolvableType requiredType, @Nullable Object[] args, boolean nonUniqueAsNull) {
        //这行代码最有用,处理有beanName的bean,debug进入看一下
		NamedBeanHolder<T> namedBean = resolveNamedBean(requiredType, args, nonUniqueAsNull);
		if (namedBean != null) {
			return namedBean.getBeanInstance();
		}
		BeanFactory parent = getParentBeanFactory();
		if (parent instanceof DefaultListableBeanFactory) {
			return ((DefaultListableBeanFactory) parent).resolveBean(requiredType, args, nonUniqueAsNull);
		}
		else if (parent != null) {
			ObjectProvider<T> parentProvider = parent.getBeanProvider(requiredType);
			if (args != null) {
				return parentProvider.getObject(args);
			}
			else {
				return (nonUniqueAsNull ? parentProvider.getIfUnique() : parentProvider.getIfAvailable());
			}
		}
		return null;
	}
@SuppressWarnings("unchecked")
	@Nullable
	private <T> NamedBeanHolder<T> resolveNamedBean(
			ResolvableType requiredType, @Nullable Object[] args, boolean nonUniqueAsNull) throws BeansException {

		Assert.notNull(requiredType, "Required type must not be null");
		Class<?> clazz = requiredType.getRawClass();
		Assert.notNull(clazz, "Required type must have a raw Class");
        //候选name列表,直觉告诉我这行代码比较重要
		String[] candidateNames = getBeanNamesForType(requiredType);

		if (candidateNames.length > 1) {
			List<String> autowireCandidates = new ArrayList<>(candidateNames.length);
			for (String beanName : candidateNames) {
				if (!containsBeanDefinition(beanName) || getBeanDefinition(beanName).isAutowireCandidate()) {
					autowireCandidates.add(beanName);
				}
			}
			if (!autowireCandidates.isEmpty()) {
				candidateNames = StringUtils.toStringArray(autowireCandidates);
			}
		}
        //因为我的代码里只有一个bean,所以我觉得应该会执行这里的代码
		if (candidateNames.length == 1) {
			String beanName = candidateNames[0];
			return new NamedBeanHolder<>(beanName, (T) getBean(beanName, clazz, args));
		}
		else if (candidateNames.length > 1) {
			Map<String, Object> candidates = new LinkedHashMap<>(candidateNames.length);
			for (String beanName : candidateNames) {
				if (containsSingleton(beanName) && args == null) {
					Object beanInstance = getBean(beanName);
					candidates.put(beanName, (beanInstance instanceof NullBean ? null : beanInstance));
				}
				else {
					candidates.put(beanName, getType(beanName));
				}
			}
			String candidateName = determinePrimaryCandidate(candidates, clazz);
			if (candidateName == null) {
				candidateName = determineHighestPriorityCandidate(candidates, clazz);
			}
			if (candidateName != null) {
				Object beanInstance = candidates.get(candidateName);
				if (beanInstance == null || beanInstance instanceof Class) {
					beanInstance = getBean(candidateName, clazz, args);
				}
				return new NamedBeanHolder<>(candidateName, (T) beanInstance);
			}
			if (!nonUniqueAsNull) {
				throw new NoUniqueBeanDefinitionException(requiredType, candidates.keySet());
			}
		}

		return null;
	}
执行完getBeanNamesForType(requiredType)后,我们看idea的变量显示,果然有一个bean,name是IndexDao

那么接下来自然会进到length==1的那个代码块,这时候我再debug进入,这里还是一个getBean方法


在spring容器中还有一些没有name的其他的bean需要被创建,所以这里我用上了条件断点,当beanName等于indexDao的时候,才会进入断点,但是当我F8跑完这行代码的时候,出乎意料的事情发生了
惊不惊喜,意不意外,getSingleton这行代码执行结束之后,代理对象就已经被创建了,所以需要debug进入这行代码去看
protected Object getSingleton(String beanName, boolean allowEarlyReference) {
        //spring所有的bean被放在ioc容器中的地方,就是这个singletonObjects,这是一个concorrentHashMap。
		Object singletonObject = this.singletonObjects.get(beanName);
		if (singletonObject == null && isSingletonCurrentlyInCreation(beanName)) {
			synchronized (this.singletonObjects) {
				singletonObject = this.earlySingletonObjects.get(beanName);
				if (singletonObject == null && allowEarlyReference) {
					ObjectFactory<?> singletonFactory = this.singletonFactories.get(beanName);
					if (singletonFactory != null) {
						singletonObject = singletonFactory.getObject();
						this.earlySingletonObjects.put(beanName, singletonObject);
						this.singletonFactories.remove(beanName);
					}
				}
			}
		}
		return singletonObject;
	}
但是我在这里只看到了get方法,那么这些bean是什么时候放到singletonObjects里的呢,我来找找
protected void addSingleton(String beanName, Object singletonObject) {
		synchronized (this.singletonObjects) {
			this.singletonObjects.put(beanName, singletonObject);
			this.singletonFactories.remove(beanName);
			this.earlySingletonObjects.remove(beanName);
			this.registeredSingletons.add(beanName);
		}
	}
在DefaultSingletonBeanRegistry注册器中,我找到了singletonObjects.put方法,代表bean是这个时候被放到这个map里去的,接下来我在这行代码上进行条件断点,然后我们来看它的调用链,找出是什么时候执行的addSingleton方法,其实从这个时候我已经知道,断点打在测试方法的倒数第二行是不对的,在getBean之前其实代理对象已经产生了

// Create bean instance.
				if (mbd.isSingleton()) {
					sharedInstance = getSingleton(beanName, () -> {
						try {
                            //创建bean,核心代码
							return createBean(beanName, mbd, args);
						}
						catch (BeansException ex) {
							// Explicitly remove instance from singleton cache: It might have been put there
							// eagerly by the creation process, to allow for circular reference resolution.
							// Also remove any beans that received a temporary reference to the bean.
							destroySingleton(beanName);
							throw ex;
						}
					});
					bean = getObjectForBeanInstance(sharedInstance, name, beanName, mbd);
				}
在createBean方法上,我也加上条件断点,然后debug进入
@Override
	protected Object createBean(String beanName, RootBeanDefinition mbd, @Nullable Object[] args)
			throws BeanCreationException {

		if (logger.isTraceEnabled()) {
			logger.trace("Creating instance of bean '" + beanName + "'");
		}
		RootBeanDefinition mbdToUse = mbd;

		// Make sure bean class is actually resolved at this point, and
		// clone the bean definition in case of a dynamically resolved Class
		// which cannot be stored in the shared merged bean definition.
		Class<?> resolvedClass = resolveBeanClass(mbd, beanName);
		if (resolvedClass != null && !mbd.hasBeanClass() && mbd.getBeanClassName() != null) {
			mbdToUse = new RootBeanDefinition(mbd);
			mbdToUse.setBeanClass(resolvedClass);
		}

		// Prepare method overrides.
		try {
			mbdToUse.prepareMethodOverrides();
		}
		catch (BeanDefinitionValidationException ex) {
			throw new BeanDefinitionStoreException(mbdToUse.getResourceDescription(),
					beanName, "Validation of method overrides failed", ex);
		}

		try {
			// Give BeanPostProcessors a chance to return a proxy instead of the target bean instance.
			Object bean = resolveBeforeInstantiation(beanName, mbdToUse);
			if (bean != null) {
				return bean;
			}
		}
		catch (Throwable ex) {
			throw new BeanCreationException(mbdToUse.getResourceDescription(), beanName,
					"BeanPostProcessor before instantiation of bean failed", ex);
		}

		try {
            //核心代码,创建bean实例,需要断点进入
			Object beanInstance = doCreateBean(beanName, mbdToUse, args);
			if (logger.isTraceEnabled()) {
				logger.trace("Finished creating instance of bean '" + beanName + "'");
			}
			return beanInstance;
		}
		catch (BeanCreationException | ImplicitlyAppearedSingletonException ex) {
			// A previously detected exception with proper bean creation context already,
			// or illegal singleton state to be communicated up to DefaultSingletonBeanRegistry.
			throw ex;
		}
		catch (Throwable ex) {
			throw new BeanCreationException(
					mbdToUse.getResourceDescription(), beanName, "Unexpected exception during bean creation", ex);
		}
	}
接下来我debug进入doCreateBean方法
debug跟进initializeBean方法,条件断点在两个初始化处理器上,我隐约觉得代理对象就是从这两个方法中产生的,我们拭目以待
protected Object initializeBean(final String beanName, final Object bean, @Nullable RootBeanDefinition mbd) {
		if (System.getSecurityManager() != null) {
			AccessController.doPrivileged((PrivilegedAction<Object>) () -> {
				invokeAwareMethods(beanName, bean);
				return null;
			}, getAccessControlContext());
		}
		else {
			invokeAwareMethods(beanName, bean);
		}
        //包装的bean
		Object wrappedBean = bean;
		if (mbd == null || !mbd.isSynthetic()) {
            //执行前置初始化beanPostProcessor处理器
			wrappedBean = applyBeanPostProcessorsBeforeInitialization(wrappedBean, beanName);
		}

		try {
			invokeInitMethods(beanName, wrappedBean, mbd);
		}
		catch (Throwable ex) {
			throw new BeanCreationException(
					(mbd != null ? mbd.getResourceDescription() : null),
					beanName, "Invocation of init method failed", ex);
		}
		if (mbd == null || !mbd.isSynthetic()) {
            //执行初始化后的beanPostProcessor处理器
			wrappedBean = applyBeanPostProcessorsAfterInitialization(wrappedBean, beanName);
		}

		return wrappedBean;
	}
执行完applyBeanPostProcessorsBeforeInitialization方法,这个时候我们看到warppedBean还是indexDao,并没有产生代理对象

我猜想在下一个后置处理器中,代理对象将被创建,我debug进去
public Object applyBeanPostProcessorsAfterInitialization(Object existingBean, String beanName)
			throws BeansException {

		Object result = existingBean;
		for (BeanPostProcessor processor : getBeanPostProcessors()) {
            //经过处理器处理后的bean,我先看看有多少个处理器
			Object current = processor.postProcessAfterInitialization(result, beanName);
			if (current == null) {
				return result;
			}
			result = current;
		}
		return result;
	}

可以看到我的猜想被证明是正确的,运行完这个后置处理器,代理对象就被创建出来了。 到了这里我们知道了代理对象是从哪里来的了,但是还是没搞清楚代理对象是怎么创建出来的,这时候我们就需要debug进入到这个处理器内部去瞧瞧了。
@Override
	public Object postProcessAfterInitialization(@Nullable Object bean, String beanName) {
		if (bean != null) {
            //获取缓存key,不重要
			Object cacheKey = getCacheKey(bean.getClass(), beanName);
			if (!this.earlyProxyReferences.contains(cacheKey)) {
                //重要方法,需要debug进去看
				return wrapIfNecessary(bean, beanName, cacheKey);
			}
		}
		return bean;
	}
于是乎我又进到了wrapIfNecessary这个方法内部
protected Object wrapIfNecessary(Object bean, String beanName, Object cacheKey) {
		if (StringUtils.hasLength(beanName) && this.targetSourcedBeans.contains(beanName)) {
			return bean;
		}
		if (Boolean.FALSE.equals(this.advisedBeans.get(cacheKey))) {
			return bean;
		}
		if (isInfrastructureClass(bean.getClass()) || shouldSkip(bean.getClass(), beanName)) {
			this.advisedBeans.put(cacheKey, Boolean.FALSE);
			return bean;
		}

		// Create proxy if we have advice.
        //看到上面这行注释,可以确定代理类就是从这里产生的,下面这个方法得到的都是一些包括切点信息,通知类型等等的信息
		Object[] specificInterceptors = getAdvicesAndAdvisorsForBean(bean.getClass(), beanName, null);
		if (specificInterceptors != DO_NOT_PROXY) {
			this.advisedBeans.put(cacheKey, Boolean.TRUE);
            //顾名思义,创建代理,bebug进入看看
			Object proxy = createProxy(
					bean.getClass(), beanName, specificInterceptors, new SingletonTargetSource(bean));
			this.proxyTypes.put(cacheKey, proxy.getClass());
			return proxy;
		}

		this.advisedBeans.put(cacheKey, Boolean.FALSE);
		return bean;
	}
protected Object createProxy(Class<?> beanClass, @Nullable String beanName,
			@Nullable Object[] specificInterceptors, TargetSource targetSource) {

		if (this.beanFactory instanceof ConfigurableListableBeanFactory) {
			AutoProxyUtils.exposeTargetClass((ConfigurableListableBeanFactory) this.beanFactory, beanName, beanClass);
		}

		ProxyFactory proxyFactory = new ProxyFactory();
		proxyFactory.copyFrom(this);

		if (!proxyFactory.isProxyTargetClass()) {
			if (shouldProxyTargetClass(beanClass, beanName)) {
				proxyFactory.setProxyTargetClass(true);
			}
			else {
				evaluateProxyInterfaces(beanClass, proxyFactory);
			}
		}

		Advisor[] advisors = buildAdvisors(beanName, specificInterceptors);
		proxyFactory.addAdvisors(advisors);
		proxyFactory.setTargetSource(targetSource);
		customizeProxyFactory(proxyFactory);

		proxyFactory.setFrozen(this.freezeProxy);
		if (advisorsPreFiltered()) {
			proxyFactory.setPreFiltered(true);
		}
        //重要的地方在这里,代理对象是通过这个方法生成的
		return proxyFactory.getProxy(getProxyClassLoader());
	}

    public Object getProxy(@Nullable ClassLoader classLoader) {
        //debug进去看看
		return createAopProxy().getProxy(classLoader);
	}
protected final synchronized AopProxy createAopProxy() {
		if (!this.active) {
			activate();
		}
        //同样需要debug进入看看
		return getAopProxyFactory().createAopProxy(this);
	}
我们看到这里有一个if语句,当config中的isOptimize和isProxyTargetClass还有hasNoUserSuppliedProxyInterfaces三个判断条件只要有一个满足的话,spring就会选择cglib的方式进行动态代理,而config中的两个boolean变量的默认值都是false,而我们的被代理对象又是实现接口的,所以spring会选择jdk动态代理的实现形式来完成动态代理,当然,我们也可以在这种情况下手动的配置config值来让spring选择cglib作为动态代理的实现方式,稍后我会演示
@Override
	public AopProxy createAopProxy(AdvisedSupport config) throws AopConfigException {
		if (config.isOptimize() || config.isProxyTargetClass() || hasNoUserSuppliedProxyInterfaces(config)) {
			Class<?> targetClass = config.getTargetClass();
			if (targetClass == null) {
				throw new AopConfigException("TargetSource cannot determine target class: " +
						"Either an interface or a target is required for proxy creation.");
			}
			if (targetClass.isInterface() || Proxy.isProxyClass(targetClass)) {
				return new JdkDynamicAopProxy(config);
			}
			return new ObjenesisCglibAopProxy(config);
		}
		else {
            //现在知道为什么我们的代理类是动态代理了吗
			return new JdkDynamicAopProxy(config);
		}
	}

我以spring aop实现的调用链图来结束这次的总结


