一. 全局的异常处理器

1、编写一个自定义的异常类, 区分哪些异常是系统异常, 哪些异常是用户不正当操作的异常
//继承Exception
public class UserException extends Exception{

  private static final long serialVersionUID = -8469276157483476569L;

  public UserException() {
    super();
  }

  public UserException(String message, Throwable cause, boolean enableSuppression, boolean writableStackTrace) {
    super(message, cause, enableSuppression, writableStackTrace);
  }

  public UserException(String message, Throwable cause) {
    super(message, cause);
  }

  public UserException(String message) {
    super(message);
  }

  public UserException(Throwable cause) {
    super(cause);
  }
2、编写一个全局异常处理器, 这个处理器必须实现HandlerExceptionResolver
//将异常处理类交给spring容器管理
@Component
public class MyExceptionHandler implements HandlerExceptionResolver {
  @Override
  public ModelAndView resolveException(HttpServletRequest request, HttpServletResponse response, Object handler,
      Exception ex) {
    // ex 接收是抛出的异常对象
    // 分类处理, 自定义异常, 直接响应 错误信息
    // 系统异常, 响应的: 系统错误, 请联系管理员
    ModelAndView modelAndView = new ModelAndView();if (ex instanceof UserException) {//用户异常
      modelAndView.addObject("error", ex.getMessage());
    } else {//系统异常
      modelAndView.addObject("error", "系统错误,联系管理员!!!");
    }
    modelAndView.setViewName("error");
    return modelAndView;
  }
3、 在springMVC的配置文件中配置全局的异常处理器
①使用Component ②在springmvc配置文件中手动添加<bean/>
4、扫描这个exception包中的注解
二、响应json支持
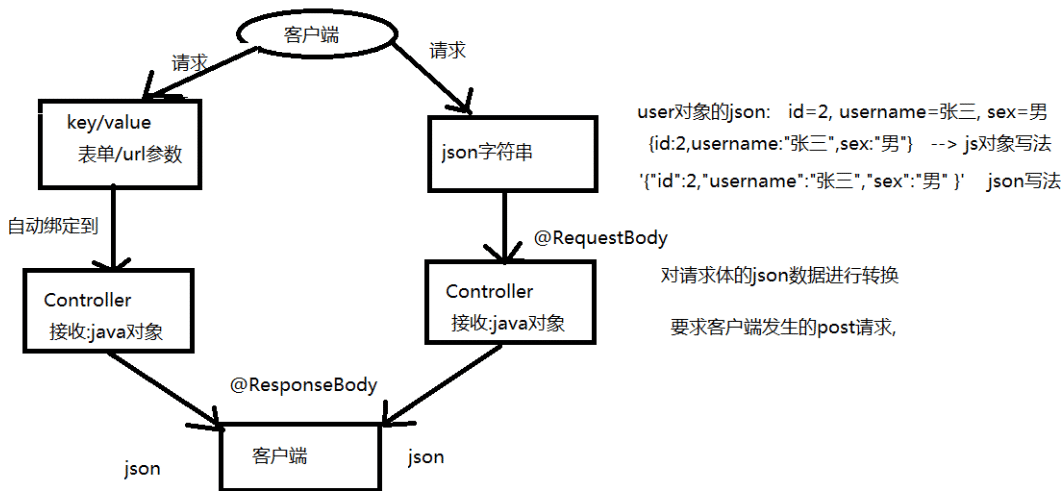
AJAX: 要求后台响应的是数据, 后台重定向,转发到一个页面, 把这个页面当成一个数据,响应给ajax,
后台: java对象
前台: ajax--> js对象, 使用json, 需要后台把java对象转换为json格式的字符串,
Servlet: 使用 json-lib, 手动调用JSONObject
SpringMVC转换json, 使用: 1)jackson *** 2) fastjson
1、导入jackson的依赖: 注意添加完把<type>bundle</type>删除,会附带导入所需要的jar
<dependency>
  <groupId>com.fasterxml.jackson.core</groupId>
  <artifactId>jackson-databind</artifactId>
  <version>2.10.0</version>
</dependency>
Controller方法的返回值 java对象, 需要配合@ResponseBody, 把方法的返回值作为数据响应给前端, ****
如果是一个java对象,而且导入json的相关依赖(jaskson/fastJson), 调用转换器, 把java对象转换为json格式字符串响应给前端
把日期转换为 指定格式的字符串
@DateTimeFormat(pattern = "yyyy-MM-dd") // SpringMVC的注解, 把前端的字符串转换为Date
@JsonFormat(pattern = "yyyy-MM-dd") // jackson的注解, 把Date转换为json指定格式的字符串@JsonFormat(pattern = "yyyy-MM-dd")
private Date brithday;[/code]
忽略某个属性转换为json
@JsonIgnoreprivate String password;
@RequestBody:主要用来接收前端传递给后端的json字符串中的数据的(请求体中的数据的),只能是post提交,get没有请求体
注解用于读取http请求的内容(字符串),通过springmvc提供的HttpMessageConverter接口将读到的内容转换为json、xml等格式的数据并绑定到controller方法的参数上。
//前端发送json, 响应json
@RequestMapping("/queryUserByCondition.action")
@ResponseBody
public User  queryUserByCondition( @RequestBody User user) throws Exception{
  return user;
}
前端代码
//请求的是json
    function requestJson(){
      //请求参数是json
      // 默认情况下, data中json, 变成js对象, 变成key/value
      //contentType:"application/json;charset=utf-8", 改为json 格式的传输
      $.ajax({
      url:"${pageContext.request.contextPath }/user/queryUserByCondition.action",
      type:"post",
      //data:"id=2&username=张三&sex=男&brithday=1999-12-21",
      contentType:"application/json;charset=utf-8",
      data:'{"id":3,"username":"李四","sex":"男","brithday":"2012-12-12"}',
      success:function(rs){
        alert(rs.username+"-->"+rs.sex); // json 字符串转换为js对象
      },
      dataType:"json"
        });
    }
三、文件上传
1、对页面的要求:
form 的method:postform的enctype: 默认值: application/x-www-form-urlencoded 一定设置为: multipart/form-data使用<input type=”file”> 选择文件
2、对页面的要求:
导入文件上传的依赖: commons-fileupload commons-io
<dependency>
  <groupId>commons-fileupload</groupId>
  <artifactId>commons-fileupload</artifactId>
  <version>1.4</version>
</dependency>
3、在springMVC配置文件上传的解析器
<!-- 文件上传 -->
<bean id="multipartResolver" class="org.springframework.web.multipart.commons.CommonsMultipartResolver">
 <!-- 设置最大的上传文件大小 :10M-->
<property name="maxUploadSize" value="10485760"></property>
</bean>
注意:bean的id一定为multipartResolver,否则获取不到数据
4、文件代码
@PostMapping("/addUser.action")
  public String addUser(User user, MultipartFile photo,Model model) throws Exception{
    if(photo == null) {
      throw new UserException("请选择图片");
    }else {
      //保存文件
      String savePath = "D:\\upload";
      //File类
      File pathFile = new File(savePath);
      if(!pathFile.exists()) {
        //创建文件夹
        pathFile.mkdirs();
      }
      //文件名取名: 时间戳   UUID
      //获取上传文件的后缀名
      String uploadFileName = photo.getOriginalFilename();
      String suffix = uploadFileName.substring(uploadFileName.lastIndexOf("."));
      String saveFilename = UUID.randomUUID().toString().replace("-", "").toUpperCase()+suffix;
      //保存
      photo.transferTo(new File(savePath,saveFilename));
      //给user对象的photoPath属性赋值
      user.setPhotoPath(saveFilename);

      //调用业务层,保存用户
      userService.saveUser(user);
      model.addAttribute("msg", "保存成功");
    }
    return "msg";
  }
<img src="/img/${user.photoPath }"/>
需要在tomcat中配置映射路径


