
证明出错在dataloader里面
在pytorch当中,float16和half是一样的数据结构,都是属于half操作,
然后dataloader不能返回half值,所以在dataloader里面,要把float16改成float32即可返回
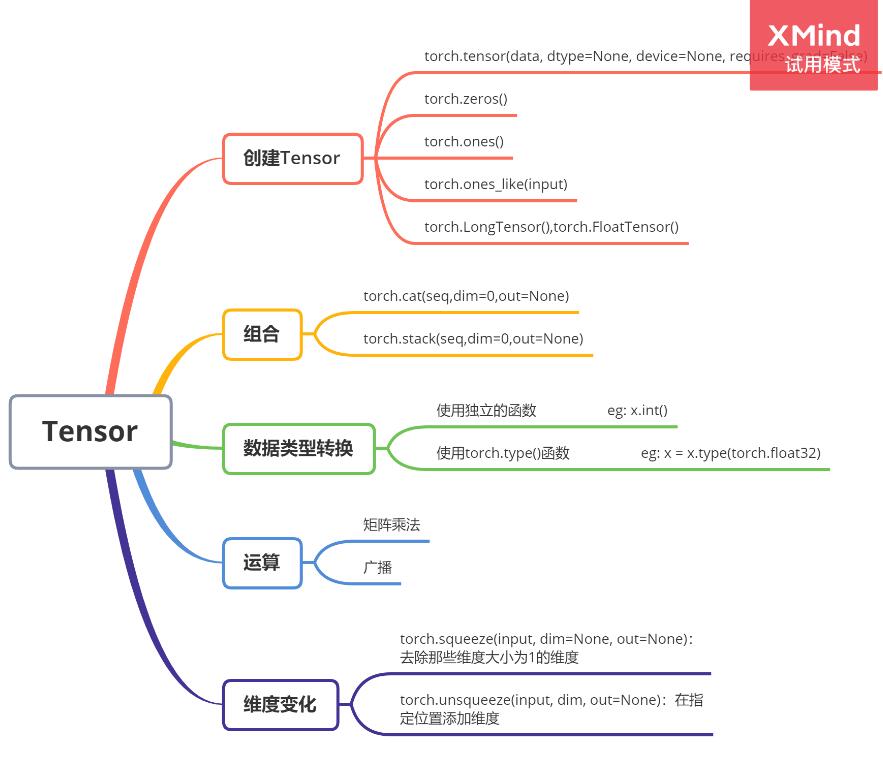
补充:Pytorch中Tensor常用操作归纳
对常用的一些Tensor的常用操作进行简单归纳,方便日后查询。后续有用到再补充。
import torch
#经典方式
device = torch.device("cuda:0")
x = torch.tensor([1,2],dtype = torch.float32,device = device,requires_grad=True)
w = sum(2 * x)
w.backward()
print(x.device)
print(x.dtype)
print(x.grad)
#Tensor
y = torch.Tensor([1,2,3])
#等价于
y = torch.FloatTensor([1,2,3])#32位浮点型
#后者声明打开梯度
y.requires_grad = True
#还有其他类型,常用的
torch.LongTensor(2,3)
torch.shortTensor(2,3)
torch.IntTensor(2,3)
w = sum(2 * y)
w.backward()
print(y.grad)
print(y.dtype)
输出:
cuda:0
torch.float32
tensor([2., 2.], device='cuda:0')
tensor([2., 2., 2.])
torch.float32
和numpy类似的创建方法
x = torch.linspace(1,10,10,dtype = torch.float32,requires_grad = True)
y = torch.ones(10)
z = torch.zeros((2,4))
w = torch.randn((2,3))#从标准正态分布(均值为0,方差为1)上随机采用,高斯噪声点,而rand相当于在0,1间随机采样
#torch.normal()????
print(x)
print(y)
print(z)
print(w)
输出
tensor([ 1., 2., 3., 4., 5., 6., 7., 8., 9., 10.], requires_grad=True)
tensor([1., 1., 1., 1., 1., 1., 1., 1., 1., 1.])
tensor([[0., 0., 0., 0.],
[0., 0., 0., 0.]])
tensor([[-0.6505, 1.3897, 2.2265],
[-1.7815, -1.8194, -0.4143]])
从numpy转换
np_data = np.arange(2,13,2).reshape((2,3))
torch_data = torch.from_numpy(np_data)#numpy转tensor
print('\nnumpy',np_data)
print('\ntorch',torch_data)
输出
numpy [[ 2 4 6]
[ 8 10 12]]torch tensor([[ 2, 4, 6],
[ 8, 10, 12]], dtype=torch.int32)
import torch
x = torch.arange(0,10,1).reshape(2,-1)#size=(2,5)
y = torch.ones(10).reshape(2,-1)#size=(2,5)
print(x)
print(y)
w = torch.cat((x,y),dim = 0)#默认从size最左边开始,这里结果为:(2+2,5)
z = torch.cat((x,y),dim = 1)#(2,5+5)
print(w,w.size())
print(z,z.size())
#还有种stack()
输出:
tensor([[0, 1, 2, 3, 4],
[5, 6, 7, 8, 9]])
tensor([[1., 1., 1., 1., 1.],
[1., 1., 1., 1., 1.]])
tensor([[0., 1., 2., 3., 4.],
[5., 6., 7., 8., 9.],
[1., 1., 1., 1., 1.],
[1., 1., 1., 1., 1.]]) torch.Size([4, 5])
tensor([[0., 1., 2., 3., 4., 1., 1., 1., 1., 1.],
[5., 6., 7., 8., 9., 1., 1., 1., 1., 1.]]) torch.Size([2, 10])
法一
x = torch.rand((2,2),dtype = torch.float32)
print(x.dtype)
x = x.double()
print(x.dtype)
x = x.int()
print(x)
输出:
torch.float32
torch.float64
tensor([[0, 0],
[0, 0]], dtype=torch.int32)
法二
x = torch.LongTensor((2,2))
print(x.dtype)
x = x.type(torch.float32)
print(x.dtype)
输出:
torch.int64
torch.float32
x = torch.arange(0,4,1).reshape(2,-1)
print(x)
print(x * x )#直接相乘
print(torch.mm(x,x))#矩阵乘法
print(x + 1)#广播
print(x.numpy())#转换成numpy
输出:
tensor([[0, 1],
[2, 3]])
tensor([[0, 1],
[4, 9]])
tensor([[ 2, 3],
[ 6, 11]])
tensor([[1, 2],
[3, 4]])
[[0 1]
[2 3]]
主要是对维度大小为1的升降维操作。
 torch.squeeze(input)#去掉维度为1的维数
 torch.unsqueeze(input,dim)#指定位置增加一维
以上为个人经验,希望能给大家一个参考,也希望大家多多支持。

