为了演示 Spring 中的事务控制,我们创建一个空项目,项目目录如下:

导入依赖:
<dependencies>
	<dependency>
	    <groupId>org.springframework</groupId>
	    <artifactId>spring-context</artifactId>
	    <version>5.0.2.RELEASE</version>
	</dependency>
	<dependency>
	    <groupId>org.springframework</groupId>
	    <artifactId>spring-jdbc</artifactId>
	    <version>5.0.2.RELEASE</version>
	</dependency>
	<dependency>
	    <groupId>org.springframework</groupId>
	    <artifactId>spring-tx</artifactId>
	    <version>5.0.2.RELEASE</version>
	</dependency>
	<dependency>
	    <groupId>mysql</groupId>
	    <artifactId>mysql-connector-java</artifactId>
	    <version>5.1.6</version>
	</dependency>
	<dependency>
	    <groupId>org.aspectj</groupId>
	    <artifactId>aspectjweaver</artifactId>
	    <version>1.8.7</version>
	</dependency>
	<dependency>
	    <groupId>junit</groupId>
	    <artifactId>junit</artifactId>
	    <version>4.12</version>
	</dependency>
	<dependency>
	    <groupId>org.springframework</groupId>
	    <artifactId>spring-test</artifactId>
	    <version>5.0.2.RELEASE</version>
	</dependency>
</dependencies>
业务层及其实现类:
/**
 * 账户的业务层接口
 */
public interface IAccountService {

    void transfer(String sourceName, String targetName, Float money);
}
/**
 * 转账的业务层实现类
 */
public class AccountServiceImpl implements IAccountService {

    private IAccountDao accountDao;

    public void setAccountDao(IAccountDao accountDao) {
        this.accountDao = accountDao;
    }

    /**
     * 转账
     * @param sourceName    转出账户名称
     * @param targetName    转入账户名称
     * @param money         转账金额
     */
    public void transfer(String sourceName, String targetName, Float money) {
            //1. 根据名称查询转出账户
            Account source = accountDao.findAccountByName(sourceName);//  1. 第一次事务,提交
            //2. 根据名称查询转入账户
            Account target = accountDao.findAccountByName(targetName);//  2. 第二次事务提交
            //3. 转出账户减钱
            source.setMoney(source.getMoney()-money);
            //4. 转入账户加钱
            target.setMoney(target.getMoney()+money);
            //5. 更新转出账户
            accountDao.updateAccount(source);  //  3. 第三次事务提交
            int i = 1/0;  					   //  4. 报异常
            //6. 更新转入账户
            accountDao.updateAccount(target);  //  5. 事务不执行
    }
}
账户持久层及其接口:
/**
 * 账户的持久层接口
 */
public interface IAccountDao {

    /**
     * 根据Id查询账户
     * @param accountId
     * @return
     */
    Account findAccountById(Integer accountId);

    /**
     * 根据名称查询账户
     * @param accountName
     * @return
     */
    Account findAccountByName(String accountName);

    /**
     * 更新账户
     * @param account
     */
    void updateAccount(Account account);
}
/**
 * 账户的持久层实现类
 */
public class AccountDaoImpl extends JdbcDaoSupport implements IAccountDao {

    public Account findAccountById(Integer accountId) {
        List<Account> accounts = super.getJdbcTemplate().query("select * from account where id = ?",new BeanPropertyRowMapper<Account>(Account.class),accountId);
        return accounts.isEmpty()?null:accounts.get(0);
    }


    public Account findAccountByName(String accountName) {
        List<Account> accounts = super.getJdbcTemplate().query("select * from account where name = ?",new BeanPropertyRowMapper<Account>(Account.class),accountName);
        if(accounts.isEmpty()){
            return null;
        }
        if(accounts.size()>1){
            throw new RuntimeException("结果集不唯一");
        }
        return accounts.get(0);
    }


    public void updateAccount(Account account) {
        super.getJdbcTemplate().update("update account set name=?,money=? where id=?",account.getName(),account.getMoney(),account.getId());
    }
}
这里配置的是 Spring 内置数据源,当然也可以应用 JdbcTemplate。
bean.xml:
<?xml version="1.0" encoding="UTF-8"?>
<beans xmlns="http://www.springframework.org/schema/beans"
       xmlns:xsi="http://www.w3.org/2001/XMLSchema-instance"
       xmlns:aop="http://www.springframework.org/schema/aop"
       xmlns:tx="http://www.springframework.org/schema/tx"
       xsi:schemaLocation="
        http://www.springframework.org/schema/beans
        http://www.springframework.org/schema/beans/spring-beans.xsd
        http://www.springframework.org/schema/tx
        http://www.springframework.org/schema/tx/spring-tx.xsd
        http://www.springframework.org/schema/aop
        http://www.springframework.org/schema/aop/spring-aop.xsd">

    <!--配置业务层-->
    <bean id="accountService" class="com.itheima.service.impl.AccountServiceImpl">
        <property name="accountDao" ref="accountDao"></property>
    </bean>

    <!-- 配置账户的持久层-->
    <bean id="accountDao" class="com.itheima.dao.impl.AccountDaoImpl">
        <property name="dataSource" ref="dataSource"></property>
    </bean>

    <!-- 配置数据源-->
    <bean id="dataSource" class="org.springframework.jdbc.datasource.DriverManagerDataSource">
        <property name="driverClassName" value="com.mysql.jdbc.Driver"></property>
        <property name="url" value="jdbc:mysql://localhost:3306/springdb"></property>
        <property name="username" value="root"></property>
        <property name="password" value="000000"></property>
    </bean>

</beans>
Spring 中基于 xml 的声明式事务控制配置步骤
1.配置事务管理器
<!--配置事务管理器-->
<bean id="transactionManager" class="org.springframework.jdbc.datasource.DataSourceTransactionManager"></bean>
2.配置事务的通知 (需要导入事务的约束 tx 和 aop 的名称空间和约束)
使用 tx:advice 标签配置事务通知
属性:
id:给事务通知起一个唯一标识
transaction-manager:给事务通知提供一个事务管理器引用
<!--配置事务的通知-->
<tx:advice id="txAdvice" transaction-manager="transactionManager"></tx:advice>
3.配置AOP的通用切入点表达式
<!--配置AOP的通用切入点表达式-->
<aop:config>
	<aop:pointcut id="pt1" expression="execution(* com.itheima.service.*.*(..))"></aop:pointcut>
</aop:config>
4.建立事务通知 与 切入点表达式的对应关系
<!--配置AOP的通用切入点表达式-->
<aop:config>
	<aop:pointcut id="pt1" expression="execution(* com.itheima.service.*.*(..))"></aop:pointcut>
	<aop:advisor advice-ref="txAdvice" pointcut-ref="pt1"></aop:advisor>
</aop:config>
5.配置事务的属性
在事务的通知 tx:advice 标签的内部
<!--配置事务的通知-->
<tx:advice id="txAdvice" transaction-manager="transactionManager">
    <tx:attributes>
        <tx:method name="*" propagation="REQUIRED" read-only="false"></tx:method>
        <tx:method name="find*" propagation="REQUIRED" read-only="false"></tx:method> <!--优先级高于通配符 * -->
    </tx:attributes>
</tx:advice>
最终 bean.xml:
<?xml version="1.0" encoding="UTF-8"?>
<beans xmlns="http://www.springframework.org/schema/beans"
       xmlns:xsi="http://www.w3.org/2001/XMLSchema-instance"
       xmlns:aop="http://www.springframework.org/schema/aop"
       xmlns:tx="http://www.springframework.org/schema/tx"
       xsi:schemaLocation="
        http://www.springframework.org/schema/beans
        http://www.springframework.org/schema/beans/spring-beans.xsd
        http://www.springframework.org/schema/tx
        http://www.springframework.org/schema/tx/spring-tx.xsd
        http://www.springframework.org/schema/aop
        http://www.springframework.org/schema/aop/spring-aop.xsd">
    <!--配置业务层-->
    <bean id="accountService" class="com.itheima.service.impl.AccountServiceImpl">
        <property name="accountDao" ref="accountDao"></property>
    </bean>

    <!--配置账户的持久层-->
    <bean id="accountDao" class="com.itheima.dao.impl.AccountDaoImpl">
        <property name="jdbcTemplate" ref="jdbcTemplate"></property>
    </bean>

    <!--配置jdbcTemplate-->
    <bean id="jdbcTemplate" class="org.springframework.jdbc.core.JdbcTemplate">
        <property name="dataSource" ref="dataSource"></property>
    </bean>

    <!-- 配置数据源-->
    <bean id="dataSource" class="org.springframework.jdbc.datasource.DriverManagerDataSource">
        <property name="driverClassName" value="com.mysql.jdbc.Driver"></property>
        <property name="url" value="jdbc:mysql://localhost:3306/springdb"></property>
        <property name="username" value="root"></property>
        <property name="password" value="000000"></property>
    </bean>

    <!--配置事务管理器-->
    <bean id="transactionManager" class="org.springframework.jdbc.datasource.DataSourceTransactionManager">
        <property name="dataSource" ref="dataSource"></property>
    </bean>

    <!--配置事务的通知-->
    <tx:advice id="txAdvice" transaction-manager="transactionManager">
        <tx:attributes>
            <tx:method name="*" propagation="REQUIRED" read-only="false"></tx:method>
            <tx:method name="find*" propagation="REQUIRED" read-only="false"></tx:method>
        </tx:attributes>
    </tx:advice>

    <!--配置AOP的通用切入点表达式-->
    <aop:config>
        <aop:pointcut id="pt1" expression="execution(* com.itheima.service.*.*(..))"></aop:pointcut>
        <aop:advisor advice-ref="txAdvice" pointcut-ref="pt1"></aop:advisor>
    </aop:config>

</beans>
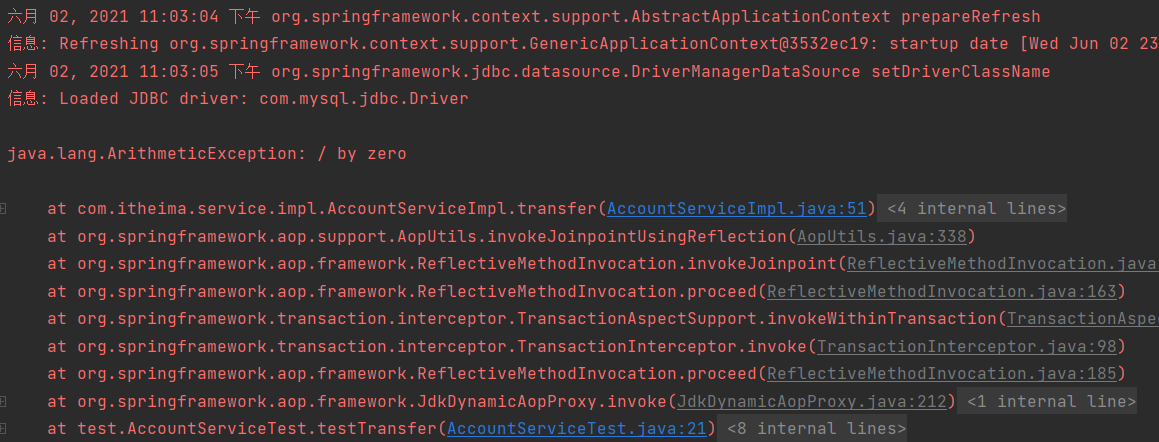
测试结果:
Spring 中基于 xml 的声明式事务控制配置步骤
1.配置事务管理器
2.开启 Spring 对注解事物的支持
3.在需要事务支持的地方使用 @Transactional 注解
bean.xml:
<?xml version="1.0" encoding="UTF-8"?>
<beans xmlns="http://www.springframework.org/schema/beans"
       xmlns:xsi="http://www.w3.org/2001/XMLSchema-instance"
       xmlns:aop="http://www.springframework.org/schema/aop"
       xmlns:tx="http://www.springframework.org/schema/tx"
       xmlns:context="http://www.springframework.org/schema/context"
       xsi:schemaLocation="
        http://www.springframework.org/schema/beans
        http://www.springframework.org/schema/beans/spring-beans.xsd
        http://www.springframework.org/schema/tx
        http://www.springframework.org/schema/tx/spring-tx.xsd
        http://www.springframework.org/schema/aop
        http://www.springframework.org/schema/aop/spring-aop.xsd
        http://www.springframework.org/schema/context
        http://www.springframework.org/schema/context/spring-context.xsd">

    <!--配置容器时要扫描的包-->
    <context:component-scan base-package="com.itheima"></context:component-scan>

    <!--配置JdbcTemplate-->
    <bean id="jdbcTemplate" class="org.springframework.jdbc.core.JdbcTemplate">
        <property name="dataSource" ref="dataSource"></property>
    </bean>

    <!-- 配置数据源-->
    <bean id="dataSource" class="org.springframework.jdbc.datasource.DriverManagerDataSource">
        <property name="driverClassName" value="com.mysql.jdbc.Driver"></property>
        <property name="url" value="jdbc:mysql://localhost:3306/springdb"></property>
        <property name="username" value="root"></property>
        <property name="password" value="000000"></property>
    </bean>

    <!--配置事务管理器-->
    <bean id="transactionManager" class="org.springframework.jdbc.datasource.DataSourceTransactionManager">
        <property name="dataSource" ref="dataSource"></property>
    </bean>

    <!--开启spring对注解事物的支持-->
    <tx:annotation-driven transaction-manager="transactionManager"></tx:annotation-driven>

</beans>
账户业务层实现类:
/**
 * 转账的业务层实现类
 */
@Service("accountService")
@Transactional
public class AccountServiceImpl implements IAccountService {
	......
}
账户持久层实现类:
/**
 * 账户的持久层实现类
 */
@Repository("accountDao")
public class AccountDaoImpl implements IAccountDao {

    @Autowired
    private JdbcTemplate jdbcTemplate;

	......
}
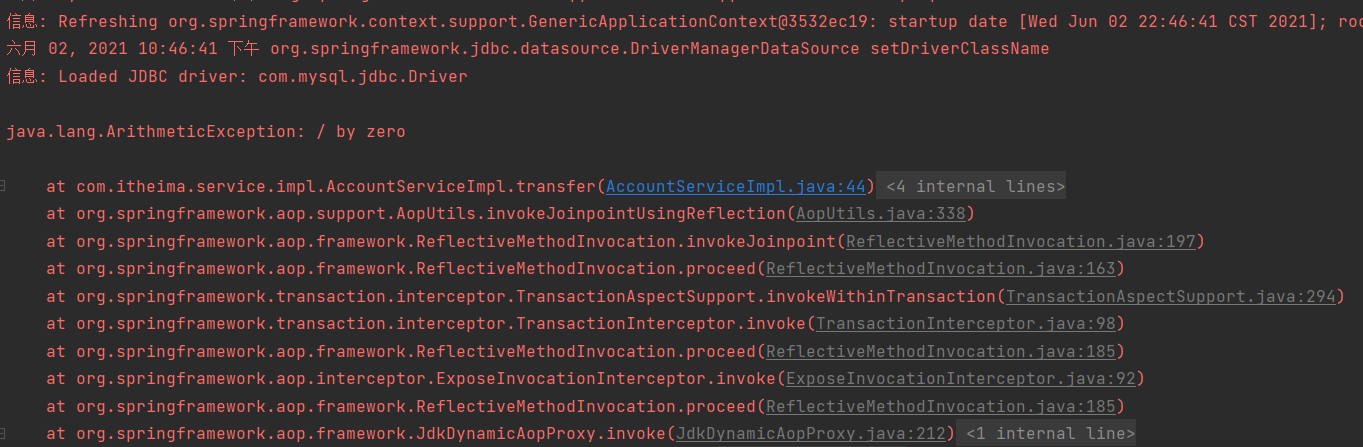
测试结果如下: