【OpenCV】⚠️高手勿入! 半小时学会基本操作⚠️图像处理
OpenCV 是一个跨平台的计算机视觉库, 支持多语言, 功能强大. 今天小白就带大家一起携手走进 OpenCV 的世界.

图像处理是非常基础和关键的, 今天就带大家来一起了解一下图像处理.

cv.cvtColor可以帮助我们转换图片通道.
格式:
cv2.cvtColor(src, code[, dst[, dstCn]])
参数:
RGB 到灰度图转换公式:
Y' = 0.299 R + 0.587 G + 0.114 B
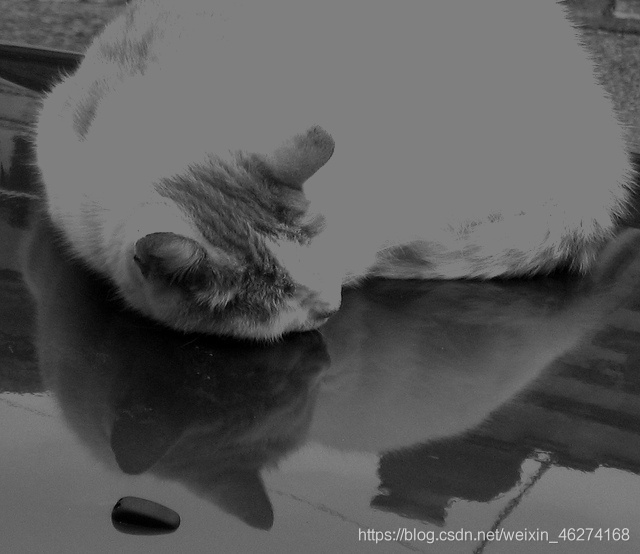
例子:
# 读取数据
img = cv2.imread("cat.jpg")

# 转换成灰度图
img_gray = cv2.cvtColor(img, cv2.COLOR_BGR2GRAY)

# 输出维度
print(img_gray.shape)  # (554, 640)

# 展示图像
cv2.imshow("img_gray", img_gray)
cv2.waitKey(0)
cv2.destroyAllWindows()
输出结果:

HSV (Hue, Saturation, Value) 是根据颜色的直观特性由 A.R. Smith 在 1978 年创建的一种颜色空间.
例子:
# 转换成hsv
img_hsv = cv2.cvtColor(img, cv2.COLOR_BGR2HSV)

# 输出维度
print(img_hsv.shape)  # (554, 640, 3)

# 展示图像
cv2.imshow("img_hsv", img_hsv)
cv2.waitKey(0)
cv2.destroyAllWindows()
输出结果:
YUV 是一种颜色编码的方法, 主要用在视频, 图形处理流水线中.
例子:
# 读取数据
img = cv2.imread("cat.jpg")

# 转换成hsv
img_yuv = cv2.cvtColor(img, cv2.COLOR_BGR2YUV)

# 输出维度
print(img_yuv.shape)  # (554, 640, 3)

# 展示图像
cv2.imshow("img_yuv", img_yuv)
cv2.waitKey(0)
cv2.destroyAllWindows()
输出结果:
格式:
ret, dst = cv2.threshold(src, thresh, maxval, type)
参数:
返回值:

大于阈值的设为 255, 低于或等于阈值的为 0.
例子:
# 读取数据
img_gray = cv2.imread("cat_gray.jpg")

# 二值化
ret, thresh1 = cv2.threshold(img_gray, 127, 255, cv2.THRESH_BINARY)

# 图片展示
cv2.imshow("thresh1", thresh1)
cv2.waitKey(0)
cv2.destroyAllWindows()
输出结果:

与 Binary 相反.
例子:
# 读取数据
img_gray = cv2.imread("cat_gray.jpg")

# 二值化
ret, thresh2 = cv2.threshold(img_gray, 127, 255, cv2.THRESH_BINARY_INV)

# 图片展示
cv2.imshow("thresh2", thresh2)
cv2.waitKey(0)
cv2.destroyAllWindows()
输出结果:

大于阈值的设为 255, 低于或等于阈值的不变.
例子:
# 读取数据
img_gray = cv2.imread("cat_gray.jpg")

# 截断
ret, thresh3 = cv2.threshold(img_gray, 127, 255, cv2.THRESH_TRUNC)

# 图片展示
cv2.imshow("thresh3", thresh3)
cv2.waitKey(0)
cv2.destroyAllWindows()
输出结果:
大于阈值部分不变, 否则设为 0.
代码:
# 读取数据
img_gray = cv2.imread("cat_gray.jpg")

# Tozero
ret, thresh4 = cv2.threshold(img_gray, 127, 255, cv2.THRESH_TOZERO)

# 图片展示
cv2.imshow("thresh4", thresh4)
cv2.waitKey(0)
cv2.destroyAllWindows()
输出结果:
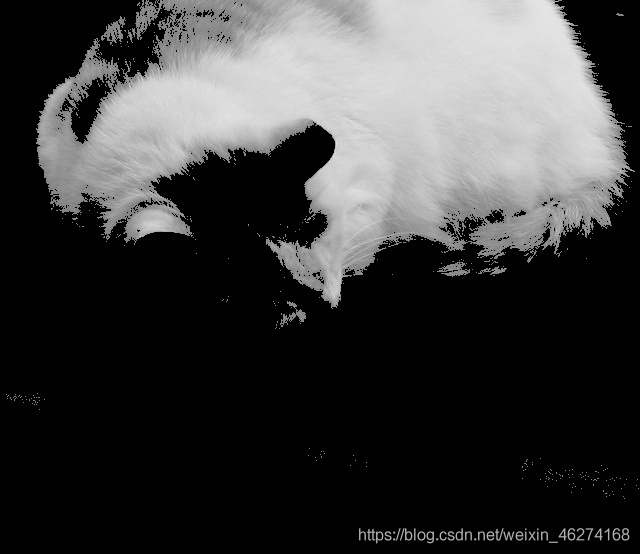
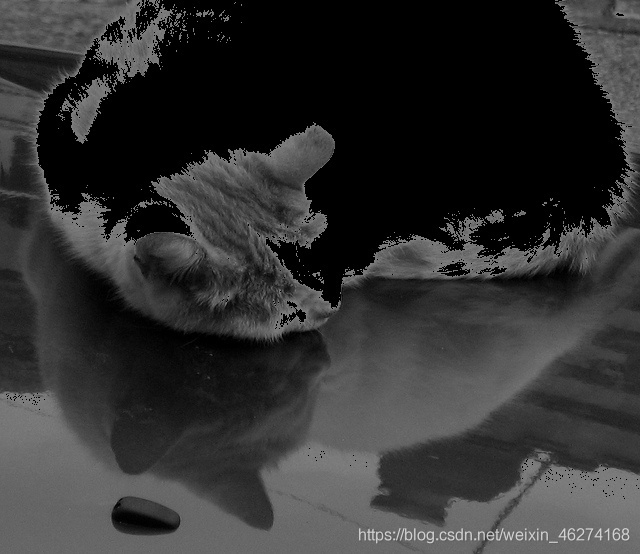
与 Tozero 相反.
代码:
# 读取数据
img_gray = cv2.imread("cat_gray.jpg")

# Tozero
ret, thresh5 = cv2.threshold(img_gray, 127, 255, cv2.THRESH_TOZERO_INV)

# 图片展示
cv2.imshow("thresh5", thresh5)
cv2.waitKey(0)
cv2.destroyAllWindows()
输出结果: