Gauss光束强度的表达式为

如图所示
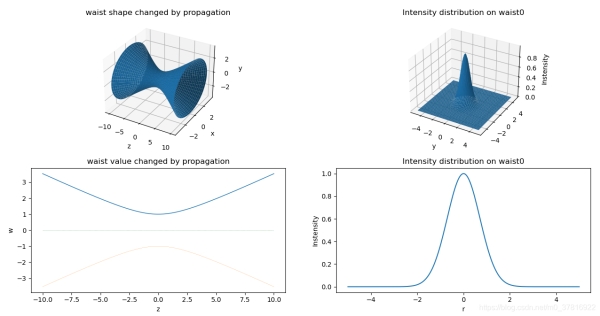
左上图和左下图表示激光传输过程中的其束腰半径的变化情况;右图则表示高斯光束某一横截面处激光的能量分布。
绘制代码如下
import matplotlib.pyplot as plt
import numpy as np
def setLabel(ax,*args):
    ax.set_xlabel(args[0])
    ax.set_ylabel(args[1])
    if len(args)==3:
        ax.set_zlabel(args[2])
def drawGauss(w0=1,dWave=1.064):
    # 轴向坐标
    z = np.linspace(-10,10,1000).reshape(1000,1)
    # z处光斑半径
    w = np.sqrt(w0**2+z**2*dWave**2/np.pi**2/w0**2)
    theta = np.linspace(0,np.pi*2,150).reshape(1,150)
    x = w*np.cos(theta)
    y = w*np.sin(theta)
    fig =  plt.figure()
    # 三维的高斯光束等功率密度面变化图
    ax1 = fig.add_subplot(221,projection='3d')
    ax1.plot_surface(z,x,y)#,cmap=plt.get_cmap('rainbow'))
    ax1.set_title("waist shape changed by propagation")
    setLabel(ax1,"z","x","y")
    # 二维的高斯光束半径变化图
    ax3 = fig.add_subplot(223)
    ax3.plot(z,w,linewidth=1)
    ax3.plot(z,-w,linewidth=0.2)
    ax3.plot([z[0],z[-1]],[0,0],linewidth=0.5,linestyle=":")
    ax3.set_title("waist value changed by propagation")
    setLabel(ax3,"z","w")
    # Gauss光束在束腰处的切片
    X,Y = np.meshgrid(np.linspace(-5,5,100),np.linspace(-5,5,100))
    Psi = np.exp(-(X**2+Y**2)/w0**2)/w0
    ax2 = fig.add_subplot(222,projection='3d')
    ax2.plot_surface(X,Y,Psi)
    ax2.set_title("Intensity distribution on waist0")
    setLabel(ax2,"x","y","Instensity")
    # Gauss光束在束腰处的径向切片
    r = np.linspace(-5,5,200)
    Psi = np.exp(-r**2/w0**2)/w0
    ax4 = fig.add_subplot(224)
    ax4.plot(r,Psi)
    ax4.set_title("Intensity distribution on waist0")
    setLabel(ax4,"r","Instensity")
    plt.show()
如果沿着z轴方向,在不同的位置处对Gauss光束进行切片处理,则不同位置处径向功率分布如图所示

实现代码如下
import matplotlib.animation as animation
def GaussGif1d(w0=1,dWave=1.064):
    zAxis = np.arange(100)
    # 轴向坐标
    z = np.linspace(0,10,100)
    # z处的束腰半径
    w = np.sqrt(w0**2+z**2*dWave**2/np.pi**2/w0**2)
    x = np.linspace(-10,10,500)
    fig = plt.figure()
    ax = fig.gca(xlim=(-5,5),ylim=(0,1))
    ax.grid()
    line, = ax.plot([],[])
    time_text = ax.text(0.1,0.9,'',transform=ax.transAxes)
    # 初始化图像
    def init():
        line.set_data([],[])
        time_text.set_text("")
        return line, time_text
    # 图像迭代
    def animate(i):
        wi = w[i]
        Psi = np.exp(-x**2/wi**2)/wi
        line.set_data(x,Psi)
        time_text.set_text("z="+str(z[i]))
        return line, time_text
    ani = animation.FuncAnimation(fig, animate, zAxis,
        interval=200, init_func=init)
    ani.save('gauss.gif',writer='imagemagick')
    plt.show()

