(最好加上前缀prefix=“person”,标明是和配置文件中哪个开头的属性匹配)
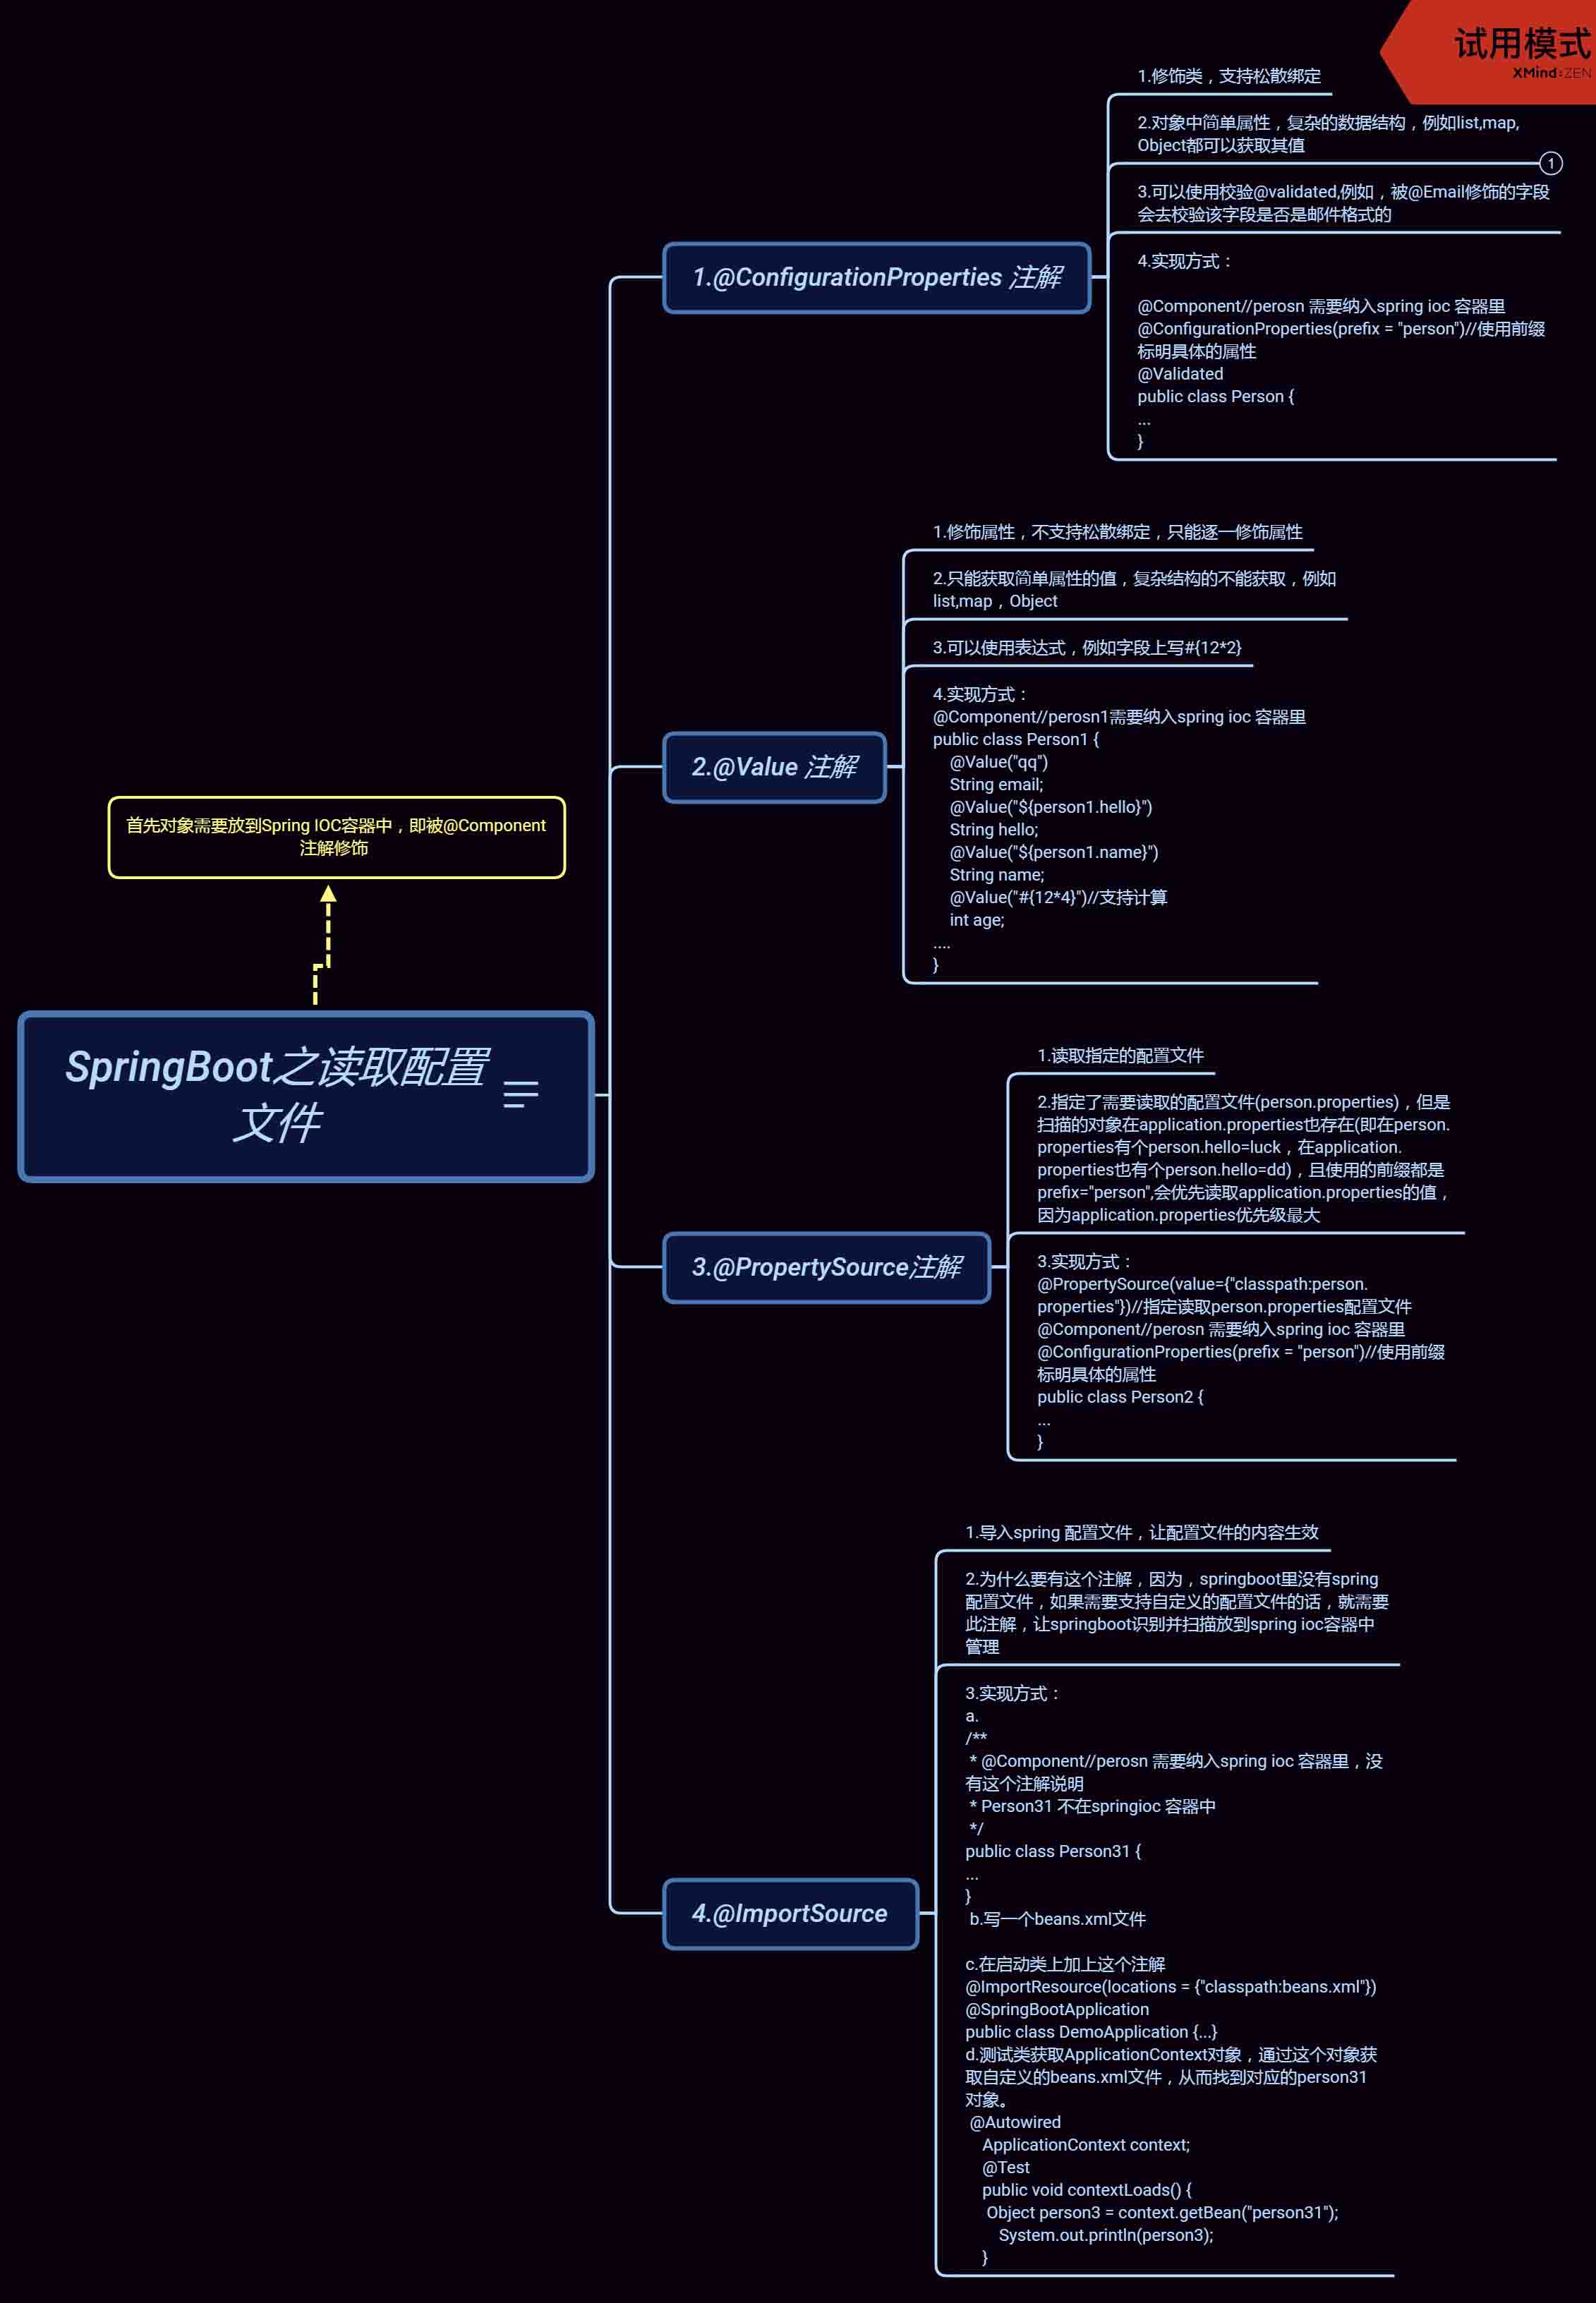
推荐使用用在类上,从配置文件读取属性值,放到对象里面,复杂的结构也适用例如map,list,对象。支持校验:@Validated
用在属性上,需要每个属性逐个绑定通过@value注解获取配置文件的值,不适合做复杂类型(map,list ,对象)值得获取不支持@Validated

使用@ConfigurationProperties注解
package com.wx.springboot20190911.demo.model;
import org.springframework.beans.factory.annotation.Value;
import org.springframework.boot.context.properties.ConfigurationProperties;
import org.springframework.stereotype.Component;
import org.springframework.validation.annotation.Validated;
import javax.validation.constraints.Email;
import java.util.Date;
import java.util.List;
import java.util.Map;
/**
* 1.ConfigurationProperties注解 从配置文件读取属性值,放到对象里面
* 2.通过@value注解获取配置文件的值
*/
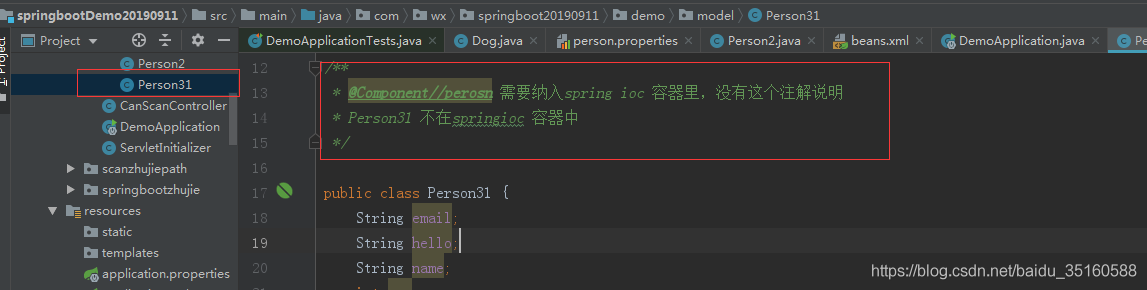
@Component//perosn 需要纳入spring ioc 容器里
@ConfigurationProperties(prefix = "person")//使用前缀标明具体的属性
@Validated
public class Person {
@Email
String email;
String hello;
String name;
int age;
boolean boss;
Date birth;
Map<String,String> maps;
List<String> list;
Dog dog;
@Override
public String toString() {
return "Person{" +
"email='" + email + '\'' +
", hello='" + hello + '\'' +
", name='" + name + '\'' +
", age=" + age +
", boss=" + boss +
", birth=" + birth +
", maps=" + maps +
", list=" + list +
", dog=" + dog +
'}';
}
public String getEmail() {
return email;
}
public void setEmail(String email) {
this.email = email;
}
public String getHello() {
return hello;
}
public void setHello(String hello) {
this.hello = hello;
}
public Dog getDog() {
return dog;
}
public void setDog(Dog dog) {
this.dog = dog;
}
public String getName() {
return name;
}
public void setName(String name) {
this.name = name;
}
public int getAge() {
return age;
}
public void setAge(int age) {
this.age = age;
}
public boolean isBoss() {
return boss;
}
public void setBoss(boolean boss) {
this.boss = boss;
}
public Date getBirth() {
return birth;
}
public void setBirth(Date birth) {
this.birth = birth;
}
public Map<String, String> getMaps() {
return maps;
}
public void setMaps(Map<String, String> maps) {
this.maps = maps;
}
public List<String> getList() {
return list;
}
public void setList(List<String> list) {
this.list = list;
}
}
package com.wx.springboot20190911.demo.model;
public class Dog {
String name;
String color;
int age;
public String getName() {
return name;
}
public void setName(String name) {
this.name = name;
}
public String getColor() {
return color;
}
public void setColor(String color) {
this.color = color;
}
public int getAge() {
return age;
}
public void setAge(int age) {
this.age = age;
}
@Override
public String toString() {
return "Dog{" +
"name='" + name + '\'' +
", color='" + color + '\'' +
", age=" + age +
'}';
}
}
使用@Value注解
package com.wx.springboot20190911.demo.model;
import org.springframework.beans.factory.annotation.Value;
import org.springframework.boot.context.properties.ConfigurationProperties;
import org.springframework.stereotype.Component;
import org.springframework.validation.annotation.Validated;
import javax.validation.Valid;
import javax.validation.constraints.Email;
import java.util.Date;
import java.util.List;
import java.util.Map;
/**
 * 1.ConfigurationProperties注解 从配置文件读取属性值,放到对象里面,推荐使用,复杂的结构也适用例如map,list对象,
 * 支持 校验@Validated
 * 2.通过@value注解获取配置文件的值,不适合做复杂类型值得获取,不支持@Validated,支持
 */
@Component//perosn 需要纳入spring ioc 容器里
//@ConfigurationProperties(prefix = "person")
@Validated
public class Person1 {
    @Email
    @Value("${person1.email}")
    String email;
    @Value("${person1.hello}")
    String hello;
    @Value("${person1.name}")
    String name;
    @Value("#{12*3}")//支持计算
    int age;
    @Value("${person1.boss}")
    boolean boss;
    @Value("${person1.birth}")
    Date birth;
    Map<String,String> maps;
    List<String> list;
    Dog dog;
    public String getHello() {
        return hello;
    }
    public void setHello(String hello) {
        this.hello = hello;
    }
    public Dog getDog() {
        return dog;
    }
    public void setDog(Dog dog) {
        this.dog = dog;
    }
    public String getName() {
        return name;
    }
    public void setName(String name) {
        this.name = name;
    }
    public int getAge() {
        return age;
    }
    public void setAge(int age) {
        this.age = age;
    }
    public boolean isBoss() {
        return boss;
    }
    public void setBoss(boolean boss) {
        this.boss = boss;
    }
    public Date getBirth() {
        return birth;
    }
    public void setBirth(Date birth) {
        this.birth = birth;
    }
    public Map<String, String> getMaps() {
        return maps;
    }
    public void setMaps(Map<String, String> maps) {
        this.maps = maps;
    }
    public List<String> getList() {
        return list;
    }
    public void setList(List<String> list) {
        this.list = list;
    }
    public String getEmail() {
        return email;
    }
    public void setEmail(String email) {
        this.email = email;
    }
    @Override
    public String toString() {
        return "Person1{" +
                "email='" + email + '\'' +
                ", hello='" + hello + '\'' +
                ", name='" + name + '\'' +
                ", age=" + age +
                ", boss=" + boss +
                ", birth=" + birth +
                ", maps=" + maps +
                ", list=" + list +
                ", dog=" + dog +
                '}';
    }
}
配置类(application.properties)代码
person.hello=luck
person.name=吴
#乱码的话 就setting设置下file encoding
person.list=ww,xx,rr
person.maps.k1=v1
person.maps.k2=v2
person.dog.name=cat
person.dog.color=red
person.dog.age=1
person.age=12
person.birth=2019/01/11
person.boss=false
person.email=www@qq.com
person1.hello=luck
person1.name=吴
#乱码的话 就setting设置下file encoding
person1.list=ww,xx,rr
person1.age=12
person1.birth=2019/01/11
person1.boss=false
person1.email=www
配置类(application.yml)代码:这种方式更加结构化
person:
  name: 霞
  age: 16
  boss : false
  birth: 2012/09/12
  maps: {k1: v1,k2: v2}
  list: [dog,cat ,house,rabbits]
  dog:
    name: ${person.hello}
    age: ${random.int(10)}
    color: white
  hello: yula
打印结果:使用第一种方式时,如果email不是"www@qq.com"这种格式,是不能运行成功的,但是使用@Value 不会校验,如下面是"www",一样能运行成功
Person{email='www@qq.com', hello='luck', name='吴', age=12, boss=false, birth=Fri Jan 11 00:00:00 CST 2019, maps={k1=v1, k2=v2}, list=[ww, xx, rr], dog=Dog{name='cat', color='red', age=1}}
Person1{email='www', hello='luck', name='吴', age=36, boss=false, birth=Fri Jan 11 00:00:00 CST 2019, maps=null, list=null, dog=null}
package com.wx.springboot20190911.demo.model;
import org.springframework.boot.context.properties.ConfigurationProperties;
import org.springframework.context.annotation.PropertySource;
import org.springframework.stereotype.Component;
import org.springframework.validation.annotation.Validated;
import javax.validation.constraints.Email;
import java.util.Date;
import java.util.List;
import java.util.Map;
/**
* 1.ConfigurationProperties注解 从配置文件读取属性值,放到对象里面
* 2.通过@value注解获取配置文件的值
*/
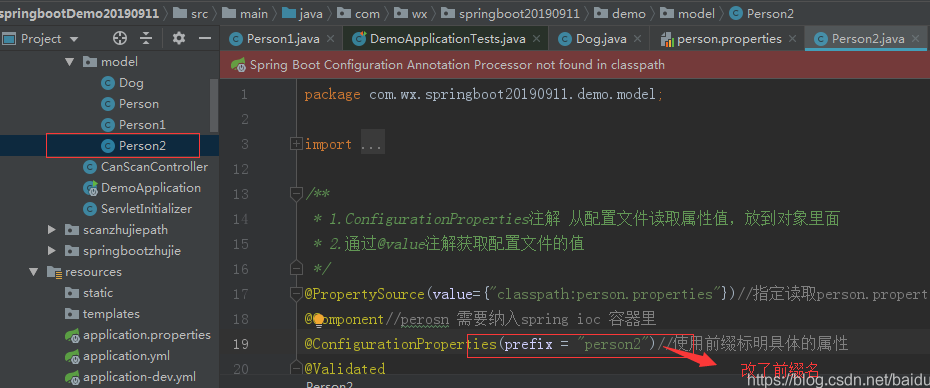
@PropertySource(value={"classpath:person.properties"})//指定读取person.properties配置文件
@Component//perosn 需要纳入spring ioc 容器里
@ConfigurationProperties(prefix = "person")//使用前缀标明具体的属性
@Validated
public class Person2 {
@Email
String email;
String hello;
String name;
int age;
boolean boss;
Date birth;
Map<String,String> maps;
List<String> list;
Dog dog;
@Override
public String toString() {
return "Person{" +
"email='" + email + '\'' +
", hello='" + hello + '\'' +
", name='" + name + '\'' +
", age=" + age +
", boss=" + boss +
", birth=" + birth +
", maps=" + maps +
", list=" + list +
", dog=" + dog +
'}';
}
public String getEmail() {
return email;
}
public void setEmail(String email) {
this.email = email;
}
public String getHello() {
return hello;
}
public void setHello(String hello) {
this.hello = hello;
}
public Dog getDog() {
return dog;
}
public void setDog(Dog dog) {
this.dog = dog;
}
public String getName() {
return name;
}
public void setName(String name) {
this.name = name;
}
public int getAge() {
return age;
}
public void setAge(int age) {
this.age = age;
}
public boolean isBoss() {
return boss;
}
public void setBoss(boolean boss) {
this.boss = boss;
}
public Date getBirth() {
return birth;
}
public void setBirth(Date birth) {
this.birth = birth;
}
public Map<String, String> getMaps() {
return maps;
}
public void setMaps(Map<String, String> maps) {
this.maps = maps;
}
public List<String> getList() {
return list;
}
public void setList(List<String> list) {
this.list = list;
}
}
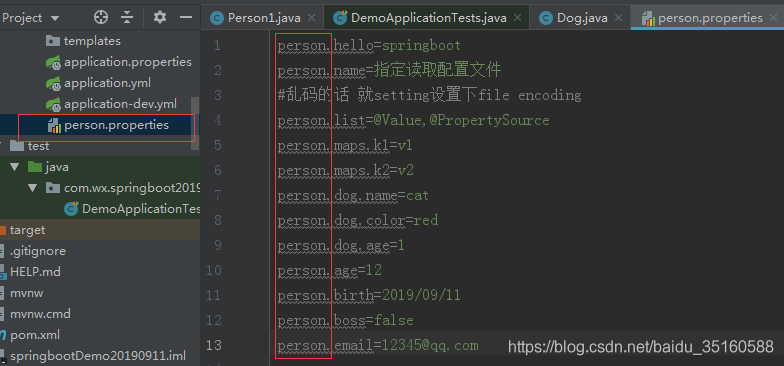
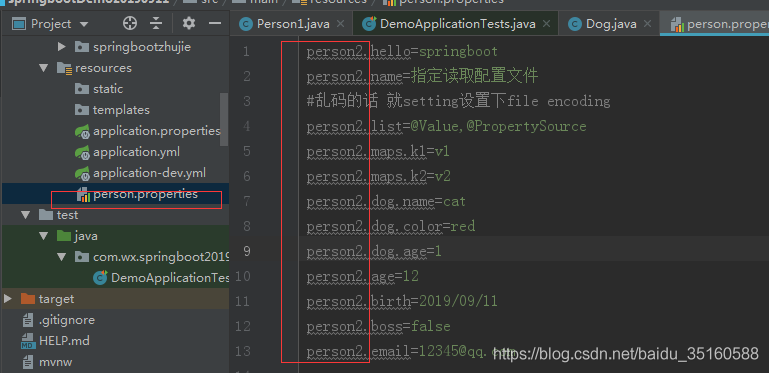
这里虽然指定了读取person.properties配置文件,但是由于prefix=“person”,导致还是读取了application.properties配置文件,因为application.properties权限最高,要想读取person.properties配置文件,就得改前缀名,例如改成prefix=“person2” person.properties配置文件的内容如下:
没改前缀名的结果演示:
Person{email='www@qq.com', hello='luck', name='吴', age=12, boss=false, birth=Fri Jan 11 00:00:00 CST 2019, maps={k1=v1, k2=v2}, list=[ww, xx, rr], dog=Dog{name='cat', color='red', age=1}}
Person1{email='www', hello='luck', name='吴', age=36, boss=false, birth=Fri Jan 11 00:00:00 CST 2019, maps=null, list=null, dog=null}
Person{email='www@qq.com', hello='luck', name='吴', age=12, boss=false, birth=Fri Jan 11 00:00:00 CST 2019, maps={k1=v1, k2=v2}, list=[ww, xx, rr], dog=Dog{name='cat', color='red', age=1}}
改前缀名的代码演示:
改了前缀名的结果演示:这时候读取的就是指定的配置文件的值
Person{email='www@qq.com', hello='luck', name='吴', age=12, boss=false, birth=Fri Jan 11 00:00:00 CST 2019, maps={k1=v1, k2=v2}, list=[ww, xx, rr], dog=Dog{name='cat', color='red', age=1}}
Person1{email='www', hello='luck', name='吴', age=36, boss=false, birth=Fri Jan 11 00:00:00 CST 2019, maps=null, list=null, dog=null}
Person{email='12345@qq.com', hello='springboot', name='指定读取配置文件', age=12, boss=false, birth=Wed Sep 11 00:00:00 CST 2019, maps={k2=v2, k1=v1}, list=[@Value, @PropertySource], dog=Dog{name='cat', color='red', age=1}}
注:只能读取 .properties 文件,无法读取 .yml 文件
让配置文件里面的内容生效
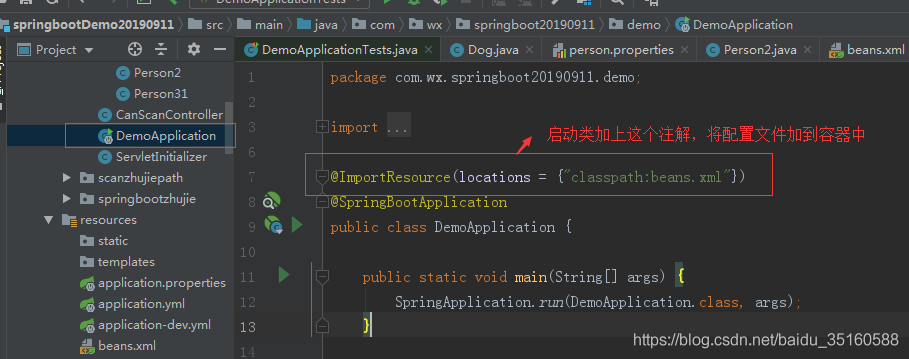
Springboot 里没有Spring 的配置文件,我们自己编写的配置文件,也不能自动识别;
想让Spring的配置文件生效,加载进来,需使用该注解
写一个Person3 类,如图所示:
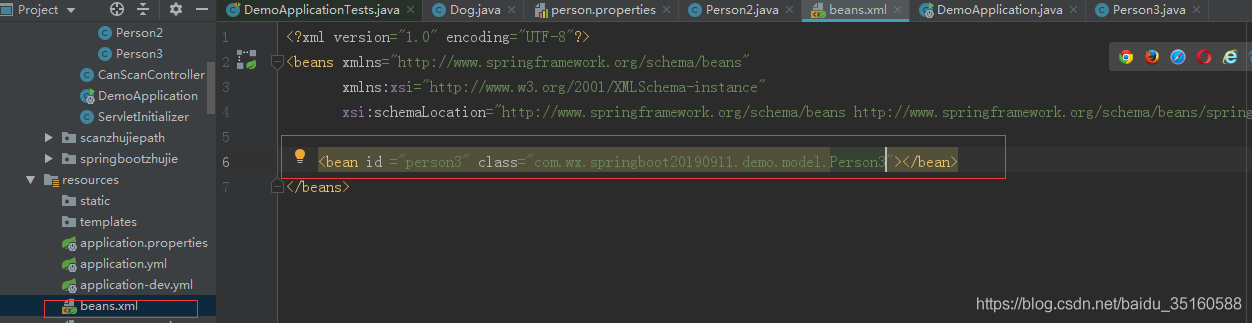
自定义一个Spring配置文件,如图所示:
在启动类上注解
测试:自定义的这个配置文件是否生效
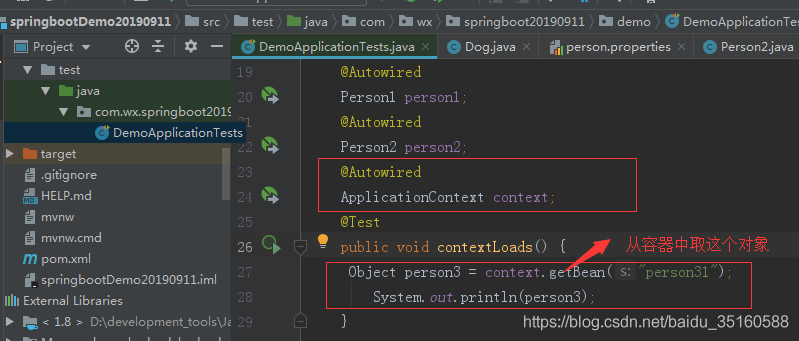
演示结果:生效了
2019-09-11 22:15:12.247 INFO 7824 --- [ main] c.w.s.demo.DemoApplicationTests : Started DemoApplicationTests in 8.558 seconds (JVM running for 10.882)
Person{email='null', hello='null', name='null', age=0, boss=false, birth=null, maps=null, list=null, dog=null}
以上为个人经验,希望能给大家一个参考,也希望大家多多支持。

