这里说的,不是截取一张图片,粘贴到excel;而是通过像素写入到excel中,下面来看看具体的实现过程吧
我们今天要分享的,是把图片写入到excel中,
我们来捋一下思路:
excel;Pillow 来读图片的取像素(RGB);openpyxl 向excel cell内填充十六进制色值;excel中;需要写入而Excel的源图片:

安装:
本次需要用到两个模块: Pillow 和 openpyxl 。
老规矩, pip 方式安装:
pip install Pillow
pip install openpyxl
由于 图片读取的像素是RGB值,而excel是十六进制写入,
所以需要定义一个RGB与十六进制转换的函数
'''
定义RGB 和十六进制色值转换函数
'''

def rgb_to_hex(rgb):
    rgb = rgb.split(',')
    color = ''
    #循环遍历
    for i in rgb:
        num = int(i)
        color  += str(hex(num))[-2:].replace('x','0').upper()
return color此操作是逐行读取图片的 RGB 色值,再将 RGB 色值转换为十六进制色值填充到 Excel 的 cell 中。
逐行读取图片中的RGB色值,再将RGB色值转换十六进制,填充到excel中:
def img_to_excel(img_path,excel_path):
    #读取源图片
    img_src = Image.open(img_path)
    #设置图片宽高
    img_width = img_src.size[0]
    img_hight = img_src.size[1]

    #图片加载
    str_strlist = img_src.load()
    #获取当前的excel文件
    wb = openpyxl.Workbook()
    #保存文件
    wb.save(excel_path)
    #打开excel_path 下的excel文件,并写入信息
    wb = openpyxl.load_workbook(excel_path)
    cell_width,cell_height = 1.0,1.0

    #设置excel的写入页
    sheet = wb['Sheet']

    #循环图片的高与宽,并存入
    for w in range(img_width):
        for h in range(img_hight):
            data = str_strlist[w,h]
            color = str(data).replace("(","").replace(")","")
            color  = rgb_to_hex(color)

            #设置填充颜色为color
            fille = PatternFill("solid",fgColor = color)
            sheet.cell(h + 1,w + 1).fill = fille

    #循环遍历row,让其全部写入
    for i in range(1,sheet.max_row + 1):
        sheet.row_dimensions[i].height = cell_height
    #循环遍历column,让其全部写入
    for i in range(1,sheet.max_column + 1):
        sheet.column_dimensions[get_column_letter(i)].width = cell_width

    #保存文件
    wb.save(excel_path)
    #关闭
img_src.close()import openpyxl
from openpyxl.styles import PatternFill
from openpyxl.utils import get_column_letter
from PIL import Image,ImageFont,ImageDraw,ImageColor
'''
色值转换:
从图片读取的像素块色值是 RGB 值,
RGB 和十六进制色值转换。
'''
def rgb_to_hex(rgb):
rgb = rgb.split(',')
color = ''
#循环遍历
for i in rgb:
num = int(i)
color += str(hex(num))[-2:].replace('x','0').upper()
return color
'''
图片转换:
逐行读取图片中的RGB色值,再将RGB色值转换十六进制,填充到excel中
'''
def img_to_excel(img_path,excel_path):
#读取源图片
img_src = Image.open(img_path)
#设置图片宽高
img_width = img_src.size[0]
img_hight = img_src.size[1]
#图片加载
str_strlist = img_src.load()
#获取当前的excel文件
wb = openpyxl.Workbook()
#保存文件
wb.save(excel_path)
#打开excel_path 下的excel文件,并写入信息
wb = openpyxl.load_workbook(excel_path)
cell_width,cell_height = 1.0,1.0
#设置excel的写入页
sheet = wb['Sheet']
#循环图片的高与宽,并存入
for w in range(img_width):
for h in range(img_hight):
data = str_strlist[w,h]
color = str(data).replace("(","").replace(")","")
color = rgb_to_hex(color)
#设置填充颜色为color
fille = PatternFill("solid",fgColor = color)
sheet.cell(h + 1,w + 1).fill = fille
#循环遍历row,让其全部写入
for i in range(1,sheet.max_row + 1):
sheet.row_dimensions[i].height = cell_height
#循环遍历column,让其全部写入
for i in range(1,sheet.max_column + 1):
sheet.column_dimensions[get_column_letter(i)].width = cell_width
#保存文件
wb.save(excel_path)
#关闭
img_src.close()
if __name__ == '__main__':
#源图片地址
img_path = './queue.jgp'
#保存excel地址
excel_path = './queue.xlsx'
#执行
img_to_excel(img_path, excel_path)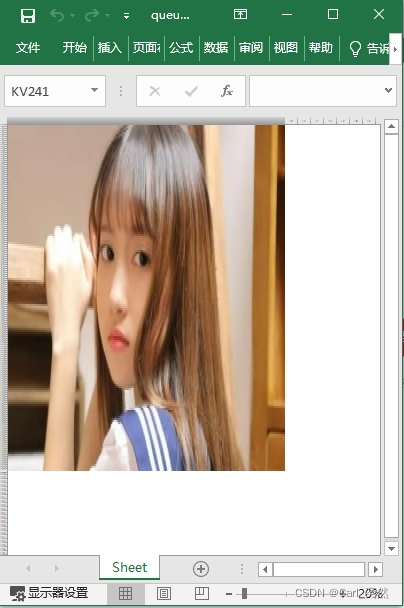
这里提醒一下:
如果你的源图片很大,运行完成后,打开Excel会提示文件损坏,
因为Excel的行数有限,导致无法全部写完数据。
Excel报错详情:

xml报错详情:
<?xml version="1.0" encoding="UTF-8" standalone="yes"?>
<recoveryLog xmlns="http://schemas.openxmlformats.org/spreadsheetml/2006/main"><logFileName>error254800_05.xml</logFileName><summary>在文件“D:\Project\img\king.xlsx”中检测到错误</summary><removedParts><removedPart>已删除的部件: 部件 /xl/styles.xml。 (样式)</removedPart></removedParts><repairedRecords><repairedRecord>已修复的记录: /xl/worksheets/sheet1.xml 部分的 单元格信息</repairedRecord></repairedRecords></recoveryLog>

