作者:itfitness 链接:https://www.jianshu.com/p/f084082cc0c6
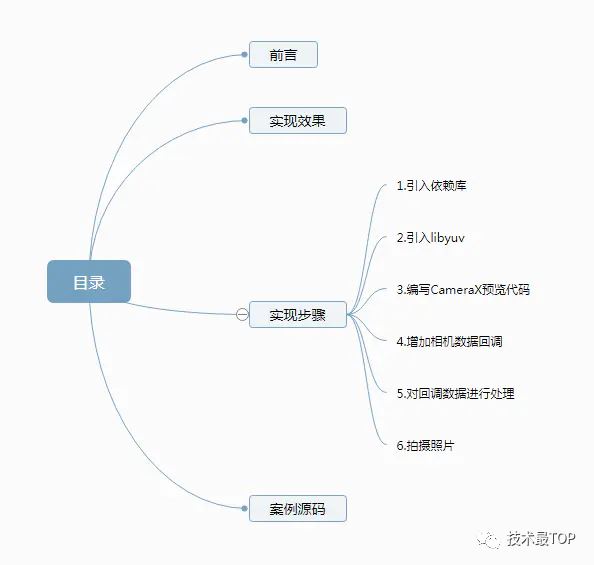
本文目录:

这里我引入的依赖库有CameraX、GPUImage(滤镜库)、Utilcodex(一款好用的工具类)
// CameraX core library using camera2 implementation
    implementation "androidx.camera:camera-camera2:1.0.1"
// CameraX Lifecycle Library
    implementation "androidx.camera:camera-lifecycle:1.0.1"
// CameraX View class
    implementation "androidx.camera:camera-view:1.0.0-alpha27"

    implementation'jp.co.cyberagent.android.gpuimage:gpuimage-library:1.4.1'
    implementation 'com.blankj:utilcodex:1.30.6'
这里我用的是这个案例(https://github.com/theeasiestway/android-yuv-utils)里面的libyuv,如下

布局代码如下
<?xml version="1.0" encoding="utf-8"?>
<FrameLayout xmlns:android="http://schemas.android.com/apk/res/android"
    xmlns:app="http://schemas.android.com/apk/res-auto"
    xmlns:tools="http://schemas.android.com/tools"
    android:layout_width="match_parent"
    android:layout_height="match_parent"
    tools:context=".MainActivity">
    <androidx.camera.view.PreviewView
        android:id="@+id/viewFinder"
        android:layout_width="0dp"
        android:layout_height="0dp" />
</FrameLayout>
Activity中开启相机预览代码如下,基本都是Google官方提供的案例代码
class MainActivity : AppCompatActivity() {
    private lateinit var cameraExecutor: ExecutorService
    override fun onCreate(savedInstanceState: Bundle?) {
        super.onCreate(savedInstanceState)
        setContentView(R.layout.activity_main)

        cameraExecutor = Executors.newSingleThreadExecutor()
        // Request camera permissions
        if (allPermissionsGranted()) {
            startCamera()
        } else {
            ActivityCompat.requestPermissions(
                this, REQUIRED_PERMISSIONS, REQUEST_CODE_PERMISSIONS)
        }
    }

    private fun allPermissionsGranted() = REQUIRED_PERMISSIONS.all {
        ContextCompat.checkSelfPermission(
            baseContext, it) == PackageManager.PERMISSION_GRANTED
    }

    override fun onRequestPermissionsResult(
        requestCode: Int, permissions: Array<String>, grantResults:
        IntArray) {
        super.onRequestPermissionsResult(requestCode, permissions, grantResults)
        if (requestCode == REQUEST_CODE_PERMISSIONS) {
            if (allPermissionsGranted()) {
                startCamera()
            } else {
                Toast.makeText(this,
                    "Permissions not granted by the user.",
                    Toast.LENGTH_SHORT).show()
                finish()
            }
        }
    }
    private fun startCamera() {
        val cameraProviderFuture = ProcessCameraProvider.getInstance(this)
        cameraProviderFuture.addListener(Runnable {
            val cameraProvider: ProcessCameraProvider = cameraProviderFuture.get()
            val preview = Preview.Builder()
                .build()
                .also {
                    it.setSurfaceProvider(viewFinder.surfaceProvider)
                }
            val cameraSelector = CameraSelector.DEFAULT_BACK_CAMERA
            try {
                cameraProvider.unbindAll()
                cameraProvider.bindToLifecycle(
                    this, cameraSelector, preview)
            } catch(exc: Exception) {
                Log.e(TAG, "Use case binding failed", exc)
            }
        }, ContextCompat.getMainExecutor(this))
    }

    override fun onDestroy() {
        super.onDestroy()
        cameraExecutor.shutdown()
    }

    companion object {
        private const val TAG = "CameraXBasic"
        private const val REQUEST_CODE_PERMISSIONS = 10
        private val REQUIRED_PERMISSIONS = arrayOf(Manifest.permission.CAMERA)

    }
}
到这里就可以实现相机预览了
我们要增加滤镜效果就必须对相机的数据进行操作,这里我们通过获取相机数据回调来获取可修改的数据
val imageAnalyzer = ImageAnalysis.Builder()
                //设置回调数据的比例为16:9
                .setTargetAspectRatio(AspectRatio.RATIO_16_9)
                .build()
                .also {
                    it.setAnalyzer(cameraExecutor,this@MainActivity)
                }
这里我们还需要进行绑定
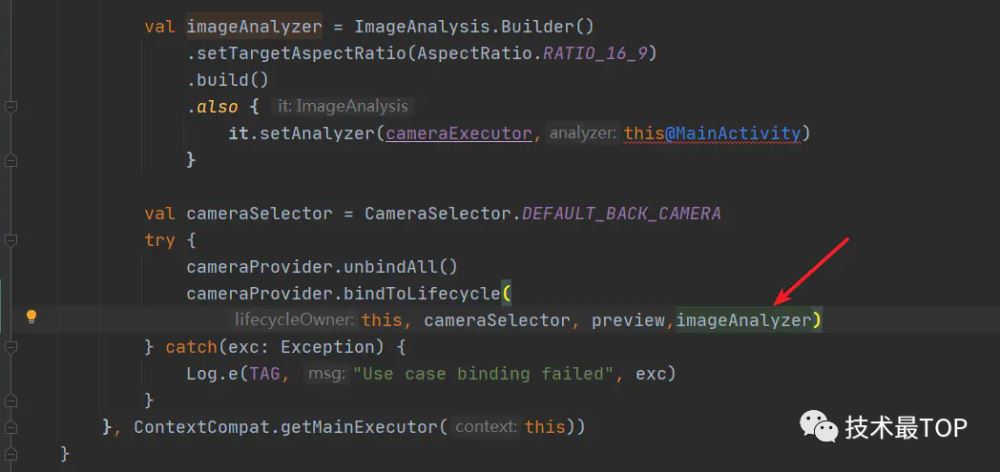
除此之外我们还需要在Activity中实现ImageAnalysis.Analyzer接口,数据的获取就在此接口的回调方法中获取,如下所示,其中ImageProxy就包含了图像数据
override fun analyze(image: ImageProxy) {

}
我们在相机数据回调的方法中对图像进行处理并添加滤镜,当然在此之前我们还需要创建GPUImage对象并设置滤镜类型
private var bitmap:Bitmap? = null
private var gpuImage:GPUImage? = null
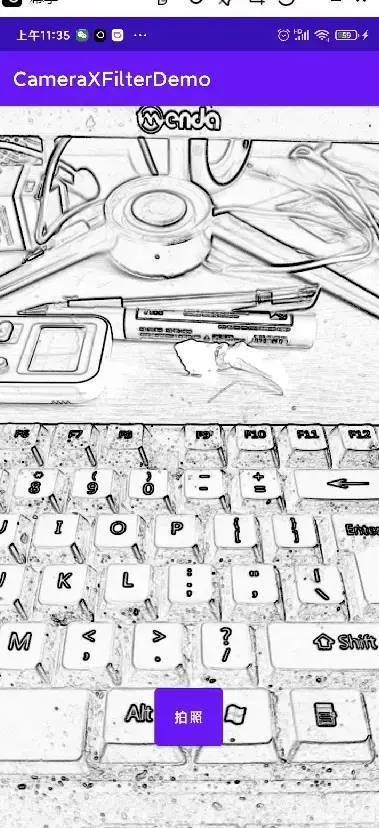
//创建GPUImage对象并设置滤镜类型,这里我使用的是素描滤镜
private fun initFilter() {
gpuImage = GPUImage(this)
gpuImage!!.setFilter(GPUImageSketchFilter())
}
@SuppressLint("UnsafeOptInUsageError")
override fun analyze(image: ImageProxy) {
//将Android的YUV数据转为libYuv的数据
var yuvFrame = yuvUtils.convertToI420(image.image!!)
//对图像进行旋转(由于回调的相机数据是横着的因此需要旋转90度)
yuvFrame = yuvUtils.rotate(yuvFrame, 90)
//根据图像大小创建Bitmap
bitmap = Bitmap.createBitmap(yuvFrame.width, yuvFrame.height, Bitmap.Config.ARGB_8888)
//将图像转为Argb格式的并填充到Bitmap上
yuvUtils.yuv420ToArgb(yuvFrame,bitmap!!)
//利用GpuImage给图像添加滤镜
bitmap = gpuImage!!.getBitmapWithFilterApplied(bitmap)
//由于这不是UI线程因此需要在UI线程更新UI
img.post {
img.setImageBitmap(bitmap)
//关闭ImageProxy,才会回调下一次的数据
image.close()
}
}
这里我们加一个拍照的按钮
<?xml version="1.0" encoding="utf-8"?>
<FrameLayout xmlns:android="http://schemas.android.com/apk/res/android"
    xmlns:app="http://schemas.android.com/apk/res-auto"
    xmlns:tools="http://schemas.android.com/tools"
    android:layout_width="match_parent"
    android:layout_height="match_parent"
    tools:context=".MainActivity">
    <androidx.camera.view.PreviewView
        android:id="@+id/viewFinder"
        android:layout_width="match_parent"
        android:layout_height="match_parent" />
    <ImageView
        android:id="@+id/img"
        android:scaleType="centerCrop"
        android:layout_width="match_parent"
        android:layout_height="match_parent"/>
    <Button
        android:id="@+id/bt_takepicture"
        android:layout_gravity="center_horizontal|bottom"
        android:layout_marginBottom="100dp"
        android:text="拍照"
        android:layout_width="70dp"
        android:layout_height="70dp"/>
</FrameLayout>
然后我们在Activity中添加拍照的逻辑,其实就是将Bitmap转为图片保存到SD卡,这里我们使用了之前引入的Utilcodex工具,当我们点击按钮的时候isTakePhoto会变为true,然后在相机的回调中就会进行保存图片的处理
bt_takepicture.setOnClickListener {
            isTakePhoto = true
        }
并且我们加入变量控制,在拍照的时候不处理回调数据
@SuppressLint("UnsafeOptInUsageError")
    override fun analyze(image: ImageProxy) {
        if(!isTakePhoto){
            //将Android的YUV数据转为libYuv的数据
            var yuvFrame = yuvUtils.convertToI420(image.image!!)
            //对图像进行旋转(由于回调的相机数据是横着的因此需要旋转90度)
            yuvFrame = yuvUtils.rotate(yuvFrame, 90)
            //根据图像大小创建Bitmap
            bitmap = Bitmap.createBitmap(yuvFrame.width, yuvFrame.height, Bitmap.Config.ARGB_8888)
            //将图像转为Argb格式的并填充到Bitmap上
            yuvUtils.yuv420ToArgb(yuvFrame,bitmap!!)
            //利用GpuImage给图像添加滤镜
            bitmap = gpuImage!!.getBitmapWithFilterApplied(bitmap)
            //由于这不是UI线程因此需要在UI线程更新UI
            img.post {
                img.setImageBitmap(bitmap)
                if(isTakePhoto){
                    takePhoto()
                }
                //关闭ImageProxy,才会回调下一次的数据
                image.close()
            }
        }else{
            image.close()
        }
    }
 /**
     * 拍照
     */
    private fun takePhoto() {
        Thread{
            val filePath = File(getExternalFilesDir(Environment.DIRECTORY_DOWNLOADS),"${System.currentTimeMillis()}save.jpg")
            ImageUtils.save(bitmap,filePath.absolutePath,Bitmap.CompressFormat.PNG)
            ToastUtils.showShort("拍摄成功")
            isTakePhoto = false
        }.start()
    }
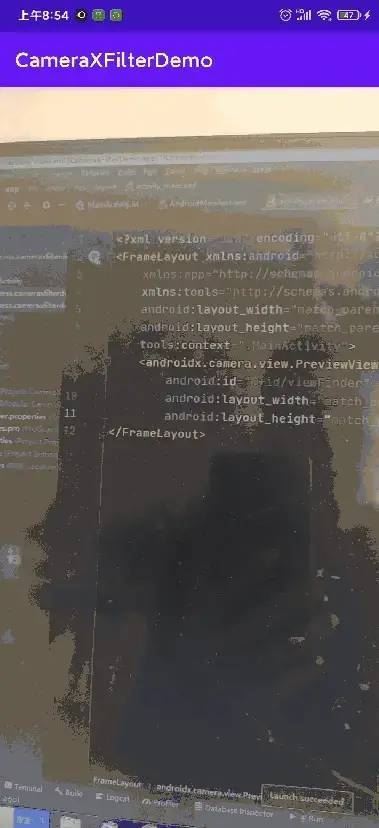
效果如下
保存的图片在如下目录

保存的图片如下