这里先看一下大体项目结构:
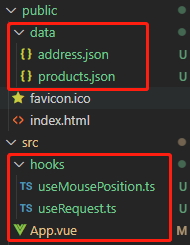
这里的hooks下的文件是示例代码,public内的是测试数据
在启动项目后,测试public的data文件内的数据,
App.vue
<template>
  <div>
    <h2>自己定义hook函数操作</h2>
    <h2>x:{{x}}, y:{{y}}</h2>
    <h3 v-if="loading">正在加载中11...</h3>
    <h3 v-else-if="errorMsg">{{errorMsg}}</h3>
    <ul v-else>
      <li>id:{{data.id}}</li>
      <li>address:{{data.address}}</li>
      <li>distance:{{data.distance}}</li>
    </ul>

    <!-- 数组数据 -->
    <ul v-for="item in data" :key="item.id">
      <li>id:{{item.id}}</li>
      <li>title:{{item.title}}</li>
      <li>price: {{item.price}}</li>
    </ul>
  </div>
</template>
<script>
import { defineComponent, watch } from 'vue'
import useMousePosition from './hooks/useMousePosition'
import useRequest from './hooks/useRequest'

export default defineComponent({
  name: 'App',
  // 需求1:用户在页面中点击页面,把点击位置的横纵坐标收集并展示起来

  setup(){
    const {x,y} = useMousePosition()
    // 发送请求
    // const {loading, data, errorMsg} = useRequest('data/address.json')   // 获取对象数据
    const {loading, data, errorMsg} = useRequest('data/products.json')  // 获取数组数据
    // 监听
    watch(data, () => {
      if(data.value){
        console.log(data.value.length);
      }
    })
    return {
      x,
      y,
      loading,
      data,
      errorMsg
    }
  }
})
</script>
src下hooks的 useMousePosition.ts
import { ref, onBeforeUnmount, onMounted } from 'vue'
export default function () {
  const x = ref(-1)
  const y = ref(-1)

  // 点击事件的回调函数
  const clickHandler = (event:MouseEvent) => {
    x.value = event.pageX
    y.value = event.pageY
  }
  // 页面已经加载完毕了,再进行点击操作
  // 页面加载完毕的生命
  onMounted(() => {
    window.addEventListener('click',clickHandler)
  })
  // 页面卸载之前的生命周期组合Api
  onBeforeUnmount(() => {
    window.removeEventListener('click',clickHandler)
  })
  return {
    x,
    y
  }
}
src下hooks的 useRequest.ts
import { ref } from 'vue';
import axios from 'axios';


interface AddressData{
  id: number;
  address:string;
  distance:string;
}
interface ProductsData{
  id: string;
  title:string;
  price:number;
}

export default function (url:string) {
  // 加载的状态
  const loading = ref(true)
  // 请求成功的数据   // 用于数据格式替换  ProductsData
  const data = ref<ProductsData[] | null>(null)
  // 错误信息
  const errorMsg = ref('')
  // 发送请求
  axios.get(url).then(response => {
    // 改变加载状态
    loading.value = false
    data.value = response.data
  }).catch(error=>{
    console.log(111);
  })

  return {
    loading,
    data,
    errorMsg
  }
}
public下data的 address.json
{
"id": 1,
"address": "陕西西安",
"distance": "100m"
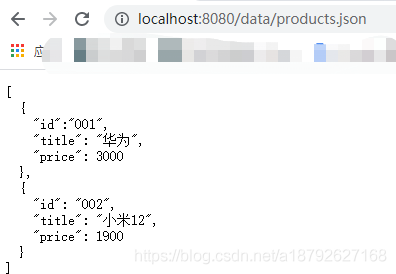
}public下data的 products.json
[
  {
    "id":"001",
    "title": "华为",
    "price": 3000
  },
  {
    "id": "002",
    "title": "小米12",
    "price": 1900
  }
]
最后查看一下整体运行展示:

以ant-design-vue 2.2.8版Upload上传组件为例:
<template>
  <a-upload
    v-model:file-list="fileList"
    name="file"
    :multiple="true"
    action="https://www.mocky.io/v2/5cc8019d300000980a055e76"
    :headers="headers"
    @change="handleChange"
  >
    <a-button>
      <upload-outlined></upload-outlined>
      Click to Upload
    </a-button>
  </a-upload>
</template>
<script>
import { message } from 'ant-design-vue';
import { UploadOutlined } from '@ant-design/icons-vue';
import { defineComponent, ref } from 'vue';
export default defineComponent({
  components: {
    UploadOutlined,
  },
  setup() {
    const handleChange = info => {
      if (info.file.status !== 'uploading') {
        console.log(info.file, info.fileList);
      }
      if (info.file.status === 'done') {
        message.success(`${info.file.name} file uploaded successfully`);
      } else if (info.file.status === 'error') {
        message.error(`${info.file.name} file upload failed.`);
      }
    };
    const fileList = ref([]);
    return {
      fileList,
      headers: {
        authorization: 'authorization-text',
      },
      handleChange,
    };
  },
});
</script><template> <a-upload v-model:file-list="fileList" name="file" :multiple="true" action="https://www.mocky.io/v2/5cc8019d300000980a055e76" :headers="headers" @change="handleChange" > <a-button> <upload-outlined></upload-outlined> Click to Upload </a-button> </a-upload> </template>
<script>
import { UploadOutlined } from '@ant-design/icons-vue';
import { defineComponent } from 'vue';
// hook
import useUpload from '../hooks/useUpload';
export default defineComponent({
  components: {
    UploadOutlined,
  },
  setup() {
    / 上传hooks
    const { fileList, headers, handleChange } = useUpload();
    return {
      fileList,
      headers,
      handleChange,
    };
  },
});
</script>import { ref } from 'vue';
import { message } from 'ant-design-vue';
export default function useUpload() {
const handleChange = (info) => {
if (info.file.status !== 'uploading') {
console.log(info.file, info.fileList);
}
if (info.file.status === 'done') {
message.success(`${info.file.name} file uploaded successfully`);
} else if (info.file.status === 'error') {
message.error(`${info.file.name} file upload failed.`);
}
};
const fileList = ref([]);
return {
fileList,
headers: {
authorization: 'authorization-text',
},
handleChange,
};
}以上为个人经验,希望能给大家一个参考,也希望大家多多支持。

