JSON 是目前主流的前后端数据传输方式,Spring MVC中使用消息转换器HTTPMessageConverter对JSON的转换提供了很好的支持,在Spring Boot中更进一步,对相关配置做了进一步的简化。默认情况下,创建一个Spring Boot项目后,添加Web依赖,代码如下:
<dependency>
  <groupId>org.springframework.boot</groupId>
  <artifactId>spring-boot-starter-web</artifactId>
</dependency>
这个依赖中默认加入了jackson-databind 作为JSON处理器,此时不需要添加额外的JSON处理器就能返回一段JSON了。创建一个Book实体类:
public class Book {
    private int id;
    private String name;
    private String author;
    @JsonIgnore
    private Float price;
    @JsonFormat(pattern = "yyyy-MM-dd")
    private Date publicationDate;
    public int getId() {
        return id;
    }
    public void setId(int id) {
        this.id = id;
    }
    public String getName() {
        return name;
    }
    public void setName(String name) {
        this.name = name;
    }
    public String getAuthor() {
        return author;
    }
    public void setAuthor(String author) {
        this.author = author;
    }
    public Float getPrice() {
        return price;
    }
    public void setPrice(Float price) {
        this.price = price;
    }
    public Date getPublicationDate() {
        return publicationDate;
    }
    public void setPublicationDate(Date publicationDate) {
        this.publicationDate = publicationDate;
    }
}
然后创建BookController,返回Book对象即可:
@Controller
public class BookController {
    @GetMapping(value = "/book")
    @ResponseBody
    public Book books(){
        Book b1 = new Book();
        b1.setId(1);
        b1.setAuthor("唐家三少");
        b1.setName("斗罗大陆Ⅰ");
        b1.setPrice(60f);
        b1.setPublicationDate(new Date());
        return b1;
    }
}
当然,如果需要频繁地用到@ResponseBody 注解,那么可以采用@RestController 组合注解代替@Controller和@ResponseBody ,代码如下:
@RestController
public class BookController {
    @GetMapping(value = "/book")
    public Book books(){
        Book b1 = new Book();
        b1.setId(1);
        b1.setAuthor("唐家三少");
        b1.setName("斗罗大陆Ⅰ");
        b1.setPrice(60f);
        b1.setPublicationDate(new Date());
        return b1;
    }
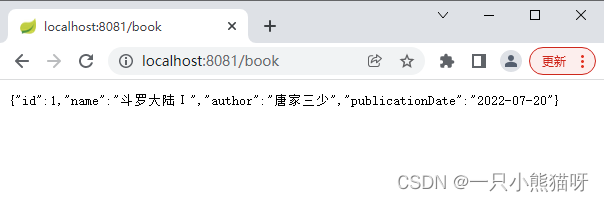
}此时在浏览器中输入"http://localhost:8081/book",即可看到返回了JSON数据,如图:

这是Spring Boot 自带的处理方式。如果采用这种方式,那么对于字段忽略、日期格式化等常见需求都可以通过注解来解决。这是通过Spring 中默认提供的 MappingJackson2HttpMessageConverter 来实现的,当然也可以根据需求自定义转换器。
常见的JSON 处理器除了jsckson-databind之外,还有Gson 和 fastjson ,针对常见用法来举例。
Gson是 Goole 的一个开源JSON解析框架。使用Gson,需要先去处默认的jackson-databind,然后引入Gson依赖,代码如下:
<dependency>
  <groupId>org.springframework.boot</groupId>
  <artifactId>spring-boot-starter-web</artifactId>
  <exclusions>
    <!--       排除默认的jackson-databind         -->
    <exclusion>
      <groupId>com.fasterxml.jackson.core</groupId>
      <artifactId>jackson-databind</artifactId>
    </exclusion>
  </exclusions>
</dependency>
<!--    引入Gson依赖    -->
<dependency>
  <groupId>com.google.code.gson</groupId>
  <artifactId>gson</artifactId>
</dependency>
由于Spring Boot 中默认提供了Gson的自动转换类 GsonHttpMessageConvertersConfiguration,因此Gson的依赖添加成功后,可以像使用jackson-databind 那样直接使用Gson。但在Gson进行转换是,如果想对日期数据进行格式化,那么还需要开发者自定义HTTPMessageConverter。先看 GsonHttpMessageConvertersConfiguration 中的一段代码:
@Bean
@ConditionalOnMissingBean
public GsonHttpMessageConverter gsonHttpMessageConverter(Gson gson) {
    GsonHttpMessageConverter converter = new GsonHttpMessageConverter();
    converter.setGson(gson);
    return converter;
}
@ConditionalOnMissingBean 注解标识当前项目中没有提供 GsonHttpMessageConverter 时才会使用默认的 GsonHttpMessageConverter ,所以开发者只需要提供一个 GsonHttpMessageConverter 即可,代码如下:
@Configuration
public class GsonConfig {
    @Bean
    GsonHttpMessageConverter gsonHttpMessageConverter(){
        GsonHttpMessageConverter gsonHttpMessageConverter = new GsonHttpMessageConverter();
        GsonBuilder builder = new GsonBuilder();
        builder.setDateFormat("yyyy-MM-dd");
        builder.excludeFieldsWithModifiers(Modifier.PROTECTED);
        Gson gson = builder.create();
        gsonHttpMessageConverter.setGson(gson);
        return gsonHttpMessageConverter;
    }
}
代码解释:
此时,将Book类中的price字段的修饰符改为 protected ,去掉注解,代码如下:
public class Book {
    private int id;
    private String name;
    private String author;
    protected Float price;
    private Date publicationDate;
    public int getId() {
        return id;
    }
    public void setId(int id) {
        this.id = id;
    }
    public String getName() {
        return name;
    }
    public void setName(String name) {
        this.name = name;
    }
    public String getAuthor() {
        return author;
    }
    public void setAuthor(String author) {
        this.author = author;
    }
    public Float getPrice() {
        return price;
    }
    public void setPrice(Float price) {
        this.price = price;
    }
    public Date getPublicationDate() {
        return publicationDate;
    }
    public void setPublicationDate(Date publicationDate) {
        this.publicationDate = publicationDate;
    }
}此时在浏览器中输入"http://localhost:8081/book",查看返回结果,如图:

fastjson是阿里巴巴的一个开源 JSON 解析框架,是目前 JSON 解析速度最快的开源框架,该框架也可以集成到 Spring Boot 中。不同于Gson,fastjson集成完成之后并不能立马使用,需要开发者提供相应的 HttpMessageConverter 后才能使用,集成fastjson需要先除去jackson-databind 依赖,引入fastjson 依赖:
<dependency>
  <groupId>org.springframework.boot</groupId>
  <artifactId>spring-boot-starter-web</artifactId>
  <exclusions>
    <!--       排除默认的jackson-databind         -->
    <exclusion>
      <groupId>com.fasterxml.jackson.core</groupId>
      <artifactId>jackson-databind</artifactId>
    </exclusion>
  </exclusions>
</dependency>
<!--    引入fastjson依赖    -->
<dependency>
  <groupId>com.alibaba</groupId>
  <artifactId>fastjson</artifactId>
</dependency>
然后配置fastjson 的 HttpMessageConverter :
@Configuration
public class MyFastJsonConfig {
    @Bean
    FastJsonHttpMessageConverter fastJsonHttpMessageConverter(){
        FastJsonHttpMessageConverter fastJsonHttpMessageConverter = new FastJsonHttpMessageConverter();
        FastJsonConfig fastJsonConfig = new FastJsonConfig();
        fastJsonConfig.setDateFormat("yyyy-MM-dd");
        fastJsonConfig.setCharset(Charset.forName("UTF-8"));
        fastJsonConfig.setSerializerFeatures(
                SerializerFeature.WriteClassName,
                SerializerFeature.WriteMapNullValue,
                SerializerFeature.PrettyFormat,
                SerializerFeature.WriteNullListAsEmpty,
                SerializerFeature.WriteNullStringAsEmpty
        );
        fastJsonHttpMessageConverter.setFastJsonConfig(fastJsonConfig);
        return fastJsonHttpMessageConverter;
    }
}
代码解释:
还需要配置一下响应编码,否则会出现乱码的情况,在application.properties 中添加如下配置:
# 是否强制对HTTP响应上配置的字符集进行编码。
spring.http.encoding.force-response=true
BookController 跟 使用Gson的 BookController 一致即可,此时在浏览器中输入"http://localhost:8081/book",查看返回结果,如图:

对于 FastJsonHttpMessageConverter 的配置,除了上边这种方式之外,还有另一种方式。
在Spring Boot 项目中,当开发者引入 spring-boot-starter-web 依赖后,该依赖又依赖了 spring-boot-autoconfigure , 在这个自动化配置中,有一个 WebMvcAutoConfiguration 类提供了对 Spring MVC 最进本的配置,如果某一项自动化配置不满足开发需求,开发者可以针对该项自定义配置,只需要实现 WebMvcConfig 接口即可(在Spring Boot 5.0 之前是通过继承 WebMvcConfigurerAdapter 来实现的),代码如下:
@Configuration
public class MyWebMvcConfig implements WebMvcConfigurer {
    @Override
    public void configureMessageConverters(List<HttpMessageConverter<?>> converters){
        FastJsonHttpMessageConverter converter = new FastJsonHttpMessageConverter();
        FastJsonConfig config = new FastJsonConfig();
        config.setDateFormat("yyyy-MM-dd");
        config.setCharset(Charset.forName("UTF-8"));
        config.setSerializerFeatures(
                SerializerFeature.WriteClassName,
                SerializerFeature.WriteMapNullValue,
                SerializerFeature.PrettyFormat,
                SerializerFeature.WriteNullListAsEmpty,
                SerializerFeature.WriteNullStringAsEmpty
        );
        converter.setFastJsonConfig(config);
        converters.add(converter);
    }
}
代码解释:
注意:如果使用了Gson , 也可以采用这种方式配置,但是不推荐。因为当项目中没有 GsonHttpMessageConverter 时,Spring Boot 会自己提供一个 GsonHttpMessageConverter ,此时重写 configureMessageConverters 方法,参数 converters 中已经有 GsonHttpMessageConverter 的实例了,需要替换已有的 GsonHttpMessageConverter 实例,操作比较麻烦,所以对于Gson,推荐直接提供 GsonHttpMessageConverter 。
在Spring MVC 中,对于静态资源都需要开发者手动配置静态资源过滤。Spring Boot 中对此也提供了自动化配置,可以简化静态资源过滤配置。
Spring Boot 中对于Spring MVC 的自动化配置都在 WebMvcAutoConfiguration 类中,因此对于默认的静态资源过滤策略可以从这个类中一窥究竟。
在 WebMvcAutoConfiguration 类中有一个静态内部类 WebMvcAutoConfigurationAdapter ,实现了 WebMvcConfigurer 接口。WebMvcConfigurer 接口中有一个方法 addResourceHandlers 是用来配置静态资源过滤的。方法在 WebMvcAutoConfigurationAdapter 类中得到了实现,源码如下:
@Override
public void addResourceHandlers(ResourceHandlerRegistry registry) {
...
    String staticPathPattern = this.mvcProperties.getStaticPathPattern();
    if (!registry.hasMappingForPattern(staticPathPattern)) {
        customizeResourceHandlerRegistration(
            registry.addResourceHandler(staticPathPattern)
            .addResourceLocations(getResourceLocations(
                this.resourceProperties.getStaticLocations()))
            .setCachePeriod(getSeconds(cachePeriod))
            .setCacheControl(cacheControl));
    }
}
Spring Boot 在这里进行了默认的静态资源过滤配置,其中 staticPathPattern 默认定义在 WebMvcProperties 中,定义内容如下:
/**
 * Path pattern used for static resources.
 */
private String staticPathPattern = "/**";
this.resourceProperties.getStaticLocations() 获取到的默认静态资源位置定义在 ResourceProperties 中,代码如下:
private static final String[] CLASSPATH_RESOURCE_LOCATIONS = {
    "classpath:/META-INF/resources/", "classpath:/resources/",
    "classpath:/static/", "classpath:/public/" };
在 getResourceLocations 方法中,对这4个静态资源位置做了扩充,代码如下:
static String[] getResourceLocations(String[] staticLocations) {
    String[] locations = new String[staticLocations.length
                                    + SERVLET_LOCATIONS.length];
    System.arraycopy(staticLocations, 0, locations, 0, staticLocations.length);
    System.arraycopy(SERVLET_LOCATIONS, 0, locations, staticLocations.length,
                     SERVLET_LOCATIONS.length);
    return locations;
}
其中 SERVLET_LOCATIONS 的定义是一个{ “/” }。
综上可以看到,Spring Boot 默认会过滤所有的静态资源,而静态资源的位置一共有5个,分别是"classpath:/META-INF/resources/“、“classpath:/resources/”、“classpath:/static/”、“classpath:/public/”、”/“,一般情况下Spring Boot 项目不需要webapp目录,所以第5个”/"可以暂时不考虑。剩下4个路径加载的优先级如下:

如果开发者使用IDEA创建Spring Boot 项目,就会默认创建出 classpath:/static/ 目录,静态资源一般放在这个目录即可。重启项目,访问浏览器"http://localhost:8081/p1.jpg",即可访问静态资源。
在application.properties中直接定义过滤规则和静态资源位置,如下:
# 静态资源过滤规则
spring.mvc.static-path-pattern=/staticFile/**
# 静态资源位置
spring.resources.static-locations=classpath:/staticFile/
在resources目录下新建目录 staticFile,放入文件, 重启项目,访问浏览器"http://localhost:8081/staticFile/p1.jpg",即可访问静态资源。此时再次访问"http://localhost:8081/p1.jpg"会提示 404
实现 WebMvcConfigurer 接口即可,然后覆盖接口的 addResourceHandlers 方法,如下:
@Configuration
public class MyWebMvcConfig implements WebMvcConfigurer {
    @Override
    public void addResourceHandlers(ResourceHandlerRegistry registry){
        registry.addResourceHandler("/staticFile/**").addResourceLocations("classpath:/staticFile/");
    }
}