下载Spring Boot工程源码, 下载地址
模块代码结构:
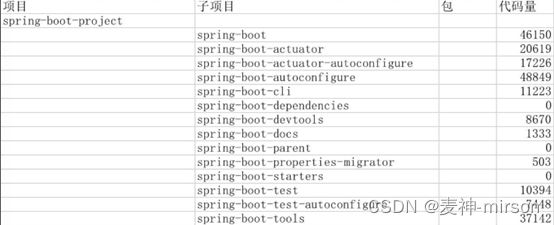
比较重要的是Spring-boot、Spring-boot-autoconfigure以及Spring-boot-starters等组件。
工程模块介绍
spring-boot
spring boot框架核心插件,对其他模块提供主要支持。内部包含所熟知的SpringApplication类, 提供应用程序入口, 内嵌支持Tomcat、Jetty和Undertow等容器。
spring-boot-actuator
主要用于管理和监控应用, 支持http、jmx、ssh、telnet等连接管理方式。
包含审计、健康状态、数据采集等功能。
spring-boot-actuator-autoconfigure
spring-boot-actuator的扩展、为其提供自动化配置功能。
spring-boot-autoconfigure
实现spring-boot工程的自动化配置, 我们常用的@EnableAutoConfiguration标注,就是通过此工程实现,
触发Spring上下文的自动装配。 设计目的是减少开发者的对bean及应用组件的管理配置,专注自己的实现。
spring-boot-cli
提供Spring项目相关的命令行功能,
安装CLI相关工具。即可通过spring run hello.groovy
直接运行Groovy脚本, 不过过多的繁琐配置, 开发人员只需关注业务逻辑。
spring-boot-dependencies
Spring Boot项目的maven依赖管理工程, 定义管理各组件的版本号,
内部没有具体代码实现。
spring-boot-devtools
Spring Boot的开发工具,比如经常调试程序,使用该插件可以支持热部署,
不需反复重启, 提高开发效率。
spring-boot-docs
Spring Boot的文档配置工程,设置文档格式、样式、布局等。
spring-boot-parent
Spring Boot的父级工程, 没有代码实现, 主要通过dependencyManagement管理各子项目的maven组件依赖。
spring-boot-properties-migrator
Spring Boot的配置属性监察功能, 也就是通过监听器观察指定的属性KEY, 发生变化时,符合指定的匹配规则,将会触发监听事件, 执行日志或发送报告等。
spring-boot-starters
它是一个管理工程, 里面包含各种应用组件,例如我们常用的spring-boot-starter-web组件, 提供对web服务支持;spring-boot-starter-data-jdbc组件, 提供的jdbc数据源的封装使用。里面每个组件只存在一个pom文件, 引入第三方依赖, 这样能简化配置, 灵活管理, 保障服务工程的兼容性。
spring-boot-test
里面包含各种模块及标注, 帮助我们方便测试spring boot 应用程序。
spring-boot-test-autoconfigure
服务于spring-boot-test工程,提供自动化配置,便于集成使用。
spring-boot-tools
spring boot工程的管理工具, 比如ant和maven构建、文档配置工具等。
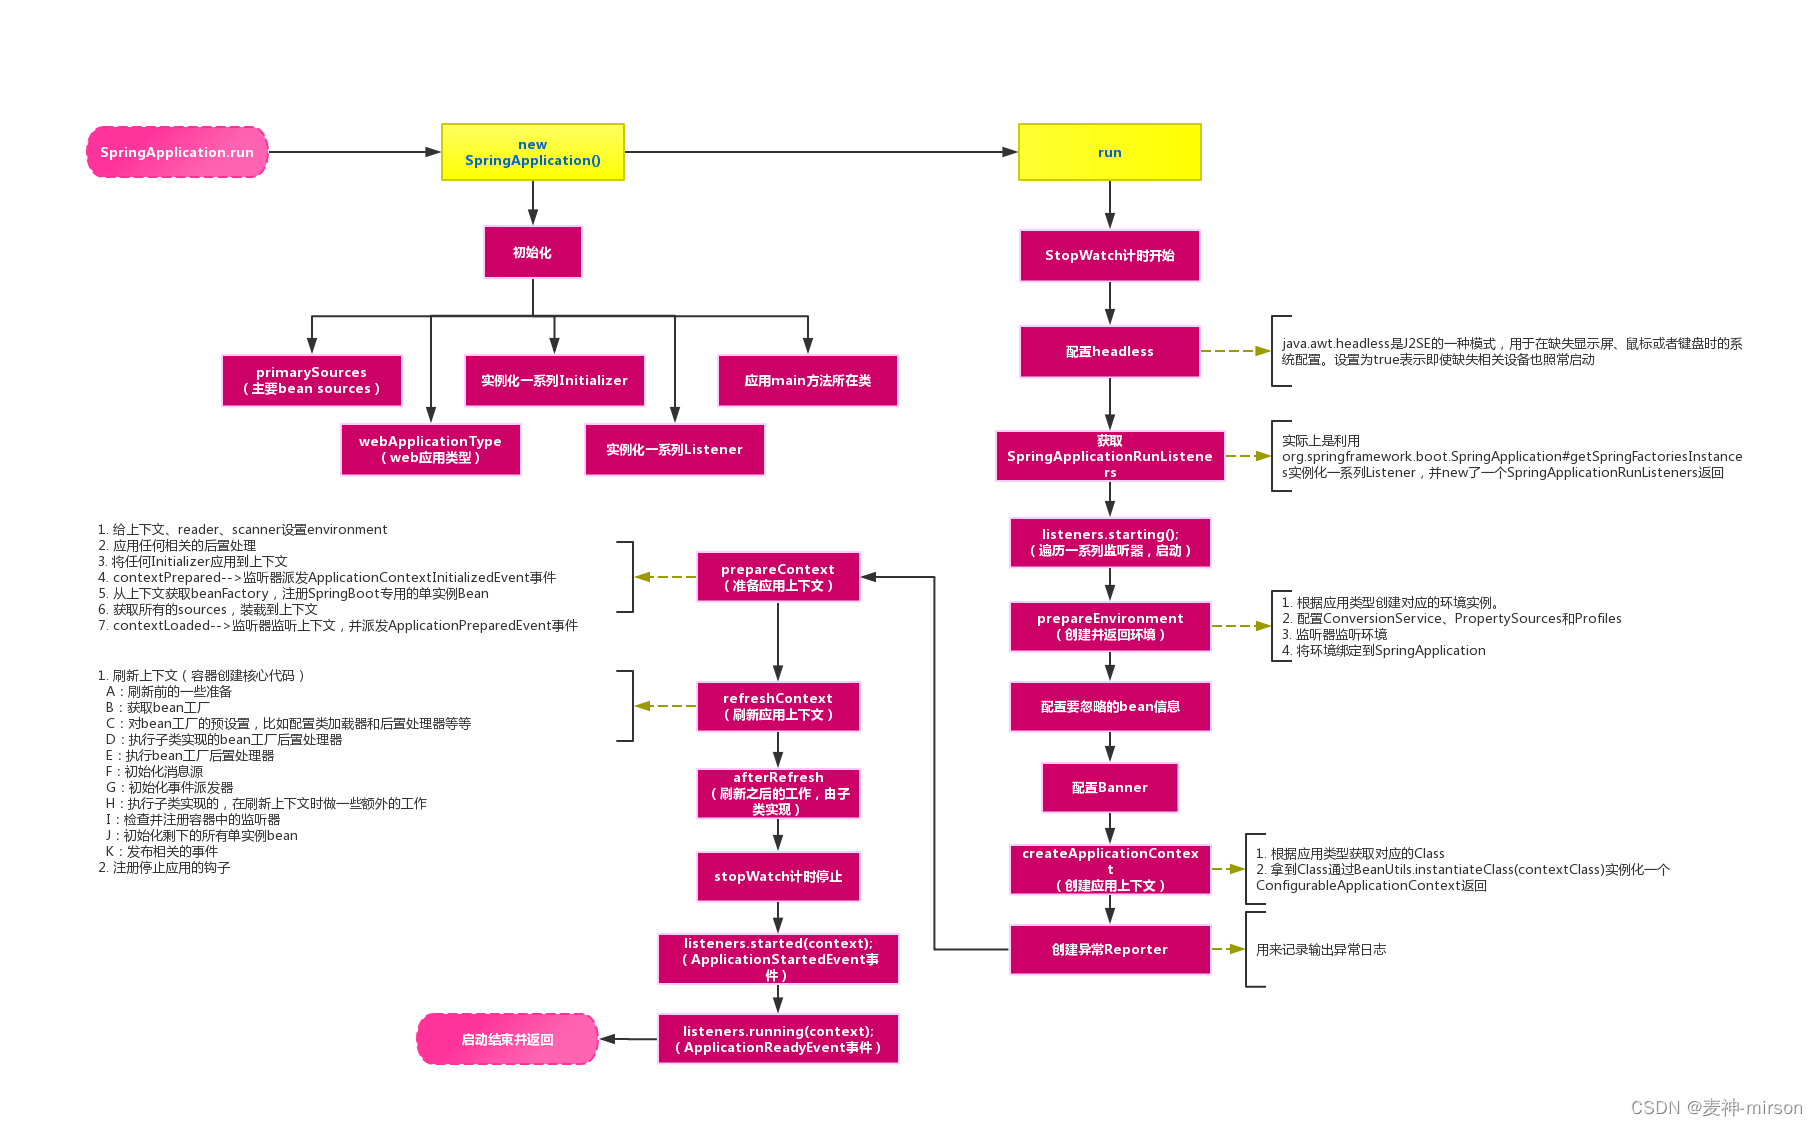
Spring Boot 的整体启动流程:
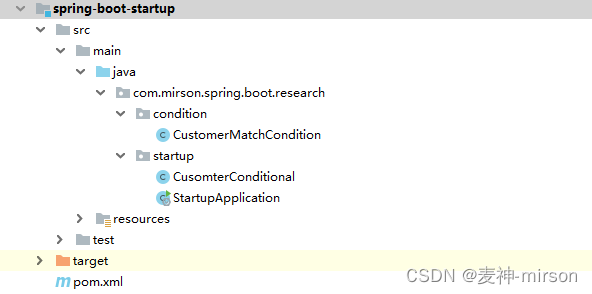
创建spring-boot-startup工程作为源码研究。
POM依赖:
<!-- Spring Boot Web 依赖组件 -->
<dependency>
 <groupId>org.springframework.boot</groupId>
 <artifactId>spring-boot-starter-web</artifactId>
</dependency>
com.mirson.spring.boot.research.startup.ResearchApplication, 启动类代码:
@SpringBootApplication
@ComponentScan(basePackages = {"com.mirson"})
public class ResearchApplication {
public static void main(String[] args) {
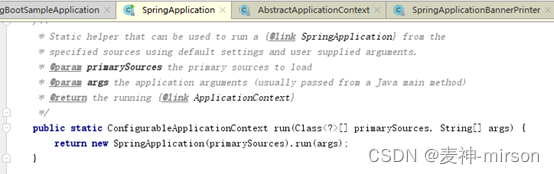
SpringApplication.run(ResearchApplication.class, args);
}
}核心@SpringBootApplication注解
@Target(ElementType.TYPE)            // 注解的适用范围,其中TYPE用于描述类、接口(包括包注解类型)或enum声明
@Retention(RetentionPolicy.RUNTIME)  // 注解的生命周期,保留到class文件中(三个生命周期)
@Documented                          // 表明这个注解应该被javadoc记录
@Inherited                           // 子类可以继承该注解
@SpringBootConfiguration             // 继承了Configuration,表示当前是注解类
@EnableAutoConfiguration             // 开启springboot的注解功能,springboot的四大神器之一,其借助@import的帮助
@ComponentScan(excludeFilters = {    // 扫描路径设置,excludeFilters为排除的过滤器,启动时不加载
        @Filter(type = FilterType.CUSTOM, classes = TypeExcludeFilter.class),
        @Filter(type = FilterType.CUSTOM, classes = AutoConfigurationExcludeFilter.class) })
public @interface SpringBootApplication {
...
}
SpringBootConfiguration
@Target(ElementType.TYPE)
@Retention(RetentionPolicy.RUNTIME)
@Documented
@Configuration
public @interface SpringBootConfiguration {
}
打开其内部, 实质上就是@Configuration注解, 它是负责处理JavaConfig配置, 类似之前Spring在XML中定义的各种配置, 通过@Configuration注解, 会自动加载各种基于JavaConfig实现的配置。比如@Bean定义, @Autowire自动装配等。
EnableAutoConfiguration
Spring Boot 内部封装了很多组件, 比如异步任务, 缓存, 数据源等, EnableAutoConfiguration相当于是个总开关, 负责管理所有组件的自动化配置,它会去扫描当前路径下所有JavaConfig配置,并且通过AutoConfigurationImportSelector, 加载默认的自动化配置组件。
ComponentScan
ComponentScan功能其实是自动扫描并加载符合条件的组件, 比如@Service、@Repository、@Component等, 把它们加载到Spring Ioc容器中。Spring Boot 项目默认会扫描加载启动类所在路径下的所有JavaConfig配置, 通过ComponetScan指定package, 可以自定义路径扫描。
从SpringApplication的run方法进入:
创建SpringApplication对象, 查看构造方法:
public SpringApplication(ResourceLoader resourceLoader, Class<?>... primarySources) {
// 设置资源加载器
this.resourceLoader = resourceLoader;
Assert.notNull(primarySources, "PrimarySources must not be null");
// 设置主资源加载器, 优先级更高
this.primarySources = new LinkedHashSet<>(Arrays.asList(primarySources));
// 应用类型推断处理, 标识应用服务是REACTIVE模式或SERVLET类型
this.webApplicationType = WebApplicationType.deduceFromClasspath();
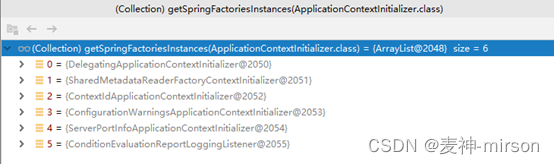
// 设置初始化加载器,默认有6个, 作用是读取spring.factories配置, 每个初始加载器实现ApplicationContextInitializer接口
setInitializers((Collection) getSpringFactoriesInstances(ApplicationContextInitializer.class));
// 设置监听器, 默认有10个, 包含配置文件, 日志, Classpath等监听器
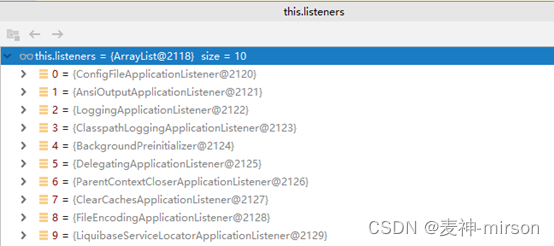
setListeners((Collection) getSpringFactoriesInstances(ApplicationListener.class));
// 设置启动类信息
this.mainApplicationClass = deduceMainApplicationClass();
}
Initializers初始化加载器
listeners监听器
查看SpringApplication的run方法:
public ConfigurableApplicationContext run(String... args) {
 // ① 创建计时器
 StopWatch stopWatch = new StopWatch();
 // 计时器开始统计
 stopWatch.start();
 // ② 定义配置型上下文, 除了具备ApplicationContex, 还拥有生命周期和流属性
 ConfigurableApplicationContext context = null;
 // ③ 定义异常记录报告
 Collection<SpringBootExceptionReporter> exceptionReporters = new ArrayList<>();
 // ④ 识别是否Headless模式, 该模式下,系统没有显示设备、键盘或鼠标
 configureHeadlessProperty();
 // ⑤ 获取所有Spring Boot 内置监听器
 SpringApplicationRunListeners listeners = getRunListeners(args);
 // 启动所有监听器
 listeners.starting();
 try {
     // ⑥ 设置服务启动时接收的参数
     ApplicationArguments applicationArguments = new DefaultApplicationArguments(args);
     // 设置环境变量信息, 为监听器和ConfigurationPropertySources初始环境变量
     ConfigurableEnvironment environment = prepareEnvironment(listeners, applicationArguments);
     // ⑦ 忽略环境变量中配置的BEAN信息
     configureIgnoreBeanInfo(environment);
     // ⑧ 控制台打印Banner条, 可以自定义图片背景等
     Banner printedBanner = printBanner(environment);
     // ⑨ 创建上下文, 根据不同模式进行创建(SERVLET、REACTIVE)
     context = createApplicationContext();
     // ⑩ 获取Spring Factory加载时的异常报告
     exceptionReporters = getSpringFactoriesInstances(SpringBootExceptionReporter.class,
                                                      new Class[] { ConfigurableApplicationContext.class }, context);
     // ⑪  Spring上下文加载预处理
     prepareContext(context, environment, listeners, applicationArguments, printedBanner);
     // ⑫ Spring 上下文加载处理
     refreshContext(context);
     // ⑬ Spring 上下文加载完毕的后置处理, 内部暂为空实现
     afterRefresh(context, applicationArguments);
     // 停止时间计时器
     stopWatch.stop();
     if (this.logStartupInfo) {
         new StartupInfoLogger(this.mainApplicationClass).logStarted(getApplicationLog(), stopWatch);
     }
     // ⑭ 启动监听器
     listeners.started(context);
     // ⑮ Spring Boot 容器启动完毕后, 调用ApplicationRunner的run方法, 处理自定义逻辑
     callRunners(context, applicationArguments);
 }
 catch (Throwable ex) {
     handleRunFailure(context, ex, exceptionReporters, listeners);
     throw new IllegalStateException(ex);
 }
 try {
     // 执行监听器
     listeners.running(context);
 }
 catch (Throwable ex) {
     handleRunFailure(context, ex, exceptionReporters, null);
     throw new IllegalStateException(ex);
 }
 return context;
}
① 创建StopWatch,Spring 提供的计时器,统计Spring Boot应用启动时长信息。
② 定义Spring上下文, 并下面第九处执行赋值。
③ 定义异常报告集合, 收集Spring Factory的初始化异常信息。
④ 配置headless信息, 该模式下,系统没有显示设备、键盘或鼠标。
⑤ 获取启动监听器,为一个集合,可以包含多个监听, 实现SpringApplicationRunListener接口,
该接口定义了容器启动的完整生命周期, 如启动、运行、环境准备、上下文准备、加载等。EventPublishingRunListener就是一个具体实现,
将SpringApplicationRunListener接口监听到的事件, 转化为SpringApplicationEvent事件, 注册并广播到所有监听器下面。
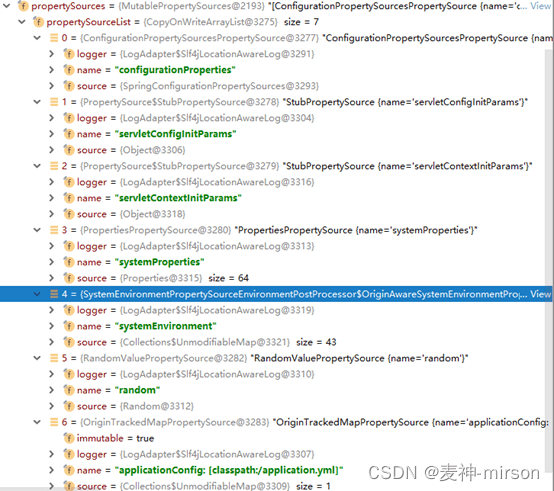
⑥ 服务配置处理,创建applicationArguments, 为应用的命令行参数, 启动程序时可以指定, 比如—debug等; prepareEnvrionment根据参数加载属性配置, 包含自定义的属性配置,像我们常见的application.yml都会加载进去, 默认会加载7个类型的配置到envrionment中。
⑦ configureIgnoreBeanInfo作用是配置是否忽略beaninfo处理, 默认是为true,会自动忽略不检索加载工程中的beaninfo类信息。
⑧ printBanner打印Spring Boot启动的Banner条, 通过bannerMode属性控制是否打印,内部有getImageBanner和getTextBanner实现, 可以支持图像与文本。
⑨ 容器创建, 通过createApplicationContext方法创建Spring容器, 会根据应用类型, 加载不同上下文处理类。Web Servlet类型会加载AnnotationConfigServletWebServerApplicationContext; Reactive类型会 加载AnnotationConfigReactiveWebServerApplicationContext。都是继承ServletWebServerApplicationContext类, 实现ConfigurableWebApplicationContext接口。 在不指 定应用类型的i情况下,默认通过AnnotationConfigApplicationContext类处理上下文,该类是继承GenericApplicationContext,实现ConfigurableApplicationContext接口。
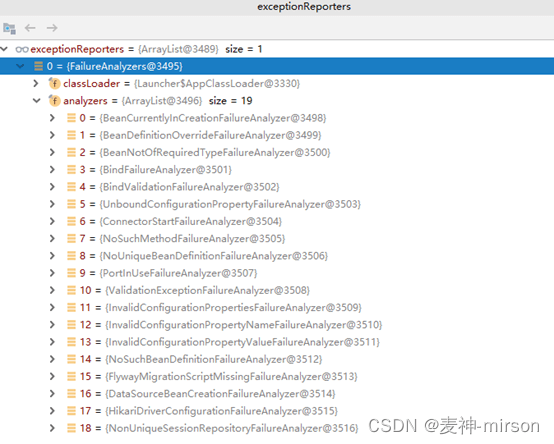
⑩ 初始化exceptionReports集合, 通过SpringFactory加载,
内置有19个异常分析器, 常见的BeanDefinition定义错误、NoUnique唯一性约束、PortInUse端口占用等异常都是通过这些分析器处理抛出。
⑪上下文加载预处理,prepareContext方法内部实现:
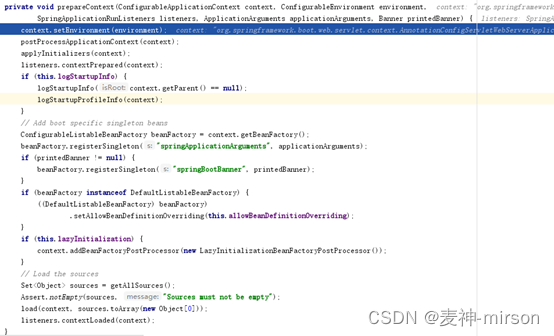
设置context的environment环境配置属性,通过applyInitializer初始化ApplicationContextInitializer。通知监听器告诉上下文预处理工作完成。 接下来创建所熟知的beanFactory容器管理工厂, 加载BeanDefinition, 最后通知监听器,加载完成。
⑫ 刷新启动Spring容器, 调用refreshConext方法。深入内部,可以看到核心处理流程:
@Override
public void refresh() throws BeansException, IllegalStateException {
    // 设置同步锁, 防止启动关闭造成的资源争抢
    synchronized (this.startupShutdownMonitor) {
        // Spring 上下文预加载处理
        prepareRefresh();
        // 刷新并返回bean工厂信息
        ConfigurableListableBeanFactory beanFactory = obtainFreshBeanFactory();
        // 预加载bean工厂信息, 如设定classloader加载器, 接口依赖等。
        prepareBeanFactory(beanFactory);
        try {
            // bean工厂处理, 设置上下文的BeanPostProcessor和ignoreDependencyInterface等信息
            postProcessBeanFactory(beanFactory);
            // 调用所有在BeanFactory中已注册的beanFactoryPostProcessor。beanFactoryPostProcessor 是BeanFactory的后置处理器, 对BeanDefinition对象修改,如我们在XML或标注配置的bean定义信息
            invokeBeanFactoryPostProcessors(beanFactory);
            // 通过委派机制注册Bean创建时的Bean Processors对象 。BeanPostProcessor是Bean后置处理器, 负责对Bean对象修改, 比如实现InitializingBean接口的Bean, 通过afterPropertiesSet方法设置修改
            registerBeanPostProcessors(beanFactory);
            // 初始化message source , 比如我们常见的国际化信息处理。
            initMessageSource();
            // 初始化事件监听器并进行广播。可以将ApplicationListener监听的事件发送至相应监听器做处理。
            initApplicationEventMulticaster();
            // 实现其他的指定Bean或容器处理, 比如GenericApplicationContext, 可以实现一些自定义UI或Theme。
            onRefresh();
            // 注册所有实现ApplicationListener接口的监听器, 广播处理相应事件。
            registerListeners();
            //  创建所有非懒加载方式定义单例类。
            finishBeanFactoryInitialization(beanFactory);
            // 完成容器的加载处理, 善后工作, 清除资源缓存, 发布完成事件等。
            finishRefresh();
        }
        catch (BeansException ex) {
            if (logger.isWarnEnabled()) {
                logger.warn("Exception encountered during context initialization - " +
                            "cancelling refresh attempt: " + ex);
            }
            // 销毁bean信息
            destroyBeans();
            // 复位 'active'激活标志.
            cancelRefresh(ex);
            // Propagate exception to caller.
            throw ex;
        }
        finally {
            // 清除基本缓存信息, 比如方法属性声明缓存、标注缓存等。
            resetCommonCaches();
        }
    }
}
⑬ 为Spring 容器初始化的后置处理方法,预置功能,内部为空实现。
⑭ Spring容器启动完成后, 通知SpringApplicationListener监听数组,
触发容器加载完成started事件, 执行监听逻辑。
⑮ 再调用运行器, 检查ApplicationContext中有无定义,调用ApplicationRunner、CommandLineRunner接口的run方法。
最后, 调用所有定义的SpringApplicationListener监听器,触发容器正常运行Running事件, 执行监听逻辑。
Spring Boot 能够极为简化的开发与配置, 从启动流程的研究分析, Spring Boot 做了大量的封装与自动化处理, 通过扫描Spring Factory 能够加载各种自动化组件, 同时内置了监听器与各种事件, 以及ApplicationRunner启动器, 具有较强的灵活性与扩展性, Spring Boot 内部封装简洁, 逻辑清晰,没有过多的冗余代码, 能够起到很好的借鉴学习作用。

