上一讲我们主要介绍了 Vue 项目的首次渲染流程,在 mountComponent 中注册了effect 函数,这样,在组件数据有更新的时候,就会通知到组件的 update 方法进行更新
Vue 中组件更新的方式也是使用了响应式 + 虚拟 DOM 的方式,这个我们在第一讲中有介绍过 Vue 1、Vue 2 和 Vue 3 中更新方式的变化,今天我们就来详细剖析一下 Vue 组件内部如何通过虚拟 DOM 更新页面的代码细节
我们从虚拟 DOM 在 Vue 的执行流程开始讲起。在 Vue 中,我们使用虚拟 DOM 来描述页面的组件,比如下面的 template 虽然格式和 HTML 很像,但是在 Vue 的内部会解析成 JavaScript 函数,这个函数就是用来返回虚拟 DOM:
<div id="app">
    <p>hello world</p>
    <Rate :value="4"></Rate>
</div>
上面的 template 会解析成下面的函数,最终返回一个 JavaScript 的对象能够描述这段HTML:
function render(){
    return h('div',{id:"app"},children:[
        h('p',{},'hello world'),
        h(Rate,{value:4}),
    ])
}
知道虚拟 DOM 是什么之后,那么它是怎么创建的呢?
我们简单回忆上一讲介绍的 mount 函数,在代码中,我们使用 createVNode 函数创建项目的虚拟 DOM,可以看到 Vue 内部的虚拟 DOM,也就是 vnode,就是一个对象,通过 type、props、children 等属性描述整个节点:
const vnode = createVNode( (
    rootComponent as ConcreteComponent,
    rootProps
)
function _createVNode() {
    // 处理属性和 class
    if (props) {
    ...
    }
    // 标记vnode信息
    const shapeFlag = isString(type)
        ? ShapeFlags.ELEMENT
        : __FEATURE_SUSPENSE__ && isSuspense(type)
        ? ShapeFlags.SUSPENSE
        : isTeleport(type)
        ? ShapeFlags.TELEPORT
        : isObject(type)
        ? ShapeFlags.STATEFUL_COMPONENT
        : isFunction(type)
        ? ShapeFlags.FUNCTIONAL_COMPONENT
        : 0
     return createBaseVNode(
        type,
        props,
        children,
        patchFlag,
        dynamicProps,
        shapeFlag,
        isBlockNode,
        true
    )
}
function createBaseVNode(type,props,children,...){
    const vnode = {
    type,
    props,
    key: props && normalizeKey(props),
    ref: props && normalizeRef(props),
    children,
    shapeFlag,
    patchFlag,
    dynamicProps,
    ...
} as VNode
// 标准化子节点
if (needFullChildrenNormalization) {
    normalizeChildren(vnode, children)
} else if (children) {
    vnode.shapeFlag |= isString(children)
        ? ShapeFlags.TEXT_CHILDREN
        : ShapeFlags.ARRAY_CHILDREN
    }
    return vnode
}componentUpdateFn
createVNode 负责创建 Vue 中的虚拟 DOM,而上一讲中我们讲过 mount 函数的核心逻辑就是使用 setupComponent 执行我们写的 <script setup>,使用 setupRenderEffect 监听组件的数据变化;所以我们来到 setupRenderEffect 函数中,去完整地剖析 Vue 中虚拟 DOM 的更新逻辑
我们给组件注册了 update 方法,这个方法使用 effect 包裹后,当组件内的 ref、reactive 包裹的响应式数据变化的时候就会执行 update 方法,触发组件内部的更新机制
看下面的代码,在 setupRenderEffect 内部的 componentUpdateFn 中,updateComponentPreRenderer 更新了属性和 slots,并且调用 renderComponentRoot 函数创建新的子树对象 nextTree,然后内部依然是调用 patch 函数
可以看到,Vue 源码中的实现首次渲染和更新的逻辑都写在一起,我们在递归的时候如果对一个标签实现更新和渲染,就可以用一个函数实现
const componentUpdateFn = ()=>{
    if (!instance.isMounted) {
    //首次渲染
    instance,
    parentSuspense,
    isSVG
    )
    。。。
}else{
    let { next, bu, u, parent, vnode } = instance
    if (next) {
        next.el = vnode.el
        updateComponentPreRender(instance, next, optimized)
    } else {
        next = vnode
    }
    const nextTree = renderComponentRoot(instance)
    patch(
        prevTree,
        nextTree,
        // parent may have changed if it's in a teleport
        hostParentNode(prevTree.el!)!,
        // anchor may have changed if it's in a fragment
        getNextHostNode(prevTree),
        instance,
        parentSuspense,
        isSVG
        )
    }
}
// 注册effect函数
const effect = new ReactiveEffect(
    componentUpdateFn,
    () => queueJob(instance.update),
    instance.scope // track it in component's effect scope
)
const update = (instance.update = effect.run.bind(effect) as S chedulerJo
update()
const updateComponentPreRender = (
    instance: ComponentInternalInstance,
    nextVNode: VNode,
    optimized: boolean
) => {
nextVNode.component = instance
    const prevProps = instance.vnode.props
    instance.vnode = nextVNode
    instance.next = null
    updateProps(instance, nextVNode.props, prevProps, optimized)
    updateSlots(instance, nextVNode.children, optimized)
    pauseTracking()
    // props update may have triggered pre-flush watchers.
    // flush them before the render update.
    flushPreFlushCbs(undefined, instance.update)
    resetTracking()
}
比较关键的就是上面代码中 32-39 行的 effect 函数,负责注册组件,这个函数也是 Vue 组件更新的入口函数
数据更新之后就会执行 patch 函数,下图就是 patch 函数执行的逻辑图:
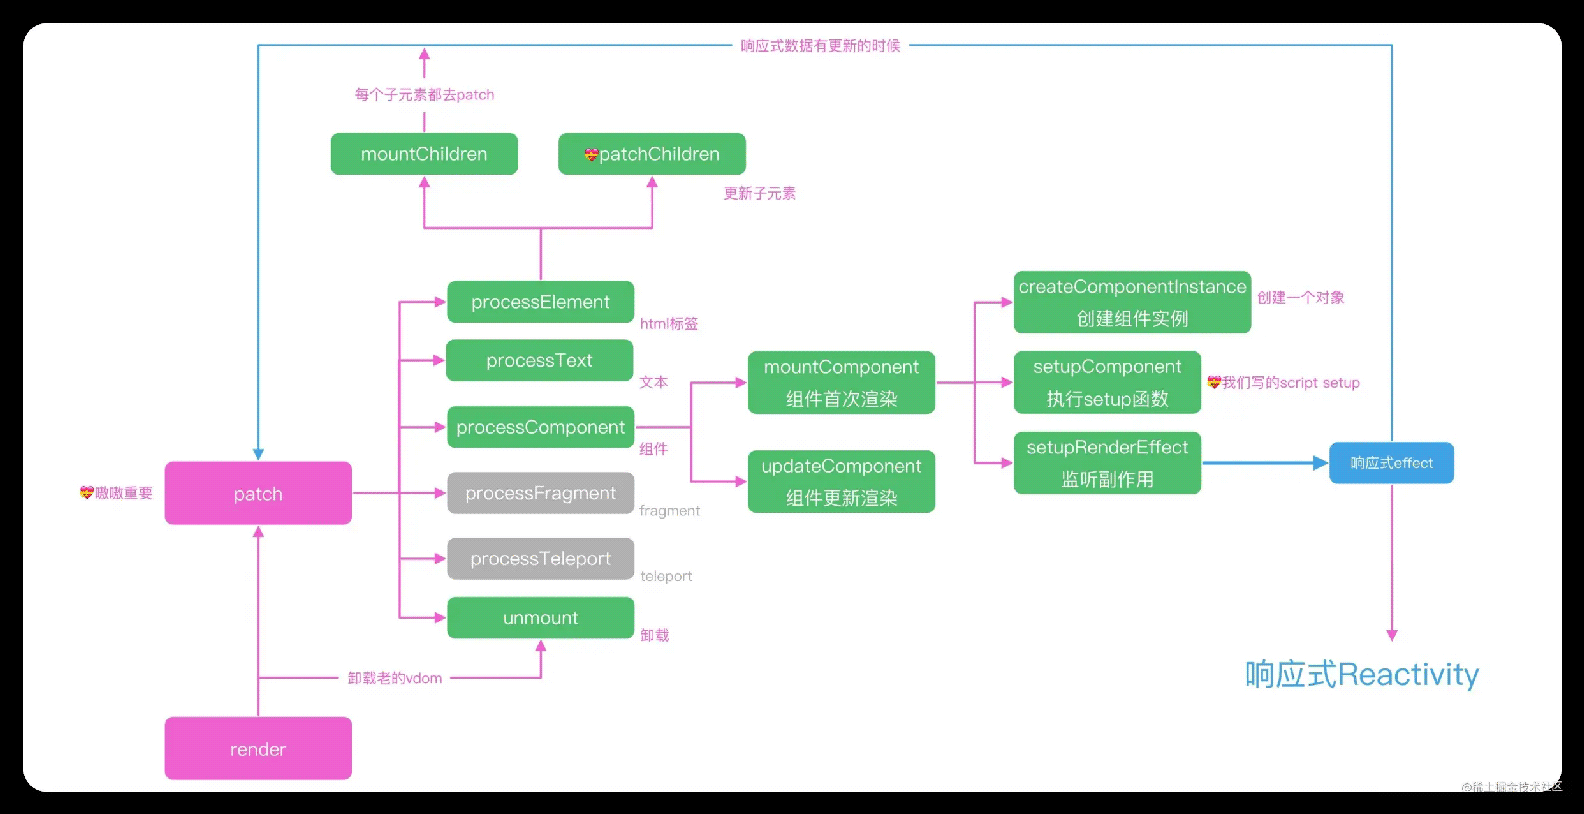
在 patch 函数中,会针对不同的组件类型执行不同的函数,组件我们会执行 processComponent,HTML 标签我们会执行 processElement:
function path(n1, n2, container){
    const { type, shapeFlag } = n2
        switch (type) {
            case Text:
            processText(n1, n2, container)
            break
            // 还有注释,fragment之类的可以处理,这里忽略
            default:
            // 通过shapeFlag判断类型
            if (shapeFlag & ShapeFlags.ELEMENT) {
                processElement(n1, n2, container, anchor)
            } else if (shapeFlag & ShapeFlags.STATEFUL_COMPONENT) {
                processComponent(n1, n2, container)
            }
       }
}
function processComponent(n1, n2, container) {
    // 老规矩,没有n1就是mount
    if (!n1) {
        // 初始化 component
        mountComponent(n2, container)
    } else {
        updateComponent(n1, n2, container)
    }
}
由于更新之后不是首次渲染了,patch 函数内部会执行 updateComponent,看下面的 updateComponent 函数内部,shouldUpdateComponent 会判断组件是否需要更新,实际执行的是 instance.update:
const instance = (n2.component = n1.component)!
if (shouldUpdateComponent(n1, n2, optimized)) {
    // normal update
    instance.next = n2
    // in case the child component is also queued, remove it to avoid
    // double updating the same child component in the same flush.
    invalidateJob(instance.update)
    // instance.update is the reactive effect.
    instance.update()
} else {
    // no update needed. just copy over properties
    n2.component = n1.component
    n2.el = n1.el
    instance.vnode = n2
}
组件的子元素是由 HTML 标签和组件构成,组件内部的递归处理最终也是对 HTML 标签的处理,所以,最后组件的更新都会进入到 processElement 内部的 patchElement 函数中
在函数 patchElement 中我们主要就做两件事,更新节点自己的属性和更新子元素
先看自身属性的更新,这里就能体现出 Vue 3 中性能优化的思想,通过 patchFlag 可以做到按需更新:
如果标记了 FULL_PROPS,就直接调用 patchProps;如果标记了 CLASS,说明节点只有 class 属性是动态的,其他的 style 等属性都不需要进行判断和 DOM 操作
这样就极大的优化了属性操作的性能
内部执行 hostPatchProp 进行实际的 DOM 操作,你还记得上一讲中 hostPatchProp 是从 nodeOps 中定义的吗,其他动态属性 STYLE、TEXT 等等也都是一样的逻辑;Vue 3 的虚拟 DOM 真正做到了按需更新,这也是相比于 React 的一个优势
const patchElement = (
    n1: VNode,
    n2: VNode,
    parentComponent: ComponentInternalInstance | null,
    parentSuspense: SuspenseBoundary | null,
    isSVG: boolean,
    slotScopeIds: string[] | null,
    optimized: boolean
) => {
    const el = (n2.el = n1.el!)
    let { patchFlag, dynamicChildren, dirs } = n2
    patchFlag |= n1.patchFlag & PatchFlags.FULL_PROPS
    const oldProps = n1.props || EMPTY_OBJ
    const newProps = n2.props || EMPTY_OBJ
    // full diff
    patchChildren(
        n1,
        n2,
        el,
        null,
        parentComponent,
        parentSuspense,
        areChildrenSVG,
        slotScopeIds,
        false
    )
    if (patchFlag > 0) {
        if (patchFlag & PatchFlags.FULL_PROPS) {
            patchProps(
                el,
                n2,
                oldProps,
                newProps,
                parentComponent,
                parentSuspense,
                isSVG
            )
        } else {
            // class是动态的
            if (patchFlag & PatchFlags.CLASS) {
                if (oldProps.class !== newProps.class) {
                    hostPatchProp(el, 'class', null, newProps.class, isSVG)
                }
            }
            // style样式是动态的
            if (patchFlag & PatchFlags.STYLE) {
                hostPatchProp(el, 'style', oldProps.style, newProps.style, isSVG)
            }
            // 属性需要diff
            if (patchFlag & PatchFlags.PROPS) {
                //
                const propsToUpdate = n2.dynamicProps!
                for (let i = 0; i < propsToUpdate.length; i++) {
                    const key = propsToUpdate[i]
                    const prev = oldProps[key]
                    const next = newProps[key]
                    // #1471 force patch value
                    if (next !== prev || key === 'value') {
                        hostPatchProp(
                            el,
                            key,
                            prev,
                            next,
                            isSVG,
                            n1.children as VNode[],
                            parentComponent,
                            parentSuspense,
                            unmountChildren
                        )
                    }
                }
            }
        }
        //文本是动态的
        if (patchFlag & PatchFlags.TEXT) {
            if (n1.children !== n2.children) {
                hostSetElementText(el, n2.children as string)
            }
        }
    }
}
而子元素的更新是 patchChildren 函数负责的,这个函数也是虚拟 DOM 中难度最高的一个函数,搞懂它还需要我们下一讲中介绍的算法知识,今天我们就先理解它主要的实现思路
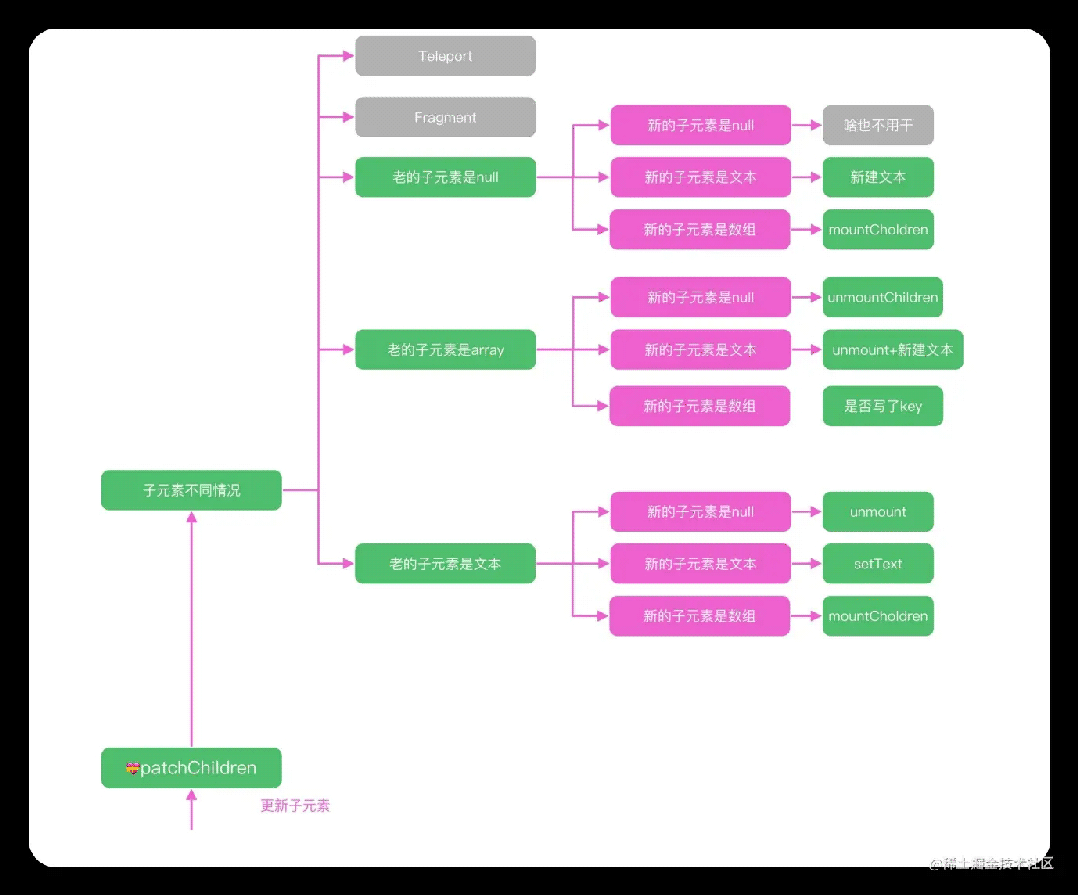
首先我们把子元素分成了文本、数组和空三个状态,新老子元素分别是这三种状态的一个,构成了不同的执行逻辑;这样 patchChildren 内部大致有五种情况需要处理:
最复杂的情况就是新的子元素和老的子元素都是数组
最朴实无华的思路就是把老的子元素全部 unmount,新的子元素全部 mount,这样虽然可以实现功能,但是没法复用已经存在的 DOM 元素,比如我们只是在数组中间新增了一个数据,全部 DOM 都销毁就有点太可惜了
所以,我们需要判断出可以复用的 DOM 元素,如果一个虚拟 DOM 没有改动或者属性变了,不需要完全销毁重建,而是更新一下属性,最大化减少 DOM 的操作,这个任务就会交给 patchKeyedChildren 函数去完成
patchKeyedChildren 函数,做的事情就是尽可能高效地把老的子元素更新成新的子元素,如何高效复用老的子元素中的 DOM 元素是 patchKeyedChildren 函数的难点:
const patchChildren: PatchChildrenFn = (
    n1,
    n2,
    container,
    anchor,
    parentComponent,
    parentSuspense,
    isSVG,
    slotScopeIds,
    optimized = false
) => {
    const c1 = n1 && n1.children
    const prevShapeFlag = n1 ? n1.shapeFlag : 0
    const c2 = n2.children
    const { patchFlag, shapeFlag } = n2
    // fast path
    if (patchFlag > 0) {
        if (patchFlag & PatchFlags.KEYED_FRAGMENT) {
            // this could be either fully-keyed or mixed (some keyed some not)
            // presence of patchFlag means children are guaranteed to be arrays
            patchKeyedChildren(
                c1 as VNode[],
                c2 as VNodeArrayChildren,
                container,
                anchor,
                parentComponent,
                parentSuspense,
                isSVG,
                slotScopeIds,
                optimized
            )
            return
        } else if (patchFlag & PatchFlags.UNKEYED_FRAGMENT) {
            // unkeyed
            patchUnkeyedChildren(
                c1 as VNode[],
                c2 as VNodeArrayChildren,
                container,
                anchor,
                parentComponent,
                parentSuspense,
                isSVG,
                slotScopeIds,
                optimized
            )
            return
        }
    }
    // children has 3 possibilities: text, array or no children.
    if (shapeFlag & ShapeFlags.TEXT_CHILDREN) {
        // text children fast path
        if (prevShapeFlag & ShapeFlags.ARRAY_CHILDREN) {
            unmountChildren(c1 as VNode[], parentComponent, parentSuspense)
        }
        if (c2 !== c1) {
            hostSetElementText(container, c2 as string)
        }
    } else {
        if (prevShapeFlag & ShapeFlags.ARRAY_CHILDREN) {
            // prev children was array
            if (shapeFlag & ShapeFlags.ARRAY_CHILDREN) {
                // two arrays, cannot assume anything, do full diff
                patchKeyedChildren(
                    c1 as VNode[],
                    c2 as VNodeArrayChildren,
                    container,
                    anchor,
                    parentComponent,
                    parentSuspense,
                    isSVG,
                    slotScopeIds,
                    optimized
                )
            } else {
                // no new children, just unmount old
                unmountChildren(c1 as VNode[], parentComponent, parentSuspense, true
    }
        } else {
            // prev children was text OR null
            // new children is array OR null
            if (prevShapeFlag & ShapeFlags.TEXT_CHILDREN) {
                hostSetElementText(container, '')
            }
            // mount new if array
            if (shapeFlag & ShapeFlags.ARRAY_CHILDREN) {
                mountChildren(
                    c2 as VNodeArrayChildren,
                    container,
                    anchor,
                    parentComponent,
                    parentSuspense,
                    isSVG,
                    slotScopeIds,
                    optimized
                )
            }
        }
    }
}
上面的代码执行逻辑如下图所示,根据 flags 判断子元素的类型后,执行不同的操作函数:
最后就剩下 patchChildren 的实现了,这也是各类虚拟 DOM 框架中最难实现的函数,我们需要实现一个高效的更新算法,能够使用尽可能少的更新次数,来实现从老的子元素到新的子元素的更新;
举个例子,类似体育课站队的时候,大家一开始站一排,但是顺序是乱的,我们需要尽快把队伍按照个头左低右高排列
在 React 中,这种场景的处理逻辑是先进行循环,使用的是单侧插入的算法,我们在排队的时候挨个对比,如果你站我右边,并且个头比我高一点,说明咱俩的相对位置和最终队伍的位置是一致的,暂时不需要变化,如果你比我个头矮,就需要去我左边找到一个正确的位置插队进去
由于都只向单侧插入,最后我们就会把所有的节点移动到正确的位置之上,这就是 React15 框架内虚拟节点 diff 的逻辑,初步实现了 DOM 的复用;而 Vue 2 借鉴了 snabbdom 的算法,在此基础上做了第一层双端对比的优化
首先 Web 场景之下对一个数组元素的操作,很少有直接全部替换的,比如我们操作一个表格,大概率是更关心表格某一行的一个字段、新增一行、删除一行,或者是对表格某个字段进行排序,所以我们可以从纯算法的场景之中加入实际应用的场景
如果我们只是在表格里新增一行,那么可以不要一开始就开始循环,而是可以先进行节点的预判
比如,在下面的例子中,新的节点就是在老的节点中新增和删除了几个元素,我们在循环之前,先进行头部元素的判断;在这个例子里,可以预判出头部元素的 a、b、c、d 是一样的节点,说明节点不需要重新创建,我们只需要进行属性的更新,然后进行队尾元素的预判,可以判断出 g 和元素也是一样的:
a b c d e f g h
a b c d i f j g h
这样我们虚拟 DOM diff 的逻辑就变成了下面的结构, 现在只需要比较 ef 和 ifg 的区别:
(a b c d) e f (g h)
(a b c) d) i f j (g h)
相比于之前的对比场景,我们需要遍历的运算量就大大减小了
而且,有很多场景比如新增一行或者删除一行的简单场景,预判完毕之后,新老元素有一个处于没有元素的状态,我们就可以直接执行 mount 或者 unmout 完成对比的全过程,不需要再进行复杂的遍历:
(a b c d)
(a b c d) e
(a b c) d
(a b c
双端对比的原理大致就是这样;最后双端对比之后的执行逻辑这一部分需要一些算法知识,下面会我详细介绍,这里你只需要掌握大概的思路
想让一个队伍尽快按照个头排好序,如果能够计算出,在队伍中,个头从低到高依次递增的最多的队列,让这些人站在原地不动,其余人穿插到他们中间,就可以最大化减少人员的移动,这就是一个最长底层子序列的算法问题
前面也说了,在执行 diff 之前,要根据需要判断每个虚拟 DOM 节点有哪些属性需要计算,因为无论响应式数据怎么变化,静态的属性和节点都不会发生变化
所以我们看每个节点 diff 的时候会做什么,在 renderer.ts 代码文件中就可以看到代码,主要就是通过虚拟 DOM 节点的 patchFlag 树形判断是否需要更新节点
方法就是使用 & 操作符来判断操作的类型,比如 patchFlag & PatchFlags.CLASS 来判断当前元素的 class 是否需要计算 diff;shapeFlag & ShapeFlags.ELEMENT 来判断当前虚拟 DOM 是 HTML 元素还是 Component 组件;这个“&”其实就是位运算的按位与
// class
// this flag is matched when the element has dynamic class bindings.
if (patchFlag & PatchFlags.CLASS) {
    if (oldProps.class !== newProps.class) {
        hostPatchProp(el, 'class', null, newProps.class, isSVG)
    }
}
// style
// this flag is matched when the element has dynamic style bindings
if (patchFlag & PatchFlags.STYLE) {
    hostPatchProp(el, 'style', oldProps.style, newProps.style, isSVG)
}
if (shapeFlag & ShapeFlags.ELEMENT) {
    processElement(
        n1,
        n2,
        container,
        anchor,
        parentComponent,
        parentSuspense,
        isSVG,
        slotScopeIds,
        optimized
    )
} else if (shapeFlag & ShapeFlags.COMPONENT) {
    processComponent(
        n1,
        n2,
        container,
        anchor,
        parentComponent,
        parentSuspense,
        isSVG,
        slotScopeIds,
        optimized
    )
}
上面的代码中 & 就是按位与的操作符,这其实是二进制上的计算符号,所以我们首先要了解一下什么是二进制
我们日常使用的数字都是十进制数字,比如数字 13 就是 110+3 的运算结果,每个位置都是代表 10 的 n 次方;13 也可以使用二进制表达,因为二进制每个位置只能是 0 和 1 两个数字,每个位置代表的是 2 的 n 次方,13 在二进制里是 1101,就是 18+14+02+1*1
而在 JavaScript 中我们可以很方便地使用 toString(2) 的方式,把十进制数字转换成二进制;运算的概念很简单,就是在二进制上的“与”和“或”运算:
(13).toString(2) // 1101
0 & 0 // 0
0 & 1 // 0
1 & 0 // 0
1 & 1 // 1
0 | 0 // 0
0 | 1 // 1
1 | 0 // 1
1 | 1 // 1
1 << 2 // 1左移动两位,就是100 就是1*2平方 = 4
二进制中,我们每个位置只能是 0 或者 1 这两个值,& 和 | 的概念和 JavaScript 中的 && 和 || 保持一致;两个二进制的 & 运算就是只有两个二进制位置都是 1 的时候,结果是 1,其余情况运算结果都是 0;| 是按位置进行“或”运算,只有两个二进制位置都是 0 的时候,结果是 0,其余情况运算结果都是 1;并且,还可以通过左移 << 和右移 >> 操作符,实现乘以 2 和除以 2 的效果
由于这些都是在二进制上的计算,运算的性能通常会比字符串和数字的计算性能要好,这也是很多框架内部使用位运算的原因
这么说估计你不是很理解,我们结合一个 LeetCode 题看看为什么说二进制的位运算性能更好
我们来做一下 LeetCode231 题,题目描述很简单,判断数字 n 是不是 2 的幂次方,也就是说,判断数字 n 是不是 2 的整次方,比如 2、4、8;我们可以很轻松地写出 JavaScript 的解答,n 一直除以 2,如果有余数就是 false,否则就是 true:
var isPowerOfTwo = function (n) {
    if (n === 1) return true
    while (n > 2) {
        n = n / 2
        if (n % 2 !== 0) return false
    }
    return n === 2
};
不过上面的解答我们可以用位运算来优化
先来分析一下 2 的幂次方的特点
2 的幂次方就是数字 1 左移动若干次,其余位置全部都是 0,所以 n-1 就是最高位变成0,其余位置都变成 1,就像十进制里的 10000-1 = 9999。这样,n 和 n-1 每个二进制位的数字都不一样,我们可以很轻松地用按位“与”来判断这个题的答案,如果 n&n-1 是 0 的话,数字 n 就符合 2 的整次幂的特点:
16
10000
16-1 = 15
01111
16&15 == 0
var isPowerOfTwo = function(n) {
    return n>0 && (n & (n - 1)) === 0
};
所以我们使用位运算提高了代码的整体性能
好,搞清楚为什么用位运算,我们回来看 diff 判断,如何根据位运算的特点,设计出权限的组合认证方案
比如 Vue 中的动态属性,有文本、class、style、props 几个属性,我们可以使用二进制中的一个位置来表示权限,看下面的代码,我们使用左移的方式分别在四个二进制上标记了 1,代表四种不同的权限,使用按位或的方式去实现权限授予
比如,一个节点如果 TEXT 和 STYLE 都需要修改,我们只需要使用 | 运算符就可以得到 flag1 的权限表示,这就是为什么 Vue 3 中针对虚拟 DOM 类型以及虚拟 DOM 需要动态计算 diff 的树形都做了标记,你可以在 Vue 3 的源码中看到下面的配置:
const PatchFlags = {
    TEXT:1, // 0001
    CLASS: 1<<1, // 0010
    STYLE:1<<2, // 0100
    PROPS:1<<3 // 1000
}
const flag1 = PatchFlags.TEXT | PatchFlags.STYLE // 0101
// 权限校验
flag1 & PatchFlags.TEXT // 有权限,结果大于1
flag1 & PatchFlags.CLASS //没有权限 是0
然后就到了虚拟 DOM 计算 diff 中的算法了
上面我们详细介绍了在虚拟 diff 计算中,如果新老子元素都是数组的时候,需要先做首尾的预判,如果新的子元素和老的子元素在预判完毕后,未处理的元素依然是数组,那么就需要对两个数组计算 diff,最终找到最短的操作路径,能够让老的子元素通过尽可能少的操作,更新成为新的子元素
Vue 3 借鉴了 infero 的算法逻辑,就像操场上需要按照个头从低到高站好一样,我们采用的思路是先寻找一个现有队列中由低到高的队列,让这个队列尽可能的长,它们的相对位置不需要变化,而其他元素进行插入和移动位置,这样就可以做到尽可能少的操作DOM
所以如何寻找这个最长递增的序列呢?这就是今天的重点算法知识了,我们看 LeetCode 第 300 题,题目描述如下, 需要在数组中找到最长底层的自序列长度:
给你一个整数数组 nums,找到其中最长严格递增子序列的长度
子序列是由数组派生而来的序列,删除(或不删除)数组中的元素而不改变其余元素的顺序
例如,[3,6,2,7] 是数组 [0,3,1,6,2,2,7] 的子序列
=
输入:nums = [10,9,2,5,3,7,101,18]
输出:4
解释:最长递增子序列是 [2,3,7,101],因此长度为 4
首先我们可以使用动态规划的思路,通过每一步的递推,使用 dp 数组,记录出每一步操作的最优解,最后得到全局最优解
在这个例子中,我们可以把 dp[i] 定义成 nums[0] 到 nums[i] 这个区间内,数组的最长递增子序列的长度,并且 dp 数组的初始值设为 1
从左边向右递推,如果 nums[i+1] > nums[i],dp[i+1]就等于 dp[i]+1;如果 nums[i+1] < nums[i],就什么都不需要干,这样我们在遍历的过程中,就能根据数组当前位置之前的最长递增子序列长度推导出 i+1 位置的最长递增子序列长度
所以可以得到如下解法:
/**
* @param {number[]} nums
* @return {number}
*/
const lengthOfLIS = function (nums) {
    let n = nums.length;
    if (n == 0) {
        return 0;
    }
    let dp = new Array(n).fill(1);
    for (let i = 0; i < n; i++) {
        for (let j = 0; j < i; j++) {
            if (nums[j] < nums[i]) {
                dp[i] = Math.max(dp[i], dp[j] + 1);
            }
        }
    }
    return Math.max(...dp)
}
由于我们需要两层循环,所以这个解法的时间复杂度是 n 的平方,这个解法其实已经不错了,但是还有更优秀的解法,也就是 Vue 3 中用到的算法:贪心 + 二分
我们再看一下这个题,贪心的思路就是在寻找最长递增的序列,所以,[1,3]要比[1,5]好,也就是说,在这个上升的序列中,我们要让上升速度尽可能变得慢,这样才有可能让后面的元素尽可能也递增
我们可以创建一个 arr 数组,用来保存这种策略下的最长递增子序列
如果当前遍历的 nums[i] 大于 arr 的最后一个元素,也就是大于 arr 的最大值时,我们把nums[i] 追加到后面即可,否则我们就在 arr 中寻找一个第一个大于 num[i] 的数字并替换它;因为是 arr 是递增的数列,所以在寻找插入位置的时候,我们可以使用二分查找的方式,把整个算法的复杂度变成 O(nlgn)
下面的代码就是贪心 + 二分的解法,我们可以得到正确的最长递增子序列的长度:
/**
* @param {number[]} nums
* @return {number}
*/
const lengthOfLIS = function (nums) {
    let len = nums.length
    if (len <= 1) {
        return len
    }
    let arr = [nums[0]]
    for (let i = 0; i < len; i++) {
        // nums[i] 大于 arr 尾元素时,直接追加到后面,递增序列长度+1
        if (nums[i] > arr[arr.length - 1]) {
            arr.push(nums[i])
        } else {
            // 否则,查找递增子序列中第一个大于numsp[i]的元素 替换它
            // 递增序列,可以使用二分查找
            let left = 0
            let right = arr.length - 1
            while (left < right) {
                let mid = (left + right) >> 1
                if (arr[mid] < nums[i]) {
                    left = mid + 1
                } else {
                    right = mid
                }
            }
            arr[left] = nums[i]
        }
    }
    return arr.length
};
但是贪心 + 二分的这种解法,现在只能得到最长递增子序列的长度,但是最后得到的 arr 并不一定是最长递增子序列,因为我们移动的 num[i] 位置可能会不正确,只是得到的数组长度是正确的,所以我们需要对这个算法改造一下,把整个数组复制一份之后,最后也能得到正确的最长递增子序列
具体代码怎么写呢?我们来到 Vue 3 的 renderer.ts 文件中,函数 getSquenece 就是用来生成最长递增子序列,看下面的代码:
// https://en.wikipedia.org/wiki/Longest_increasing_subsequence
function getSequence(arr: number[]): number[] {
    const p = arr.slice() //赋值一份arr
    const result = [0]
    let i, j, u, v, c
    const len = arr.length
    for (i = 0; i < len; i++) {
        const arrI = arr[i]
        if (arrI !== 0) {
            j = result[result.length - 1]
            if (arr[j] < arrI) {
                p[i] = j // 存储在result最后一个索引的值
                result.push(i)
                continue
            }
            u = 0
            v = result.length - 1
            // 二分查找,查找比arrI小的节点,更新result的值
            while (u < v) {
                c = (u + v) >> 1
                if (arr[result[c]] < arrI) {
                    u = c + 1
                } else {
                    v = c
                }
            }
            if (arrI < arr[result[u]]) {
                if (u > 0) {
                    p[i] = result[u - 1]
                }
                result[u] = i
            }
        }
    }
    u = result.length
    v = result[u - 1]
    // 查找数组p 找到最终的索引
    while (u-- > 0) {
        result[u] = v
        v = p[v]
    }
    return result
}
这段代码就是 Vue 3 里的实现,result 存储的就是长度是 i 的递增子序列最小末位置的索引,最后计算出最长递增子序列
我们得到 increasingNewIndexSequence 队列后,再去遍历数组进行 patch 操作就可以实现完整的 diff 流程了:
for (i = toBePatched - 1; i >= 0; i--) {
    const nextIndex = s2 + i
    const nextChild = c2[nextIndex] as VNode
    const anchor =
        nextIndex + 1 < l2 ? (c2[nextIndex + 1] as VNode).el : parentAnchor
    if (newIndexToOldIndexMap[i] === 0) {
        // mount new
        patch(
            null,
            nextChild,
            container,
            anchor,
            parentComponent,
            parentSuspense,
            isSVG,
            slotScopeIds,
            optimized
        )
    } else if (moved) {
        // move if:
        // There is no stable subsequence (e.g. a reverse)
        // OR current node is not among the stable sequence
        if (j < 0 || i !== increasingNewIndexSequence[j]) {
            move(nextChild, container, anchor, MoveType.REORDER)
        } else {
            j--
        }
    }
}
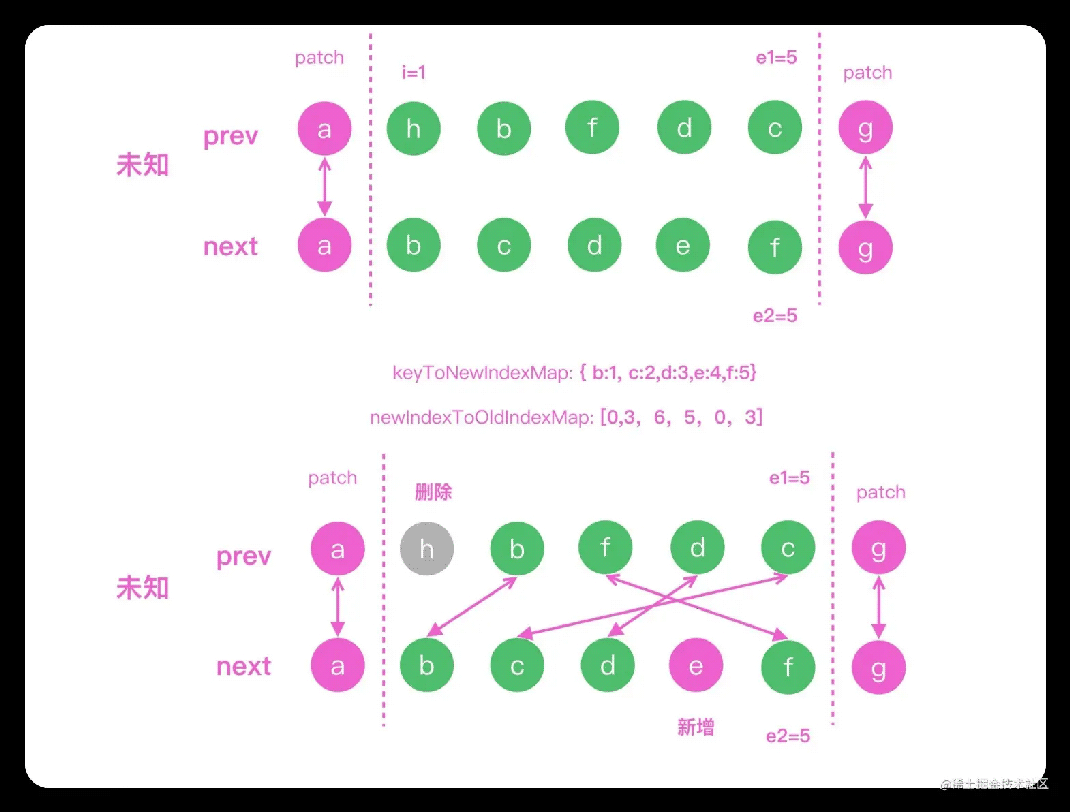
上面代码的思路,我们用下图演示。做完双端对比之后,a 和 g 已经计算出可以直接复用 DOM,剩下的队列中我们需要把 hbfdc 更新成 abdef
首先我们需要使用 keyToNewIndexMap 存储新节点中每个 key 对应的索引,比如下图中 key 是 c 的元素的索引就是 2;然后计算出 newIndexOldIndexMap 存储这个 key 在老的子元素中的位置,我们可以根据 c 的索引是 2,在 newIndexOldIndexMap 中查询到在老的子元素的位置是 6, 关于 newIndexOldIndexMap 的具体逻辑你可以在上面的代码中看到: