在项目中常常需要切换不同的组件,这时候我们就可以使用vue内置的动态组件的方式来实现。
component 组件:在页面中通过使用component元素,在根据组件中的is属性来动态的切换不同的组件。
demo:
<template> //index.vue
  <div class="contain-wrap">
   <input type="button" @click="fatherBtn()" value="点击显示子组件">
  <component :is="which_to_show" @fatherEvent="btnclick" ></component>
  </div>
</template>
<script>
import FoodNews from "./foodNews"
import List from "./list"
import About from "./about"
export default {
  name: "index",
  components:{
    List,
    FoodNews,
  },
  data() {
    return {
      arr:['123','如图表'],
      content:'',
      which_to_show:"List",
      params:"动态主键之间的传参"
    };
  },
  methods:{
   btnclick(params){
     console.log(`呜呜~ 我被子组件${params}触发了 嘤嘤`)
   },
   fatherBtn(){
     let arr=["List","FoodNews"]
     let index=arr.indexOf(this.which_to_show)
     if(index<2){
       this.which_to_show=arr[index+1]
     }else{
       this.which_to_show = arr[0];
     }
   }
  },
  created() {},
};
</script>
<style module lang="scss">
 .title{
       color:purple;
     }
</style>
子组件:
<template>//foodNews.vue
  <div :class="$style.container">
       <input type="button" @click="btnClick()" value="子组件操作这个值">
  </div>
</template>
<script>
export default {
  name: "FoodNews",
  data() {
    return {};
  },
  methods: {
     btnClick(){
       this.$emit("fatherEvent","foodNews")
    }
  }
};
</script>
<style  module lang="scss">
   .container{
     width: 500px;
     height:500px;

   }
   .title{
       color:skyblue;
     }
</style>
<template>//list.vue
    <div class="contain-wrap" :style="{backgroundImage: 'url('+backgroundImg+')'}">
        <div class="contain" >
       <input type="button" @click="btnClick3()" value="List子组件操作这个值">
        </div>

    </div>
</template>
<script>
    import NxNav from "../components/NxNav";
    export default {
        name: "index",
        data() {
            return {
             backgroundImg:require('@/assets/foot/17.jpg'),
            }
        },
        methods:{
            btnClick3(){
             this.$emit("fatherEvent","list")
            }
        },
         mounted(){
    },
    }
</script>
<style scoped lang="scss">
    .contain-wrap{
        height: auto;
        min-height:500px;
        display: flex;
        flex-direction: column;
    }
</style>
点击点击显示子组件按钮就可以实现动态组件之间的切换。
动态组件传参:
通过上面的demo可以实现组件之间的切换,其实也是可以给动态组件传值的。
demo: 还是上面那个demo只不过在上面加上了一些传值的内容
//index.vue
  <component :is="which_to_show" :tt="params" :ff="arr" :yy="which_to_show"></component>
 props:{//list.vue
    tt:{
      type:String
    },
    ff:{
      type:Array
    },
    yy:{
      type:String
    }},
     created() {
        console.log(this.tt)
        console.log(this.yy)
        console.log(this.ff)
  },
 props:{//foodNews.vue
    tt:{
      type:String
    },
    ff:{
      type:Array
    },
    yy:{
      type:String
    }
  },
   created() {
        console.log(this.tt)
        console.log(this.yy)
        console.log(this.ff)
  },
效果图:
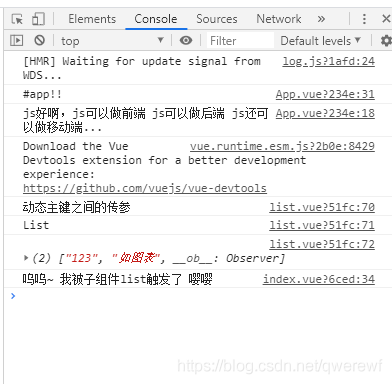
通过控制台打印你会发现,只要绑定到动态组件上的属性,在每一个组件中都可以获取到,并且也可以在动态组件中绑定事件
keep-alive:动态切换掉的组件是被移除掉了,如果把切换出去的组件保留在内存中,可以保留它的状态或避免重新渲染。为此可以添加一个 keep-alive 指令参数:
 <keep-alive>
  <component @fatherEvent="btnclick"  :is="which_to_show" :tt="params" :ff="arr" :yy="which_to_show"></component>
  </keep-alive>
通过使用keep-alive来存储被移除的组件的状态。这样用户再切换回来的时候仍然可以看到之前的内容。
actived、deactivated钩子函数的使用
keep-alive可以配合actived、deactivated钩子函数使用,actived表示在keep-alive缓存组件被激活时调用。deactivated表示在 keep-alive 缓存的组件被停用时调用。因此我们可以在这个钩子函数中做一些逻辑数据处理
组件:定义的组件是页面的一部分,组件具有共用行,复用性,组件内部的data数据是被当前调用组件独立使用的,不影响其他使用
全局组件:只要定义了,处处可以使用,性能不高,但使用起来简单
局部组件:定义了,只有注册才能使用,性能高,使用起来复杂
子组件通过props接受父组件传递来的值,子组件可以接受父组件传递来的String,Boolen,Number,Array,Object,Function这些数据类型
单项数据流概念:子组件可以使用父组件传递来的数据,但是绝对不能修改传递来的数据;子组件可以在data中添加一个属性值来接收父组件传递来的值,这样就可以修改值了,这里修改的是子组件自己的data值:如 newcount: this.count
如果子组件没有props接受父组件传递来的值,即Non-prop属性;那么父组件传递来的值就会成为子组件标签上的属性值
<!DOCTYPE html>
<html>
	<head>
		<meta charset="utf-8">
		<title></title>
	</head>
	<body>
		<div id="root"></div>
	</body>
	<script src="https://unpkg.com/vue@next"></script>
	<script>
		//局部组件
		const localComponent = {
			data() {
				return {
					val: "局部组件"
				}
			},
			props: ['message2', 'params'],
			template: `
			 <div>{{val}}:{{message2}}{{params.a}}</div>
			`
		}
		var app = Vue.createApp({
			data() {
				return {
					msg: "组件传值-我是一个全局组件",
					msg2: "组件传值-我是一个局部组件",
					eventFun: () => {
						console.log("我是父组件传递来的函数")
					},
					params: {
						a: '1',
						b: '2',
						c: '3'
					},
					oldcount: 1
				}
			},
			components: {
				localComponent
			},
			template: `
			<div>
				<global-component v-bind:message="msg" v-bind:event="eventFun" v-bind:count="oldcount" />
				<local-component v-bind:message2="msg2" v-bind:params="params" />
			</div>
			`
		});
		//全局组件
		app.component("globalComponent", {
			data() {
				return {
					val: "全局组件",
					newcount: this.count
				}
			},
			props: {
				message: {
					type: String, //传递参数类型,String类型
					default: "默认值"
				},
				event: Function, //传递参数类型,function类型
				count: Number
			},
			methods: {
				handleClick() {
					console.log("触发父组件传递来的函数");
					this.event(); //父组件传递来的函数
					this.newcount += 1; //每次点击加1
				}
			},
			template: `<div v-on:click="handleClick">{{val}}:{{message}}{{newcount}}</div>`
		});
		var vm = app.mount("#root");
	</script>
</html>
1.在子组件上添加自定义事件触发父组件methods中的方法,获取子组件传递来的值;
2.在子组件methods中添加方法,通过this.$emit(“父组件中自定义事件”,参数,…)触发父组件中的方法并传递参数
<!DOCTYPE html>
<html>
	<head>
		<meta charset="utf-8">
		<title></title>
	</head>
	<body>
		<div id="root"></div>
	</body>
	<script src="https://unpkg.com/vue@next"></script>
	<script>
		const app = Vue.createApp({
			data() {
				return {
					count: 1
				}
			},
			methods: {
				handleComponent(params, params2) {
					console.log(params)
					this.count += params2;
				}
			},
			template: `
			   <div>
			         <component-sendvalue v-bind:count="count" v-on:fatherComponent="handleComponent" />
			   </div>
			`
		});
		app.component("componentSendvalue", {
			props: ['count'],
			methods: {
				childComponent() {
					this.$emit("fatherComponent", "我是子组件,向你问好", 2);
				}
			},
			template: `
			  <div v-on:click="childComponent">
			      我是子组件,我想向父组件传值:{{count}}
			  </div>
			  `
		});
		const vm = app.mount("#root");
	</script>
</html>
子组件也可以通过v-model进行数据之间的双向绑定:
const app = Vue.createApp({
			data() {
				return {
					count: 1,
					count2: 1
				}
			},
			template: `
			  <child-component v-model:count="count" v-model:count2="count2" />
			`
		});
		app.component("childComponent", {
			props: ["count", "count2"],
			methods: {
				handelClick() {
					this.$emit("update:count", this.count + 4)
				}
			},
			template: `
			  <div v-on:click="handelClick">我是子组件:{{count}}:{{count2}}</div>
			`
		})
		const vm = app.mount("#root");
通过在父组件中添加一个provide方法,并把要传递的值写入进去;
在孙子组件或者在下级组件中通过添加inject数组获取要传递的值
<!DOCTYPE html>
<html>
	<head>
		<meta charset="utf-8">
		<title></title>
	</head>
	<body>
		<div id="root"></div>
	</body>
	<script src="https://unpkg.com/vue@next"></script>
	<script>
		const app = Vue.createApp({
			data() {
				return {
					count: 2
				}
			},
			// provide: {
			// 	count: 1
			// },
			provide() {
				return {
					count: this.count
				}
			},
			template: `
              <child-componet />
			`
		});
		app.component("child-componet", {
			template: `<div>
			我是孩子组件:我要引入我的孩子组件
			<grandson-componet />
			</div>`
		})
		app.component("grandson-componet", {
			inject: ['count'],
			template: `<div>我是孙子组件:{{count}}</div>`
		})
		const vm = app.mount("#root");
		//页面输出:
		// 我是孩子组件:我要引入我的孩子组件
		//我是孙子组件:2
	</script>
</html>
通过ref动态绑定组件,并通过this.$refs[‘组件名称’]获取组件的不同信息
以上为个人经验,希望能给大家一个参考,也希望大家多多支持。

