TCP与UDP的差别如图:
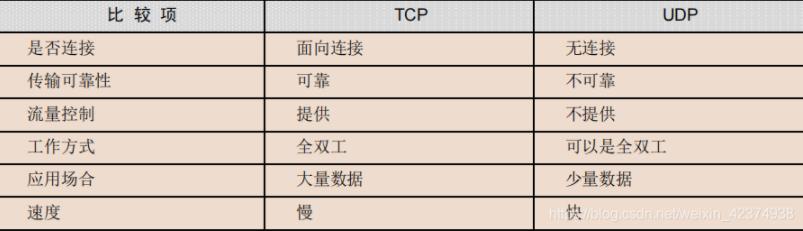
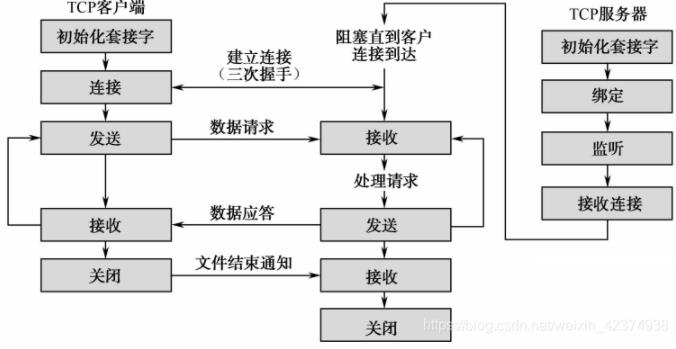
如下图所示,TCP能够为应用程序提供可靠的通信连接,使一台计算机发出的字节流无差错 地送达网络上的其他计算机。因此,对可靠性要求高的数据通信系统往往使用TCP传输数据,但在正式收发数据前,通信双方必须首先建立连接。

下面介绍基于TCP的经典编程模型,TCP客户端与服务器间的交互时序如下图所示:
TCP服务器端的具体实现如下:
建立工程TcpServer.pro,文件代码如下。
(1)头文件“tcpserver.h”中声明了需要的各种控件,TcpServer继承自QDialog,实现了服务器端的对话框显示与控制。其具体代码如下:
#include <QDialog>
#include <QListWidget>
#include <QLabel>
#include <QLineEdit>
#include <QPushButton>
#include <QGridLayout>
class TcpServer : public QDialog
{
Q_OBJECT
public:
TcpServer(QWidget *parent = 0,Qt::WindowFlags f=0);
~TcpServer();
private:
QListWidget *ContentListWidget;
QLabel *PortLabel;
QLineEdit *PortLineEdit;
QPushButton *CreateBtn;
QGridLayout *mainLayout;
};
(2)在源文件“tcpserver.cpp”中,TcpServer类的构造函数主要实现窗体各控件的创建、布局等,其具体代码如下:
#include "tcpserver.h"
TcpServer::TcpServer(QWidget *parent,Qt::WindowFlags f) : QDialog(parent,f)
{
setWindowTitle(tr("TCP Server"));
ContentListWidget = new QListWidget;
PortLabel = new QLabel(tr("端口:"));
PortLineEdit = new QLineEdit;
CreateBtn = new QPushButton(tr("创建聊天室"));
mainLayout = new QGridLayout(this);
mainLayout->addWidget(ContentListWidget,0,0,1,2);
mainLayout->addWidget(PortLabel,1,0);
mainLayout->addWidget(PortLineEdit,1,1);
mainLayout->addWidget(CreateBtn,2,0,1,2);
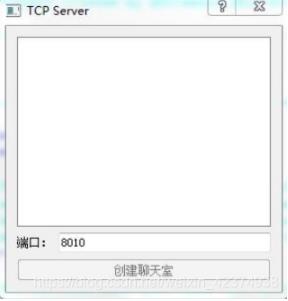
} (3)服务器端界面如下图所示:

以上完成了服务器端界面的设计,下面将详细完成聊天室的服务器端功能。
(1)在工程文件“TcpServer.pro”中添加如下语句:
QT += network
(2)在工程“TcpServer.pro”中添加C++类文件“tcpclientsocket.h”及“tcpclientsocket.cpp”,TcpClientSocket 继承自QTcpSocket,创建一个TCP套接字,以便在服务器端实现与客户端程序的通信。
头文件“tcpclientsocket.h”的具体代码如下:
#include <QTcpSocket>
#include <QObject>
class TcpClientSocket : public QTcpSocket
{
Q_OBJECT //添加宏(Q_OBJECT)是为了实现信号与槽的通信
public:
TcpClientSocket(QObject *parent=0);
signals:
void updateClients(QString,int);
void disconnected(int);
protected slots:
void dataReceived();
void slotDisconnected();
};
(3)在源文件“tcpclientsocket.cpp”中,构造函数(TcpClientSocket)的内容(指定了信号与槽的
连接关系)如下:
#include "tcpclientsocket.h"
TcpClientSocket::TcpClientSocket(QObject *parent)
{
connect(this,SIGNAL(readyRead()),this,SLOT(dataReceived())); // readyRead()是QIODevice的signal,由 QTcpSocket继承而来。QIODevice是所有输入/输出设备的一个抽象类,其中定义了基本的接口,在Qt中, QTcpSocket也被看成一个QIODevice,readyRead()信号在有数据到来时发出。
connect(this,SIGNAL(disconnected()),this,SLOT(slotDisconnected())); // disconnected()信号在断开连接时发出。
}
在源文件“tcpclientsocket.cpp”中,dataReceived()函数的具体代码如下:
void TcpClientSocket::dataReceived()
{
while(bytesAvailable()>0)
{
int length = bytesAvailable();
char buf[1024];
read(buf,length);
QString msg=buf;
emit updateClients(msg,length);
}
}
在源文件“tcpclientsocket.cpp”中,槽函数slotDisconnected()的具体代码如下:
void TcpClientSocket::slotDisconnected()
{
emit disconnected(this->socketDescriptor());
}
(4)在工程“TcpServer.pro”中添加C++类文件“server.h”及“server.cpp”,Server继承自QTcpServer,实现一 个TCP协议的服务器。利用QTcpServer,开发者可以监听到指定端口的TCP连接。其具体代码如下:
#include <QTcpServer>
#include <QObject>
#include "tcpclientsocket.h" //包含TCP的套接字
class Server : public QTcpServer
{
Q_OBJECT
//添加宏(Q_OBJECT)是为了实现信号与槽的通信
public:
Server(QObject *parent=0,int port=0);
QList<TcpClientSocket*> tcpClientSocketList;
signals:
void updateServer(QString,int);
public slots:
void updateClients(QString,int);
void slotDisconnected(int);
protected:
void incomingConnection(int socketDescriptor);
};
(5)在源文件“server.cpp”中,构造函数(Server)的具体内容如下:
#include "server.h"
Server::Server(QObject *parent,int port):QTcpServer(parent)
{
listen(QHostAddress::Any,port);
}
其中,listen(QHostAddress::Any,port)在指定的端口对任意地址进行监听。
QHostAddress定义了几种特殊的IP地址,如QHostAddress::Null表示一个空地址;
QHostAddress::LocalHost表示IPv4的本机地址127.0.0.1;
QHostAddress::LocalHostIPv6表示IPv6的本机地址;
QHostAddress::Broadcast表示广播地址255.255.255.255;
QHostAddress::Any表示IPv4的任意地址0.0.0.0;
QHostAddress::AnyIPv6表示IPv6的任意地址。
在源文件“server.cpp”中,当出现一个新的连接时,QTcpSever触发incomingConnection()函数,参数
socketDescriptor指定了连接的Socket描述符,其具体代码如下:
void Server::incomingConnection(int socketDescriptor)
{
TcpClientSocket *tcpClientSocket=new TcpClientSocket(this); //创建一个新的TcpClientSocket与客户端通信。
connect(tcpClientSocket,SIGNAL(updateClients(QString,int), this,SLOT(updateClients(QString,int))); //连接TcpClientSocket的updateClients信号。
connect(tcpClientSocket,SIGNAL(disconnected(int)),this, SLOT(slotDisconnected(int))); //连接 TcpClientSocket的disconnected信号。
tcpClientSocket->setSocketDescriptor(socketDescriptor); //将新创建的TcpClient Socket的套接字描述符指定为参数socketDescriptor。
tcpClientSocketList.append(tcpClientSocket); //将tcpClientSocket加入客户端套接字列表以便管理。
}
在源文件“server.cpp”中,updateClients()函数将任意客户端发来的信息进行广播,保证聊天室的所有成员均能看到其他人的发言。其具体代码如下:
void Server::updateClients(QString msg,int length)
{
emit updateServer(msg,length); //发出updateServer信号,用来通知服务器对话框更新相应的显示状态。
for(int i=0;i<tcpClientSocketList.count();i++) //实现信息的广播,tcpClientSocketList中保存了所有与服务器相连的TcpClientSocket对象。
{
QTcpSocket *item = tcpClientSocketList.at(i);
if(item->write(msg.toLatin1(),length)!=length)
{
continue;
}
}
}
在源文件“server.cpp”中,slotDisconnected()函数实现从tcpClientSocketList列表中将断开连接的
TcpClientSocket对象删除的功能。其具体代码如下:
void Server::slotDisconnected(int descriptor)
{
for(int i=0;i<tcpClientSocketList.count();i++)
{
QTcpSocket *item = tcpClientSocketList.at(i);
if(item->socketDescriptor()==descriptor)
{
tcpClientSocketList.removeAt(i);
return;
}
}
return;
}
(6)在头文件“tcpserver.h”中添加如下内容:
#include "server.h"
private:
int port;
Server *server;
public slots:
void slotCreateServer();
void updateServer(QString,int);
(7)在源文件“tcpserver.cpp”中,在构造函数中添加如下代码:
port=8010;
PortLineEdit->setText(QString::number(port));
connect(CreateBtn,SIGNAL(clicked()),this,SLOT(slotCreateServer()));
其中,槽函数slotCreateServer()用于创建一个TCP服务器,具体内容如下:
void TcpServer::slotCreateServer()
{
server = new Server(this,port); //创建一个Server对象
connect(server,SIGNAL(updateServer(QString,int)),this,
SLOT(updateServer(QString,int)));
CreateBtn->setEnabled(false);
}
槽函数updateServer()用于更新服务器上的信息显示,具体内容如下:
void TcpServer::updateServer(QString msg,int length)
{
ContentListWidget->addItem(msg.left(length));
}
(8)此时,工程中添加了很多文件,工程文件中的内容已经被改变,需要重新在工程文件
“TcpServer.pro”中添加:
QT += network
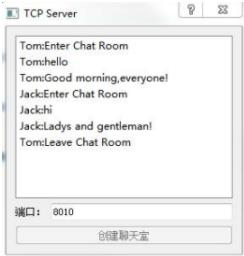
此时,运行服务器端工程“TcpServer.pro”编译通过。单击“创建聊天室”按钮,便开通了一个TCP聊天室的服务器,如下图所示:
TCP客户端编程具体步骤如下:
建立工程“TcpClient.pro”,文件代码如下。
(1)在头文件“tcpclient.h”中,TcpClient类继承自QDialog类,声明了需要的各种控件,其具体代码如下:
#include <QDialog>
#include <QListWidget>
#include <QLineEdit>
#include <QPushButton>
#include <QLabel>
#include <QGridLayout>
class TcpClient : public QDialog
{
Q_OBJECT
public:
TcpClient(QWidget *parent = 0,Qt::WindowFlags f=0);
~TcpClient();
private:
QListWidget *contentListWidget;
QLineEdit *sendLineEdit;
QPushButton *sendBtn;
QLabel *userNameLabel;
QLineEdit *userNameLineEdit;
QLabel *serverIPLabel;
QLineEdit *serverIPLineEdit;
QLabel *portLabel;
QLineEdit *portLineEdit;
QPushButton *enterBtn;
QGridLayout *mainLayout;
};
(2)源文件“tcpclient.cpp”的具体代码如下:
#include "tcpclient.h"
TcpClient::TcpClient(QWidget *parent,Qt::WindowFlags f)
: QDialog(parent,f)
{
setWindowTitle(tr("TCP Client"));
contentListWidget = new QListWidget;
sendLineEdit = new QLineEdit;
sendBtn = new QPushButton(tr("发送"));
userNameLabel = new QLabel(tr("用户名:"));
userNameLineEdit = new QLineEdit;
serverIPLabel = new QLabel(tr("服务器地址:"));
serverIPLineEdit = new QLineEdit;
portLabel = new QLabel(tr("端口:"));
portLineEdit = new QLineEdit;
enterBtn= new QPushButton(tr("进入聊天室"));
mainLayout = new QGridLayout(this);
mainLayout->addWidget(contentListWidget,0,0,1,2);
mainLayout->addWidget(sendLineEdit,1,0);
mainLayout->addWidget(sendBtn,1,1);
mainLayout->addWidget(userNameLabel,2,0);
mainLayout->addWidget(userNameLineEdit,2,1);
mainLayout->addWidget(serverIPLabel,3,0);
mainLayout->addWidget(serverIPLineEdit,3,1);
mainLayout->addWidget(portLabel,4,0);
mainLayout->addWidget(portLineEdit,4,1);
mainLayout->addWidget(enterBtn,5,0,1,2);
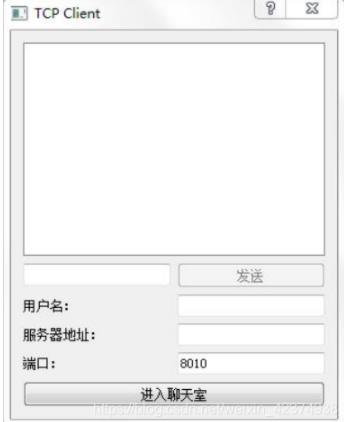
}(3)客户端界面如下图所示:

以上完成了客户端界面的设计,下面将完成客户端的真正聊天功能。
(1)在客户端工程文件“TcpClient.pro”中添加如下语句:
QT += network
(2)在头文件“tcpclient.h”中添加如下代码:
#include <QHostAddress>
#include <QTcpSocket>
private:
bool status;
int port;
QHostAddress *serverIP;
QString userName;
QTcpSocket *tcpSocket;
public slots:
void slotEnter();
void slotConnected();
void slotDisconnected();
void dataReceived();
void slotSend();
(3)在源文件“tcpclient.cpp”中添加头文件:
#include <QMessageBox>
#include <QHostInfo>
在其构造函数中添加如下代码:
status = false;
port = 8010;
portLineEdit->setText(QString::number(port));
serverIP =new QHostAddress();
connect(enterBtn,SIGNAL(clicked()),this,SLOT(slotEnter()));
connect(sendBtn,SIGNAL(clicked()),this,SLOT(slotSend()));
sendBtn->setEnabled(false);
在以上代码中,槽函数slotEnter()实现了进入和离开聊天室的功能。具体代码如下:
void TcpClient::slotEnter()
{
    if(!status)    //status表示当前的状态,true表示已经进入聊天室,false表示已经离开聊天室。 这里根据status的状态决定是执行“进入”还是“离开”的操作。
    {
        /* 完成输入合法性检验 */
        QString ip = serverIPLineEdit->text();
        if(!serverIP->setAddress(ip))//用来判断给定的IP地址能否被正确解析。
        {
            QMessageBox::information(this,tr("error"),tr("server ip address error!"));
            return;
        }
        if(userNameLineEdit->text()=="")
        {
            QMessageBox::information(this,tr("error"),tr("User name error!"));
            return;
        }
        userName=userNameLineEdit->text();
        /* 创建了一个QTcpSocket类对象,并将信号/槽连接起来 */
        tcpSocket = new QTcpSocket(this);
        connect(tcpSocket,SIGNAL(connected()),this,SLOT (slotConnected()));
        connect(tcpSocket,SIGNAL(disconnected()),this,SLOT (slotDisconnected()));
        connect(tcpSocket,SIGNAL(readyRead()),this,SLOT (dataReceived()));
        tcpSocket->connectToHost(*serverIP,port);    //与TCP服务器端连接,连接成功后发出connected() 信号
        status=true;
    }
    else
    {
        int length=0;
        QString msg=userName+tr(":Leave Chat Room");//构造一条离开聊天室的消息。
        if((length=tcpSocket->write(msg.toLatin1(),msg.length()))!=msg.length())                                                //通知服务器端以上 构造的消息
        {
            return;
        }
        tcpSocket->disconnectFromHost();                    //与服务器断开连接,断开连接后发出disconnected()信号。
        status=false; //将status状态复位
    }
}
在源文件“tcpclient.cpp”中,槽函数slotConnected()为connected()信号的响应槽,当与服务器连接成功后,客户端构造一条进入聊天室的消息,并通知服务器。其具体代码如下:
void TcpClient::slotConnected()
{
sendBtn->setEnabled(true);
enterBtn->setText(tr("离开"));
int length=0;
QString msg=userName+tr(":Enter Chat Room");
if((length=tcpSocket->write(msg.toLatin1(),msg.length()))!=msg.length())
{
return;
}
}
在源文件“tcpclient.cpp”中,槽函数slotSend()的具体代码如下:
void TcpClient::slotSend()
{
if(sendLineEdit->text()=="")
{
return;
}
QString msg=userName+":"+sendLineEdit->text();
tcpSocket->write(msg.toLatin1(),msg.length());
sendLineEdit->clear();
}
在源文件“tcpclient.cpp”中,槽函数slotDisconnected()的具体内容如下:
void TcpClient::slotDisconnected()
{
sendBtn->setEnabled(false);
enterBtn->setText(tr("进入聊天室"));
}
当有数据到来时,触发源文件“tcpclient.cpp”的dataReceived()函数,从套接字中将有效数据取出并显示,其代码如下:
void TcpClient::dataReceived()
{
while(tcpSocket->bytesAvailable()>0)
{
QByteArray datagram;
datagram.resize(tcpSocket->bytesAvailable());
tcpSocket->read(datagram.data(),datagram.size());
QString msg=datagram.data();
contentListWidget->addItem(msg.left(datagram.size()));
}
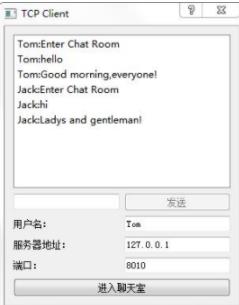
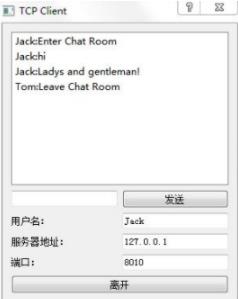
} (4)此时运行客户端“TcpClient.pro”工程,结果如下图所示:
最后,同时运行服务器和客户端程序,运行结果如下图所示,这里演示的是系统中登录了两 个用户的状态。