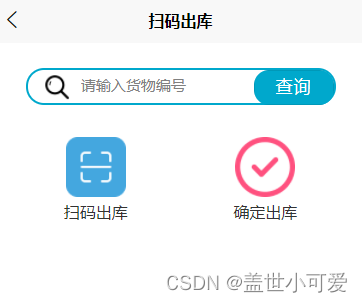
最近用uniapp开发h5 实现扫码功能
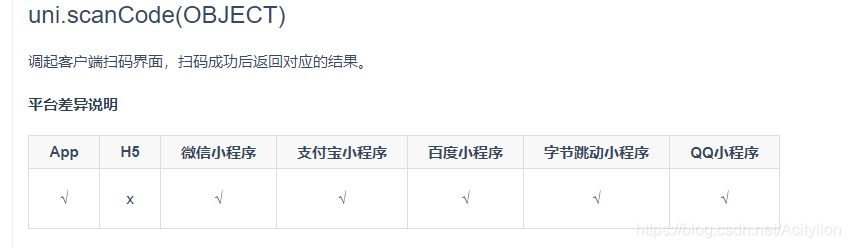
首先打开uniapp官网,在uni-app官网上发现uni-app不支持H5扫码功能。失望ing
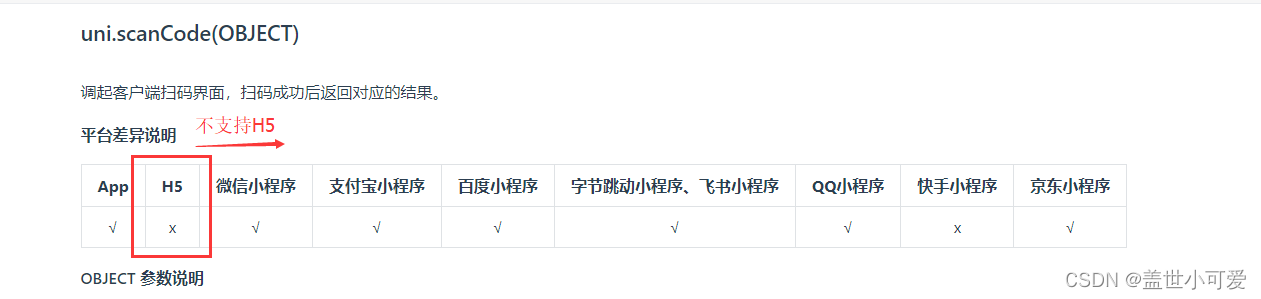
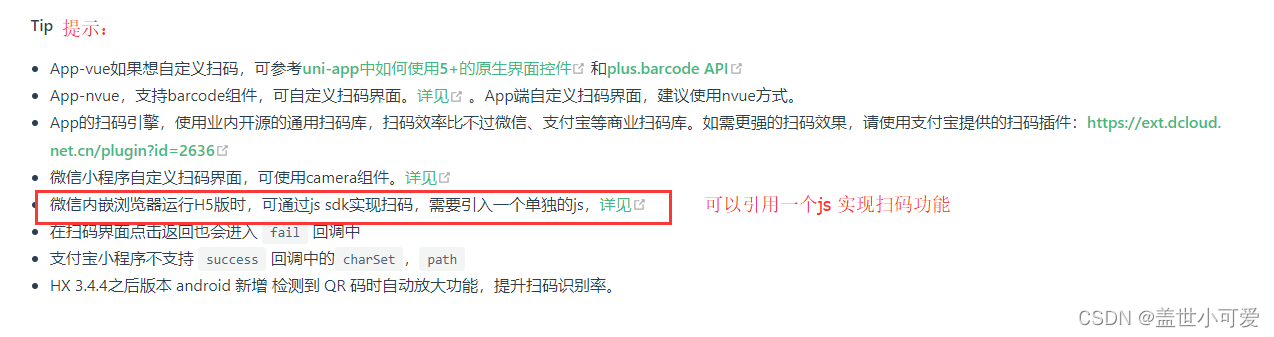
but 往官网下面看 有几行提示信息 惊喜ing
话不多说 上才艺
这里有两种引入方式:
1.按照文档的方法,下载js文件,直接引入到项目里
2.通过npm安装
npm install weixin-js-sdk --save
// 按需引入
import wx from 'weixin-js-sdk';
// 最好是在onLoad中调用
  onLoad: function () {
    this.getCofig();
  },

methods: {
    // 配置信息
    getCofig() {
      const that = this;
      let url = '';
      let ua = navigator.userAgent.toLowerCase();
      url = window.location.href.split('#')[0]; //获取到的url是当前页面的域名

      // GetWeixinScan 后端提供配置信息
      uni.request({
        url: '/api/goods/wx/wx_jsapi_ticket', // 此处找后端要接口 微信不能使用端口访问端口改为 wx
        method: 'GET',
        data: {
          url: url // 当前页面的域名
        },
        success: (response) => {
          const res = response.data;
          console.log(res, 'resres')
          if (res) {
            that.wxConfig(
              res.appId,
              res.timestamp,
              res.nonceStr,
              res.signature
            );
          } else {
            alert('获取配置信息返回为空');
          }
        }
        , fail: error => {
          console.log(error, '请求获取微信配置失败 请求方法:http://xx.haileer.top:8901/wx_jsapi_ticket');
        }
      });
    },
    //wx.config的配置
    wxConfig(appId, timestamp, nonceStr, signature) {
      wx.config({
        debug: false, // 开启调试模式,
        appId: appId, // 必填,企业号的唯一标识
        timestamp: timestamp, // 必填,生成签名的时间戳
        nonceStr: nonceStr, // 必填,生成签名的随机串
        signature: signature, // 必填,签名
        jsApiList: ['scanQRCode', 'checkJsApi'], // 必填,需要使用的JS接口列表
      });
      wx.ready(() => {
        console.log('配置完成,扫码前准备完成')
      })
      wx.error(function (res) {
        alert('出错了:' + res.errMsg); //wx.config配置错误,会弹出窗口哪里错误,然后根据微信文档查询即可。
      });
    },
} // 点击扫码 区分普通扫码和H5扫码
scan() {
const that = this
// #ifndef H5
uni.scanCode({
success: function (res) {
console.log("进来了1")
console.log('条码res:' + res);
console.log('条码类型:' + res.scanType);
console.log('条码内容:' + res.result);
},
fail: error => {
console.log("暂不支持1")
}
});
// #endif
// #ifdef H5
// this.log("暂不支持H5扫码 走onScan这个方法")
this.onScan()
// #endif
},
// h5扫描二维码并解析
onScan() {
const that = this;
wx.scanQRCode({
needResult: 1, // 默认为0,扫描结果由微信处理,1则直接返回扫描结果,
scanType: ['qrCode', 'barCode'], // 可以指定扫二维码还是一维码,默认二者都有
success: function (res) {
var result = res.resultStr; // 当 needResult 为 1 时,扫码返回的结果
var resultArr = result.split(','); // 扫描结果以逗号分割数组
var codeContent = resultArr[resultArr.length - 1]; // 获取数组最后一个元素,也就是最终的内容
},
fail: function (response) {
console.log("调用扫码失败")
that.$toast(response);
alert(' wx.scanQRCode失败')
},
});
},在调用后端接口获取config信息的时候
1.后端提供的接口 端口号使用wx代替
2.传给后端的url参数,记得一定是网页域名 const url = location.href.split(‘#’)[0]
3.可以提醒后端把jsapi_ticket的值也返回,便于在自行使用工具校验签名算法的时候输入
4.可以提醒后端把timestamp把后三位数去掉,因为签名校验中的timestamp最多只能输入10位
uniapp 不支持H5扫码功能 所以需要调用微信的SDK
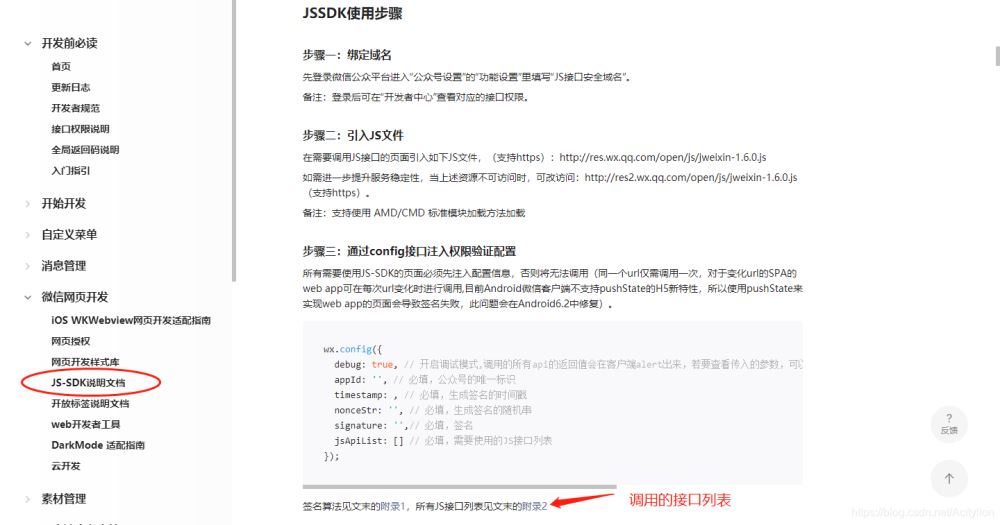
https://developers.weixin.qq.com/doc/offiaccount/OA_Web_Apps/JS-SDK.html#2
第一步 先下载sdk文件,然后引入 index.js文件 也可以放在components方法里
npm install jweixin-module --save
第二步 调接口返回config配置信息
//在onload 中调用,找后台要接口!!!
var apiUrl = location.href.split("#")[0]
uni.request({
				url: api.api.getJsSdkConfig,
				data: {
					url: apiUrl,//当前页面的域名
					api: ['scanQRCode'],//调用的方法去接口列表里找
				},
				success: function(res) {

					var wxData = JSON.parse(res.data.data.config)
					that.wx_sanCode(wxData)
				}

			})
//扫码
wx_sanCode: function(wxData) {
wx.config({
debug: true, // 开启调试模式,调用的所有api的返回值会在客户端alert出来,若要查看传入的参数,可以在pc端打开,参数信息会通过log打出,仅在pc端时才会打印。
appId: wxData.appId, // 必填,公众号的唯一标识
timestamp: wxData.timestamp, // 必填,生成签名的时间戳
nonceStr: wxData.nonceStr, // 必填,生成签名的随机串
signature: wxData.signature, // 必填,签名
jsApiList: wxData.jsApiList // 必填,需要使用的JS接口列表
})
wx.ready(function() {
// config信息验证后会执行ready方法,所有接口调用都必须在config接口获得结果之后,config是一个客户端的异步操作,所以如果需要在页面加载时就调用相关接口,则须把相关接口放在ready函数中调用来确保正确执行。对于用户触发时才调用的接口,则可以直接调用,不需要放在ready函数中。
wx.checkJsApi({
jsApiList: ['scanQRCode'], // 需要检测的JS接口列表,所有JS接口列表见附录2,
success: function(res) {
console.log('返回信息')
console.log(res)
// 以键值对的形式返回,可用的api值true,不可用为false
// 如:{"checkResult":{"chooseImage":true},"errMsg":"checkJsApi:ok"}
}
});
});
wx.error(function(res){
// config信息验证失败会执行error函数,如签名过期导致验证失败,具体错误信息可以打开config的debug模式查看,也可以在返回的res参数中查看,对于SPA可以在这里更新签名。
console.log(res,'接口验证失败')
}); }然后就是点击事件乎起扫码功能
//扫码
		bindsaoQRcode:function(){
				wx.scanQRCode({
				  needResult: 1, // 默认为0,扫描结果由微信处理,1则直接返回扫描结果,
				  scanType: ["qrCode","barCode"], // 可以指定扫二维码还是一维码,默认二者都有
				  success: function (res) {
					  console.log(res);
					  console.log('扫码')
				    var result = res.resultStr; // 当needResult 为 1 时,扫码返回的结果
	                window.location.href = result //安卓机型跳转渲染有问题 所以要加这句
				  }
				});
			},
