Memtable 是 Rocksdb 在内存中保存数据的一种数据结构,一个 Memtable 的容量是固定的,在 Memtable 写满后,会转换为 Immutable Memtable,Immutable Memtable 中的数据会 Flush 到 SST File 中。
Memtable 和 Immutable Memtable 的唯一区别是 Memtable 可读可写,而 Immutable Memtable 是只读且不允许写入。Rocksdb 引入了 Column Family 的概念,在一个 Column Family 中只有一个 Memtable,但允许存在多个 Immutable Memtable。Rocksdb 支持创建多数据结构类型的 Memtable,默认的是 SkipList,即跳跃表。
Rocksdb 中 Memtable 有多种实现方式 (SkipList / HashSkipList / HashLinkList / Vector),其中默认的实现方式为 SkipList。
一个 Memtable 中维护了两个 SkipList,其中范围删除插入 range_del_table_,其余的操作写入 table_。
Memtable 定义的操作接口 Add () 如下:
bool MemTable::Add(SequenceNumber s, ValueType type,
                   const Slice& key, /* user key */
                   const Slice& value, bool allow_concurrent,
                   MemTablePostProcessInfo* post_process_info) {
  // 一条key-value Entry的数据格式
  //  key_size     : varint32 of internal_key.size()
  //  key bytes    : char[internal_key.size()]
  //  value_size   : varint32 of value.size()
  //  value bytes  : char[value.size()]
  uint32_t key_size = static_cast<uint32_t>(key.size());
  uint32_t val_size = static_cast<uint32_t>(value.size());
  uint32_t internal_key_size = key_size + 8;
  const uint32_t encoded_len = VarintLength(internal_key_size) +
                               internal_key_size + VarintLength(val_size) +
                               val_size;
  char* buf = nullptr;
  // 通过判断key-value的类型来选择memtable, 范围删除的kv插入range_del_table_
  std::unique_ptr<MemTableRep>& table =
      type == kTypeRangeDeletion ? range_del_table_ : table_;
  KeyHandle handle = table->Allocate(encoded_len, &buf);
  //...
  // 是否允许并发插入
  if (!allow_concurrent) {
    // 是否制定了函数提取key的前缀
    if (insert_with_hint_prefix_extractor_ != nullptr &&
        insert_with_hint_prefix_extractor_->InDomain(key_slice)) {
      // ...
      bool res = table->InsertWithHint(handle, &insert_hints_[prefix]);
    } else {
      // 插入key-value pair
      bool res = table->Insert(handle);
      if (UNLIKELY(!res)) {
        return res;
      }
    }
  } else {
    // 插入key-value pair
bool res = table->InsertConcurrently(handle);
    if (UNLIKELY(!res)) {
      return res;
    }
  }
  return true;
}
Add () 函数将用户的 key 和 value 封装成一个 buf,然后根据不同的条件调用 table->Insert () 插入至 Memtable。table 就是 Memtable 的工厂类实现,默认 SkiplistRep, 即通过调用 SkipList 的 Insert () 完成 key 的插入。
Memtable 定义的操作接口 Get () 如下:
bool MemTable::Get(const LookupKey& key, std::string* value, Status* s,
                   MergeContext* merge_context,
                   RangeDelAggregator* range_del_agg, SequenceNumber* seq,
                   const ReadOptions& read_opts, ReadCallback* callback,
                   bool* is_blob_index) {
  // 在range_del_table_上初始化一个迭代器
  std::unique_ptr<InternalIterator> range_del_iter(
      NewRangeTombstoneIterator(read_opts));
  Status status = range_del_agg->AddTombstones(std::move(range_del_iter));
  if (!status.ok()) {
    *s = status;
    return false;
  }
  Slice user_key = key.user_key();
  // 利用前缀提取过滤判断key是否存在
  bool const may_contain =
      nullptr == prefix_bloom_
Memtable 的 Get () 调用了 SkipListRep 的 Get () 接口,最终是通过 SkipList 的 FindGreaterOrEqual () 来查找。查找出来的 key 会被传入的回调函数 SaveValu 并 e () 根据 type 处理,例如 ktypeDeletion 就返回 NotFound ()。
SkipList 即跳跃表,在普通单向链表的基础上增加了一些索引,而且这些索引是分层的,从而可以快速地查到数据。如下是一个典型的跳跃表构建过程:
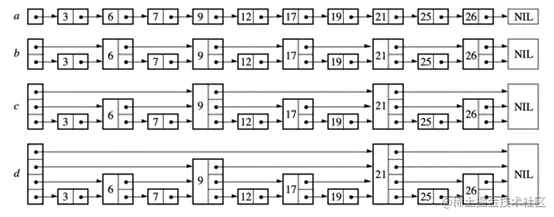
初始我们有个带头结点的有序链表 a,而后每相邻两个节点增加一个指针,让指针指向下下个节点,得到表 b。这样所有新增指针连成了一个新的链表,但它包含的节点个数只有原来的一半。其后我们对第二层链表再次进行此操作,得到表 c。重复这个过程,直到采样出的节点只剩一个,如图 d。这样便完成了跳跃表的构建。跳跃表查找过程如下:

从 head 开始,head 的 level 为 4,判断 head 后继节点值小于 <12,此时当前节点变为 6,继续查找;
节点 6 的 level 为 3,判断后继节点值为 NIL,因此 level 降低到 2;
判断 x -> forward [2] -> key (25) > 17,继续降低 level 到 1;
判断 x -> forward [1] -> key (9) < 17,此时 x 变为 x ->forward [1],x 成为节点 9;
节点 9 的判断 x -> forward [1] -> key 为 17,因此找到节点,直接返回。
跳跃表插入过程如下:

我们以上图为例,list -> leve=4,如果要插入节点 17,首先确定搜索路径,与之前步骤类似。
创建新节点 Node (17),并为其生成 level (随机),该 level 可能值为 [1, MaxLevel],此时需要对比,如果 level < list -> level,需要先将突出部分从 header 指向它,这里新生成的节点 Node (17) 的 level 为 5,超过了 list 当前的最大 level,于是将 update [4] 设置为 header,后续直接将 Node (17) 作为 header 的后继。

最后是设置搜索路径上每个节点的后继关系,这样我们便完成了节点的插入。我们来看一下 SkipList 的具体代码实现:
InlineSkipList 数据结构 >>
class InlineSkipList {
 private:
  struct Node;
  struct Splice;
 public:
  using DecodedKey = \
    typename std::remove_reference<Comparator>::type::DecodedType;
…
  Allocator* const allocator_;
  Comparator const compare_;
  Node* const head_;
  std::atomic<int> max_height_;
  Splice* seq_splice_;
};
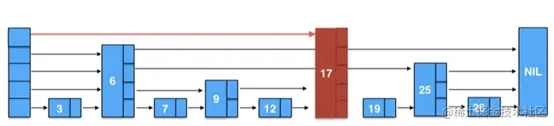
Node 的数据结构 >>
template <class Comparator>
struct InlineSkipList<Comparator>::Node {
 private:
  // 存放该节点的next_节点的数组
  // 数组大小为该节点的height,当调用NewNode()分配内存初始化整个数组
  std::atomic<Node*> next_[1];
};
Node 的数据结构如图,它将 key 和链表每层的指针连续存储,通过 next_[-n] 这种方式来访问每层的 next 指针,此外在 new 新节点时会把该节点高度写在 next_[0] 的前 4 个字节处,当完成插入后,next_[0] 会恢复成指向同层的下一个节点的指针。

Memtable 的 Add () 通过 SkipList 的 Insert () 来查找,下面是 Insert () 的具体实现:
bool InlineSkipList<Comparator>::Insert(const char* key, Splice* splice,
                                        bool allow_partial_splice_fix) {
  Node* x = reinterpret_cast<Node*>(const_cast<char*>(key)) - 1; // x即为next_[0]
  const DecodedKey key_decoded = compare_.decode_key(key);
  int height = x->UnstashHeight();
  assert(height >= 1 && height <= kMaxHeight_);
  int max_height = max_height_.load(std::memory_order_relaxed);
  // 更新max_height
  while (height > max_height) {
    if (max_height_.compare_exchange_weak(max_height, height)) {
      // successfully updated it
      max_height = height;
      break;
    }
    // 否则重试,可能因为其他人增加了它而退出循环
  }
  assert(max_height <= kMaxPossibleHeight);
  // 插入节点的时候,需要借助一个Splice对象,该对象主要保存着最近一次插入的节点快照
  // 它保存着一个prev和next的节点指针数组,由Level可以索引到对应Level的节点
  int recompute_height = 0;
  if (splice->height_ < max_height) {
    // 当重置splice
    splice->prev_[max_height] = head_;
    splice->next_[max_height] = nullptr;
    splice->height_ = max_height;
    recompute_height = max_height;
  } else {
    while (recompute_height < max_height) {
      if (splice->prev_[recompute_height]->Next(recompute_height) !=
          splice->next_[recompute_height]) { //判断该层的splice是否紧密,即prev_->Next是否等于next_
        ++recompute_height;
      } else if (splice->prev_[recompute_height] != head_ &&
                 !KeyIsAfterNode(key_decoded,
                                 splice->prev_[recompute_height])) { //小于splice当前层的prev_
        // ...
      } else if (KeyIsAfterNode(key_decoded,
                                splice->next_[recompute_height])) { //大于splice当前层的prev_
        // ...
      } else {
        // 找到了合适的level
        break;
      }
    }
  }
  assert(recompute_height <= max_height);
  if (recompute_height > 0) {//计算splice
    RecomputeSpliceLevels(key_decoded, splice, recompute_height); // 找到要插入的key合适的splice
  }
  bool splice_is_valid = true;
  if (UseCAS) {//CAS无锁机制
    //...
  } else {
    for (int i = 0; i < height; ++i) {
      if (i >= recompute_height &&
          splice->prev_[i]->Next(i) != splice->next_[i]) { // 确保splice此Level有效,如果无效的话再查找一次
        FindSpliceForLevel<false>(key_decoded, splice->prev_[i], nullptr, i,
                                  &splice->prev_[i], &splice->next_[i]);
      }
      // Checking for duplicate keys on the level 0 is sufficient
      if (UNLIKELY(i == 0 && splice->next_[i] != nullptr &&
                   compare_(x->Key(), splice->next_[i]->Key()) >= 0)) {
        // duplicate key
        return false;
      }
      if (UNLIKELY(i == 0 && splice->prev_[i] != head_ &&
                   compare_(splice->prev_[i]->Key(), x->Key()) >= 0)) {
        // duplicate key
        return false;
      }
      //…
      x->NoBarrier_SetNext(i, splice->next_[i]); //将新节点next指向对应的next节点
      splice->prev_[i]->SetNext(i, x); //将splice的prev节点的next指向新节点
    }
  }
  if (splice_is_valid) {//将新节点Height下的prev节点都设置为该节点,因为原先的prev和next之间已经不连续了。
    for (int i = 0; i < height; ++i) {
      splice->prev_[i] = x;
    }
    //...
  } else {
    splice->height_ = 0;
  }
  return true;
}
Memtable 的 Get () 通过 SkipList 的 FindGreaterOrEqual () 来查找,下面是 FindGreaterOrEqual () 的具体实现:
InlineSkipList<Comparator>::FindGreaterOrEqual(const char* key) const {
  Node* x = head_;
  int level = GetMaxHeight() - 1;//从最高层开始查找
  Node* last_bigger = nullptr;
  const DecodedKey key_decoded = compare_.decode_key(key);
  while (true) {
    Node* next = x->Next(level);
    if (next != nullptr) {
      PREFETCH(next->Next(level), 0, 1);
    }
    // Make sure the lists are sorted
    assert(x == head_ || next == nullptr || KeyIsAfterNode(next->Key(), x));
    // Make sure we haven't overshot during our search
    assert(x == head_ || KeyIsAfterNode(key_decoded, x));
    int cmp = (next == nullptr || next == last_bigger)
                  ? 1
                  : compare_(next->Key(), key_decoded);
    if (cmp == 0 || (cmp > 0 && level == 0)) { // 找到相等的key或者查找的key不在此范围内
      return next;
    } else if (cmp < 0) { //待查找 key 比 next 大,则在该层继续查找
      x = next;
    } else { // 待查找 key 不大于 next,且没到底,则继续往下层查找
      // Switch to next list, reuse compare_() result
      last_bigger = next;
      level--;
    }
  }
}
