先来看下效果,他在首页的时候是不显示路由的,点击跳转到其他页面了才会显示

打开 index.js,加上 mode : " history "
import Vue from 'vue'
import Router from 'vue-router'

Vue.use(Router)

export default new Router({
  mode:"history",
  routes: [
    {
      path: '/',
      name: '/home',
      component: ()=>import("@/components/home"),
    },
  ]
})生活中的路由:

vue-router的理解:
vue 的一个插件库,专门用来实现SPA应用(single page web application)
对SPA应用的理解:
1.单页Web应用(single page web application,SPA)
2.整个应用只有一个完整的页面
3.点击页面中的导航链接不会刷新页面,只会做页面的局部更新
4.数据需要通过ajax请求获取
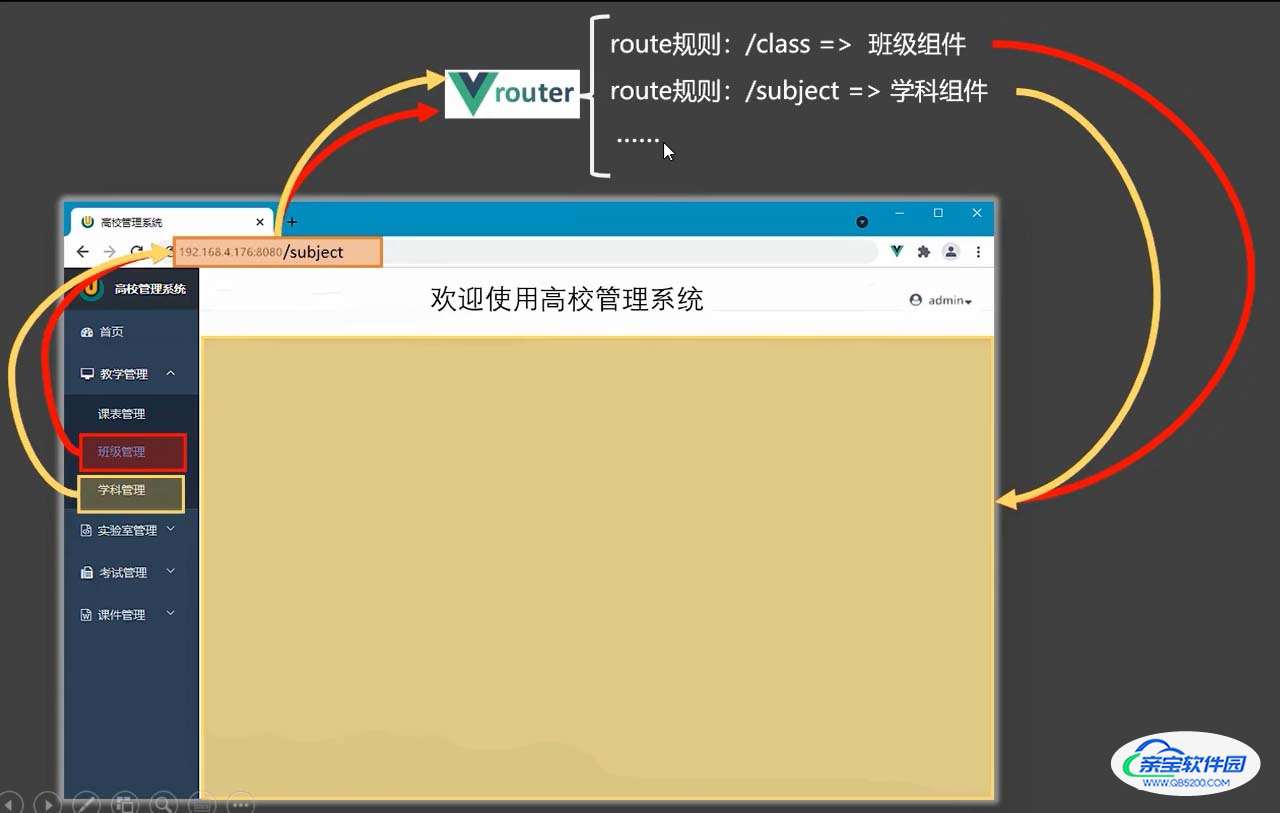
什么是路由?
1.—个路由就是一组映射关系 (key - value)
2. key 为路径, value 可能是 function 或 component
路由分类
1.后端路由:
1)理解:value 是 function,用于处理客户端提交的请求
2)工作过程:服务器接收到一个请求时,根据请求路径找到匹配的函数来处理请求,返回响应数据
2.前端路由:
1)理解:value 是 component,用于展示页面内容
2)工作过程:当浏览器的路径改变时,对应的组件就会显示
我们需要完成一个功能,点击左侧导航切换右侧内容,页面如下:

前提:布局编写
我们之前在 public 下新建了 css 文件夹,并放入了 bootstrap.css,并在 index.html 中进行了引入:
<link rel="stylesheet" href="<%= BASE_URL %>css/bootstrap.css" rel="external nofollow" >
在 App.vue 中编写布局:
<template>
  <div>
    <div class="row">
      <div class="col-xs-offset-2 col-xs-8">
        <div class="page-header"><h2>Vue Router Demo</h2></div>
      </div>
    </div>
    <div class="row">
      <div class="col-xs-2 col-xs-offset-2">
        <div class="list-group">
          <a class="list-group-item active" href="./about.html" rel="external nofollow"  rel="external nofollow" >About</a>
          <a class="list-group-item" href="./home.html" rel="external nofollow" >Home</a>
        </div>
      </div>
      <div class="col-xs-6">
        <div class="panel">
          <div class="panel-body"><h2>我是About的内容</h2></div>
        </div>
      </div>
    </div>
  </div>
</template>
创建 About.vue 和 Home.vue 组件,两个文件只有文字不同
<template>
  <h2>我是About的内容</h2>
</template>

<script>
export default {
  name: "About"
}
</script>

<style scoped>

</style>
1、安装vue-router
由于我们目前学习的是 vue2 ,所以我们需要指定 vue-router 的 3 版本,不指定会默认安装 4 版本,而 4 版本只能在 vue3 中使用,所以我们执行:
npm i vue-router@3
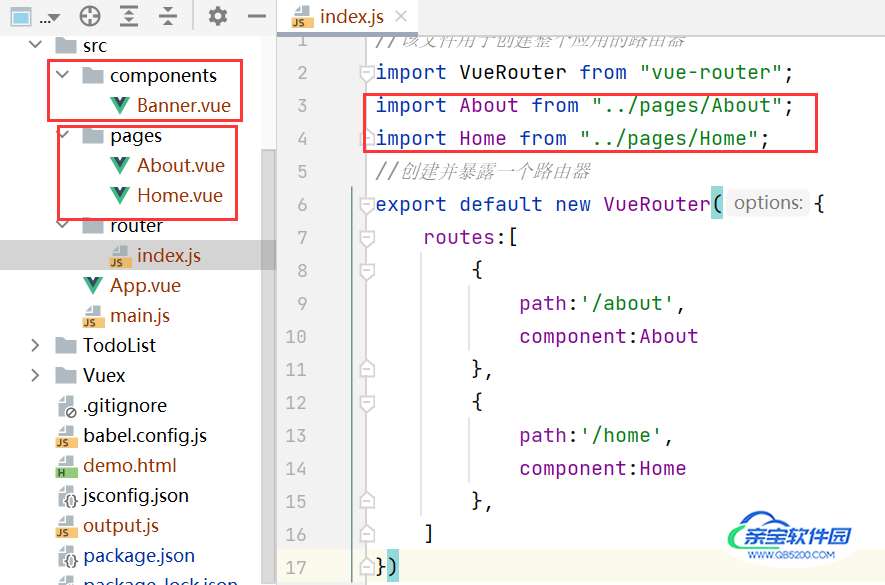
2、和 components 同级,创建 router 文件夹,其下创建 index.js
//该文件用于创建整个应用的路由器
import VueRouter from "vue-router";
import About from "../components/About";
import Home from "../components/Home";
//创建并暴露一个路由器
export default new VueRouter({
    routes:[
        {
            path:'/about',
            component:About
        },
        {
            path:'/home',
            component:Home
        },
    ]
})
3、main.js 引入 vue-router,引入路由器
vue-router 是个插件,所以我们在 main.js 中引入并使用,同时引入刚才写的 index.js,并配置
//引入Vue
import Vue from 'vue';
//引入App
import App from './App';
//引入vue-router
import VueRouter from "vue-router";
//引入路由器
import router from "@/router";

//关闭vue的生产提示
Vue.config.productionTip = false
//应用插件
Vue.use(VueRouter)

//创建vm
new Vue({
    el: "#app",
    render: h => h(App),
    router:router
})
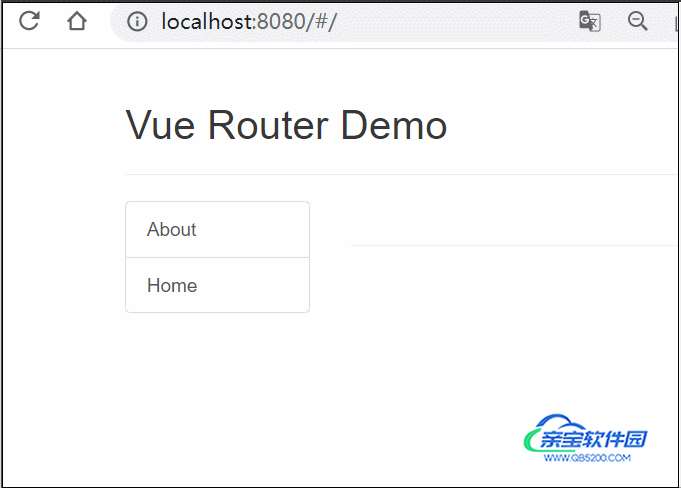
4、修改页面
App.vue 中 a 标签改为 <router-link>,其中active-class可配置高亮样式
<!--原始html中我们使用a标签实现页面的跳转-->
<!--<a class="list-group-item active" href="./about.html" rel="external nofollow"  rel="external nofollow" >About</a>
    <a class="list-group-item" href=" . / home. html" rel="external nofollow" >Home</a>-->

<!--vue中我们使用router-link标签实现路由的切换-->
<router-link class="list-group-item" active-class="active" to="/about">About</router-link>
<router-link class="list-group-item" active-class="active" to="/home">Home</router-link>
把要区分展示的位置改为<router-view>标签
<div class="panel-body">
	<!--指定组件的呈现位置-->
	<router-view></router-view>
</div>
运行程序:

1、路由组件通常存放在 pages 文件夹,一般组件通常存放在 components文件夹
我们把头部单独写成一个组件,新建 Banner.vue
<template>
  <div class="col-xs-offset-2 col-xs-8">
    <div class="page-header"><h2>Vue Router Demo</h2></div>
  </div>
</template>

<script>
export default {
  name: "Banner"
}
</script>
在App.vue 中引入并使用
<template>
  <div>
    <div class="row">
      <Banner/>
    </div>
    <div class="row">
      ......
    </div>
  </div>
</template>

<script>
import Banner from "@/components/Banner";
export default {
  name: 'App',
  components: {Banner},
}
</script>
我们把 Banner 叫作一般组件,而 About、Home 我们叫作路由组件,一般放在 pages 文件夹里,所以需要修改:
2、通过切换,“隐藏"了的路由组件,默认是被销毁掉的,需要的时候再去挂载
3、每个组件都有自己的$route属性,里面存储着自己的路由信息
4、整个应用只有一个router,可以通过组件的 $router属性获取到
先看效果:
新建 Message.vue 和 News.vue
Message.vue
<template>
<div>
<ul>
<li v-for="m in messageList" :key="m.id">
<a href="/ message1" rel="external nofollow" >{{m.title}}</a>
</li>
</ul>
</div>
</template>
<script>
export default {
name: "Message",
data(){
return{
messageList:[
{id:"001",title:"消息001"},
{id:"002",title:"消息002"},
{id:"003",title:"消息003"},
]
}
}
}
</script>
<style scoped>
</style>News.vue
<template>
  <ul>
    <li>news001</li>
    <li>news002</li>
    <li>news003</li>
  </ul>
</template>

<script>
export default {
  name: "News"
}
</script>
制定路由规则,修改 index.js
//该文件用于创建整个应用的路由器
import VueRouter from "vue-router";
import About from "../pages/About";
import Home from "../pages/Home";
import News from "../pages/News";
import Message from "../pages/Message";
//创建并暴露一个路由器
export default new VueRouter({
    routes: [
        {
            path: '/about',
            component: About
        },
        {
            path: '/home',
            component: Home,
            children: [
                {
                    path: 'news',
                    component: News
                },
                {
                    path: 'message',
                    component: Message
                }
            ]
        },
    ]
})
修改 Home.vue
<template>
  <div>
    <h2>Home组件内容</h2>
    <div>
      <ul class="nav nav-tabs">
        <li>
          <router-link class="list-group-item" active-class="active" to="/home/news">News</router-link>
        </li>
        <li>
          <router-link class="list-group-item" active-class="active" to="/home/message">Message</router-link>
        </li>
      </ul>
      <router-view></router-view>
    </div>
  </div>
</template>

<script>
export default {
  name: "Home"
}
</script>
有两点需要注意:
1、index.js 中/about 和 /home 是一级路由,news 和 message 是二级路由,规则前不需要加斜杠了
2、Home.vue 中的路径,需要写完整路径 /home/news
以上为个人经验,希望能给大家一个参考,也希望大家多多支持。

