通过data属性传递的参数,在后台可以通过request获取到。
data可以是一个对象或者函数 ,
 <
 Upload
 name=
 "file"
 data=
 {this.
 state.
 ingoreFirst
 }
 action=
 "/api/uploadFile"
 onChange=
 {(
 info)
 =>this.
 handleUploadFileOnChange(
 info)
 }
 >
如果是一个bool值,则request.fields获取到空{}
这样就可以
 <
 Upload
 name=
 "file"
 data=
 {this.
 state
 }
 action=
 "/api/uploadFile"
 onChange=
 {(
 info)
 =>this.
 handleUploadFileOnChange(
 info)
 }
 >
如果不想把整个state返回服务器端
可以用函数
 <
 Upload
 name=
 "file"
 data=
 {()
 =>this.
 handleUploadData()
 }
 action=
 "/api/uploadFile"
 onChange=
 {(
 info)
 =>this.
 handleUploadFileOnChange(
 info)
 }
 >
handleUploadData()
{
let
d={
ingoreFirst:
this.
state.
ingoreFirst,
ingoreLast:
this.
state.
ingoreLast}
return
d;
}图片上传自定义方法的使用,参数的上传
其中customRequest 作为自定义上传的方法与后端进行交互并可以传递额外的参数
beforeUpload 方法可以对上传的图片类型和大小做一下相对简单的前端校验
        <Upload
            name="uploadFile"
             listType="picture-card"
             className="avatar-uploader"
             showUploadList={false}
             fileList={fileList}
             customRequest={this.uploadHeadImg} //自定义上传的方法
             beforeUpload={this.beforeUpload}
             onChange={this.handleChange}
             >
        {imageUrl ? <img src={imageUrl} alt="avatar" style={{ width: '100%' }} /> : uploadButton}
      </Upload>```
    uploadHeadImg =(option) => {
    const { pageTenantId } = this.state
    const formdata= new FormData();
    formdata.append('pageTenantId',pageTenantId);
    formdata.append('uploadFileName',option.file.name);
    formdata.append('uploadFile', option.file)
    axios.post('后端提供的接口',formdata,{headers:{
        "Content-Type": "application/x-www-form-urlencoded"
    }}).then(res=>{
        if(res.data.status==0) {
            option.onSuccess(res.data.data.returnParams.fileUrl)
            this.setState({
                logoUrl: res.data.data.returnParams.fileUrl
            })
        }
    }
  )
 }
onchange方法可以通过上传的状态对文件进行一些判断
     handleChange = async(info) => {
        if (info.file.status === 'uploading') {
          this.setState({ loading: true });
          return;
        }
        if (info.file.status === 'done') {
          // Get this url from response in real world.
           await this.getBase64(info.file.originFileObj, imageUrl =>
            this.setState({
              imageUrl,
              loading: false,
              fileList:info.fileList,
            }),
            );
        }
      };
beforeUpload的具体使用根据要求进行判断
    beforeUpload(file) {
        // 只允许图片的jpeg和png类型
        const isJpgOrPng = file.type === 'image/jpeg' || file.type === 'image/png';
        if (!isJpgOrPng) {
            message.error('图片类型只能为JPEG/PNG!');
        }
        const isLt2M = file.size / 1024 / 1024 < 2;
        if (!isLt2M) {
            message.error('图片不能大于2MB!');
        }
        return isJpgOrPng && isLt2M;
        }
在form表单中要使用getValueFromEvent对上传的文件数据赋值具体使用
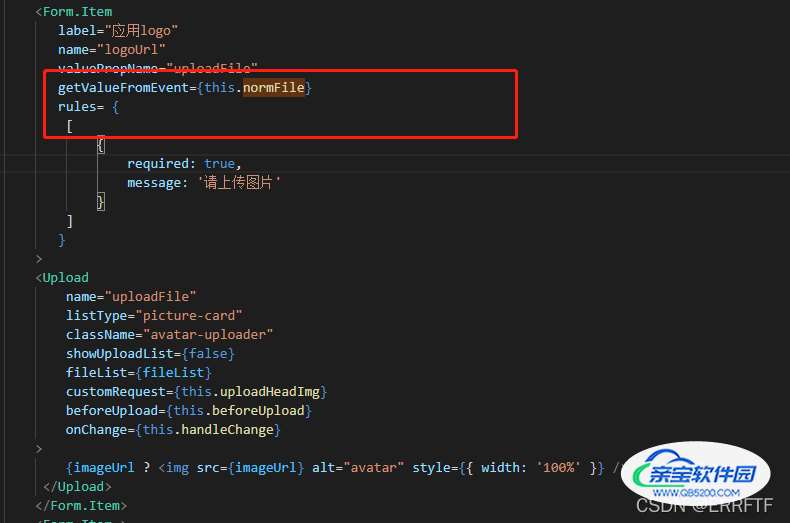
normFile 方法把文件return出来
    normFile = (e) => {
        this.setState({
            uploadFileName:e.file.name
        })
        if (Array.isArray(e)) {
          return e;
        }
        return e && e.fileList;
      };
以上为个人经验,希望能给大家一个参考,也希望大家多多支持。

