前言
slot可以在子组件中开启插槽,在父组件引用该组建时,可以定义这个插槽内要展现的功能或模块,下面话不多说了,来一起看看详细的介绍吧
1.单个slot
子组件中在相应位置写slot标签,父组件在引用子组件时,在子组件标签内写要插入插槽的元素;
还可以设置slot在父组件没有设置插槽时,子组件的插槽默认显示内容;
父组件.vue
<template>
<div class="home">
<child-componment>
<p>
这是父组件的slot替代内容!
</p>
</child-componment>
</div>
</template>
<script>
import childComponment from '@/components/childComponment.vue'
export default {
name: "home",
components:{
childComponment
},
data(){
return {
message: ''
}
}
};
</script>
子组件childComponment.vue
<template>
<div class="childComponment">
<h2>这是子组件childComponment!</h2>
<slot>
<span style="color: red;">如果父组件没有插入内容,我这样可以设置默认的显示内容</span>
</slot>
</div>
</template>
<script>
export default {
name: "childComponment",
data(){
return {
message: ''
}
}
};
</script>
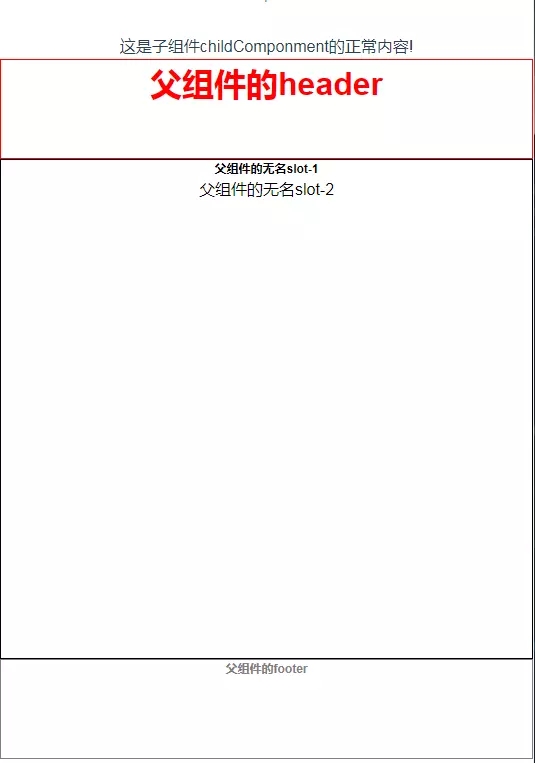
2.具名slot(同时使用多个插槽)
给slot指定一个名称,可以分发多个slot插槽,但是只能有一个无名slot;
父组件的slot插槽内容,不写slot="xxx"的都会插到子组件的无名slot中;
如果没有指定无名slot(默认slot),父组件内多余的内容将会被抛弃。
<template>
<div class="home">
<child-componment>
<h1 slot="header">
父组件的header
</h1>
<h6 slot="footer">父组件的footer</h6>
<h6>父组件的无名slot-1</h6>
<p>
父组件的无名slot-2
</p>
</child-componment>
</div>
</template>
<script>
import childComponment from '@/components/childComponment.vue'
export default {
name: "home",
components:{
childComponment
},
data(){
return {
message: ''
}
}
};
</script>
子组件
<template>
<div class="childComponment">
<span>这是子组件childComponment的正常内容!</span>
<div class="header">
<slot name="header">
<span style="color: red;">子组件默认header-slot</span>
</slot>
</div>
<div class="container">
<!-- 如果没有指定无名slot(默认slot),父组件内多余的内容将会被抛弃 -->
<slot>
<span style="color: red;">子组件默认无名slot</span>
</slot>
</div>
<div class="footer">
<slot name="footer">
<span style="color: red;">子组件默认footer-slot</span>
</slot>
</div>
</div>
</template>
<script>
export default {
name: "childComponment",
data(){
return {
message: ''
}
}
};
</script>
<style scoped>
.childComponment{
font-size: 16px;
}
.header{
height: 100px;
border:1px solid red;
color: red;
}
.container{
height: 500px;
border: 1px solid black;
color: black;
}
.footer{
height:100px;
border: 1px grey solid;
color: grey;
}
</style>
3.作用域插槽
<template>
<div class="home">
<child-componment>
<template slot-scope="slotProps">
<!-- 这里显示子组件传来的数据 -->
<p>{{slotProps}}</p>
</template>
</child-componment>
</div>
</template>
<script>
import childComponment from '@/components/childComponment.vue'
export default {
name: "home",
components:{
childComponment
}
};
</script>
子组件
<template>
 <div class="childComponment">
 <span>这是子组件childComponment的正常内容!</span>
 <div class="container">
  <!-- 如果没有指定无名slot(默认slot),父组件内多余的内容将会被抛弃 -->
  <slot msg="子组件信息" slotData="子组件数据"></slot>
 </div>
 </div>
</template>
Tips:
作用于插槽也可是具名插槽
案例:列表组件
这是作用于插槽使用最多的案例,允许组件自定义应该如何渲染组件的每一项。
<template>
 <div class="about">
 <h1>This is about page</h1>
 <my-list :books="books">
 <template slot="bookList" slot-scope="myListProps">
  <li>{{myListProps.bookName}}</li>
 </template>
 </my-list>
 </div>
</template>
<script>
import myList from '@/components/myList.vue'
export default {
 components:{
 myList
 },
 data(){
 return {
  books: [
  {name: 'css揭秘'},
  {name: '深入浅出nodejs'},
  {name: 'javascript设计模式与开发实战'}
  ]
 }
 }
}
</script>
子组件myList.vue
<template>
 <div class="myList">
 <h1>This is myList page</h1>
 <ul>
 <slot name="bookList" v-for="book in books" :bookName="book.name"></slot>
 </ul>
 </div>
</template>
<script>
export default {
 props:{
 books:{
  type: Array,
  default: function(){
  return []
  }
 }
 },
 mounted(){
 console.log(this.books)
 }
}
</script>
其实上面的案例可直接在父组件中for循环就好,此处只是作为演示slot的作用域插槽;
实际开发中作用域插槽的使用场景主要为:既可以复用子组件的slot,又可以使slot内容不一致。
4.访问slot
vue2.0提供了$slot方法来访问slot
此处代码以**“具名slot(同时使用多个插槽)”**的代码为例,修改一下子组件childComponment.vue
export default {
name: "childComponment",
data(){
return {
message: ''
}
},
mounted(){
let header = this.$slots.header
let main = this.$slots.default
let footer = this.$slots.footer
console.log(header)
console.log(main)
console.log(footer)
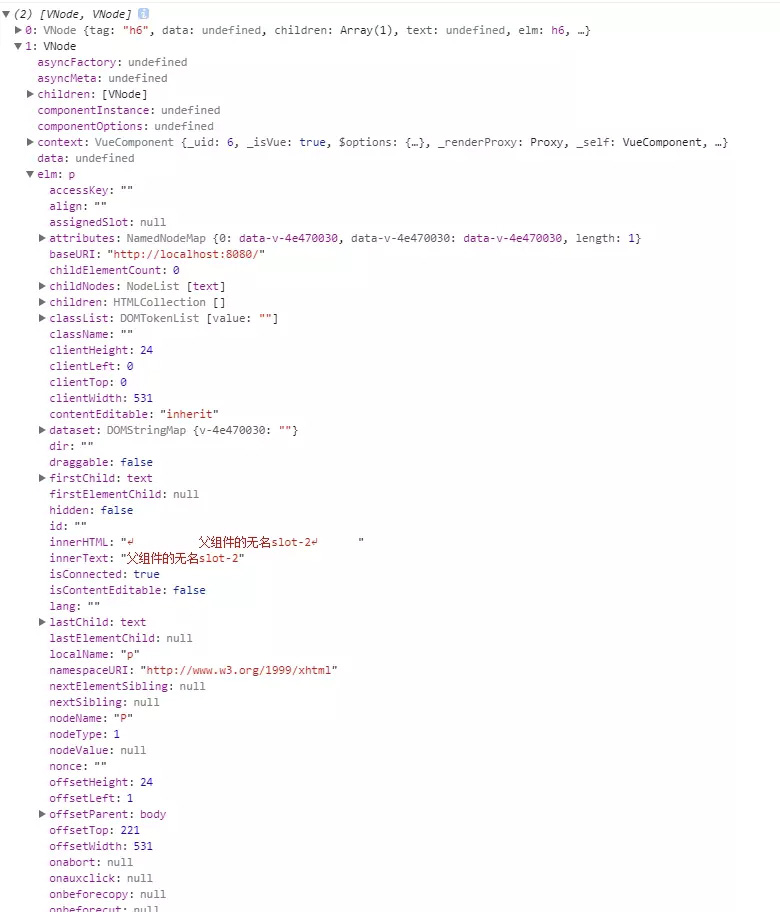
console.log(footer[0].elm.innerHTML)
}
};
打印结果:
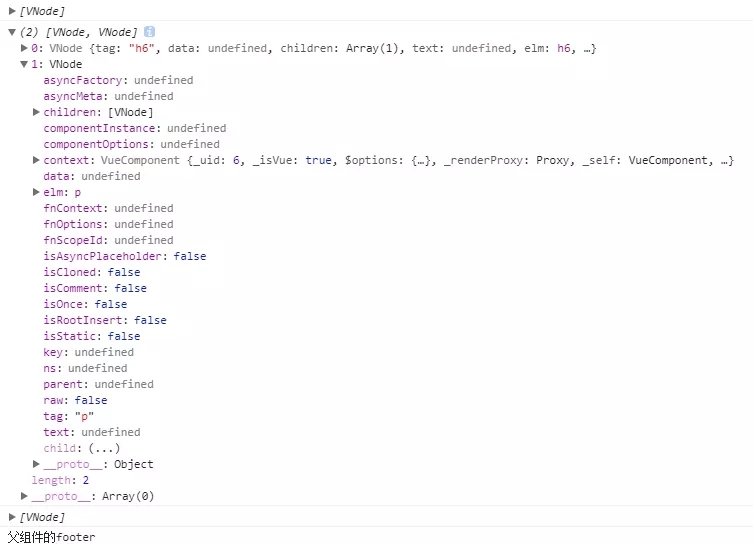
其中elm的内容为插槽内容,结构如下:
总结
以上就是这篇文章的全部内容了,希望本文的内容对大家的学习或者工作具有一定的参考学习价值,谢谢大家对的支持。

